It’s back!!!!!! Once again it is time for the Great Blogger’s Bake-Off. It will be EVEN better than before too. It is open to EVERYONE! Come on. Show us what you can do!!!!!!
Simple Pulled Pork Salad with Sun-Dried Tomato Vinaigrette
The other day, when Larry was busy smokin’ his meats, He’s Smokin’ Again one of the things he smoked was a big pork shoulder. That took about 10 hours to cook, but once it was done it came out so good. It was very moist and tender, and full of flavor.
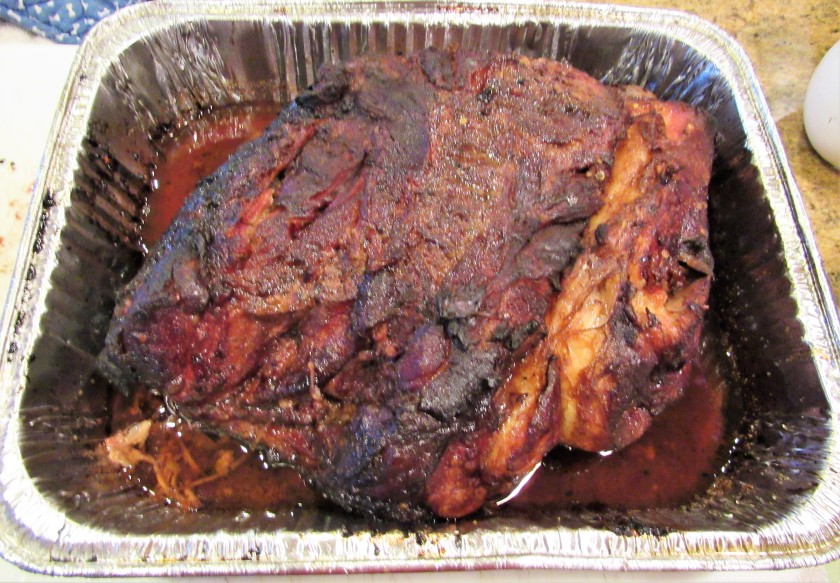
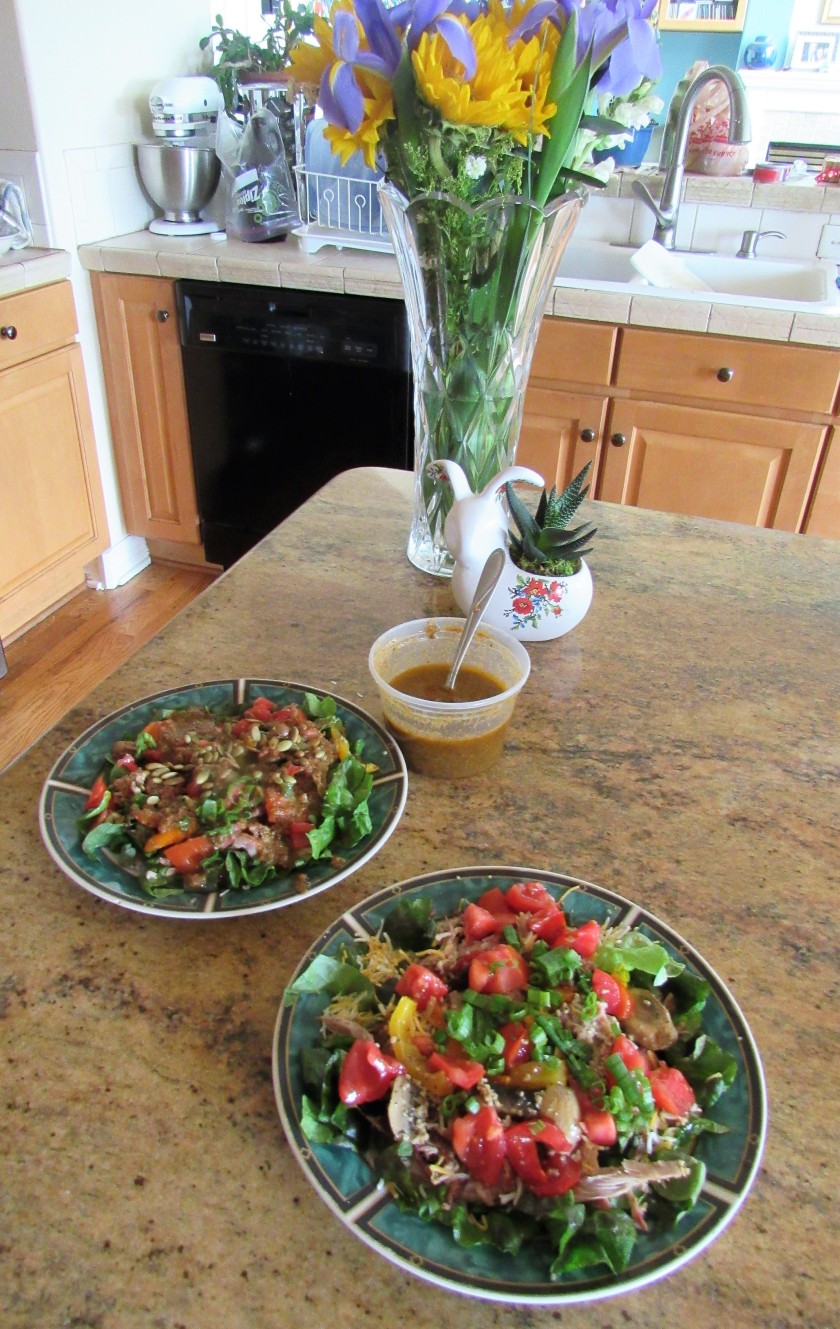
After it cooled, we pulled it and shredded it. We will be eating it in many ways. We put some in the freezer for later and gave some away to a friend of ours when he came over for a quick, impromptu lunch. One of the ways I served it was by making it into a salad with a sun-dried tomato vinaigrette. The weather is getting warmer, so salads are making their way back into our menus once again. It was a delicious salad that was perfect for a warm day.
It was a quick, easy salad, AND I got to use us some leftovers, which as you all know, makes me of so happy. 🙂 For the salad, I used red leaf lettuce, 1 heirloom tomato, shredded cheddar (for Larry’s salad), green onions, shredded pork and my leftover peppers and mushrooms then topped it with some roasted pepitas (for mine). The dressing was super easy to make too and went very well with the salad. I served it with a cool, citrusy white blend. A perfect light dinner out on our beloved deck, on a nice Spring day. Life is good.
Sun-Dried Tomato Vinaigrette
1/3 cup of sun-dried tomatoes in oil
1 tsp black pepper
salt to taste
1 TBSP garlic
1 shallot
1/3 cup white balsamic vinegar
1/3 cup olive oil
1 tsp sugar
Mix everything together in a food processor until is is well blended and the tomatoes and shallot are ground up.
This is good as a salad dressing or you can also use it as a marinade for meat too. It’s easy-peasy and delicious.
Stay safe and stay well Everyone. ‘Til next time.
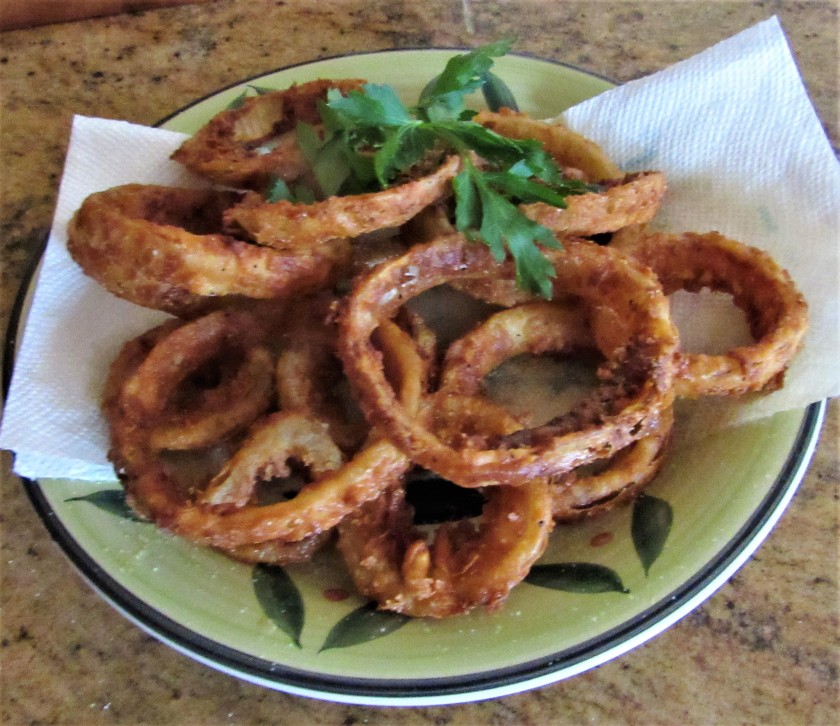
Perfect Light and Crispy Onion Rings
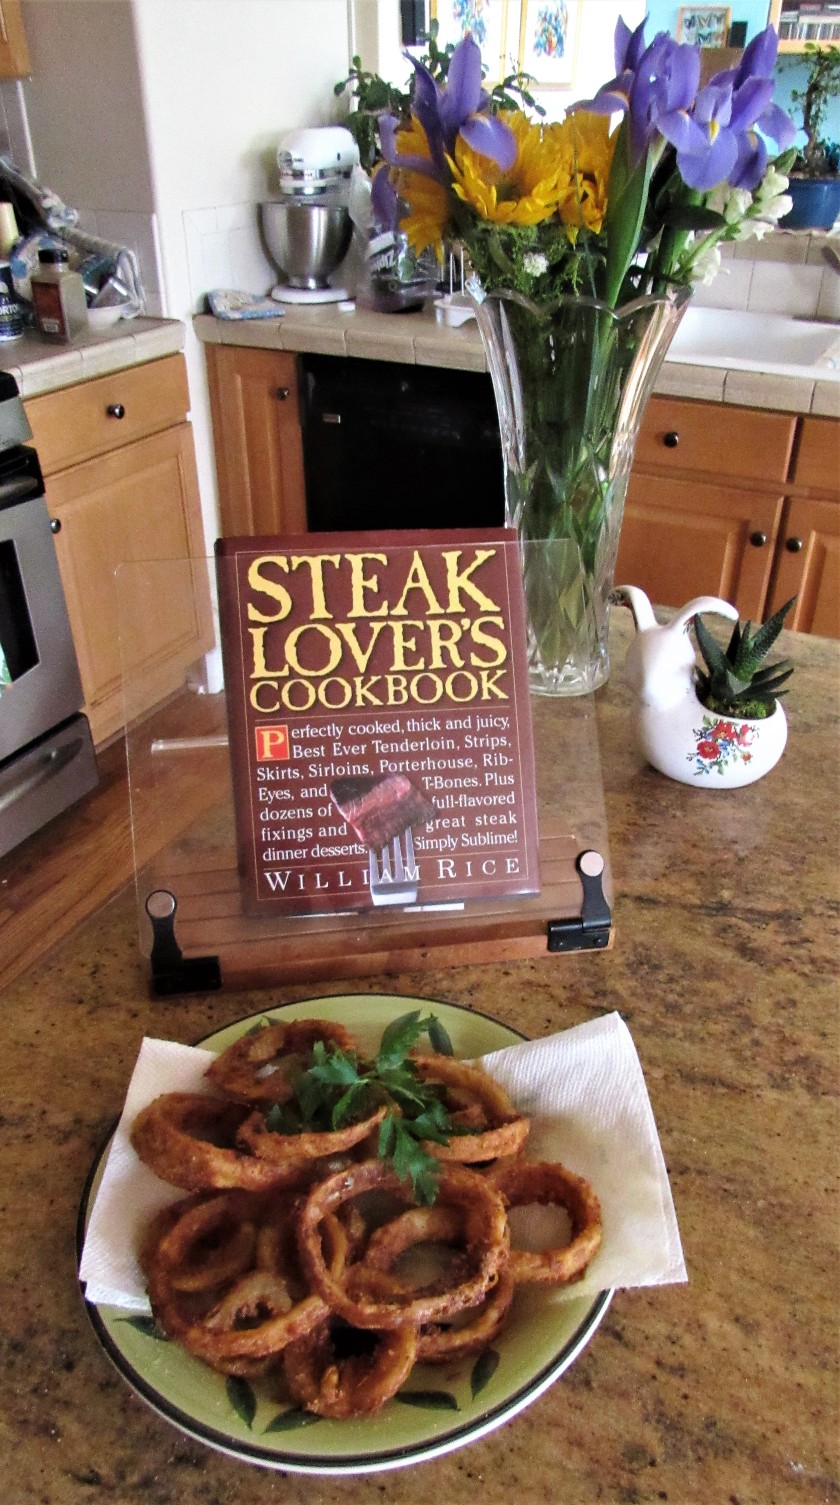
I love onion rings, but I do not eat them all that often. When Larry smoked all his meats, onion rings just seemed like the perfect side to accompany the meat. He’s Smokin’ Again And sure enough, they were a great match for the steak, but then no big surprise, since the recipe was in one of my steak books. 🙂 Again, easy-peasy and only a few simple ingredients to make these perfect onion rings.
Onion Rings
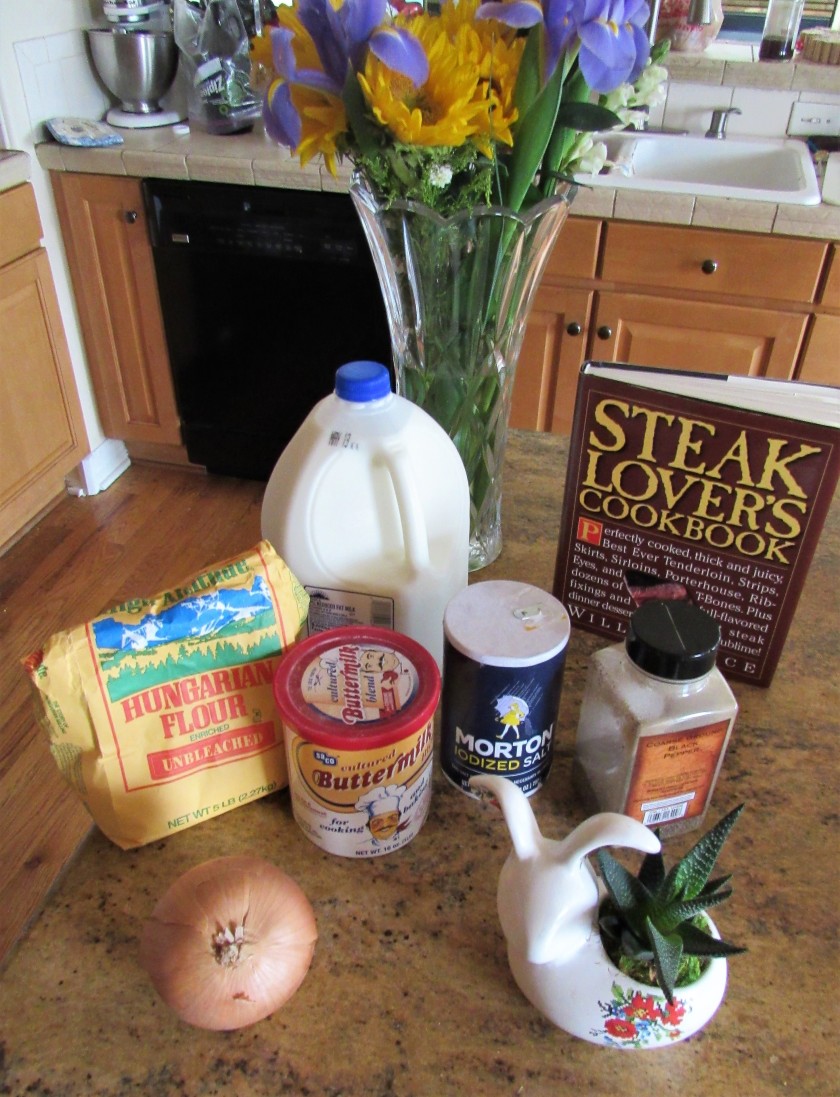
1 large onion, peeled and slice crosswise
1 1/2 cups flour
1 tsp salt + more to add immediately after cooking
1 /2 tsp black pepper
1/4 tsp cayenne pepper
1 1/2 cups buttermilk
vegetable oil for frying
Combine all the dry ingredients and mix together well.
Pour the buttermilk into another bowl.
Slice the onion crosswise then carefully separate the rings to make them individual rings.
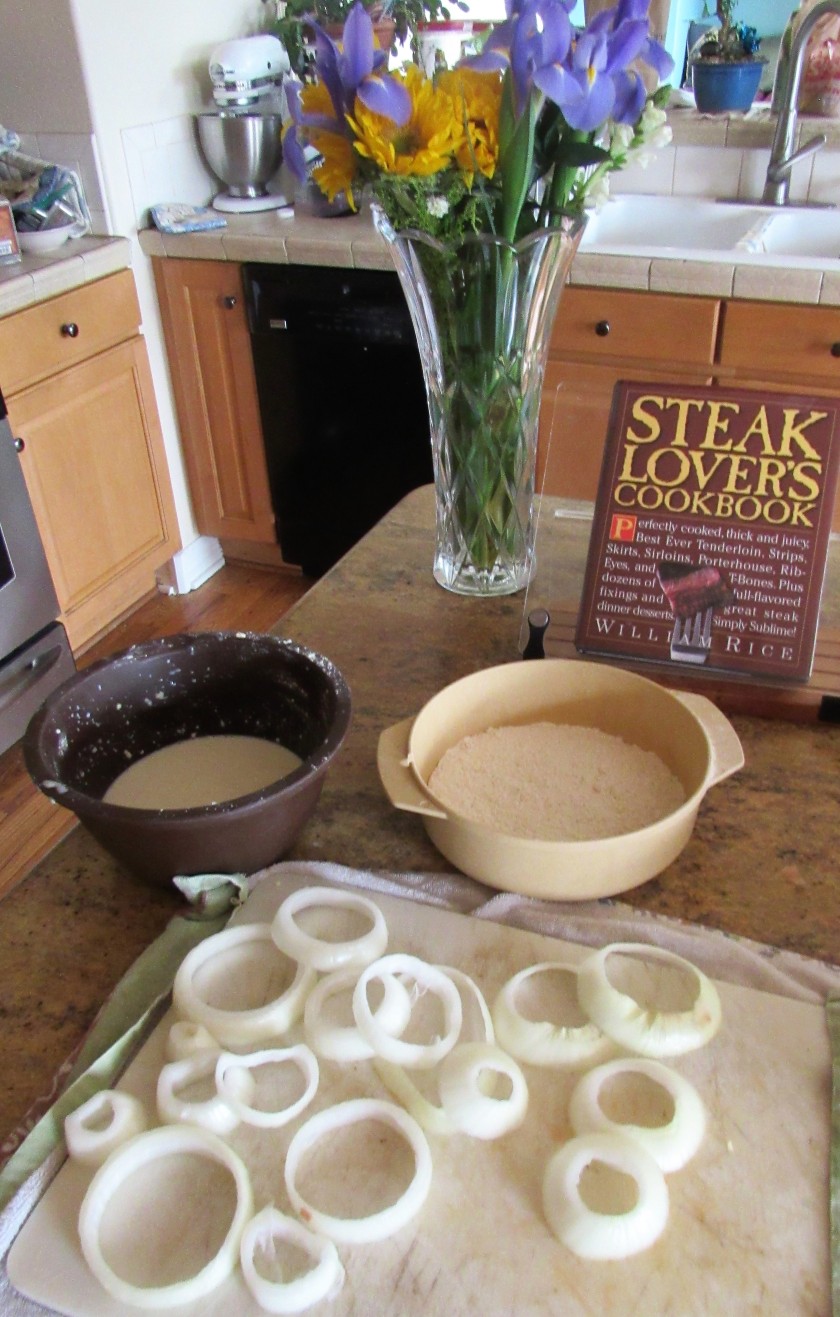
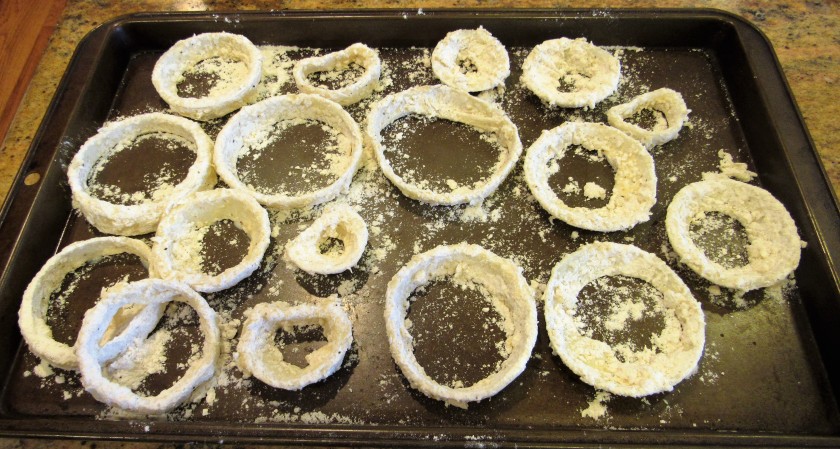
First, dip the rings into the flour mixture and completely coat, shaking off all the excess flour. Then dip the onion ring into the buttermilk and thoroughly coat. Shake off the excess, and dip back into the flour mixture once again, shaking off all the excess flour. Continue until all the rings are coated. Place the coated onion rings on a sheet pan.
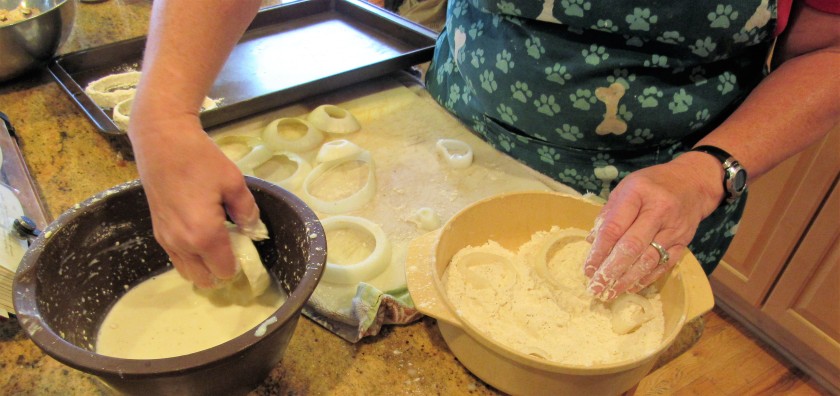
Pour vegetable oil into a skillet, to about 1″ in depth. Get the oil to 375* F or 190* C. Once the oil is hot enough, carefully add the coated onion rings into the hot oil. DO NOT put the onion rings in before the oil gets to temperature or they will soak up the oil and will become greasy and limp. They will not crisp up. Do not over crowd the skillet either. Add the onion rings to the oil in small batches. Cook for about 1 1/2 minutes, then carefully flip the rings over and continue to cook for another 1 1/2 minutes, or until they are golden brown and light and crispy.
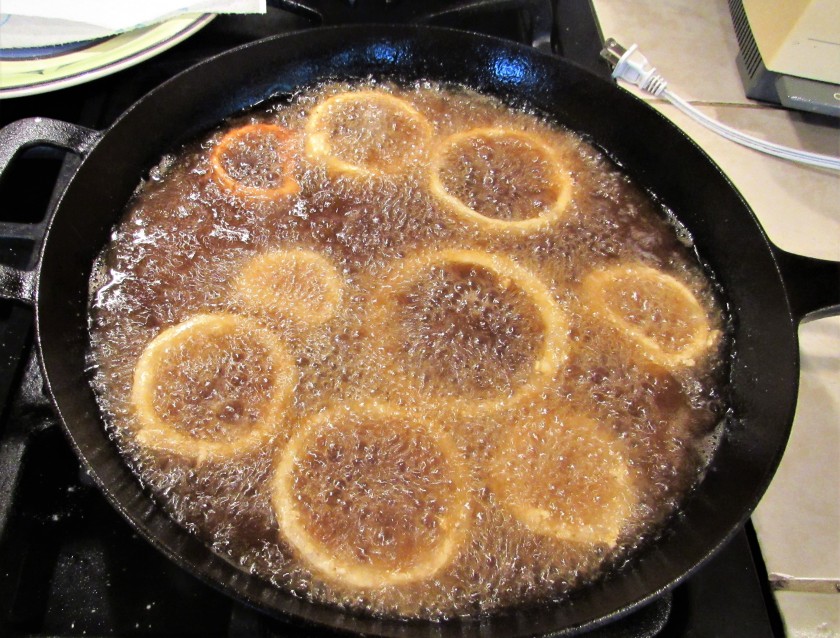
When the onion rings are crispy and golden brown, place them on a plate lined with a paper towel and add salt while they are still hot. These are best when served immediately, while they are still hot. These are perfect. They are light and crispy and just melt in your mouth. Go ahead. I dare you. Can you eat just one? I know I sure can’t. 🙂
Stay safe and stay well Everyone! ‘Til next time.
Another Bright Sunny Day
I have been nominated for another Sunshine Award This latest nomination comes from Dee at retrodee. Thank you, thank you, thank you. In these dark and gloomy days of late, it is very nice indeed to have a some sunshine to bring some much needed light to our lives. If you have not checked out Dee at retrodee, you definitely should. She takes us back into happier, more innocent times, when life was much more simple and easier to understand. It is a very fun blast to the past.

The rules:
1. Thank the blogger who nominated you in the post and link to their blog
2. Answer the 11 questions asked of you
3. List the rules and include the Sunshine Blogger Award logo in your post
4. Write a new list of 11 questions for your nominees
5. Nominate 11 bloggers for the Sunshine Blogger Award
Dee’s Questions to me:
1 What’s your favorite spice?
Tough one. I LOVE all kinds of spices. I love big bold flavors of all kinds.
2. Who is your favorite character of all time? (can be from anything)
Again, a very tough question. I have so many interests. I guess it really just kind of depends on my mood at the time.
3. Do you believe in Aliens?
Yes, I do. I think it is awfully selfish to think that we are the only life forms out there in this big, vast universe, or multiple universes.
4. Do you use social media and which is your favorite platform?
Well, I am on Facebook, and it is definitely a love/hate relationship. The only reason I am really still on it is for my blog at this point. I am not on any other social media platforms.
5. Do you remember your dreams the next morning?
Sometimes, but mostly not. I am not a big sleeper, which means I do not dream much either.
6. What is your favorite charitable cause?
I have a lot. Anything with animals or the ocean or helping Veterans.
7. Do you collect anything?
COOKBOOKS. I have well over 600 and counting.
8. Do you use curse words on at least a semi-regular basis?
OMG!!!!!! I need to have my mouth washed out with soap numerous times a day. My dad was a sailor and I worked in restaurants for many, many years. I like to say I speak restaurant with sailor mixed in. 🙂 🙂 🙂
9. Would you like to go back in time and live in the 1950’s?
Absolutely! I think we all need to slow down and live in more innocent times.
10. What’s your favorite Elvis song?
It’s hard to choose just one. He put out so much good music.
11. As a blogger, what do you think of the “reblog” feature on WordPress? Is it just better to write a new post on a previously covered subject?
I depends on the blog and the subject matter. Usually I do not reblog, but I will if I am really moved by the blog and what it says to me.
I am not very good at singling people out for nominations because I think there are so many great blogs out there. They are all different and unique and each one offers something special. So I will open this open to anyone and everyone who wishes to participate. It’s a great way to get to know each other, plus it brightens up our days.
My questions to all of you:
- How have you been affected, if so, by this COVID-19 nightmare?
- What have you learned?
- What is your favorite thing about yourself?
- What is your least favorite thing about yourself?
- If you could travel through space and/or time, would you?
- What has influenced you the most?
- What is your favorite type of music?
- What is your favorite type of food?
- Are animals pets or family?
- Beach, mountains or dessert?
- What is your favorite time of year?
I look forward to hearing from you. Let the sun shine in and may your days be sunny and bright.

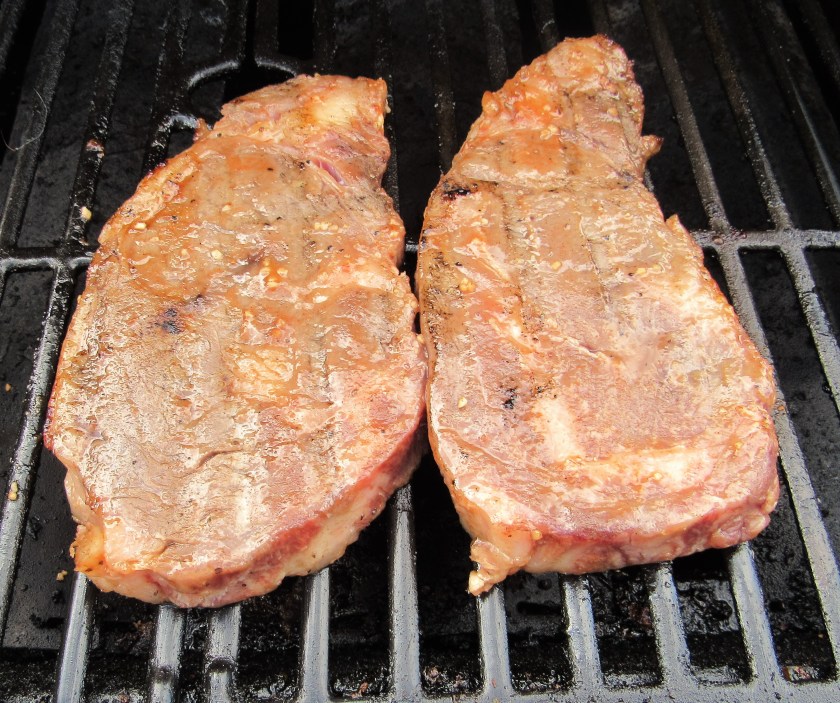
He’s Smokin’ Again
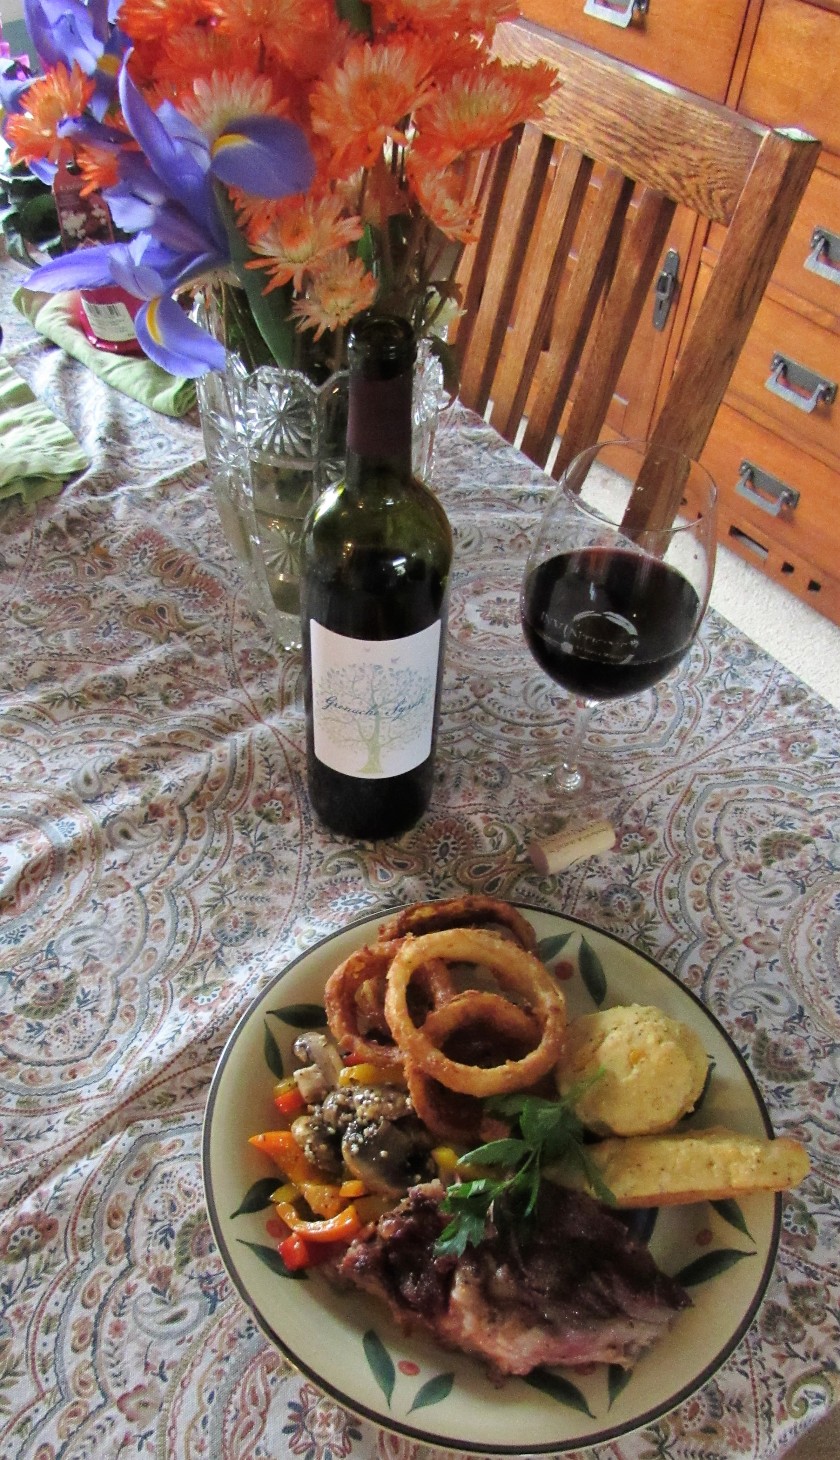
Larry has been busy smokin’ out in the yard again. NO, NO, NO! It’s not what you think. He was smoking meat, and lots of it too. He did a 10 lb pork roast, some ribs, a beef roast and some chicken breasts. When he uses the smoker, he likes to make it worthwhile and does a big batch of meat all at once. Believe me, we will not be going hungry anytime soon. 🙂
The pork roast was first in the smoker. It took about 10 hours for this to smoke up just right.
Then Larry added the ribs, chicken and beef to the smoker.
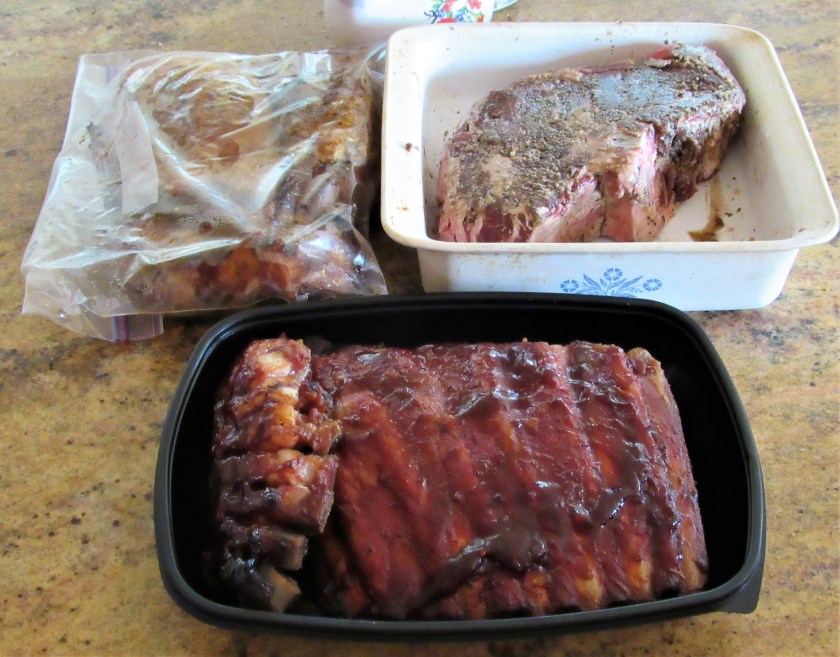

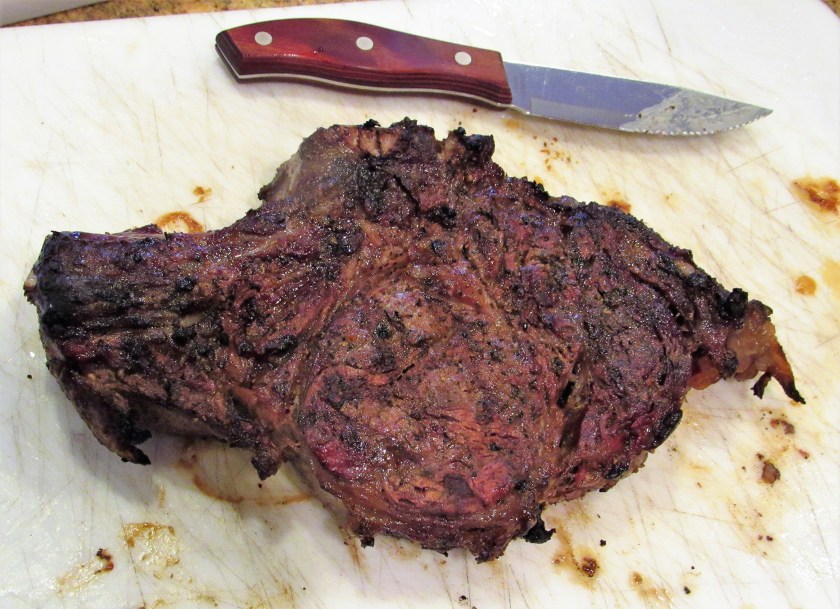
This smoke job was Larry’s best effort yet. Everything came out so good. It was all full of flavor and very tender. To really enjoy these bold smoked meats, we needed some bold and hearty side dishes to go with them. We chose to eat the beef roast for dinner. I sauteed some peppers and mushrooms and made some delicious, crispy onion rings and my lemon pepper corn bread Lemon and Pepper Cornbread to go with the meal, finished with a fruity red grenache-syrah blend.

The meal was a smoker’s delight.
Stay safe and stay well Everyone! ‘Til next time.
Heart of Wine
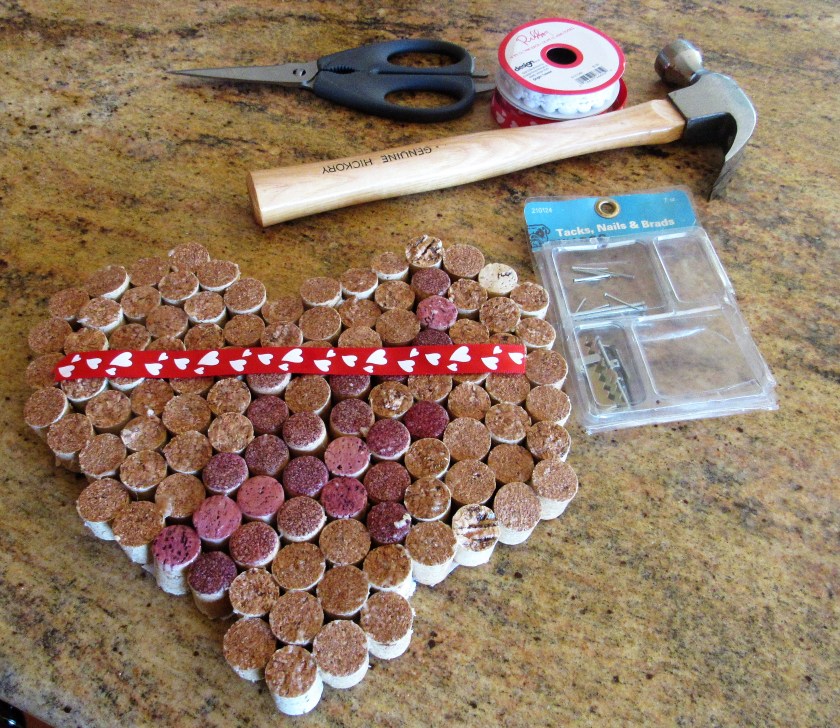
I have said many times, there is much more to me than just cooking. Although cooking and food have always been passions of mine, I have many other things I am passionate about as well. Photography, guitar and music in general, SCUBA DIVING and swimming and … WINE!!!!!! With having wine as a passion, and there is always a ton of wine in our house, that means there is also a ton of wine corks too. I love to repurpose things as much as possible, and I have always had a very creative side to me as well. I have made many things with wine corks in the past. They are fun, unique and challenging to work with. My latest creation was a heart of wine (corks). This presented a few challenges and took more time than I expected, but right now, time is all we have. The corks just did not want to cooperate, but in the end, we came to an agreement, and things worked out. It actually came out pretty good, if I do say so myself. In fact, I liked it so much that once I figured it all out, I made another one to give as a gift.
As you see, I have plenty of corks. This was the practice run.
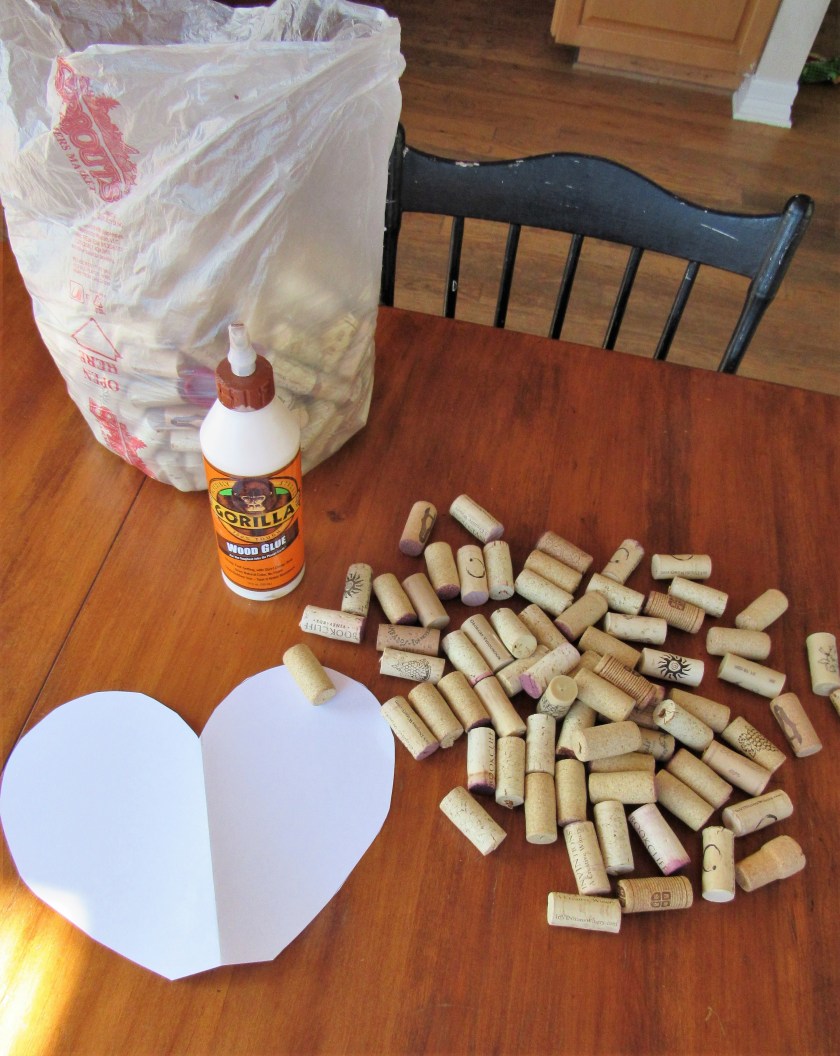
Making the pattern and determining how many corks I needed. Corks come in many different styles. Some are decorated and labeled, while others are plain. For this one, I used only the plain ones that were similar.
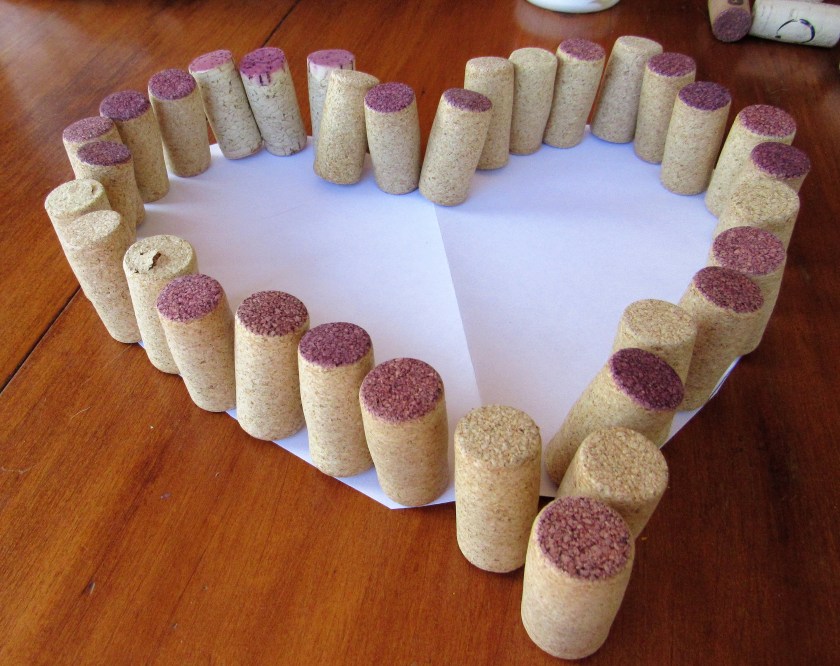
The most challenging part of this project was that the corks did not want to stick together. I used wood glue, since after all corks are made from wood, but the glue took much longer to dry than expected and the corks kept shifting around. I finally found that I had to firmly, but gently hold the corks together for a bit before adding another one. Then I repeated until I filled my heart.

After fighting with the corks to stay in place and the glue to stick, I finally won the battle and got everything to fit and lock in place. You want as tight a fit as you can get in order to hold the corks in place.
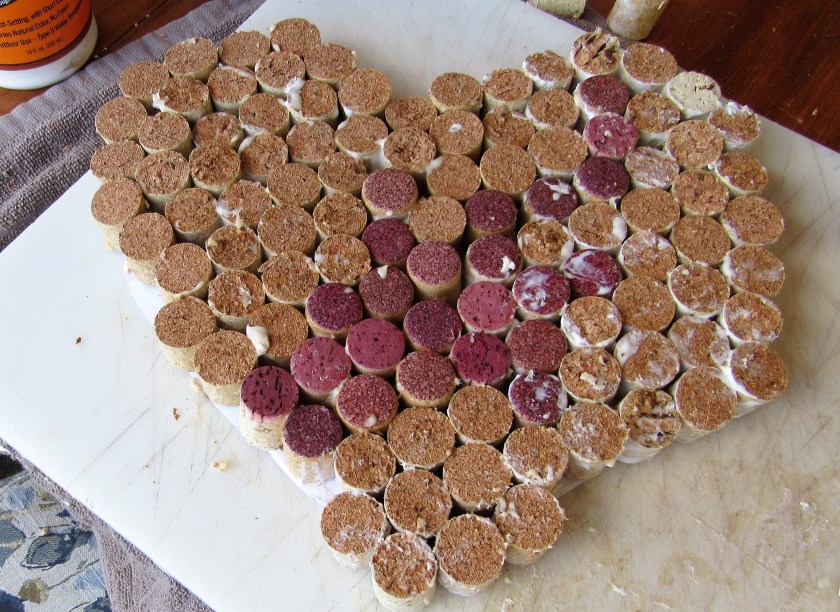
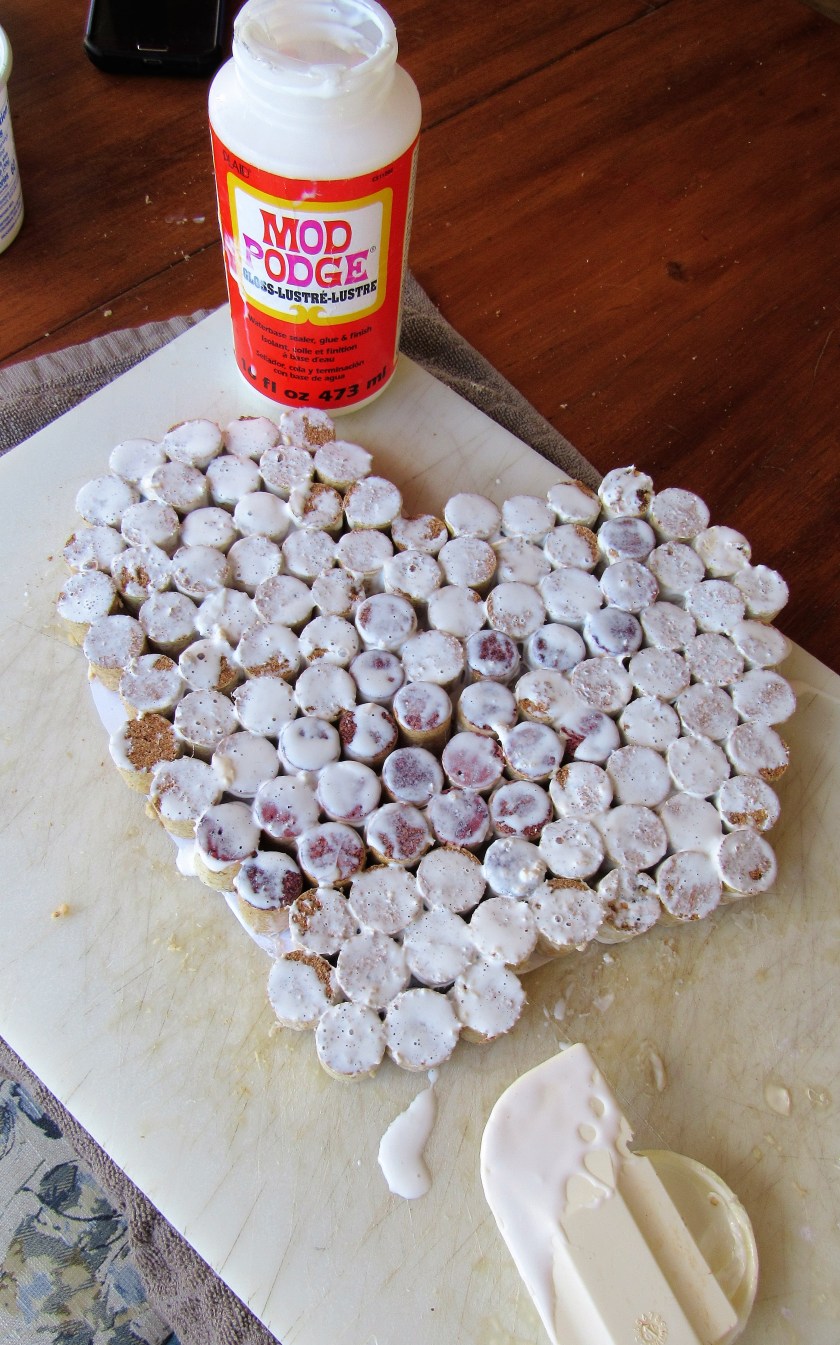
After fitting everything together, I sealed it all once more with Mod Podge, which is another type of glue that also makes it shine and adds luster. I covered the entire top with the Mod Podge glue. With the new layer of glue on, now I just had to let it sit and dry. Because it was so fragile at first, I didn’t touch it for about 2 days, just to make sure the glue was completely dried. The glue dries clear.
Now that it was dry, I needed to figure out a way to hang it. I found some cute, heart decorated ribbon that was a perfect addition. I had two very small nails that I carefully hammered into the ribbon and the corks. You do not need a lot of ribbon; just enough to make a loop.

And now, my heart of wine hangs on the wall in my kitchen nook. This one was full of trial and error, but after working out the kinks, I quickly made another one that I will be giving as a gift.

Stay safe and stay well Everyone. ‘Til next time.
Lemon and Pepper Cornbread
Leftovers were the menu choice for dinner, but I didn’t not have any bread to go with the meal, and I am most definitely a bread eater, and like having some kind of bread with my dinner. I found a really interesting and different recipe for cornbread that was a perfect match for our leftover scallops with ham. Spanish Scallops with Ham and Ahi Tuna
I love cornbread, but I never thought about adding lemon to it. Now that I have though, it is a definite do-over. You can even mix it up a bit and add orange or tangerine instead of the lemon, if you like. These have a fresh lemony and peppery kick.
Lemon and Pepper Cornbread

3 cups milk
4 tsp black pepper or 3 tsp black pepper and 1 tsp cayenne pepper
3 eggs
1/2 cup sugar
1 1 /2 sticks butter, melted
1 TBSP lemon zest
2 TBSP lemon juice
3 1/2 cups flour
2 1/2 cups cornmeal
2 TBSP baking powder
1 TBSP salt
1 1/2 cups corn kernels
I did not realize HOW much this recipe was going to make, so I ended up giving some of it away to Priscilla. Besides, it gave us a chance to meet up for a bit too. If you do not want to make this much, cut the recipe in half. It makes 18-20 servings.
Preheat the oven to 375* or 190* C.
Spray your pans with cooking spray. I had a fun cornstick cast iron pan that I used, as well as a 12 muffin pan and 2 mini loaves.
Mix all the dry ingredients, except for the sugar and the lemon zest, and the corn together and set aside.
Beat the eggs and sugar together until they form soft peaks, for about 4-5 minutes and set aside.
Add the milk and the butter to a saucepan and bring to a simmer. Cook long enough for the butter to melt completely.

After the milk and butter cool a bit, add then add the lemon juice and lemon zest and about 1/3 of the dry mixture and mix well. Then add about 1/3 of the egg mixture and fold in. Continue until all the ingredients are mixed together thoroughly. You are going to have a very thick dough. Add the dough to your pans and spread evenly. I used a combination of pans and you can too.

Bake for about 20 minutes, or until your bread is golden and a toothpick comes out clean. These are best when served hot with either butter or honey butter. YUMMY!!!!!

Stay safe and stay well Everyone. ‘Til next time.
Calzanadas or Empazones?
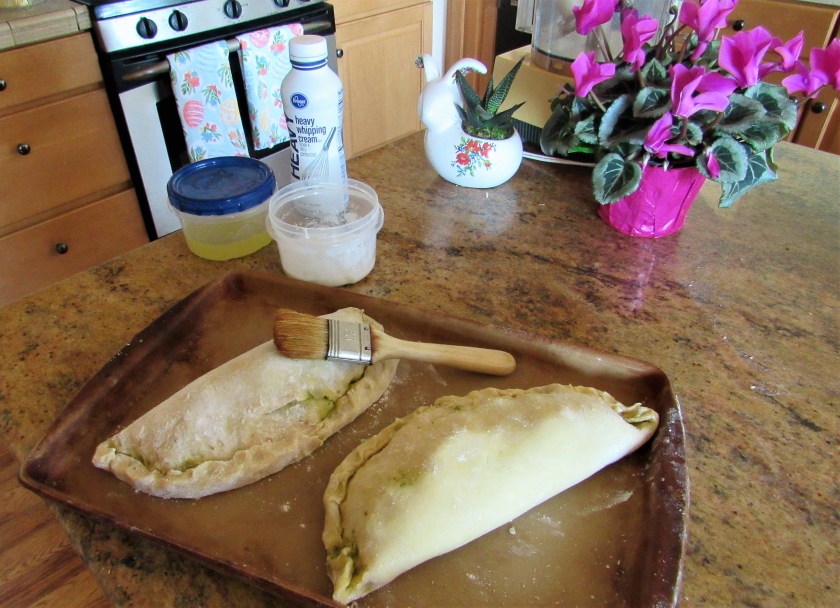
Empanadas and calzones are very similar. One is Spanish in origin, the other Italian. The only real differences that I know of are the sizes and the type of dough that is used for each one. They both can be either sweet or savory, and you can fill them with anything you like. Empanadas tend to be a little smaller than calzones and are usually made with a dough that does not contain yeast, which makes them less doughy or bready and flakier. When I made these, I just didn’t feel like making a yeast dough for the calzones, so I made them with a my basic empanada dough instead. So … Are they calzanadas or empazones?
I made some pesto, cooked up a chicken breast, used up some leftover vegetables and added some mozzarella cheese to make these tasty calzanadas/empazones. Then I served them with a little additional pesto sauce on the side and a cool, crisp barrel aged chenin blanc to make for a perfect spring meal out on the deck.

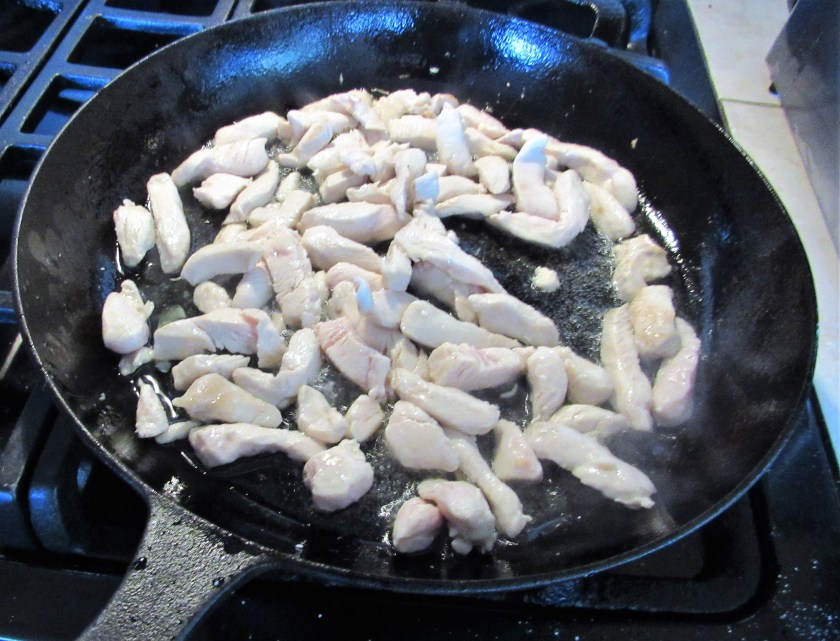
Pesto Chicken and Vegetable Calzanadas
This time when I made my pesto, I used some toasted pepitas instead of pine nuts for my pesto sauce. Presto Pesto Chicken You can use any kind of vegetables you like. I used my leftover artichoke hearts, mushrooms, onions and then I added some grape tomatoes cut in half as well.
My Basic Dough
1 1/2 cups flour
6 TBSP cold butter, cubed
1 tsp salt
1 egg
5-6 TBSP heavy whipping cream
Mix the flour, butter and salt in a food processor until everything is crumbly. Then add the egg and cream and continue to process until it forms into a dough ball. Wrap the dough ball in plastic wrap and refrigerate for at least 30 minutes before rolling out and using.
Cut the chicken into thin strips and cook in olive oil.
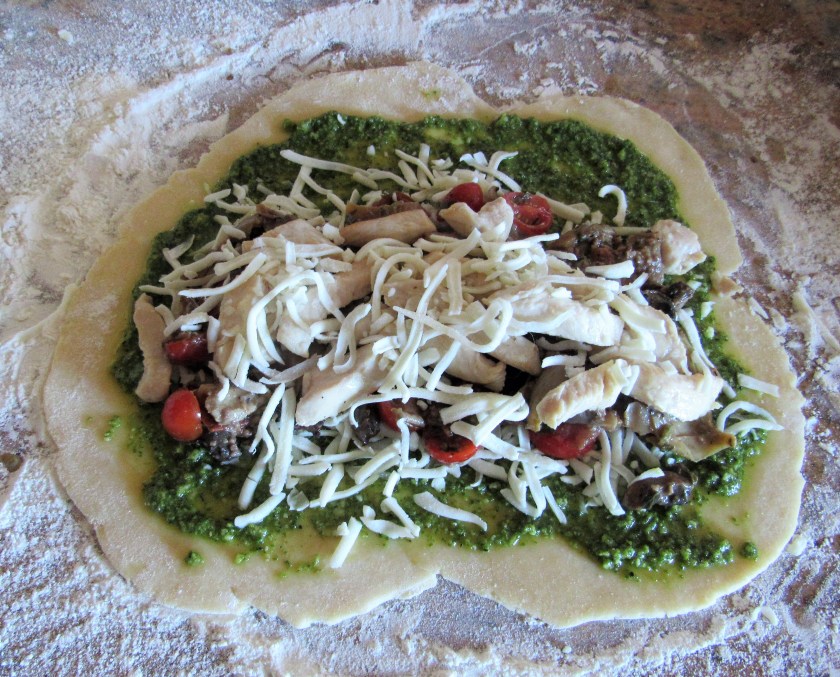
Cut the dough either in half or in quarters, depending on how large you want to make your calzones. On a lightly floured surface, roll the dough out to about 1/4 ” in thickness, then spread the pesto sauce over the dough, leaving about 1″ around the edges.

Top with mozzarella cheese, then the vegetables, followed by the chicken, with more cheese on top.
Preheat the over to 375* F or about 185-190* C.
Carefully fold the dough over the filling and make a tight seal around the edges. Then crimp the edges to seal them even more. Once your pockets are made, make an egg wash and brush over the and around the calzone pockets.
Bake for about 45 minutes or until the dough is golden brown and done.
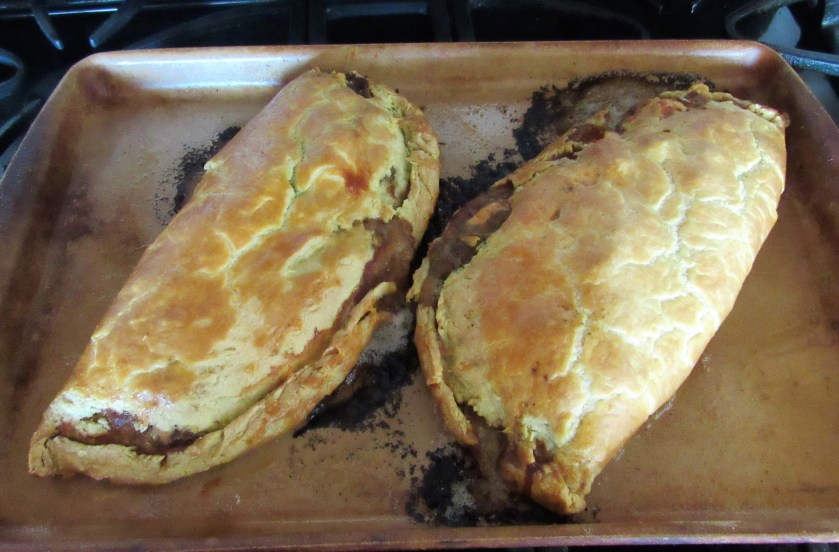
Now, mangia! Serve them with a little extra pesto on the side and a good, crisp white wine. Perfect.

Stay safe and stay well Everyone! ‘Til next time.
Steak with Spicy Orange Sauce
It was another steak night and I wanted to make something simple because my friend Kathy came over for a visit and I did not have a lot of time to think about dinner. This sauce was perfect. It was simple and delicious. This simple sauce can also be used for pork, chicken or veal too if you prefer.

Spicy Orange Sauce
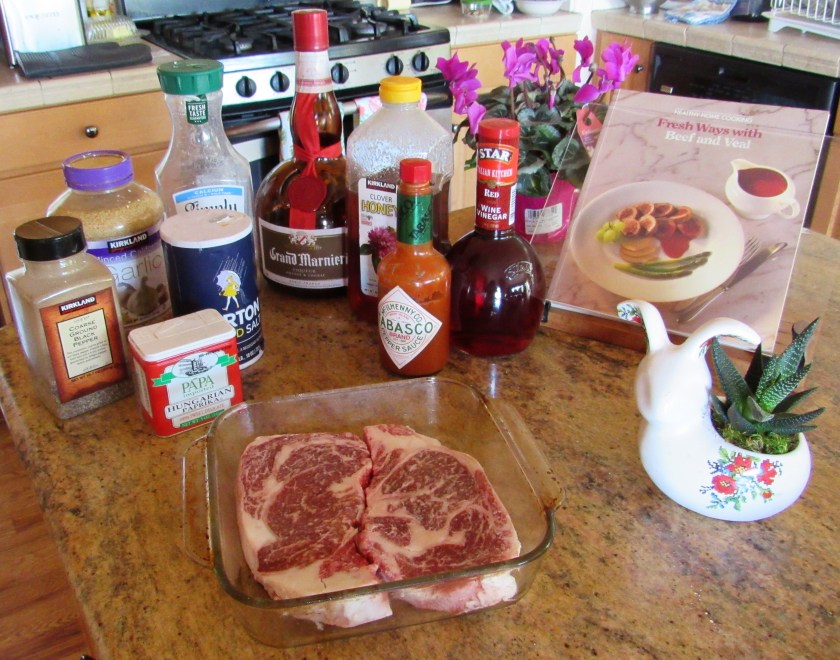
1 cup orange juice
4 TBSP honey
2 TBSP red wine vinegar
1 TBSP garlic
2 TBSP ketchup
1 TBSP Grand Marnier
1 tsp paprika
2 tsp Tabasco sauce
1 tsp black pepper
salt to taste
1-2 tsp cornstarch, optional
Mix everything together and pour over the meat to marinate for at least 3-4 hours before cooking.
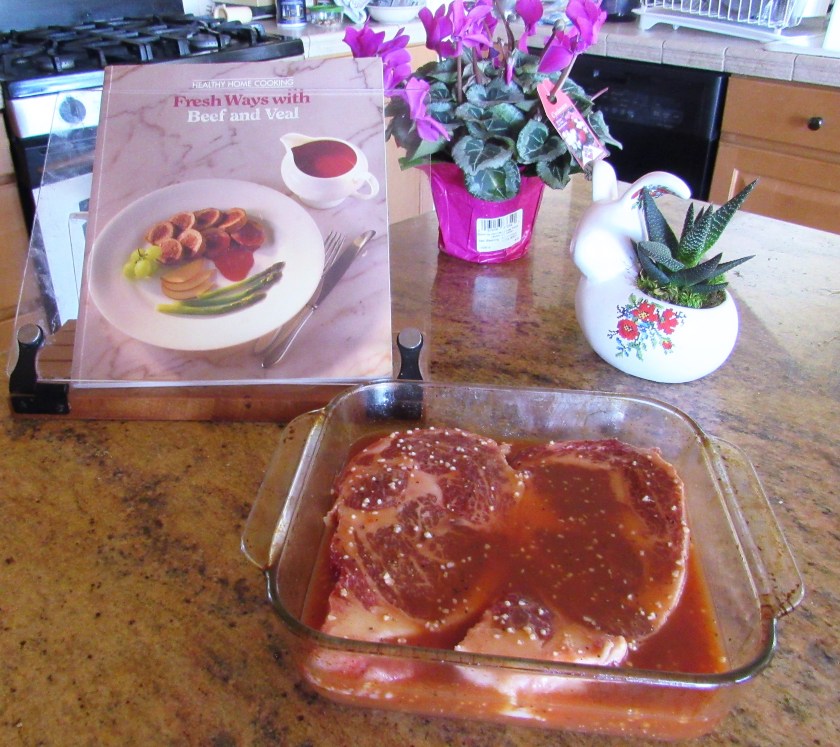
When ready, grill the steak to your liking.
Reserve the sauce. Heat the sauce before serving. If you like it a little thicker, add some cornstarch to the sauce, bring to a boil, then reduce to a simmer and cook for about 5 minutes. Once your steak is cooked, top with the sauce. It’s now ready to enjoy. I served this with some mashed sweet potatoes, made with maple syrup and green beans. My wine choice was a smooth, fruity red blend. This was a perfectly easy and delicious spring meal that we enjoyed out on the deck.

Stay well and stay safe Everyone! ‘Til next time.
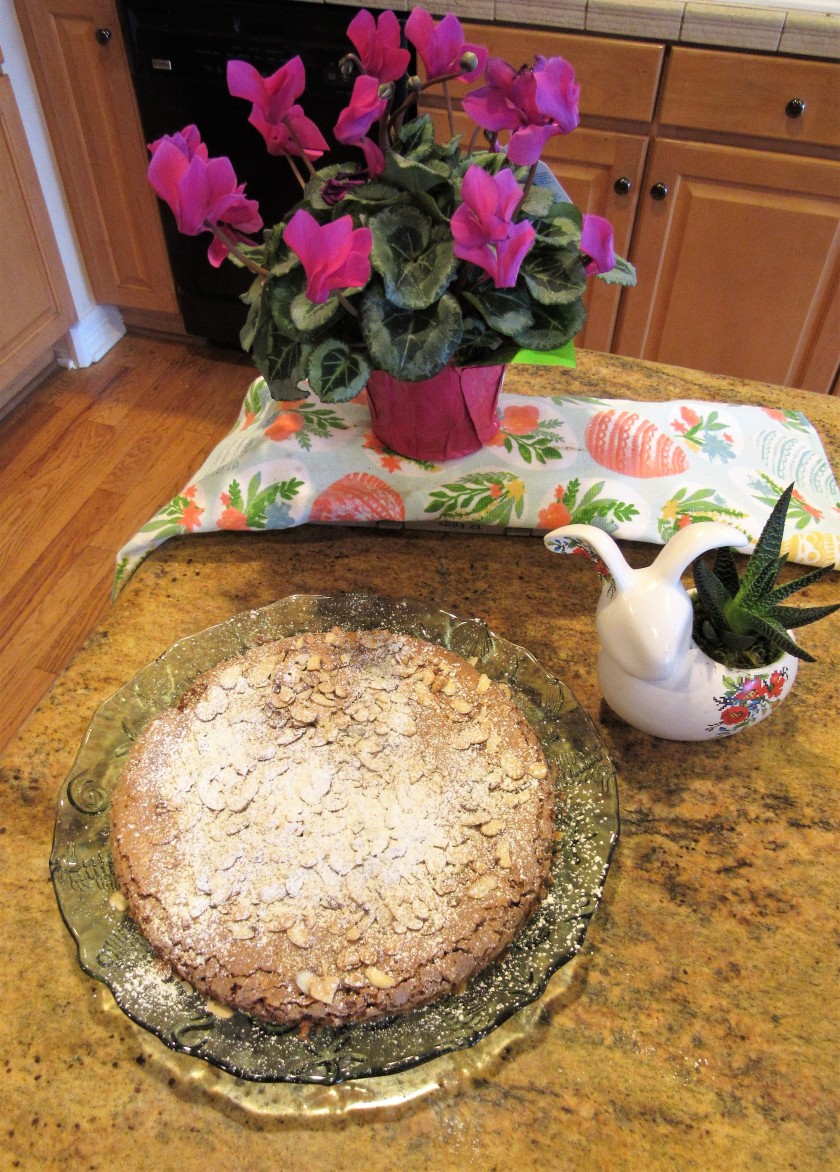
Italian Chocolate Almond Torte
I have been so good since the start of Lent, and have not made any sweets, cookies or desserts …. until today, although I was tempted many times. I was going to make this dessert the other day to celebrate being able to get together with Janet and Bob, but Janet beat me to it and made her delicious rum cake instead. Dinner at a Distance But I got together with my friend Kathy today, which was still a fun celebration, so we needed some nice sweet treat for the occasion. I made an Italian chocolate almond torte.
In Italy, almonds and dessert are a common theme. Italians love using almonds in their desserts, and the possibilities are endless. This Italian chocolate almond torte originally hails from Southern Italy, from La Pigna, in Capri. It is rich and dense, very full of flavor, and very simple to make too, with only a few simple ingredients.
Italian Chocolate Almond Torte

2 cups slivered almonds + more for the topping, optional
1 1/4-1 1/2 cups semi sweet chocolate chips
7 egg yolks
1 cup sugar
5 TBSP butter at room temperature
powdered sugar
Preheat the oven to 350* F or 165* C.
Spray a 8–9 inch cake pan with cooking spray.
Place the almonds and chocolate in a food processor and process until they are ground to a medium fine texture.


Beat the eggs and sugar together at a medium-high speed for about 3 minutes, or until it is light and fluffy. Then add the butter and beat again for another 3 minutes. Next add the chocolate almond mixture and beat once for more 2 minutes. You will have a thick, very dense batter.

Once the batter is all mixed, pour it into the prepared pan and spread the batter evenly.

Bake for about 45 minutes or until a toothpick comes out clean and the center is completely cooked.
Toast some more almond slivers, if you like. When the torte is completely cooled, remove it from the pan. Sprinkle the toasted almonds on top and then dust with powdered sugar.

This torte is best when served slightly warmed with either a bit of ice cream or Zabaglione (Italian custard), but it is very good just on its own too.

Stay safe and stay well Everyone. ‘Til Next time.
