I have created this site to help people have fun in the kitchen. I write about enjoying life both in and out of my kitchen. Life is short! Make the most of it and enjoy!
There is a house not too far from me that has some GIANT sunflowers growing in their backyard. They just look so pretty every time I pass by, I just had to get a picture of them.
Make everyday sunny and bright. Take time to stop and smell all the flowers along your way. 🙂
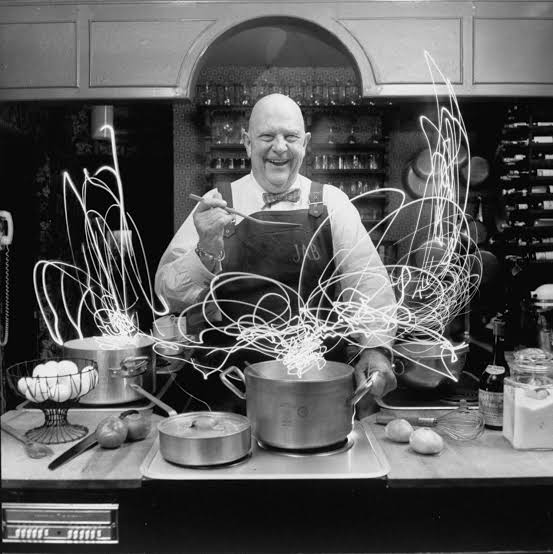
I love to hear all the scoop about what people are saying about the foods we eat. I get a good laugh out of these fun food quotes. I hope you do too. 🙂
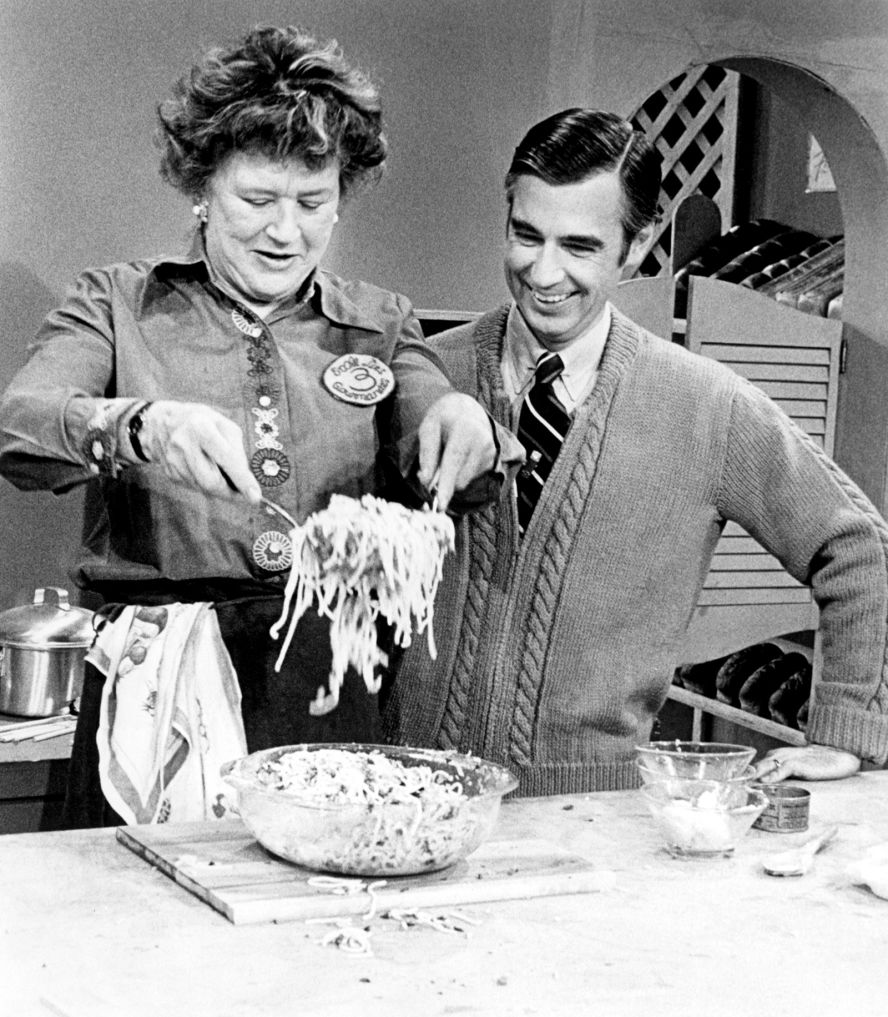
Of course, my all time favorite Chef, Julia Child, always has something good to say.
People who love to eat are always the best people.
~Julia Child and Mr. Rogers~
Food is our common ground, a universal experience.
~James Beard ~ American chef and cookbook author
There is no good cooking without good ingredients.
~ Paul Bocuse, The “Pope” of French Cuisine~
One of the very nicest things about life is the way we must regularly stop whatever it is we are doing and devote our attention to eating.
~ Luciano Pavarotti, famous Italian opera tenor~
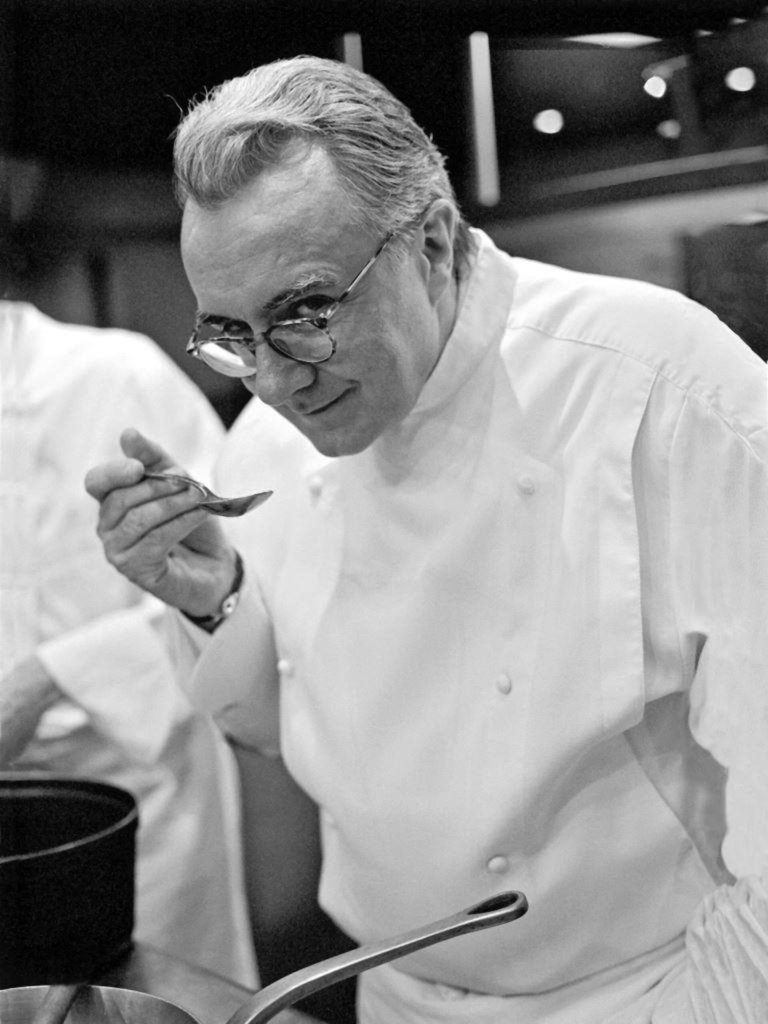
Desserts are like mistresses. They are bad for you. So if you are having one, you might as well have two.
~ Chef Alain Ducasse, the first chef to have 3 Michelin stars at three different establishments. ~
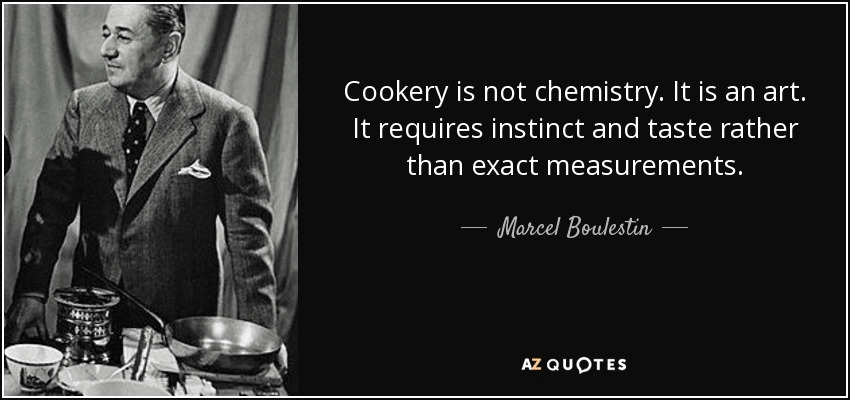
Cookery is not chemistry. It is an art. It requires instinct and taste rather than exact measurements.
~ Marcel Boulestin – French chef, restaurateur, and the author of cookery books that popularized French cuisine in the English-speaking world.~
As always, I hope you enjoyed these and a got a good chuckle or two. I got another good chuckle when doing my research for these, and once again, I am listed as a resource. WOW!!!!!! Am I becoming a “famous expert” too? I promise, I won’t let it go to my head. 🙂
Life is short. Live life to the fullest and enjoy the ride. Take time to laugh as much as you can along the way too. Have a great day and make everyday great. ‘Til next time.
Right now, we are in the dog days of summer. Our temperatures have been soaring and it is HOT, HOT, HOT! We have been hovering at the upper 90’s and 100’s F or 37-38*C, for the past couple of weeks. When it is this hot, the best thing to do is to stay indoors, away from the heat.
Yesterday was another one of those super HOT days. I took my own advice and stayed indoors and painted my Mandela, which is now hanging on in my family room.
Stay cool! Have a great day and make everyday great. ‘Til next time.
Larry and I love our steaks. We eat a lot of steak, and because we eat a lot of steak, I am always looking for new ideas and new ways to prepare it. As I was looking through my personal culinary library, I came up with a great inspiration and made it Cubano style. I served my Cubano steak with our leftovers from when Julia were “just playing around” in the kitchen together More Fun In The Kitchen With Julia.
Cubano, or Cuban, styled foods are known for their characteristic citrus flavors. They also have lots of aromatic spices, garlic and onions. My favorites. I like BIG, BOLD flavors. Cuban cuisine blends Spanish, African, and Caribbean influences into bold, soulful meals. Traditional Cuban dishes often feature slow-cooked meats, aromatic sofrito, and citrus-based marinades. Cuban sofrito is a savory cooking base made from finely diced onions, green bell peppers, and garlic slowly sautéed in olive oil, usually finished with a touch of tomato paste or sauce, cumin, and oregano. It takes about 15 to 20 minutes to prepare and forms the flavorful foundation for classic dishes like black beans, ropa vieja, and picadillo. Unlike most Mexican dishes, Cuban food is NOT spicy. It has a more Spanish take on foods and food preparations. Instead of hot chili peppers, Cuban cooking relies on savory, aromatic flavor bases, which is reliant on using more ingredients like garlic, onion, olive oil, and herbs rather than fiery heat and cumin, oregano, and bay leaves instead of chili powder or hot peppers. Cuban cuisine is more European and African in nature than Mesoamerican like Mexican food.
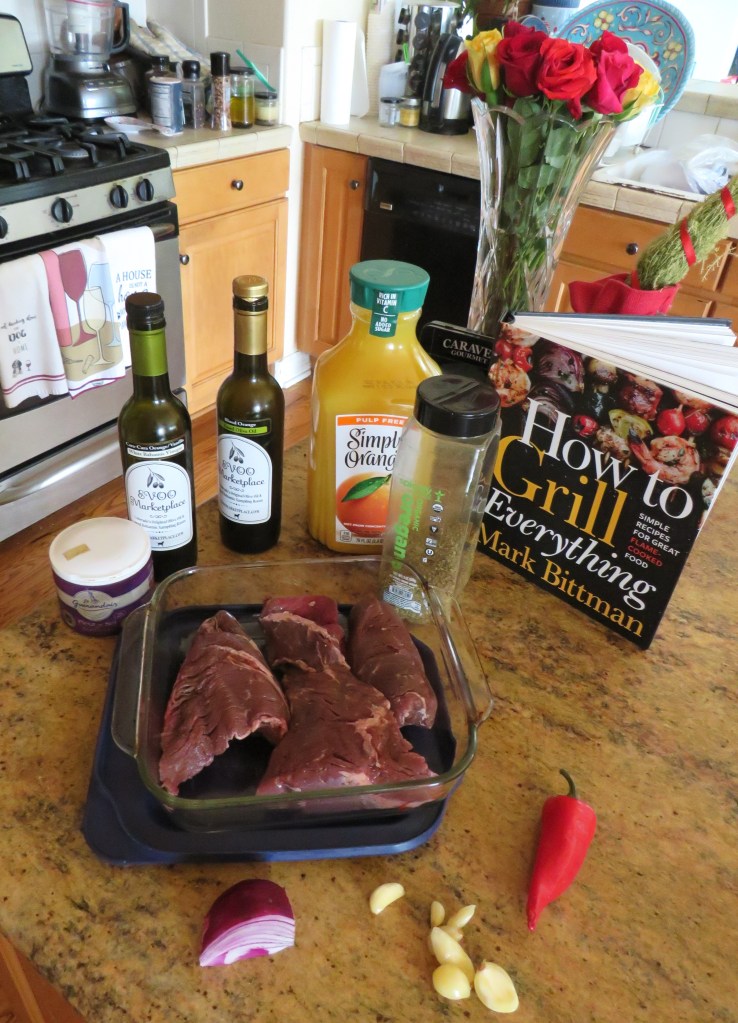
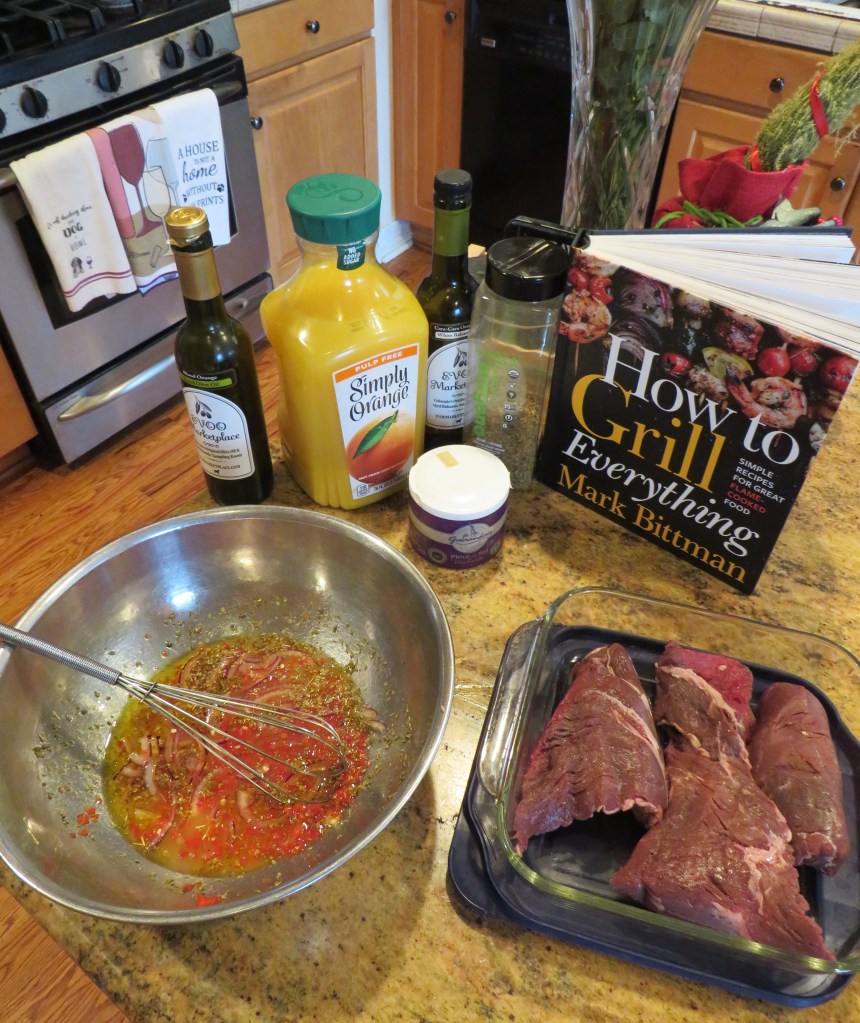
Cubano Steak
I marinated my steak in an orange juice and garlic base, which is very Cuban.
2-3 lbs steak
1 cup orange juice
6-8 garlic cloves, sliced very thin
1/4 red onion, sliced very thin
1 red chili pepper, diced fine
1-2 TBSP orange vinegar, optional
1-2 TBSP orange olive oil, optional
1 tsp salt
1 tsp dried oregano or 1 TBSP fresh chopped oregano
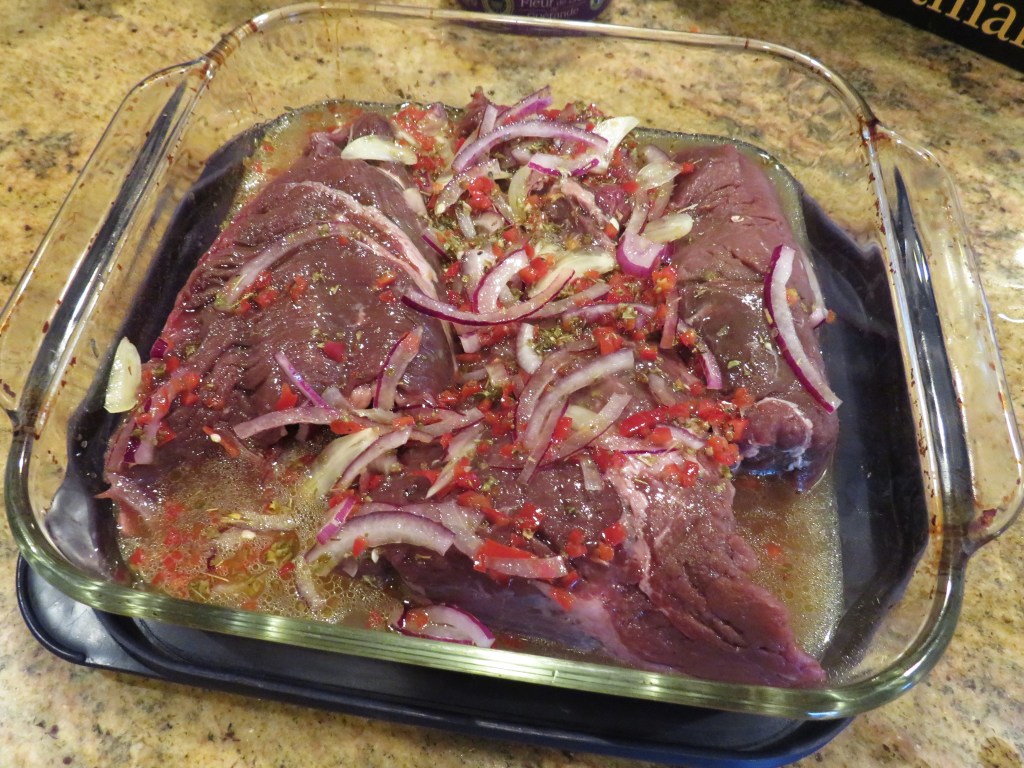
Mix everything together well and pour over your steak to marinate. You can use this for chicken or pork as well if you like. Let the meat marinate for at least 2-3 hours before cooking it.
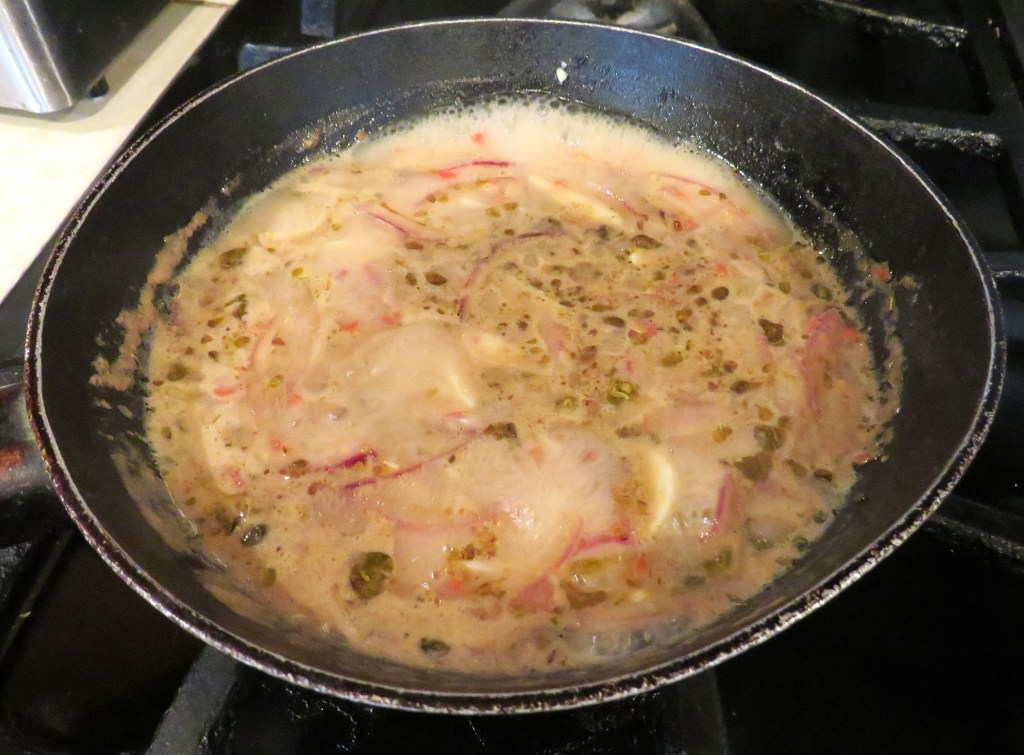
When you are ready to grill the steaks, reserve the marinade to make your sauce to top the cooked meat. Bring it to a boil, then reduce the heat to a simmer and cook for about 7-10 minutes, stirring frequently.
When the steak is cooked, spoon some of the reduced sauce over the steak and serve. Esta mui rico. Desfruitas!
Live life to the fullest and make it delicious. Enjoy the ride and the foods along the way. Have a great day and make everyday great. ‘Til next time
There are many, many different versions of chicken salad found all over the world today. Because chicken itself is so versatile, it only makes sense that there are so many different versions of chicken salad too. The key to turning a good chicken salad into a great chicken salad is balance; the balance between juicy, hand-shredded meat with a bright, acidic dressing and contrasting textures.
Chicken salad as we know it today, started in the united States around 1863, when Liam Gray, owner of Town Meats in Wakefield, Rhode Island, mixed leftover chicken with mayonnaise, tarragon, and grapes to create the first distinct commercial version. But its roots can be traced back to early Chinese recipes that used pulled poultry, from as far back as the Han Dynasty, dating back to around 200 BCE, when cold chicken was mixed with oils, vinegar and spices. Then in 19th century Europe, particularly in France, cold chicken was tossed together with mustard sauces, vinaigrettes and eggs and became very popular. At the same time in the American South, chicken was being mixed with a mayonnaise base with other ingredients tossed in too.
I love chicken salad. It is a perfect ingredient to take along on a picnic, either as is or in a sandwich. I have made and eaten it many different ways too. One of my favorite ways to make it curried, since I love anything curried.
Yesterday, I went to a celebration of life and I brought some curried chicken salad croissants to share with everyone. The event was a casual event. We had no idea who or how many people were going to attend. Many people brought things to share and we had a lot of food. There ended up being between 150-200 people in attendance, all there to pay their respects to the founder of our jewelry classes.
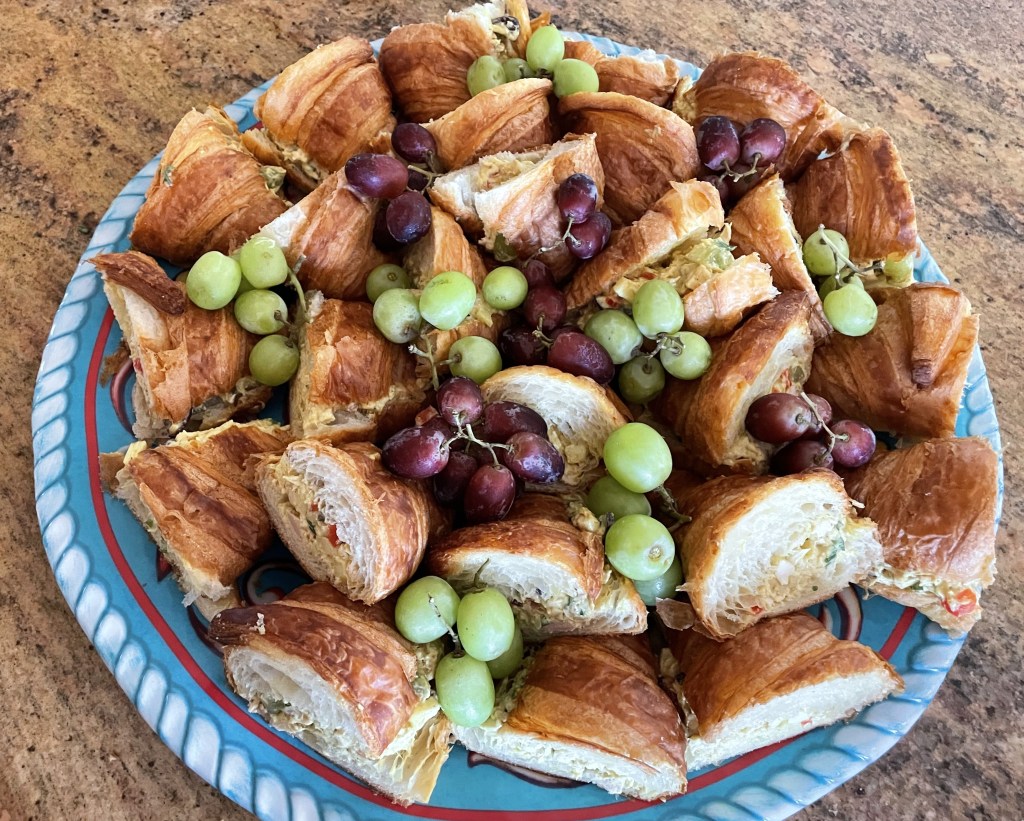
Curried Chicken Salad Croissants
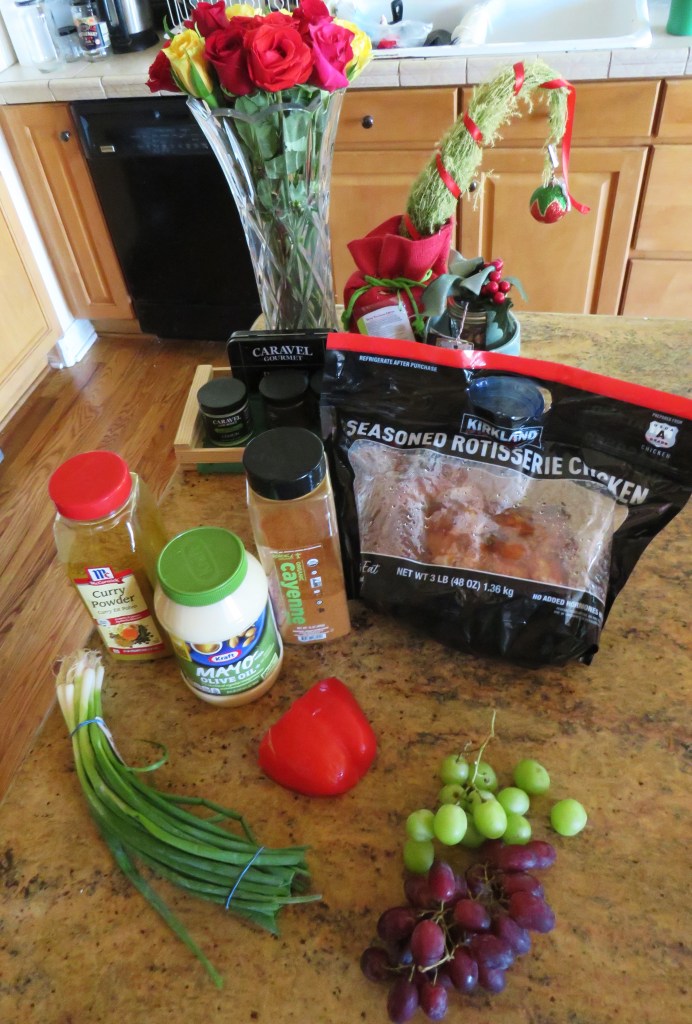
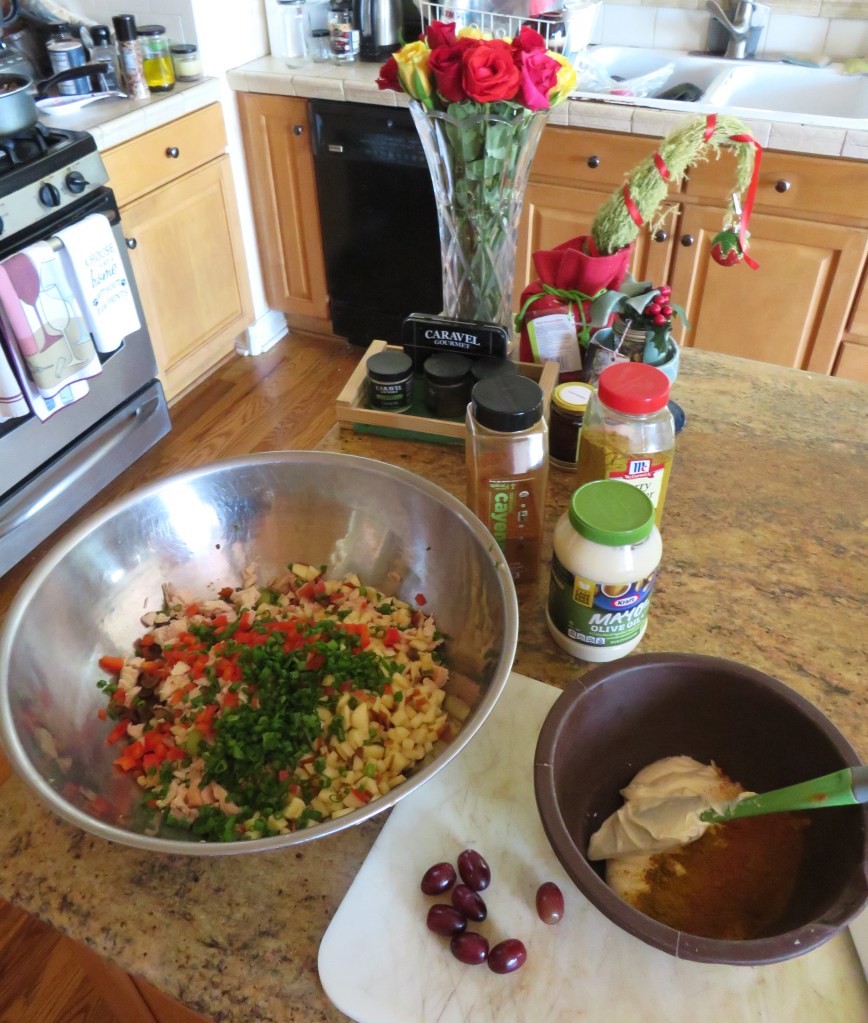
Once again, Costco helped out quite a bit. I bought some Costco croissants and used a whole Costco rotisserie chicken to make my salad. Costco rotisserie chickens are the best!!!!! I knew I was making it for the masses, so I made a large amount. But I will cut down the proportions for a normal amount here. 🙂
2 cups shredded cooked or rotisserie chicken
1 cup, or more as needed, mayonnaise or Miracle Whip – I use both, but this time I used mayonnaise. It is more universally enjoyed than Miracle Whip.
1 -2 TBSP curry powder
1/2-1 tsp cayenne pepper, or to taste
1/4 red bell pepper, diced fine
1/4 cup green onions, sliced very thin
1/2 apple, diced fine
1/2 cup grapes, quartered
1/4 cup toasted pecans or walnuts, diced, optional – I did not use any nuts this time since I was making it for a large crowd and I didn’t know if anyone had nut allergies. Normally I do add nuts though.
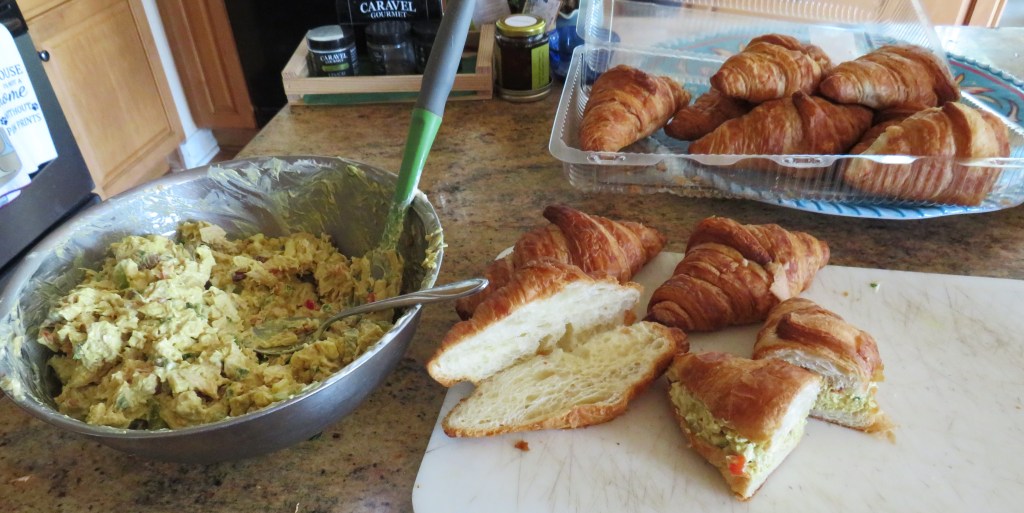
Mix everything together well and chill until ready to use. I made my salad the day before and made my sandwiches right before leaving so the croissants would not get soggy or mushy.
When I was ready to make the sandwiches, I sliced the croissants almost in half then filled them with chicken salad. Then I sliced each one in half again.
They were a big hit. They were light and airy and full of flavor.
Things don’t have to be fancy or difficult in order to be tasty. As I have said many times, simple is often best.
Life is short and precious. We never know how long we have, so make the most out of everyday and live life to the fullest and enjoy the ride. Have a great day and make everyday great. ‘Til next time.
Fast food has become a world wide thing, found in every culture, on every street corner, all over the world. Every culture has their own particular version of “fast food” too. The fast food industry was created as a commercial strategy to accommodate large numbers of busy commuters, travelers and wage workers. It has grown into a multi Billion $$$$$ industry. Chains spread across the globe in the 1970’s and 1980’s, becoming symbols of American culture.
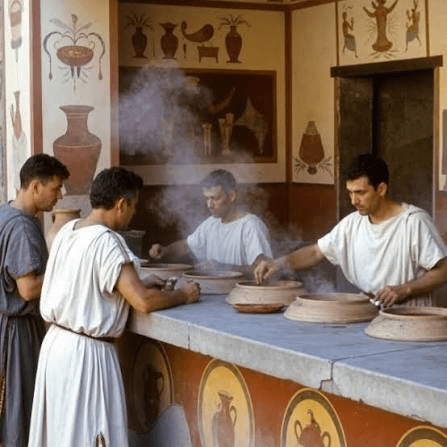
When we think of “fast foods” we think of big chains like McDonald’s, Burger King, KFC, and many others before heading off to the day’s adventures. Rightly so too, but people have always been on the move and have always grabbed a quick bite to eat to take with them. The original fast foods started back in the times of the Ancient Romans, more than 2000 years ago. Many people in these days did not have kitchens, or were always traveling by foot, and would stop at little public counters called thermopoleums for hot food and wine. Perfectly preserved food kiosks have been unearthed from the ash of ancient Pompeii, complete with signage indicating a menu that included duck, goat, and snails. Similar fast food stands were also found in Ancient China, during the Han Dynasty.
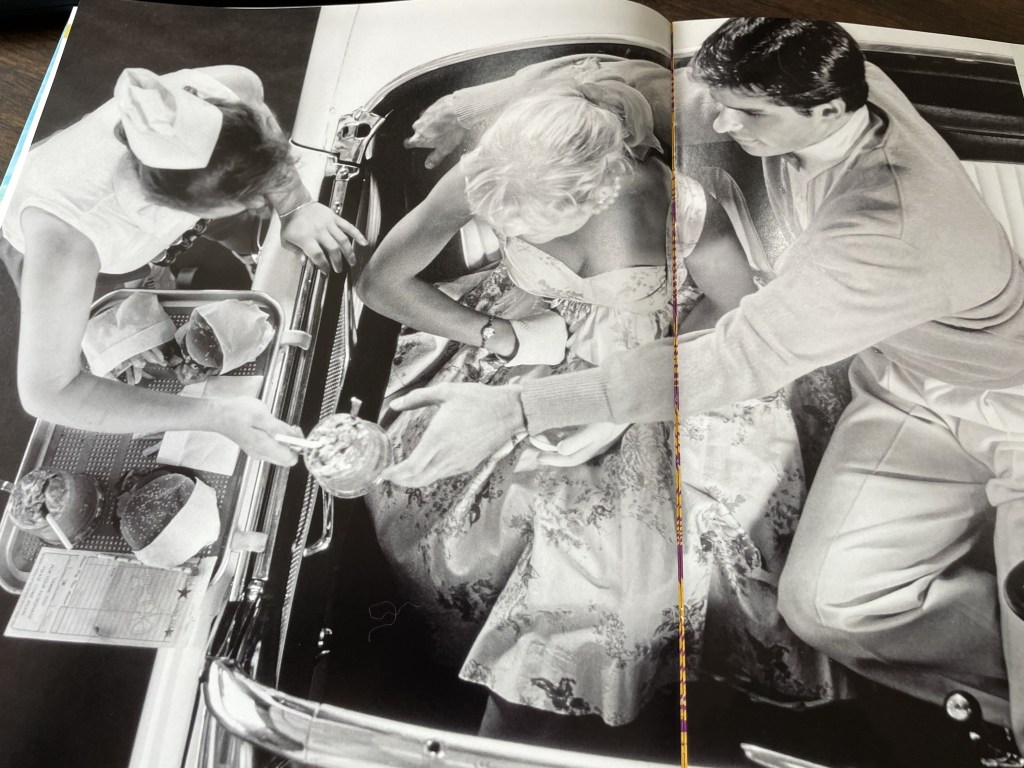
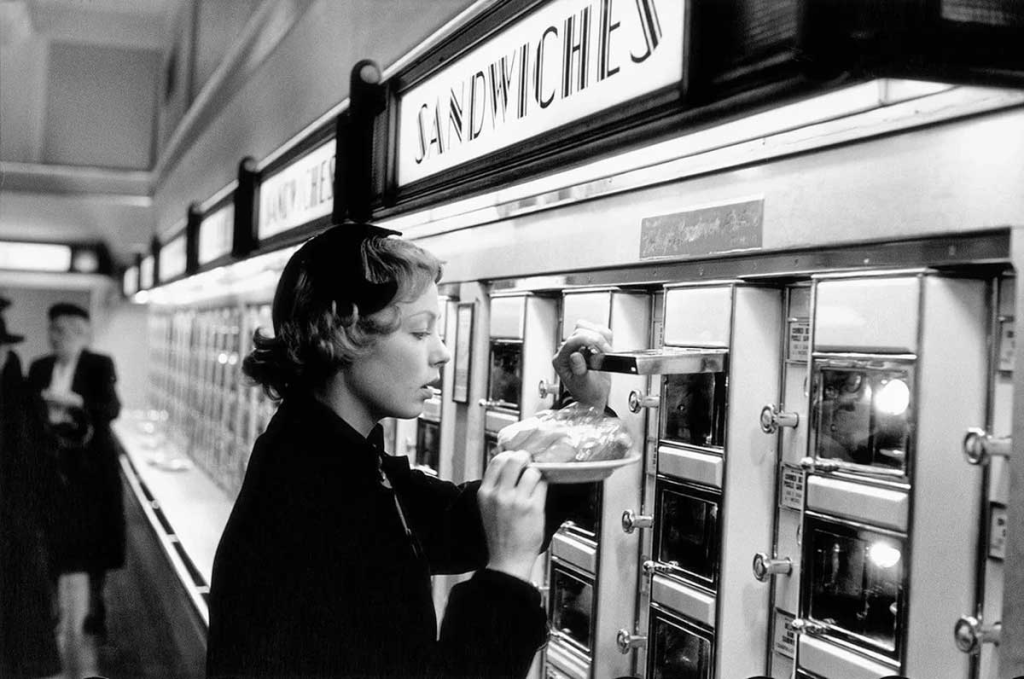
Americans certainly did not create the idea of fast foods, or foods to go, but we definitely made them better and turned them into what they have evolved into today. Automats were the beginning of fast food restaurants. America is the birthplace the modern franchised fast-food industry. They started in the United States in 1902. They were coin-operated glass slots that let people grab hot ready-cooked food instantly. Joseph Horn and James Hardart opened an automat in New York City, marking the beginning of fast food in the United States.
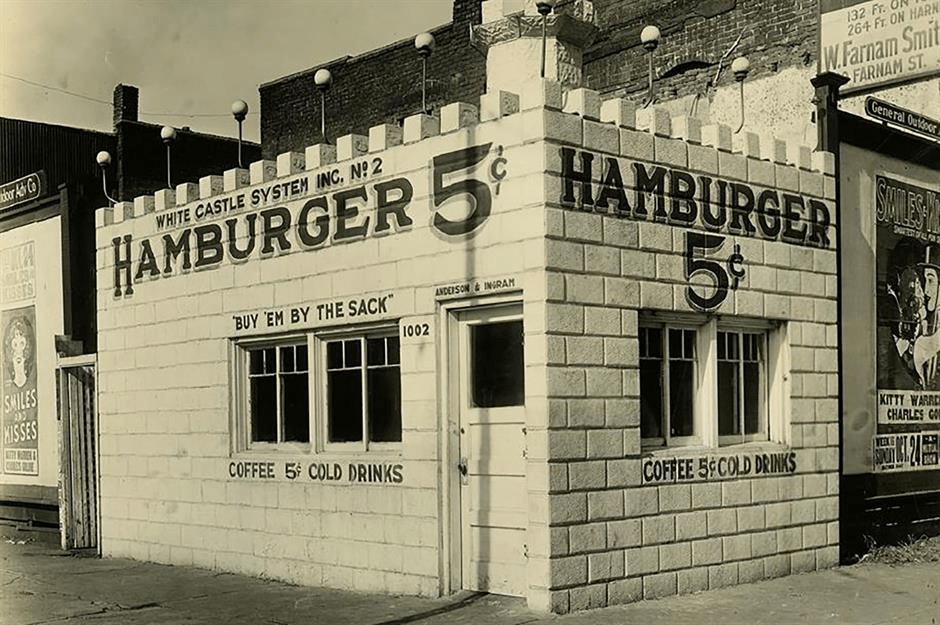
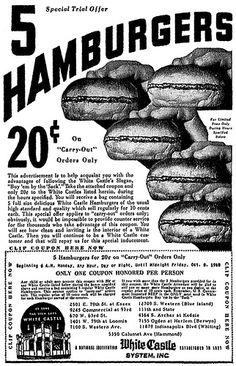
The first modern fast food chain was the White Castle Burger chain, that started in Wichita, KS in 1916. They came up with the idea of a restaurant where customers could see their burgers being cooked in front of their eyes to prove their care and attention to cleanliness (this was also reflected in the restaurant’s white walls). Fresh hot burgers sold for 5 cents a piece back then.
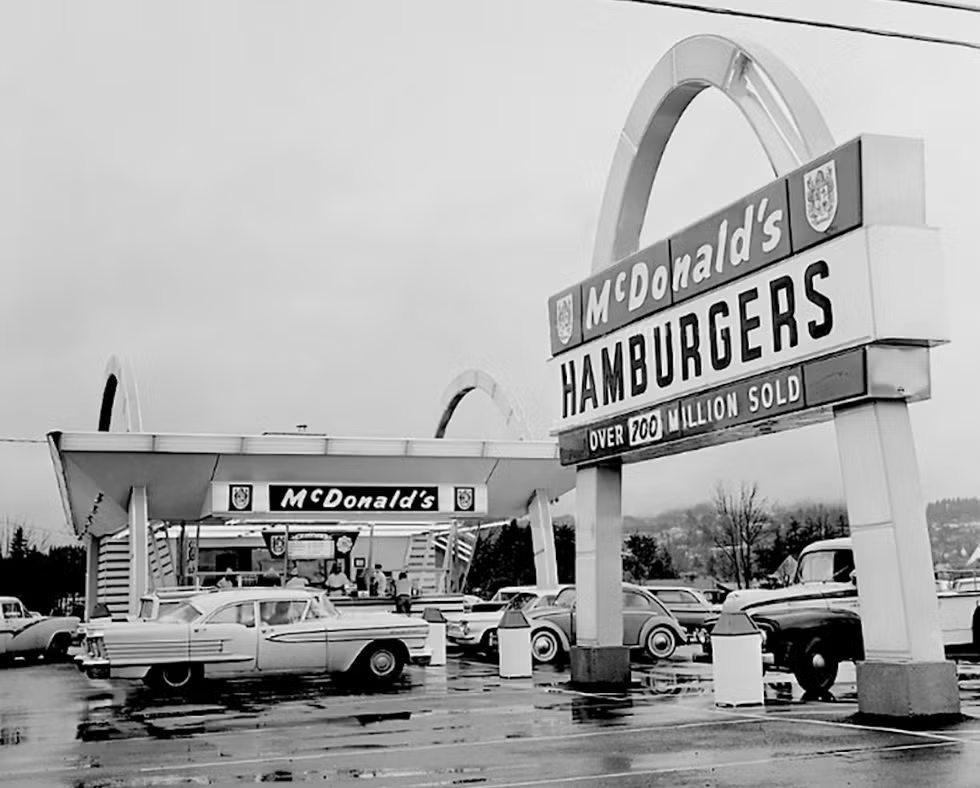
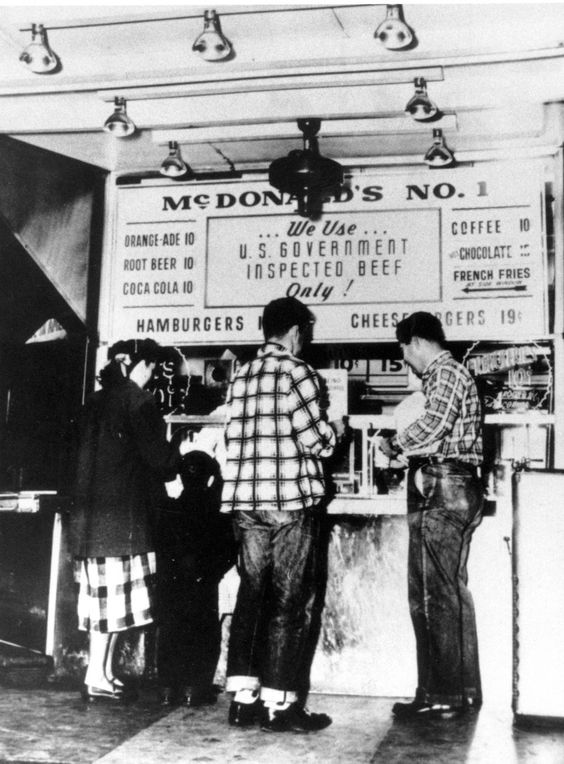
The White Castle burger stands were the hottest thing around until their rivals came and took over in the 1940’s. White Castle was the king of the cheap, fast burgers until the McDonald Brothers, Richard and Maurice, came on the scene. They were based in San Bernadino, CA and started off selling burgers and BBQ as a drive thru service. The McDonald Brothers were the first to introduce the “Speedee Service System,” using kitchen assembly lines for fast food. They operated from 1940-1948 until they were bought out by Ray Kroc, who convinced the brothers to franchise in 1955, eventually buying the McDonalds out and turning the restaurant into the world’s most valuable franchise – with 36,525 restaurants worldwide and counting. The menu was streamlined and was whittled down to burgers, cheeseburgers, fries, soft drinks, coffee, milk and milkshakes back in 1948.
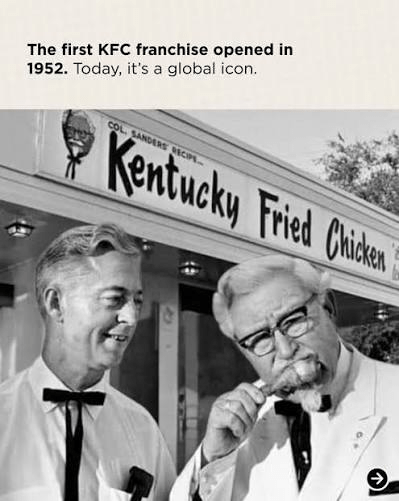
After the explosion of the fast, cheap burgers, many other fast food places started popping up all over the place too. One of the next big fast food industries to take over the world was Kentucky Fried Chicken, now known as KFC. KFC was actually started in the 1930’s, by Colonel Harlan Sanders. He operated out of a converted gas station from the 1930’s until 1952, when after many years of refining his recipe for good, Southern fried chicken, he opened his first restaurant in Lexington, KY.
And the rest is history from this point forward. The fast food industry as we now know it was born. There was no turning back. Today, you can find just about any type of “fast food” anywhere you go, anytime you want it. We’ve certainly come a long, long way from the humble beginnings of the thermopoleums in Ancient Roman days.
Life is short and we are always on the move. Live life to the fullest and make the most out of everyday. Enjoy the ride, and grab something to eat along the way. Have a great day and make everyday great. ‘Til next time.
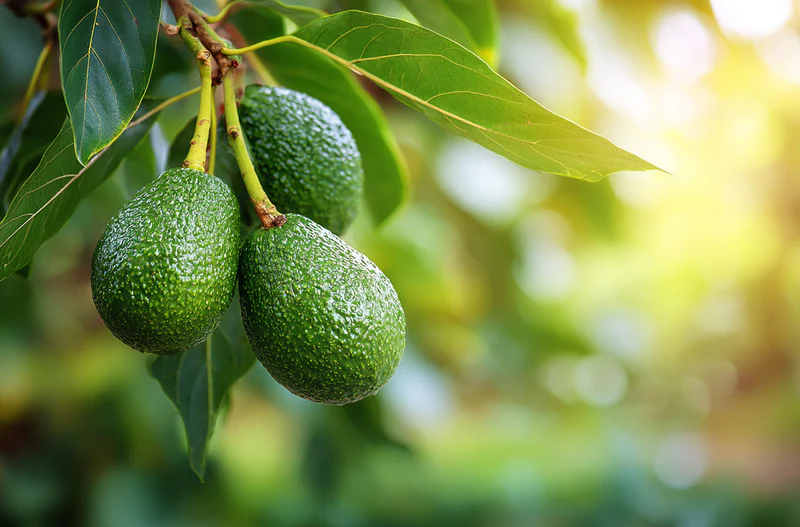
Avocados are a staple in any Latin American diet. They have been part of the diet in Mexico and Central America for more than 10,000 years. The name avocado is derived from the ancient Aztec word ahuacatl, which means testicle. It got this name because it is said that avocados are shaped like a man’s testicle. Avocados were first enjoyed as wild fruits but were domesticated and cultivated about 5000 years ago. Because of their shape and name, avocados were associated with fertility. They were also thought of as an aphrodisiac and were used in many different ancient ceremonial rituals. The avocado was extremely important among the indigenous people of ancient Mesoamerica, as the fruit provided sustenance and possessed mythological powers. For instance, the Aztecs believed the fruit provided strength to whomever consumed it, and in ancient Maya, the fourteenth month of their calendar (K’ank’in) is represented by the glyph for the avocado.
The popularity of the avocado grew as the world grew. When the Spanish explorers came to the new world, they brought this delicious fruit to back to Europe, where it’s popularity grew exponentially. It was known by many different names, such as the avocado pear or the alligator pear. It got the name alligator pear because of its skin, which was thought of as alligator-like. In India, avocados are called butter fruit because of their rich, buttery consistency and flavor.
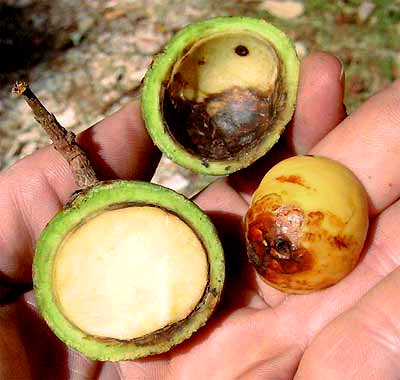
Avocados are fruits, not vegetables. They are known as large berries because the seed is on the inside of the fruit. It grows from a flower’s ovary and holds a pit. However, people treat it like a vegetable in the kitchen because it has a savory taste. Avocados are considered to be soft endocarps because the innermost layer of the fruit wall that directly surrounds the seed. In a true berry, this layer is fleshy and soft. In a drupe (like a peach or a plum), this layer hardens into a woody “stone” or “pit”. Because the avocado’s skin around its seed is thin and leathery rather than hardened, it is a berry. So when eating an avocado, you are actually eating a piece of fruit rather eating a vegetable. It’s all so confusing.
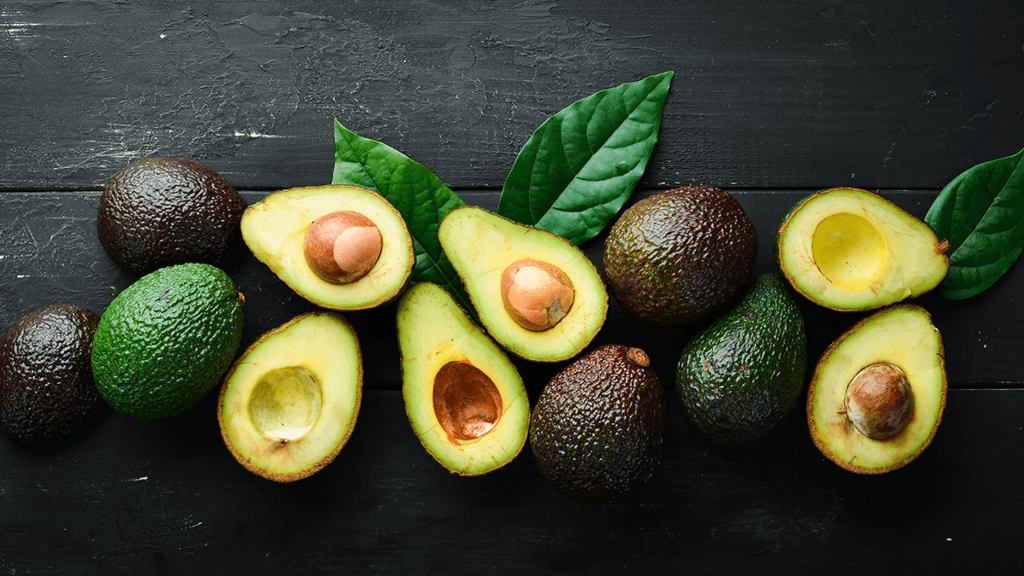
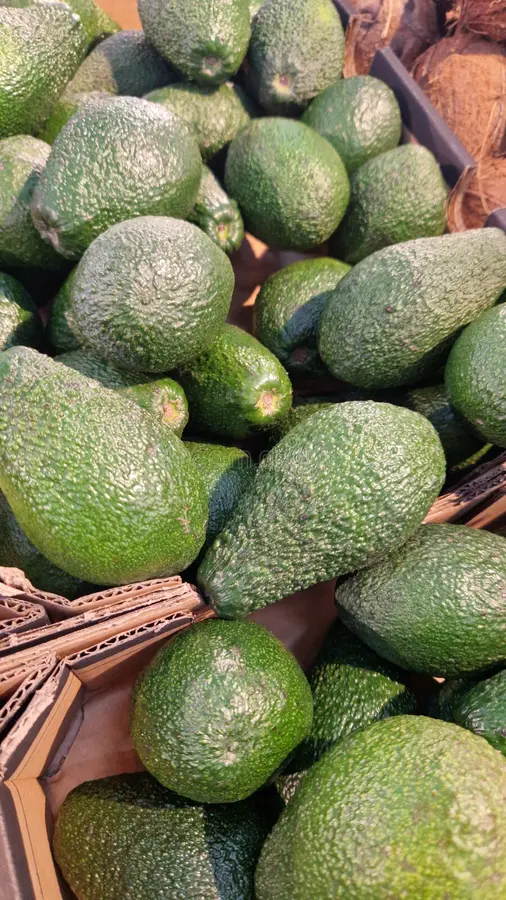
There are 23 different varieties of avocados enjoyed all over the world. Each type has its own unique traits and characteristics. I won’t go through all 23 types of avocados here, but just know there are quite a few different types available.
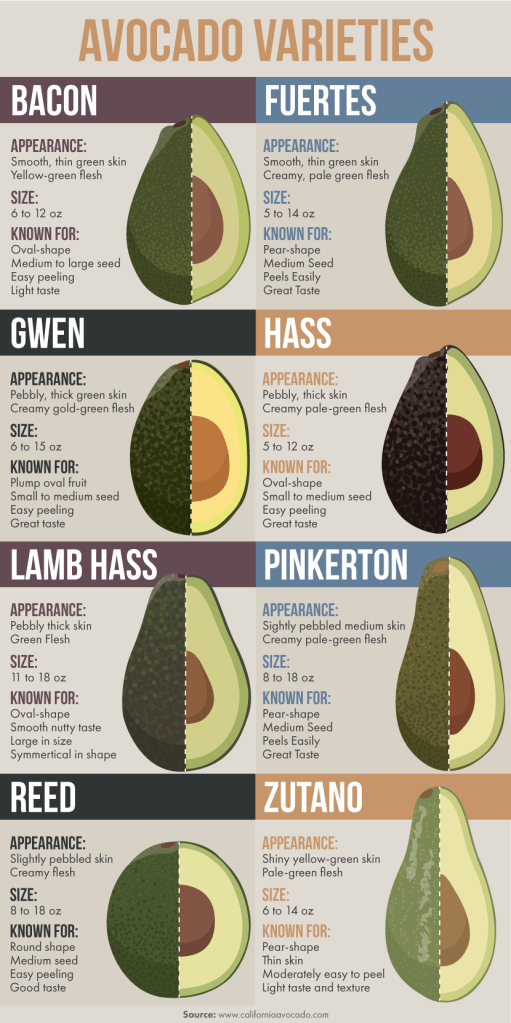
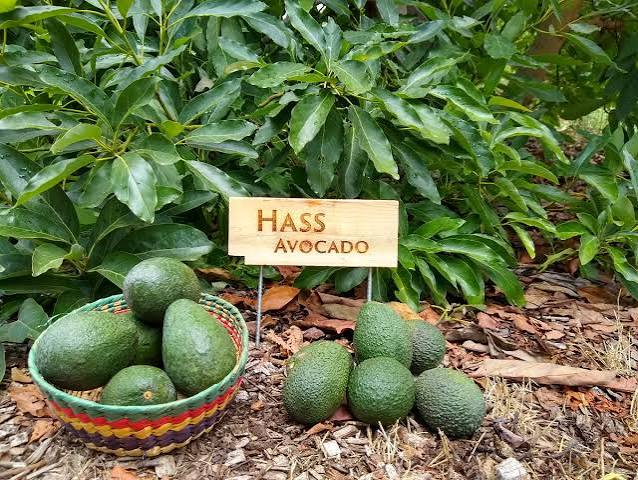
In the United States, and for most of the rest of the world, the Hass avocado is one of, if not the most popular, variety of avocados found. It has a distinctive pebbly skin that changes from green to purplish-black as it ripens. The flesh is creamy, smooth, and rich in flavor, making it a favorite for guacamole, salads, and stuffed avocados.
The Hass originated in California in the early 20th century, with a tree planted by Rudolph Hass being the first of its kind. Today, it’s grown not only in California but also in most other avocado-growing nations. It makes up 90% of Mexico’s huge production and is also Columbia’s most-grown avocado. It’s hands down the most widely cultivated avocado variety globally. Hass avocados are available year-round because they are grown in multiple regions, but they typically have a peak season in California from late winter to early summer.
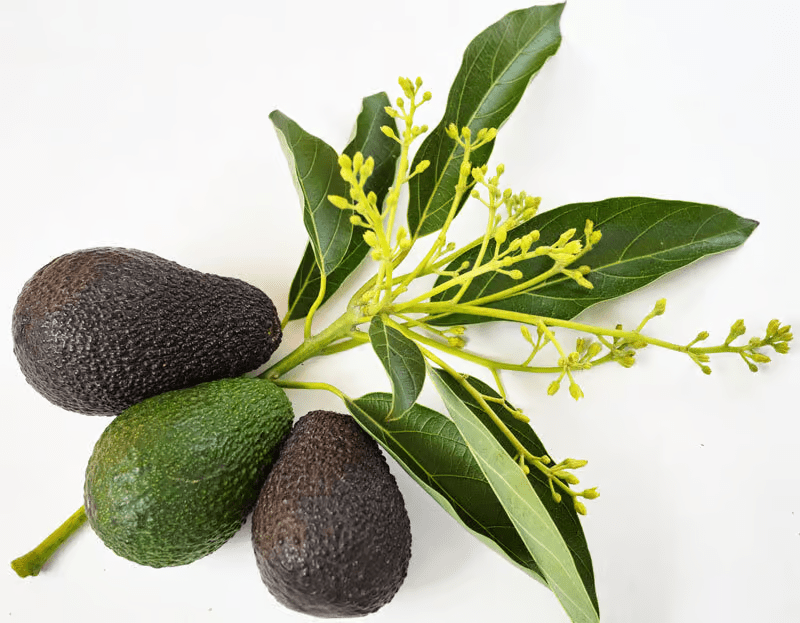
Type A and Type B avocados refer to the two flowering groups of avocado trees, which are important for the pollination and production of avocados. Avocado trees are unique in that they have a reproductive system that depends on cross-pollination between different varieties within the two types. Type A Avocados are also called the Mexican, open as female flowers in the morning and then close in the afternoon. On the following day, they open as male flowers, releasing pollen. Type A avocados tend to have thicker skins and higher oil content than Type B. The Haas, Bacon and Zutano are common Type A varieties. Type B avocados are also known as the Guatemalan. Common Type B avocado varieties include Fuerte, Pinkerton, and Puebla.
To ensure successful pollination and a good avocado crop, Type A and Type B avocado trees are often planted in close proximity so that they can cross-pollinate. For example, if you have a Type A avocado tree, planting a Type B avocado tree nearby will enhance pollination and result in better fruit production. This interdependence between Type A and Type B avocado trees is necessary because avocado flowers are self-incompatible, meaning they cannot typically pollinate themselves. The side effect of planting Type A and Type B trees together is that over time many natural avocado hybrids occurred.
Avocados are very nutritious, but because of their high fat content, are not necessarily low in calories. They are a good source of fiber and healthy fats. They are good sources of the foillowing:
2 grams protein
15 grams fat
9 grams carbs
7 grams fiber
11% RDA Vitamin C
14% RDA Vitamin E
20% RDA Folate
14% RDA Potassium
3% RDA Iron
1% RDA Calcium
Avocados are very versatile foods. You can use them in all kinds of delicious recipes. Most of the time, they are eaten cold or mashed or used as spreads or dips. But did you know they can also be cooked too? The possibilities are endless. Just use your imagination and be creative to see what you can come up with.
I love avocados and could eat them every day, but Larry does not care for them so I don’t buy them as often as I would like. I remember growing up in California, people would beg you to take them by the bag full because they were so abundant and would just fall from their trees. Today, they are getting to be pretty pricy, I guess, in part because of their popularity.
Life is short. Make the most out of everyday and live life to the fullest. Have a great day and make everyday great. ‘Til next time.
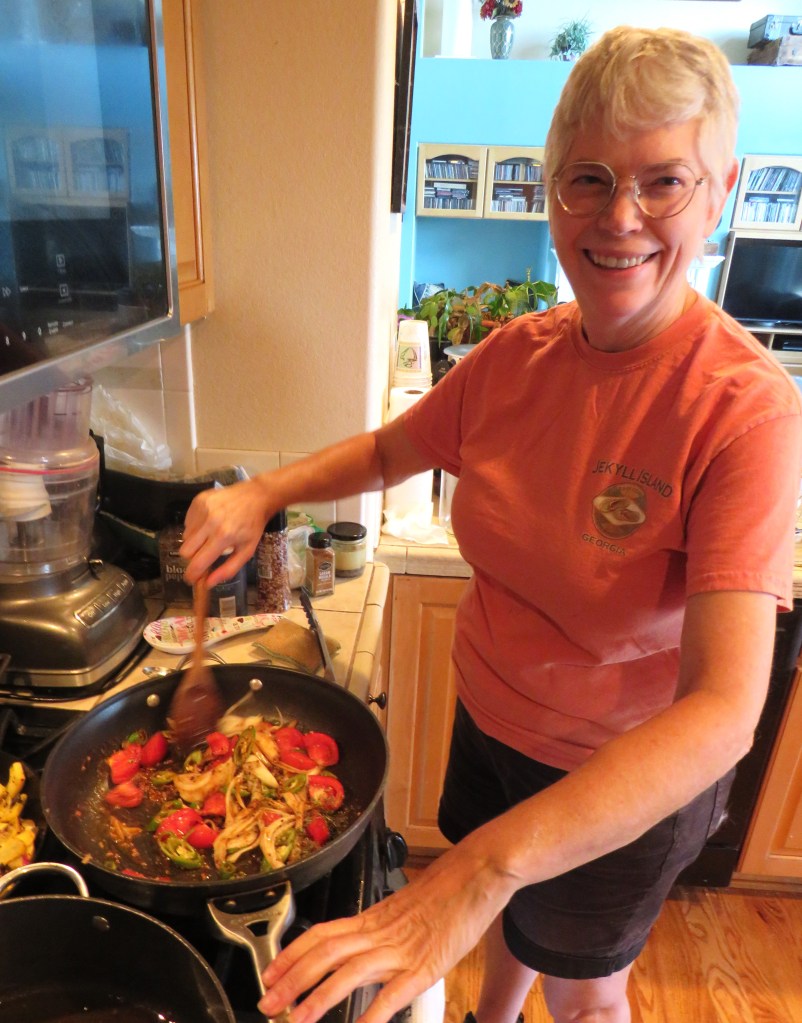
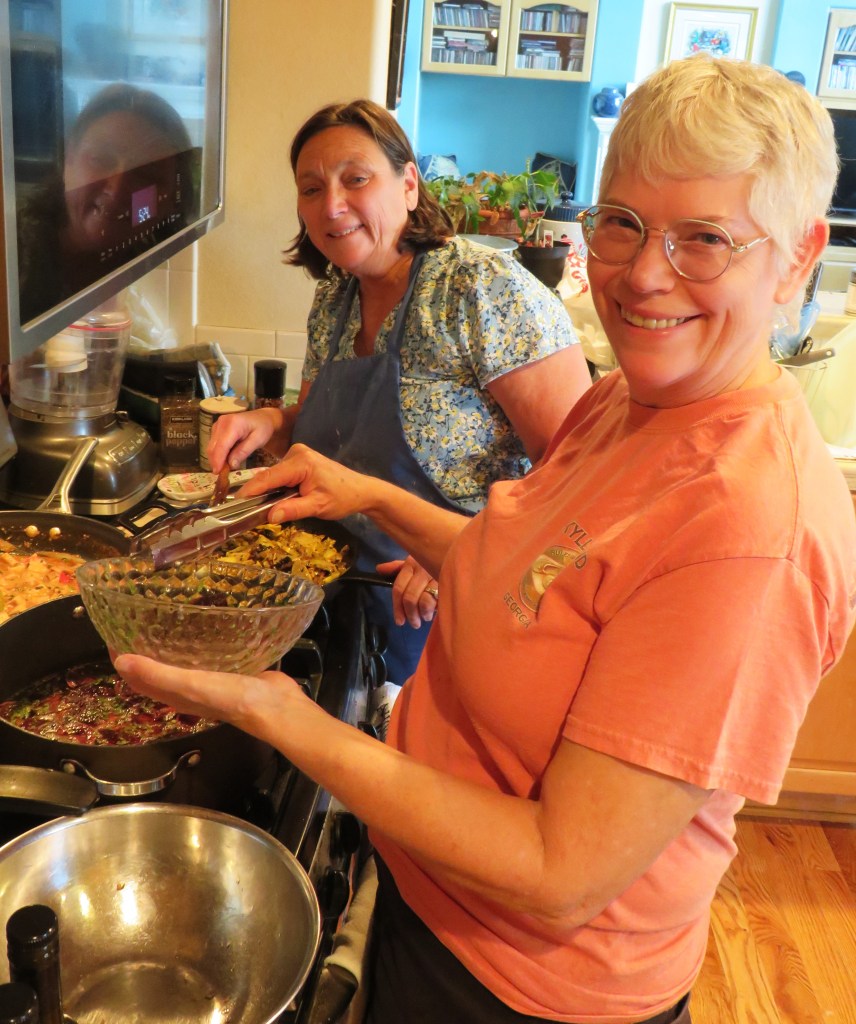
Julia and I got to cook together one more time before they headed out, homeward bound, back to Blackberry Homestead. We weren’t really sure what we were going to make and just made it up as we went along. But we had a lot of fun and the results were delicious.
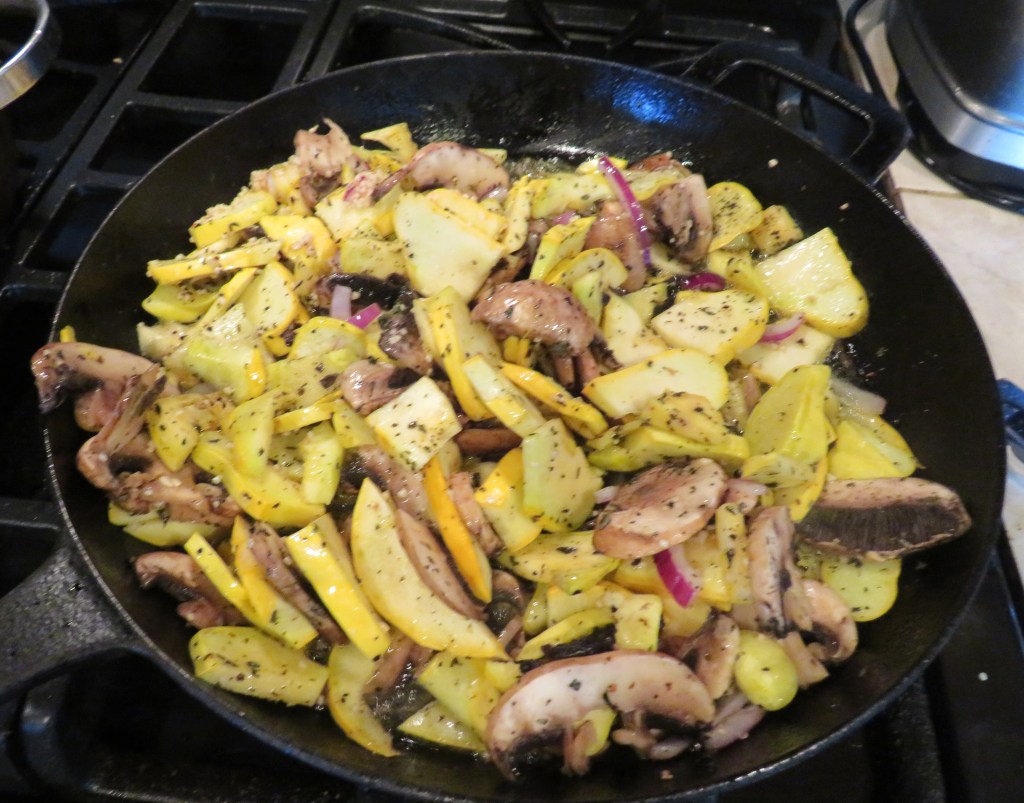
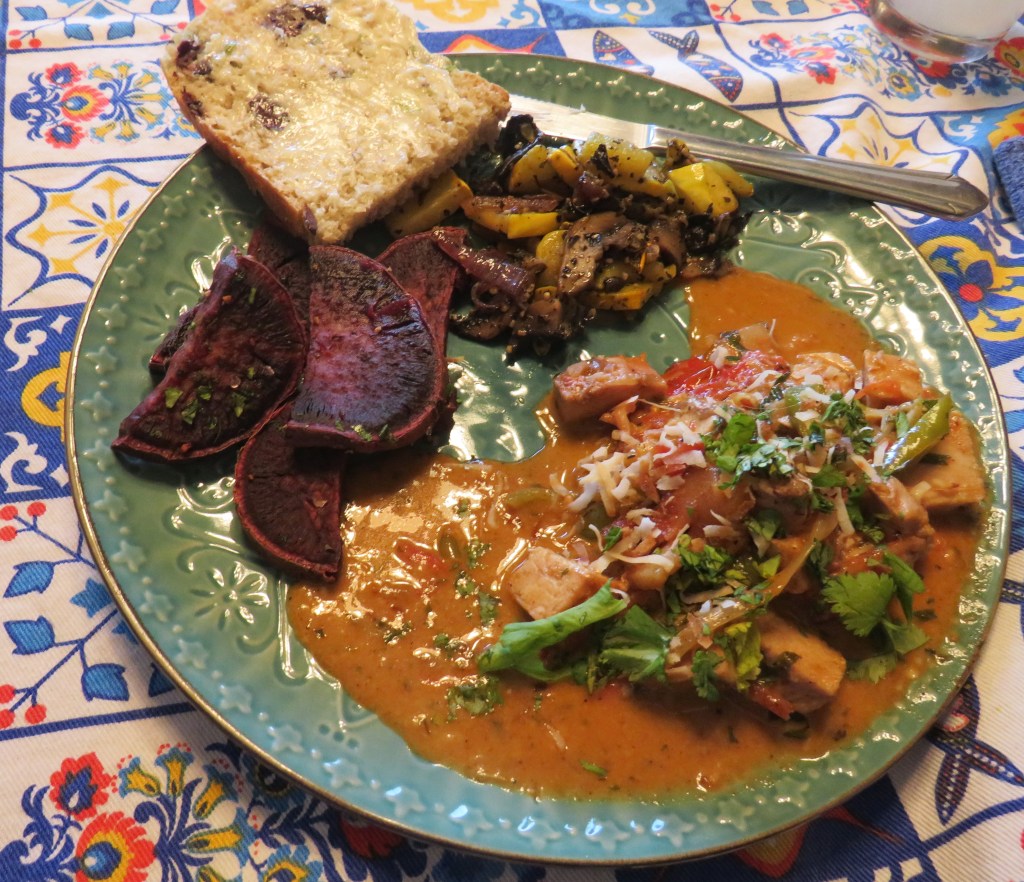
The goal was to use up more of the fresh vegetables from Julia and Bruce’s garden, and that we did. Part of the big vegetable box included some bright yellow/orange patty pan squash. We mixed them with garlic, red onions, mushrooms and fresh herbs, also from Julia’s garden, and sauteed everything together. Delicious!!!!!
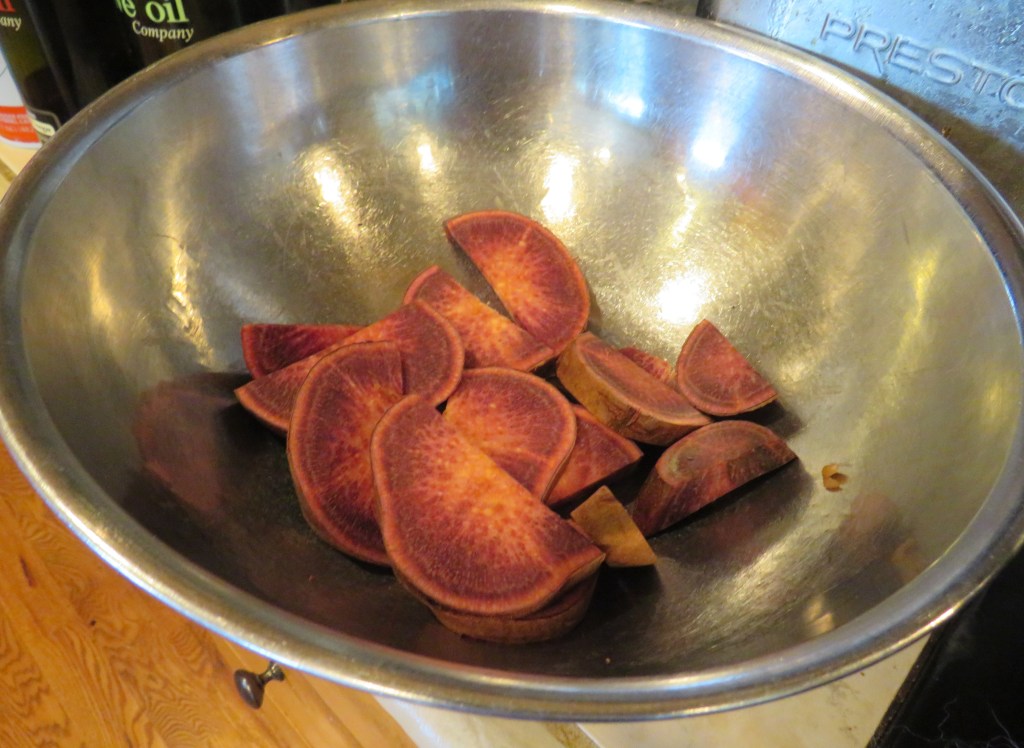
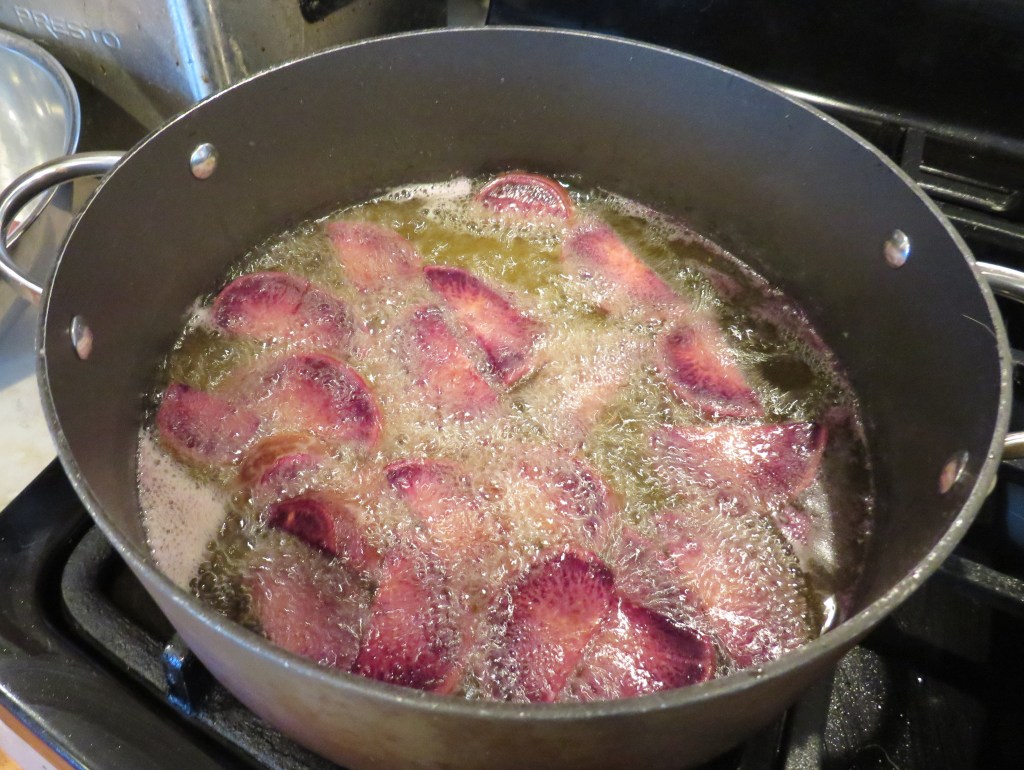
Julia also brought a bunch of HUGE purple sweet potatoes. So we sliced them into thick rounds, keeping the skin on them, and deep fried them. Once they were cooked we seasoned them with butter, salt & fresh ground black pepper and some honey ginger vinegar. They came out really good.
For our meat, we used our leftover pork Smokin’ Meats Again. We diced it up and turned it into a red curry. We used the last of the tomatoes Julia brought, along with some of her peppers, and some onions, garlic, ginger, coconut milk and various Indian and/or Thai spices. As I said, I couldn’t tell you exactly what we used because we were literally making things up as we went along. It’s fun cooking with someone who likes to cook like I do; someone else who says “NO RULES APPLY”. 🙂
For not really having any kind of plan at all, everything came out great. We served our olive bread on the side too. Our meal was definitely a hodge podge of this and that, but it all came together beautifully.
We had a great time with Bruce and Julia. We had so much fun. Julia and I both said we wished we lived closer so we could play together more often. We always have so much fun together. 🙂 🙂 🙂
Life is always so much better when good friends share, and cook, good food together. Life is short. Make the most out of it and enjoy the ride. Have a great day and make everyday great. ‘Til next time.
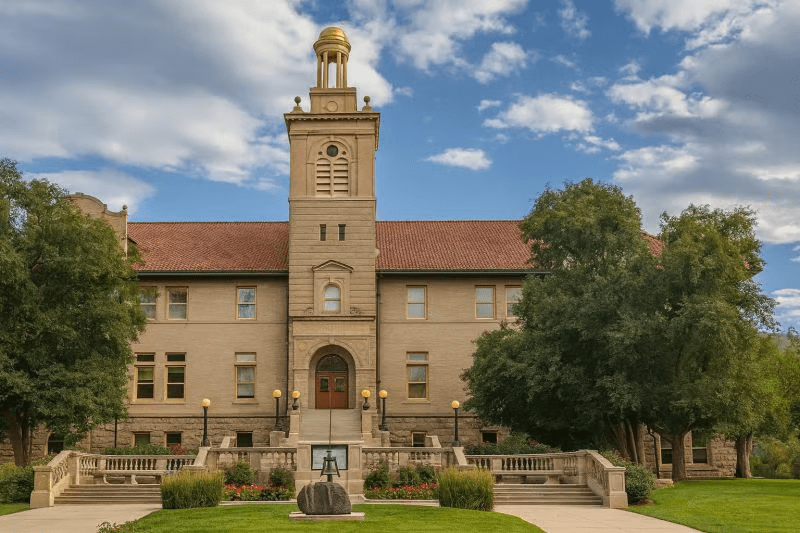
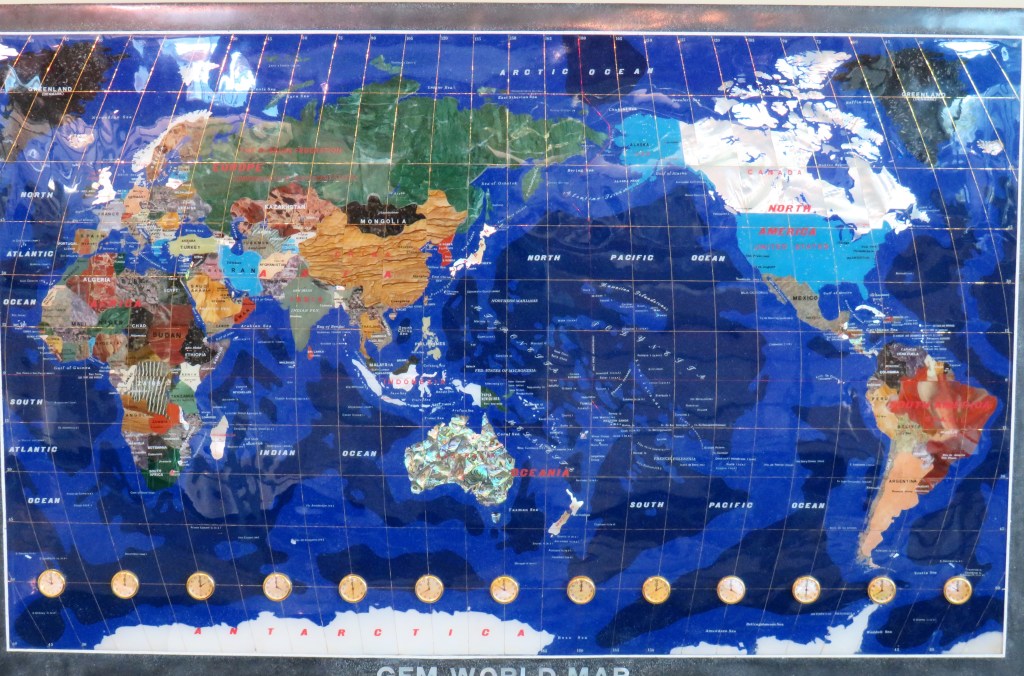
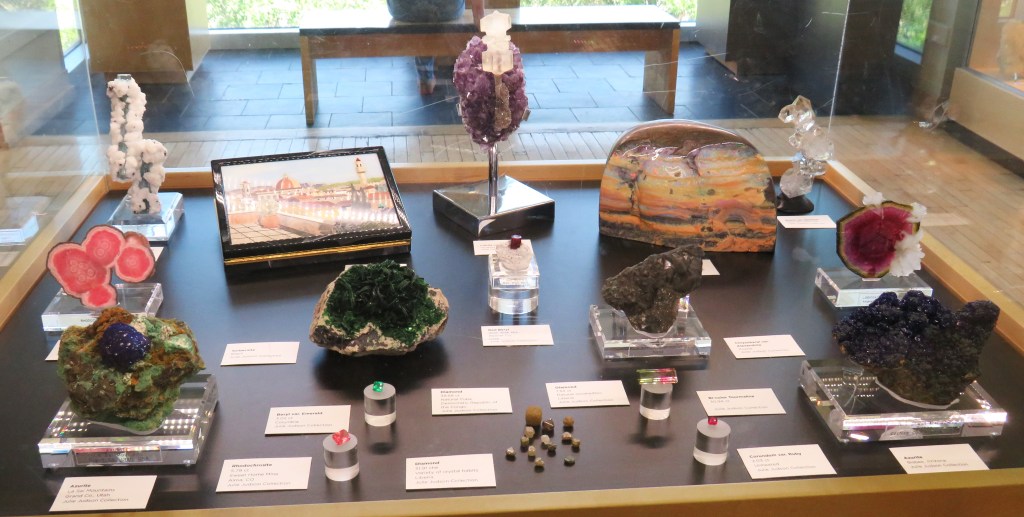
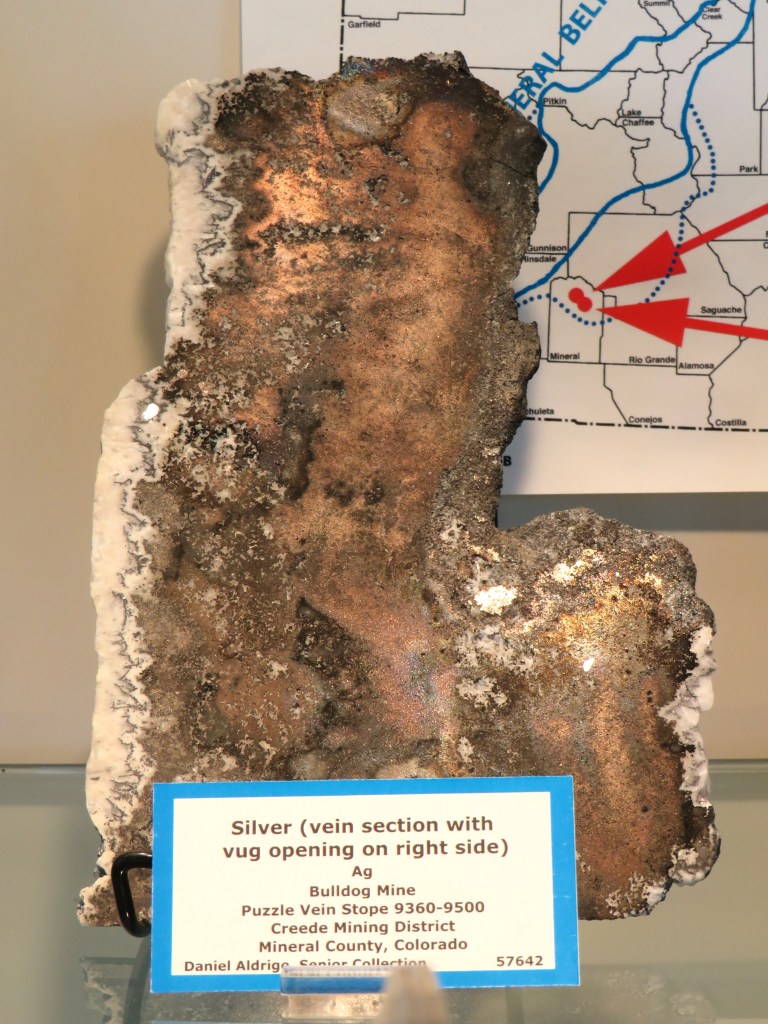
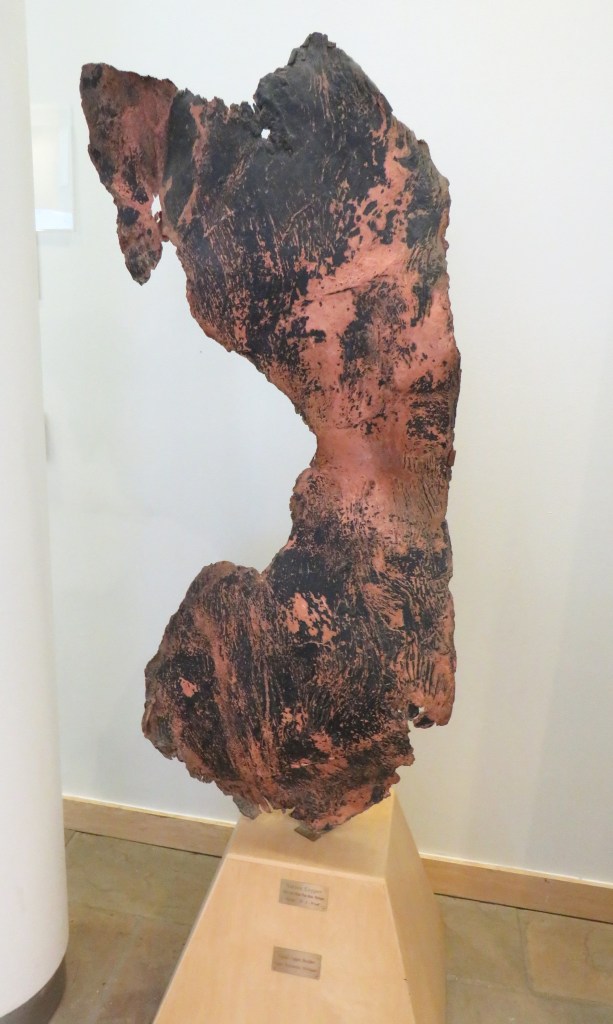
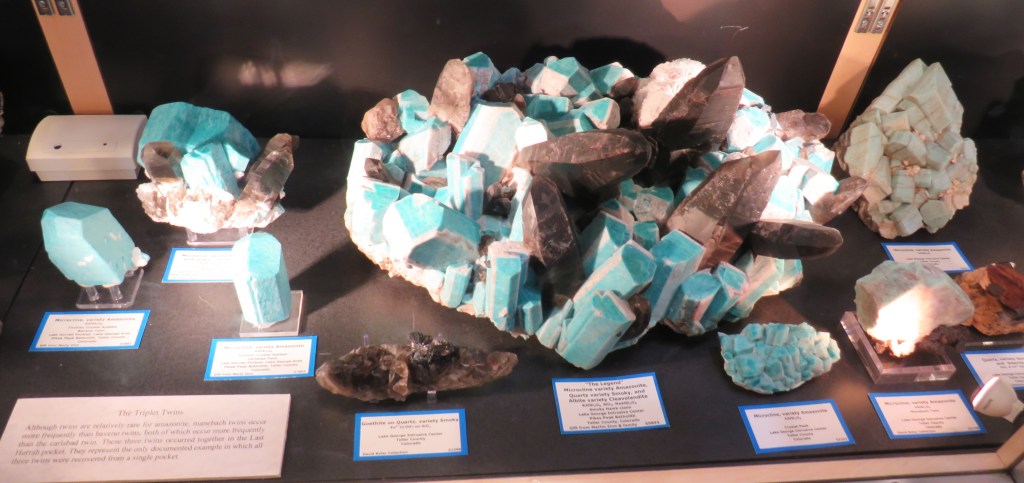
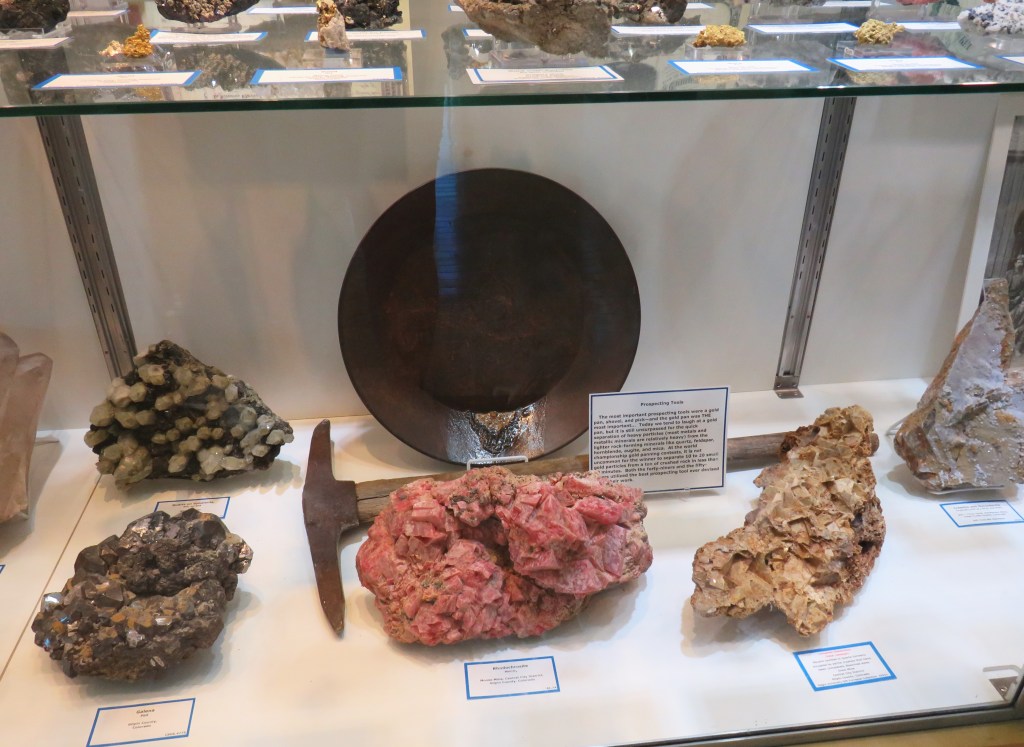
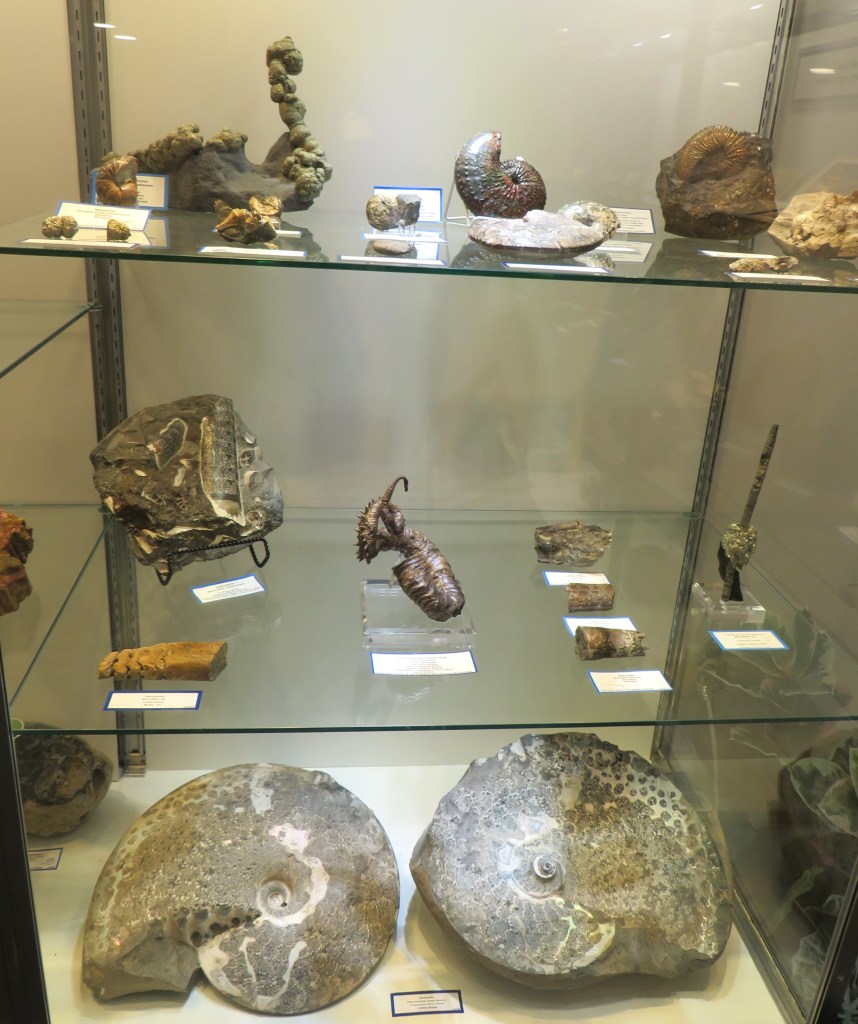
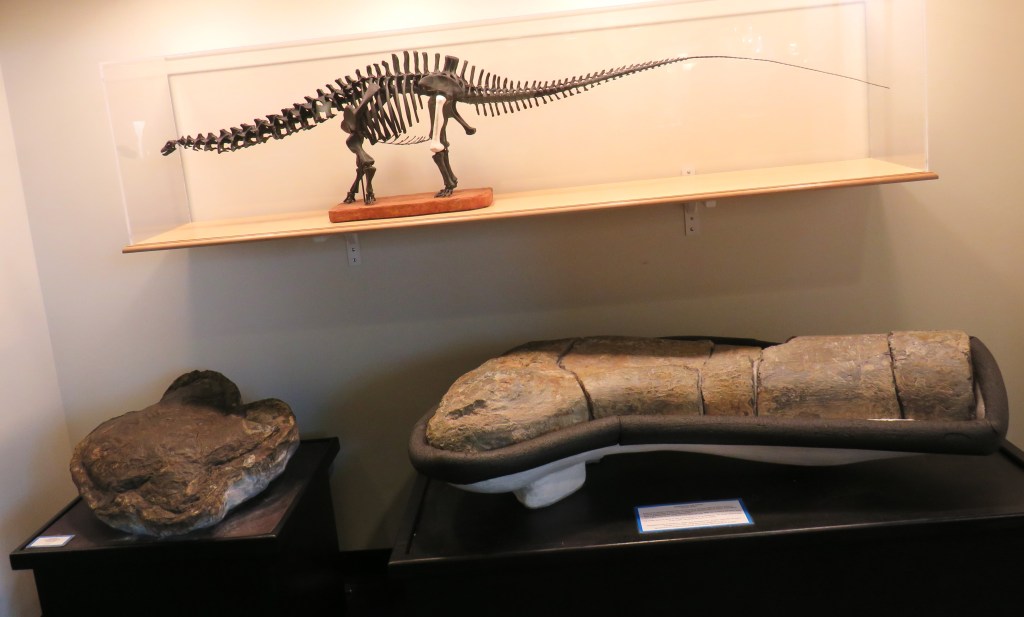
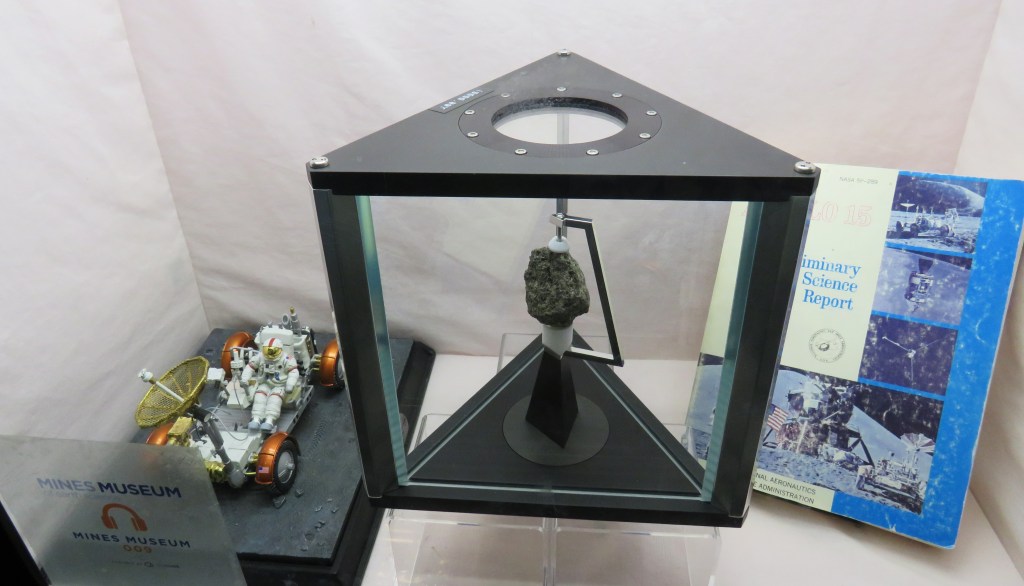
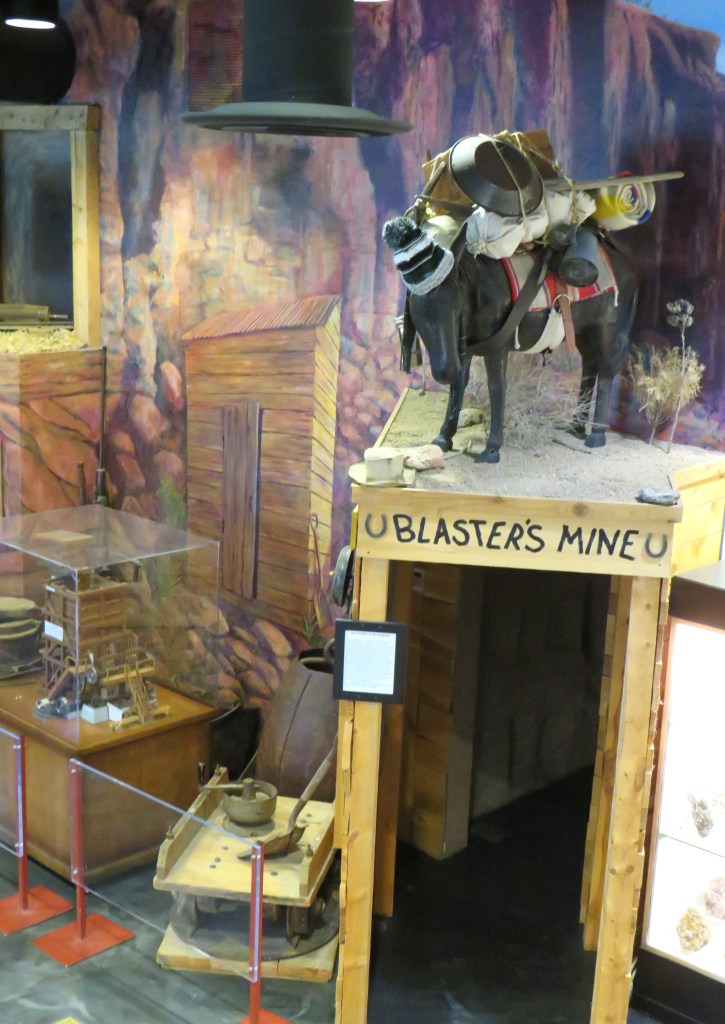
Yesterday, Bruce, Julia and I all visited the Mines Museum of Earth Science, in Golden. Once again, Julia was enabling me with my “new addiction” of silver, precious metals and gems. 🙂
The Mines Museum of Earth Science, formerly known as the Colorado School of Mines Geology Museum, is a geology museum located on the campus of the Colorado School of Mines, in Golden, Colorado. It was established in 1874 by paleontologist and Mines’ professor, Arthur Lakes. It features over 15,000 square feet of extensive collections including Colorado’s state mineral collection, Apollo 17 moon rocks, and a walk-through mine with glowing UV minerals. The museum houses over 50,000 rocks, fossils, gemstones, and meteorites. It is known for having some of the finest examples of Rhodochrosite (Colorado’s state mineral) in the world. Admission is 100% free to the public, though donations are accepted.
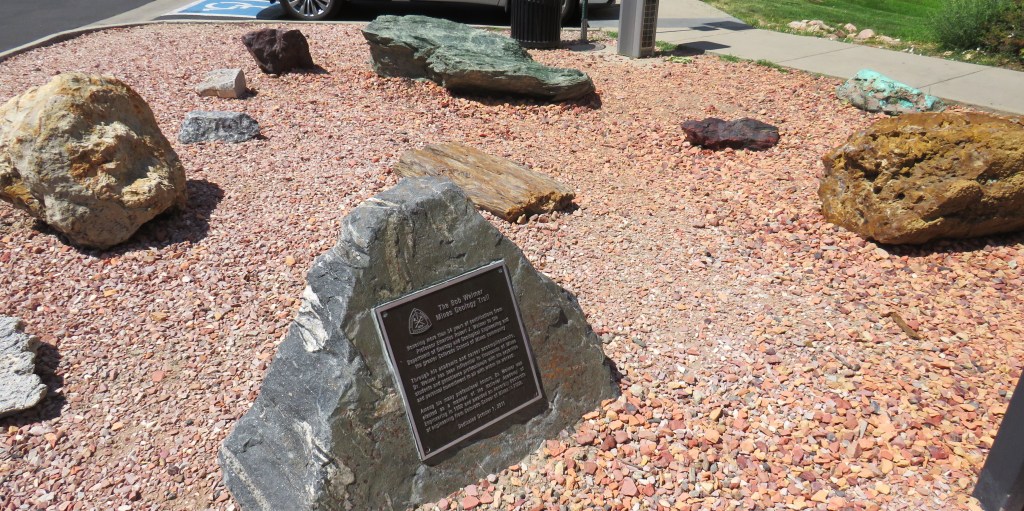
We had a good time learning about the history of mining precious metals and gemstones of both Colorado and of the world.
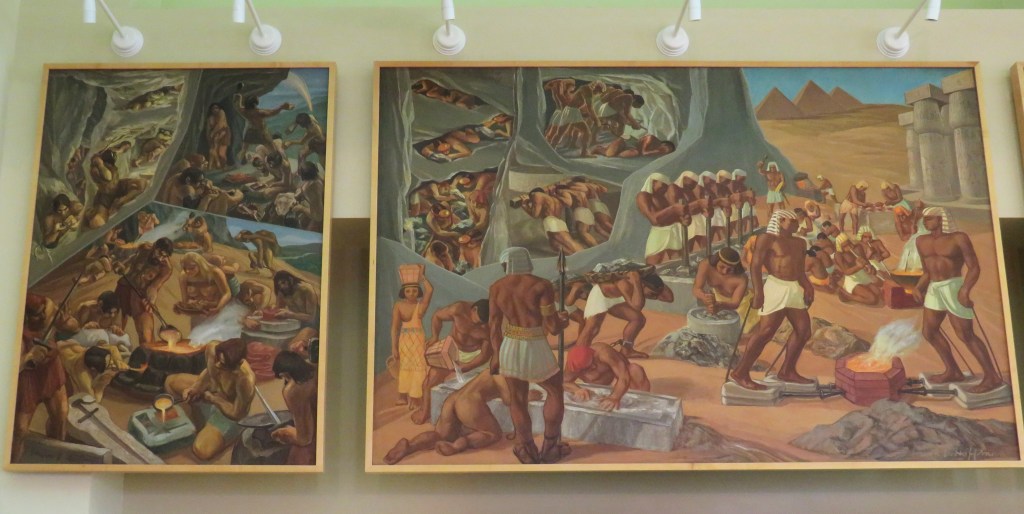
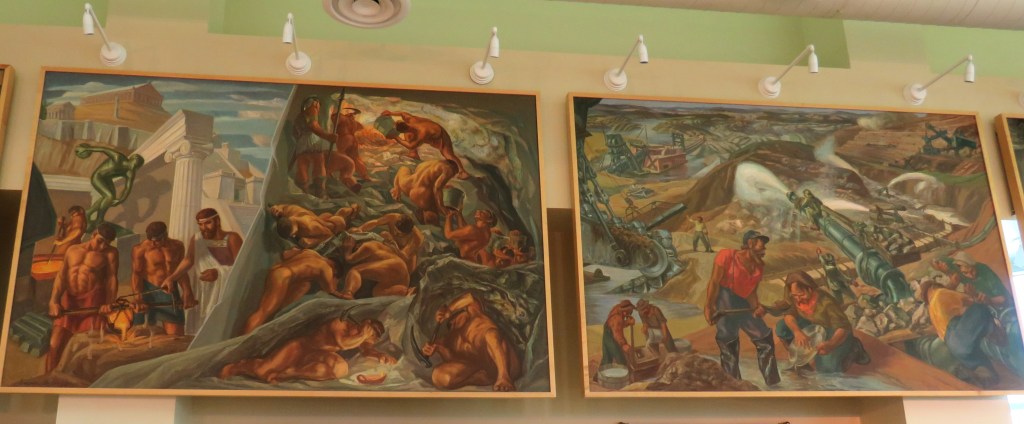
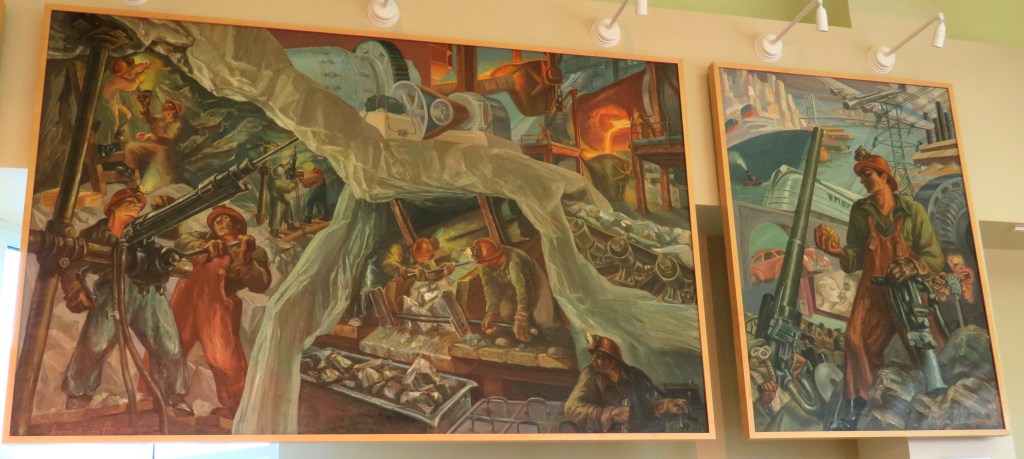
Mining is nothing new. People have practiced mining and quarrying since ancient times. The first mineral known to be mined was flint, a fine-grained variety of quartz used to make weapons. Early peoples mined other things, such as ochre, for use as pigment in art and religious ceremonies. Egyptians mined native metals, including gold, silver, and copper, from stream beds as early as 3700 to 3000 BCE. Around 2600 BCE they began to quarry stone to build the Great Pyramids. By the Middle Ages, mining was common in Europe. Georgius Agricola (Figure 9.8), a German physician, wrote the first widely read book about mining, De re metallica, published in 1556. Agricola’s work is said by some to represent the beginning of the science of mineralogy.
Mineral resources literally put places on the map of the ancient world. If a region contained abundant amounts of copper, silver, tin, or gold, and later iron, it soon became populated and prosperous. Civilizations established trade routes and developed commercial systems, shipping commodities over increasingly longer distances. If resource supplies became depleted in one location, people sought new sources. Thus, exploration was needed to sustain production and consumption of valuable resources. These same dynamics operate today: when new mineral deposits are discovered, new communities and industries may appear. When old deposits become depleted, communities and industries wane. And, always, mining companies are exploring to find new sources of economically viable minerals. Copper, tin, iron, and nickel were all important during the early ages of humans, and they are equally important today. Those same metals – and many others – are key parts of a seemingly infinite number of products.
All three of us were ooing and awing over all the pieces we saw. The gems were just magnificent.
And this is how silver looks in it’s very rawest stage.
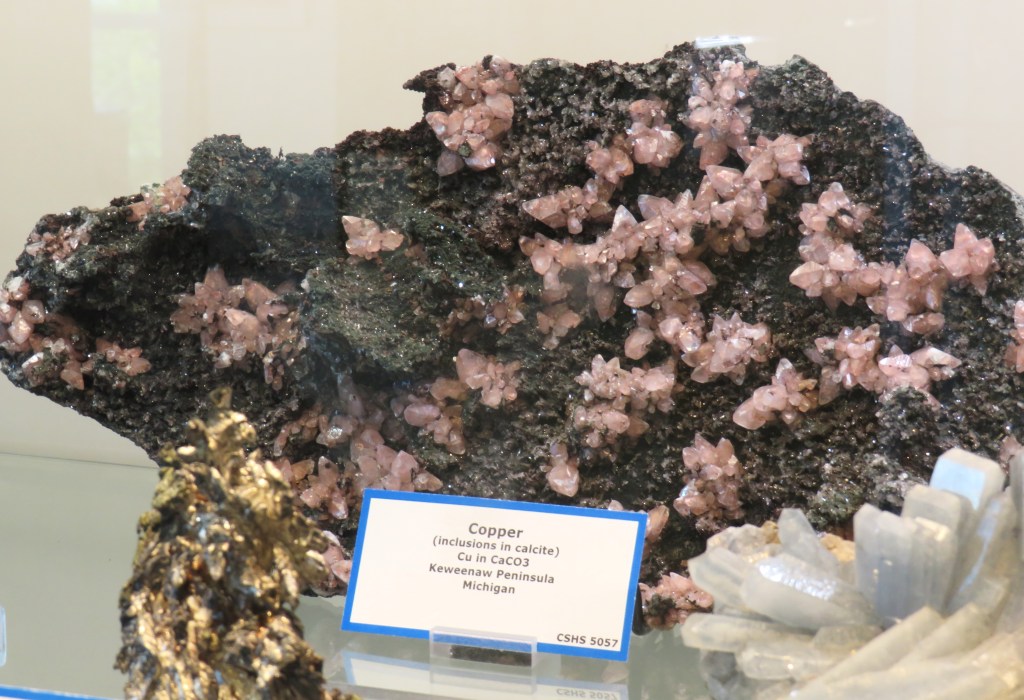
This is a large copper vein.
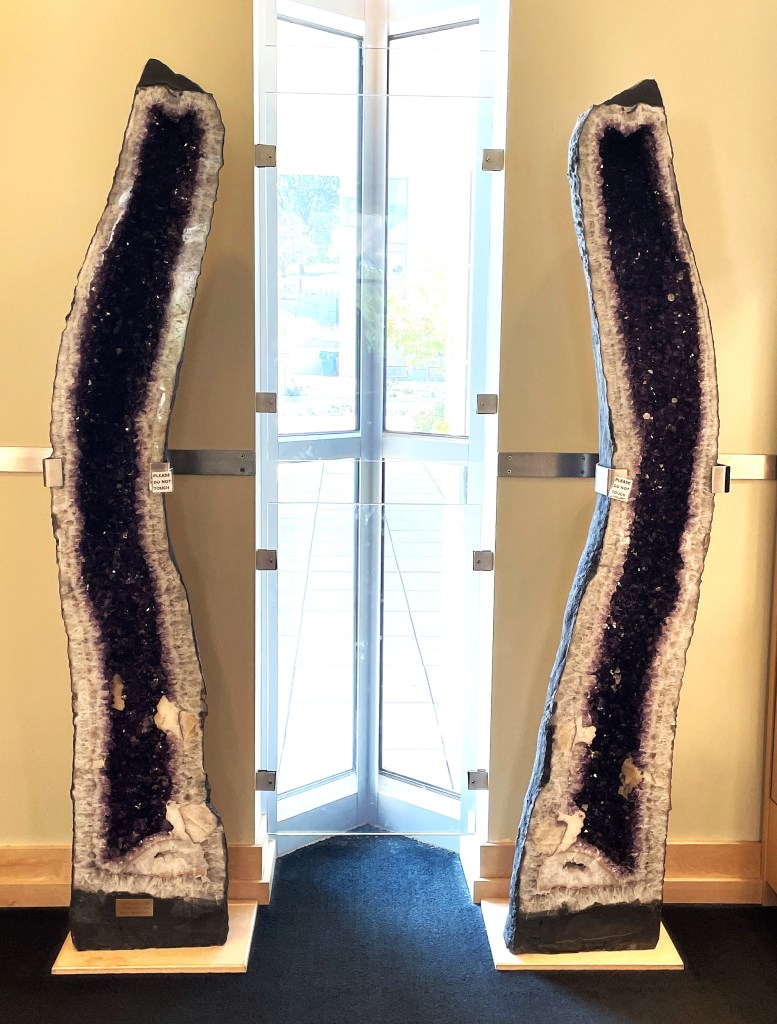
This is the largest amethyst geode I have ever seen. It is quite impressive.
Way more than just a bunch of rocks!!!!!
We loved seeing all the fluorescent stones in the mineshaft too.
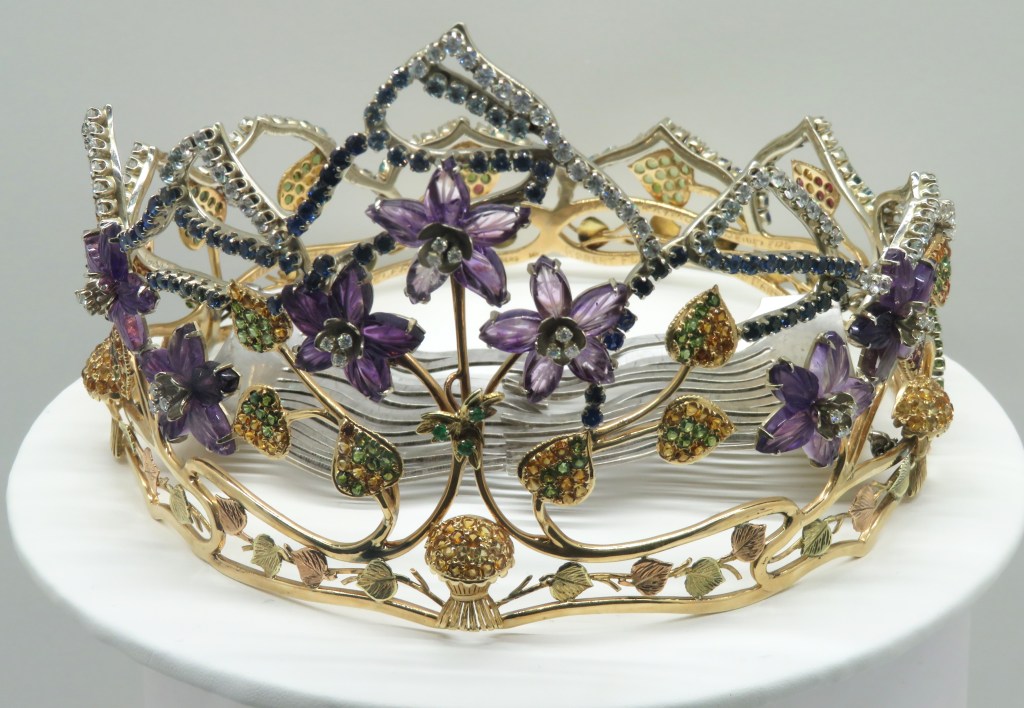
Miss Colorado’s Crown, inspired and made from Colorado’s gems and minerals.
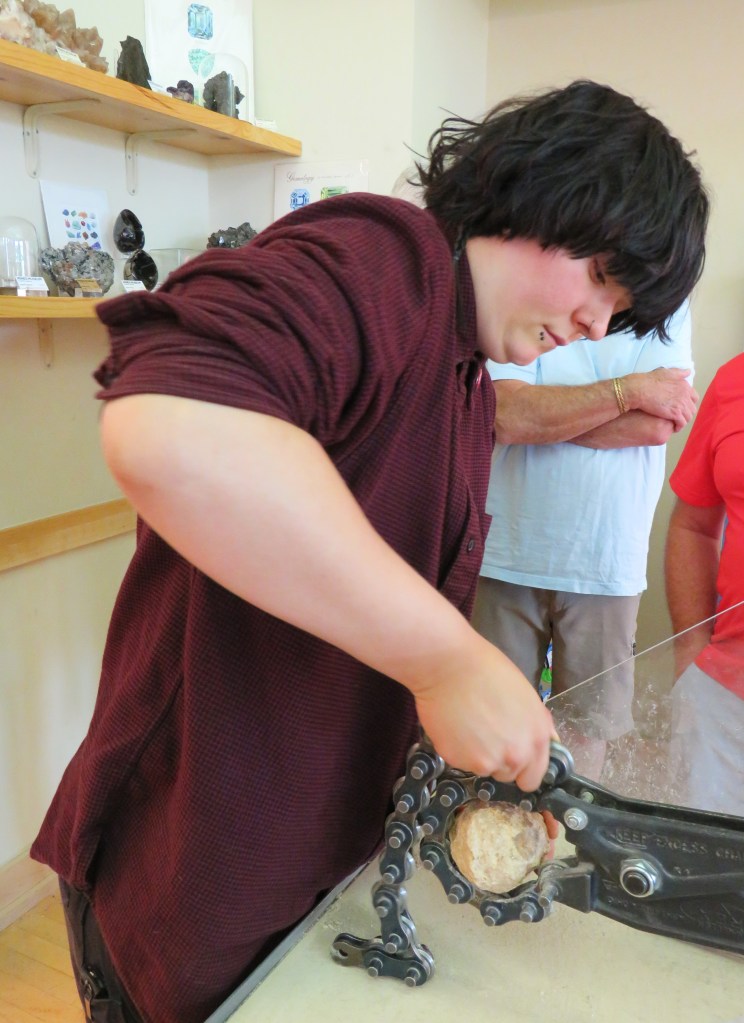
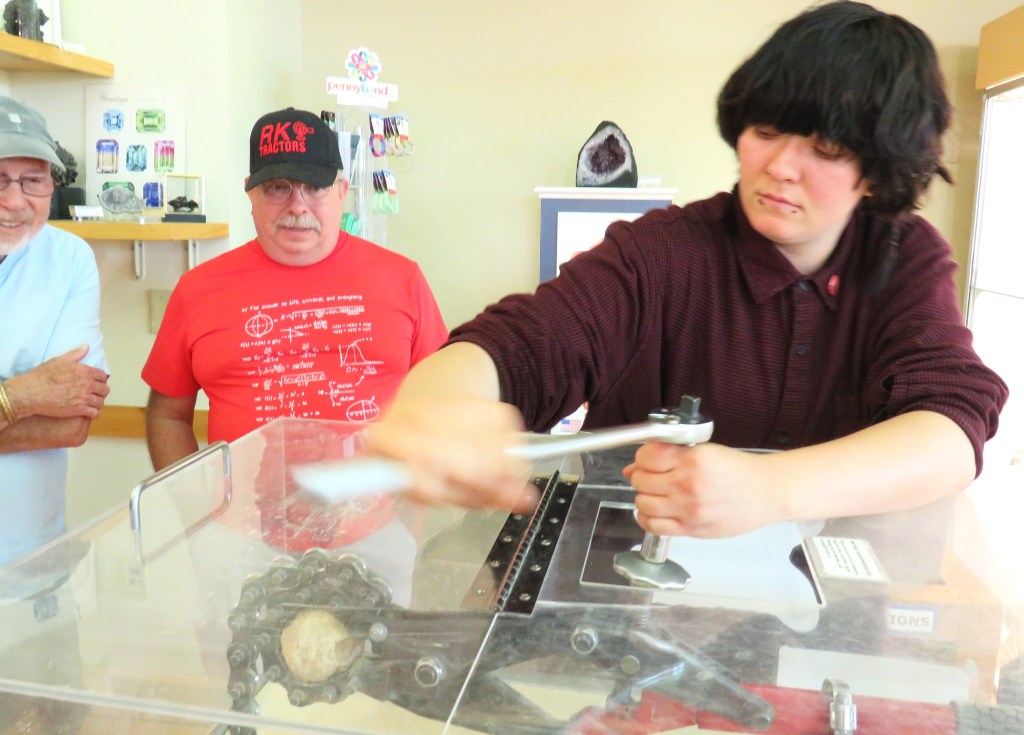
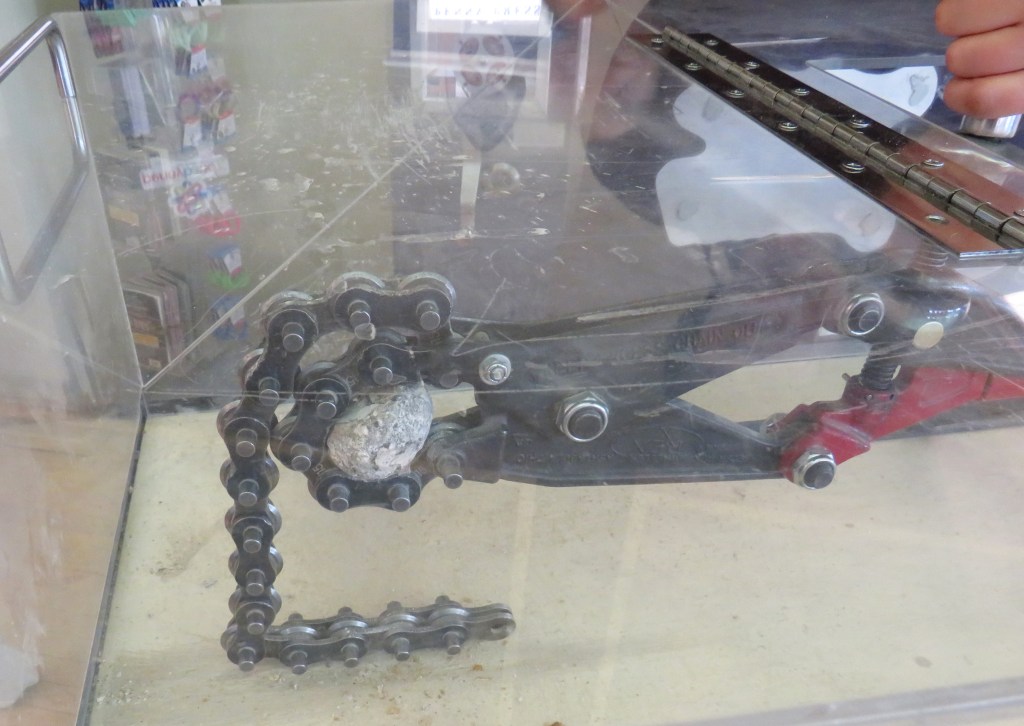
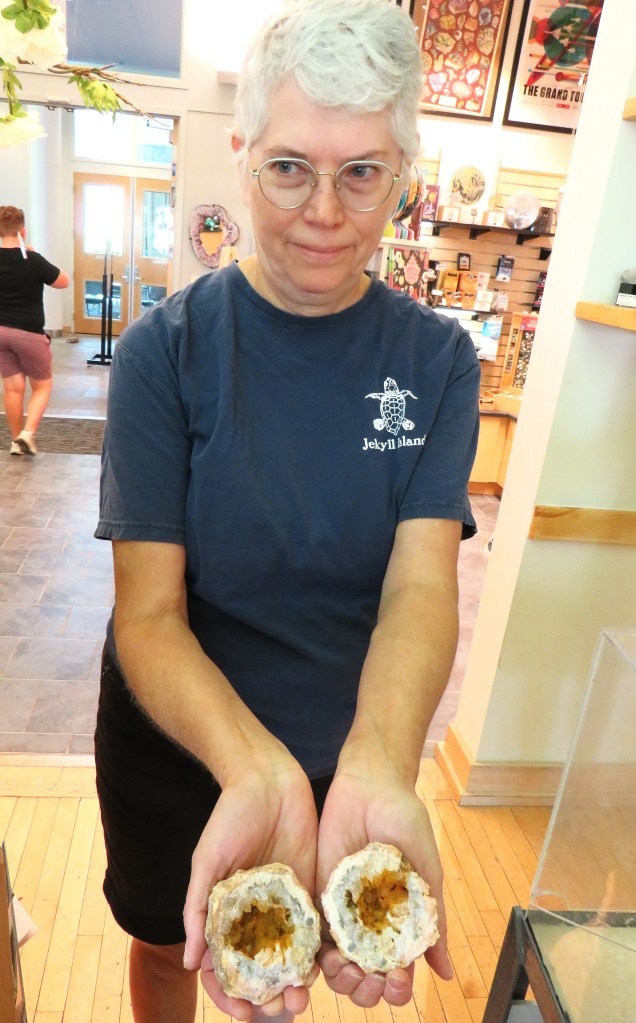
Julia and I each purchased our own geodes too, and had them cracked open. We chose different geodes. A geode isa hollow, spherical rock with mineral crystals inside deposited by mineral-rich water. The word “geode” comes from the Greek word for “Earth-like.” Geodes form when mineral-laden water fills spaces in igneous or sedimentary rock. The rock gets spaces from gas bubbles in igneous rock or by tectonic shifts forming cracks in sedimentary rock. The minerals forming the geode come from ground water or hydrothermal fluids. Over time, minerals deposit from the dissolved silicates and carbonates in water. Geodes contain hollow spaces called vugs. Vugs range in size from a few millimeters to crystal caves. If the original rock fills completely with minerals, it’s called a nodule.
Geodes in the wild are often found in deserts, in areas rich in limestone, and volcanic ash beds. Ideally, look in regions of past volcanic activity or where limestone dissolves over time. In forested areas, check river beds and lake shores. In the United States, geodes are common in Arizona, California, western Illinois, Indiana, Iowa, Kentucky, Missouri, Nevada, and Utah. The are abundant in Brazil, Mexico, and Namibia. In Somerset, England geodes are common enough to have their own name (“potato stones”). Wherever you go, look for a rounded rock. While the minerals within geodes may be any color, usually the rock is bluish-gray or tan.
Cracking open the geodes.
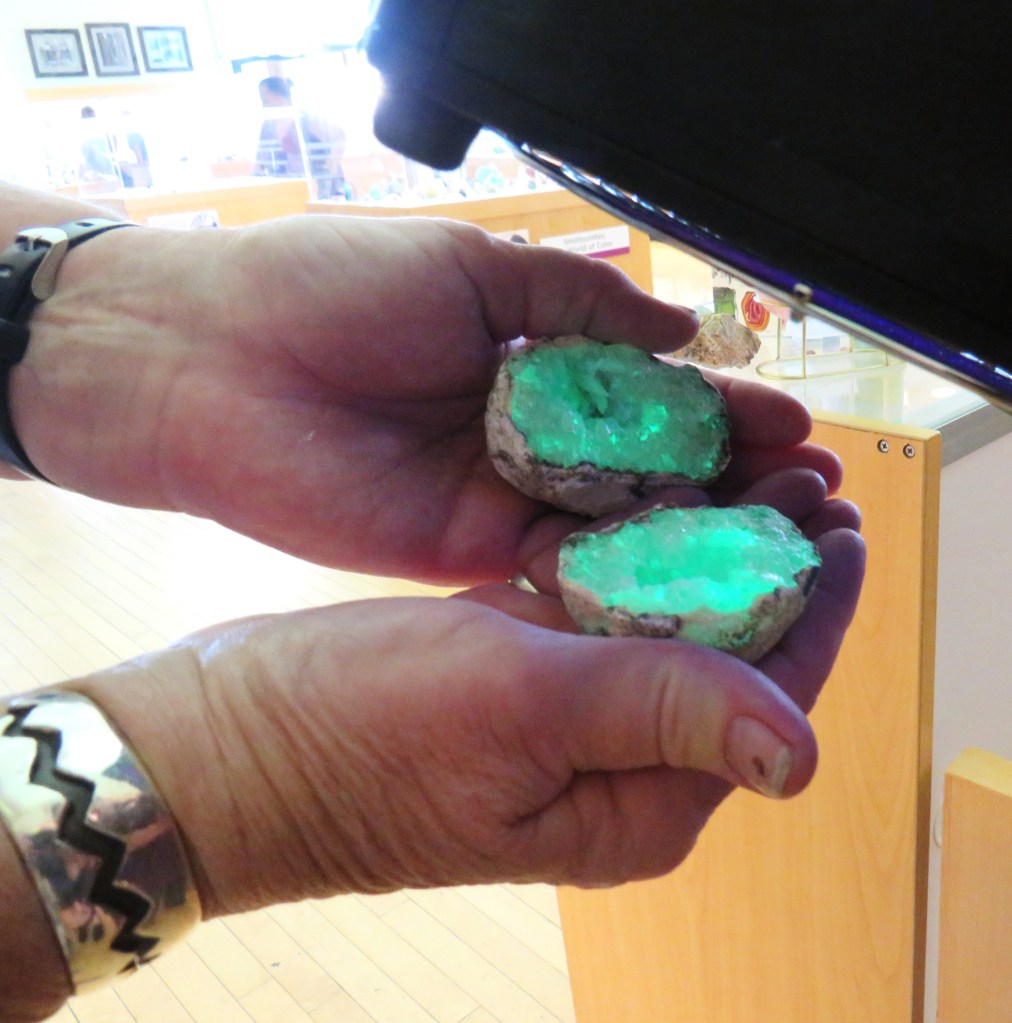
We held mine under black, fluorescent light and discovered mine is fluorescent and shines bright green.
It was yet another new and fun adventure.
The Mines Museum is located at 1310 Maple Street in Golden, CO. They are open from 10-4.
You are never to old to learn new things. In fact, learning new things is what keeps us young. Learn as many new things as you can and enjoy every minute of everyday. ‘Til next time.
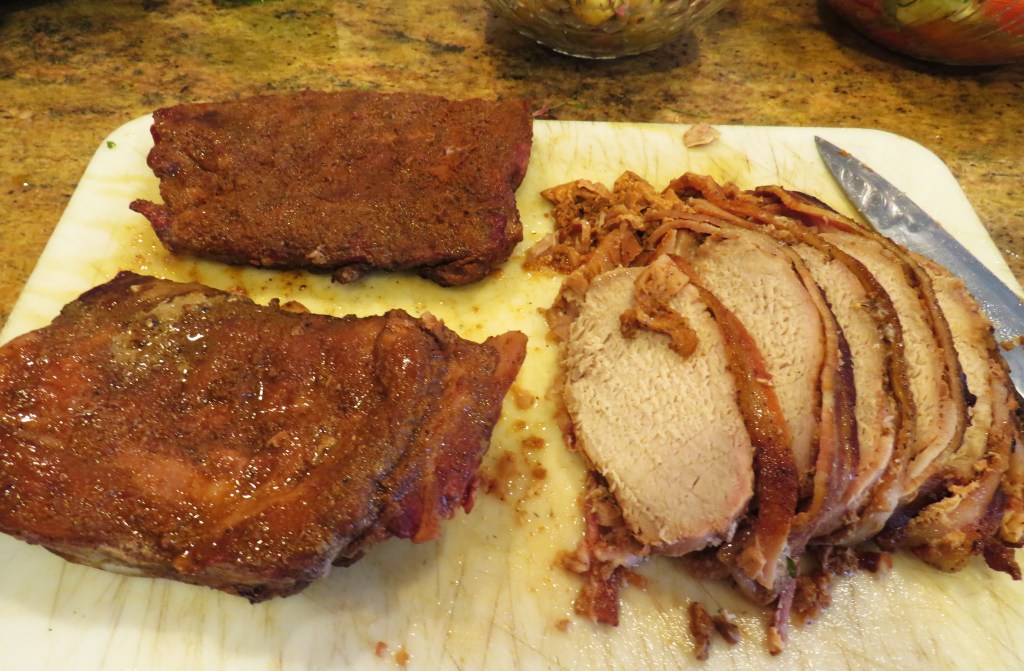
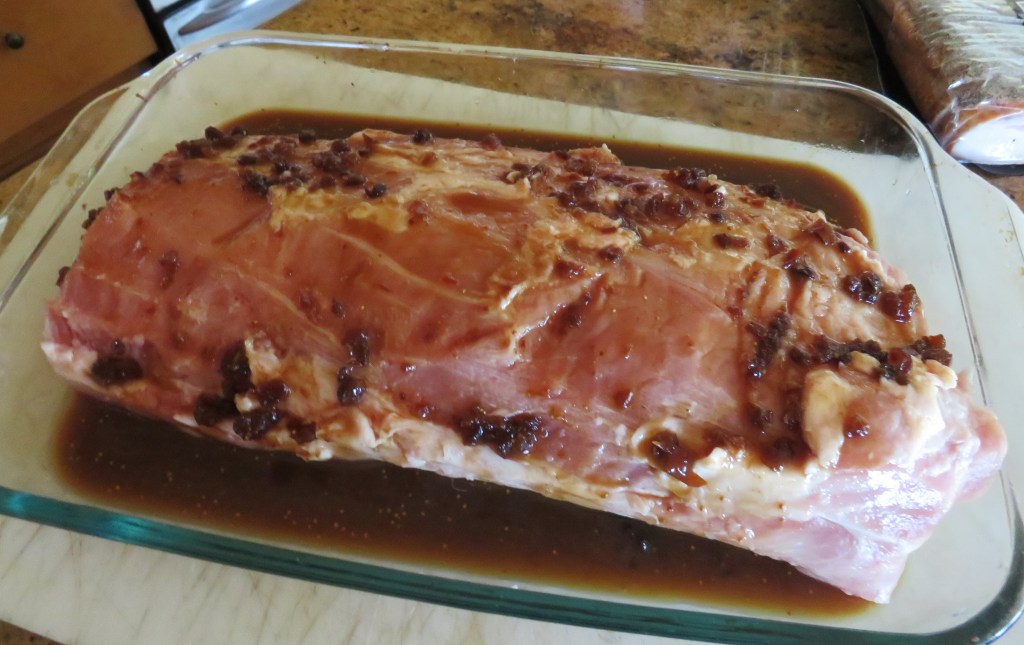
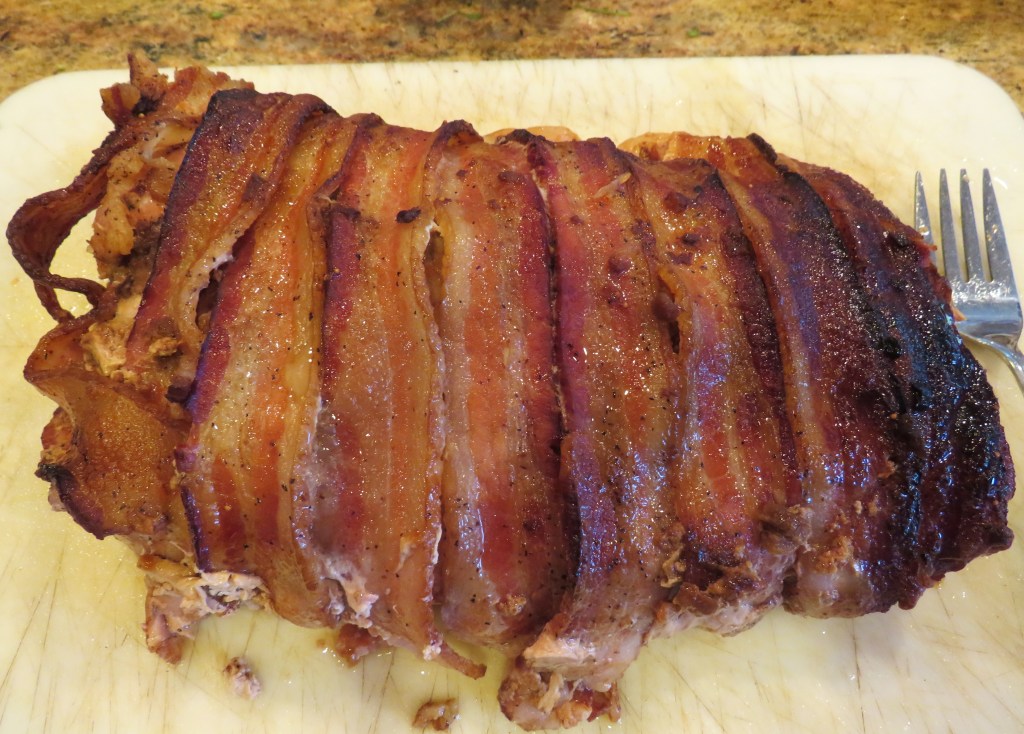
You would think that we had become vegetarians with all the deliciously fresh vegetables Bruce and Julia brought to us from their garden. Not so though. We definitely ate our fair share of meats as well. Larry once again had the smoker going and smoked some ribs and a bacon wrapped pork loin for all of us to enjoy.
I can’t tell you what Larry used for the ribs since he made those up. But I can tell you how I prepared the bacon wrapped pork. We topped both with my spicy ketchup Spicy Ketchup.
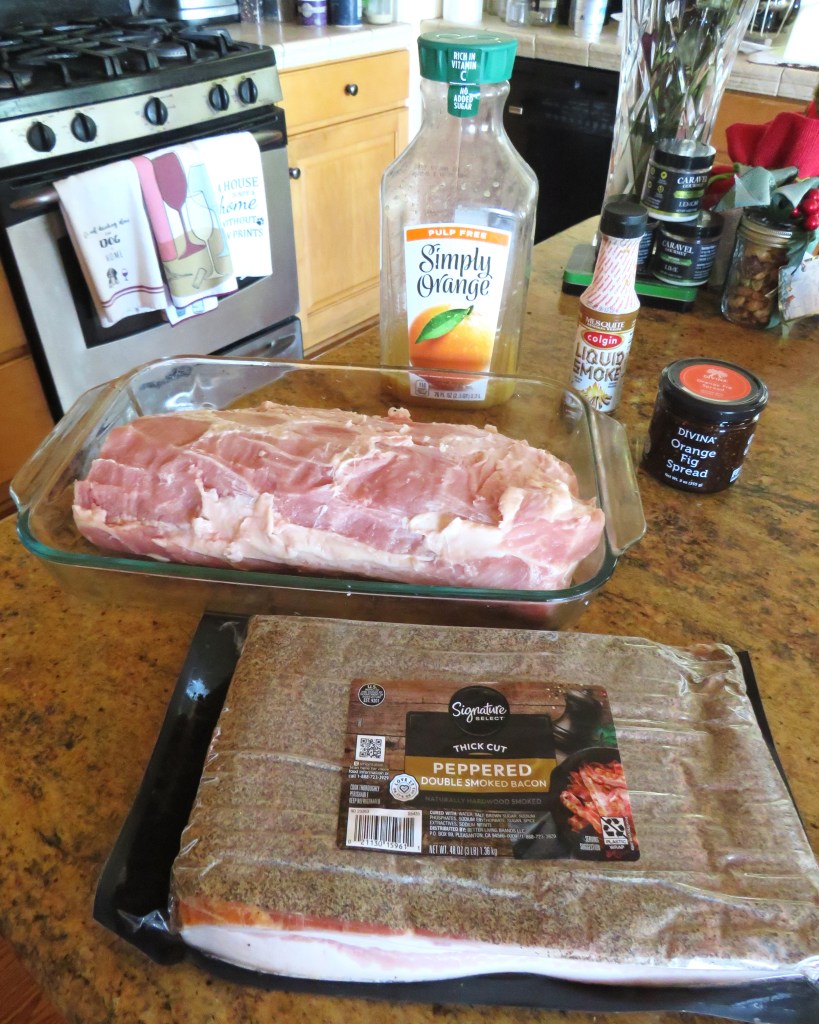
First, I made a marinade.
1 cup orange juice
1/2 cup orange and fig jam
2 tsp liquid smoke
My pork loin was about 4 lbs, with the excess fat removed. I let it marinate overnight. When I was ready to wrap it, I patted it dry with a paper towel, then wrapped it with about 20 pieces of bacon, overlapping it, so the pork loin was completely wrapped and covered. I used pepper bacon.
We smoked the bacon and the ribs together. Once again, Larry is in charge of the smoker, not me, so I don’t know how long he smoked everything, but I am going out on a limb to say it was for about 3-4 hours. Then we placed them both in the slow cooker for an additional 2-3 hours for them to get nice and tender. And then, we let the feasting begin! 🙂 Everything got rave reviews.
Life is short. Make the most out of every minute and everyday. Have a great day and make everyday great. ‘Til next time.