Don’t Cry, Onions Are Good For You

I love all kinds of onions, and cook with them all the time.  Almost everything I cook has onions and/or garlic.  That being said though, after all my years of experience cutting onions, I am still super sensitive to them.  My eyes just let loose on the water works and they burn something terrible.  It is almost like I have just watched a really sad movie or just received some very sad news when I am crying over onions.  I constantly have to stop and clean my eyes while cutting them.  The reason we cry while cutting onions is because onions produce a chemical irritant known as syn-propanethial-S-oxide, which stimulates the lachrynal glands in the eyes, and that is what makes us cry.  Over the years, I have learned a few tips that are supposed to help with the tears, and I have tried a lot of them.  There are still some others I need to try though, but so far, nothing has helped.  Here are some of the tips I have learned:  1) freeze the onions before cutting; 2) soak them in cold water; 3) use a super sharp knife; 4) microwave them; 5) keep a piece of bread in your mouth; 6) wear goggles (being a swimmer, I always have goggles on hand, but all they did for me was make me look like a goofball in the kitchen); 7) keep the sliced side of the onion on your cutting board; and 8) chew gum while cutting onions (professional kitchens never allow gum in the kitchen, so for many years this was never even an option for me).   Every time I cut onions, and I cry a river while doing so, I think back on my days in culinary school when one of my chef instructors punished me for disagreeing with him, and he made me cut a 10-lb bag of onions.  After just a few, I was crying so much and my eyes were burning so badly, he finally gave in and had someone else cut the rest.  I think he felt sorry for me.  That was cruel and inhumane punishment, I tell you.  Even though I cry up a storm when I cut onions, I will never stop using them when I cook, because the taste and texture onions bring to foods, in addition to all their health benefits, are well worth shedding a few tears.

Onions are very healthy.  They are very low in calories, high in fiber, and contain a lot of vitamins and minerals, including vitamins C and B6.  Other health benefits of eating onions are that they are rich in anti-oxidants which help fight cancer.  They also contain anti-fungal, anti-bacterial and anti-inflammatory agents. They can also help fight rinoviruses, which are the cause of the common cold and help fight off re-occurrences of other viruses as well.  Eating onions can also help regulate blood sugars and and the insulin levels in the body, which allows the body to store less fat.  And, they are an excellent source of chromium and potassium too.  Because onions are so rich in potassium, they are very heart healthy.  The potassium helps regulate the blood circulation in the body, which helps lower the blood pressure.  Be careful though, just as with anything, too much of something is NOT a good thing, but can indeed be a bad thing, especially if you are on blood pressure medicine.  Eating too much potassium with certain blood pressure medicines can cause some very bad side effects.  Always check with your doctor first before consuming a lot of onions and onion products.

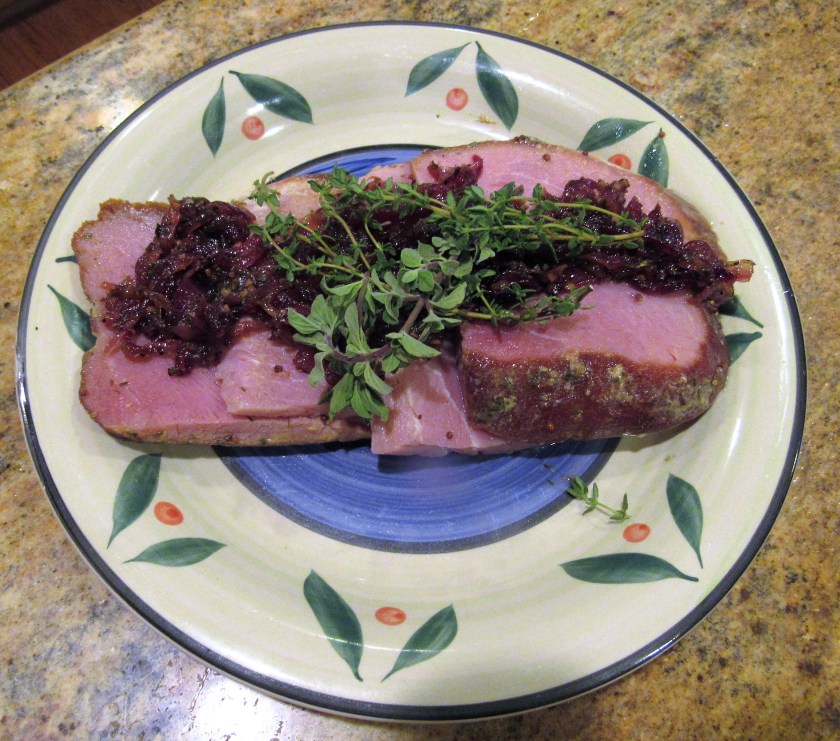
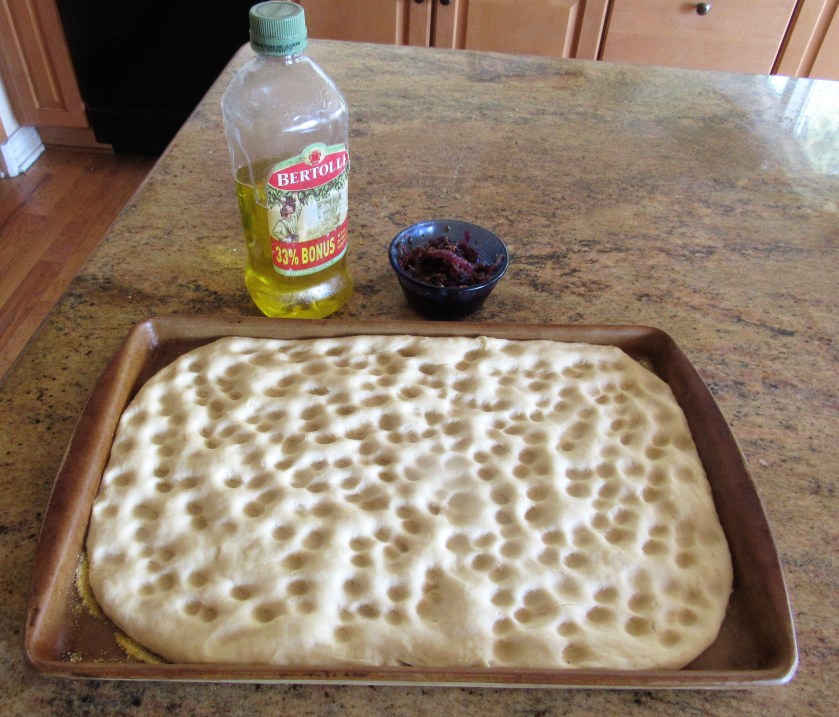
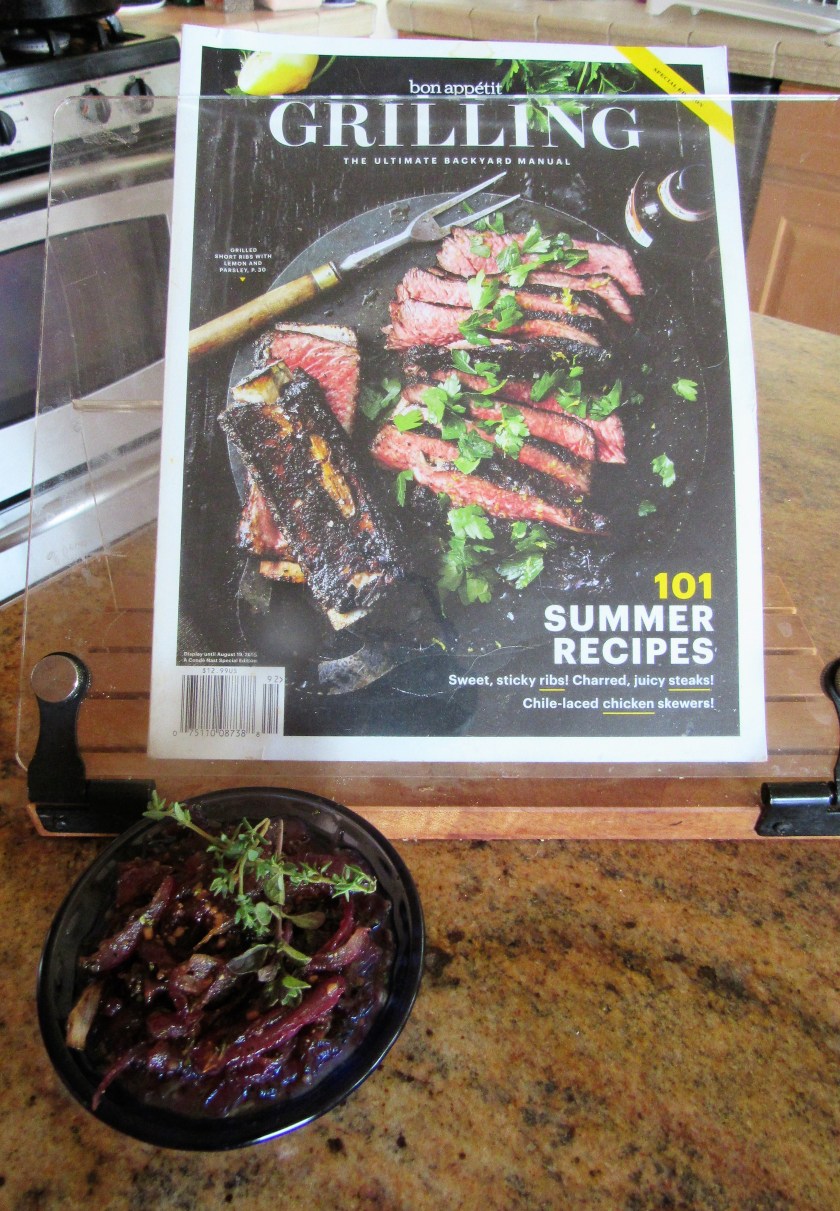
The pros and cons of onions …… That being said, the other day, I caramamelized some red onions.  You have already seen them on my focaccia, Focaccia with Caramelized Onion Marmalade .  I also used them to top some ham I had cooked earlier and taken out of the freezer.  The caramelized onions really made the flavors of the ham come to life.

IMG_2503

Caramelized Onion Marmalade

1 red onion, sliced very thin

1 TBSP garlic

2 TBSP sugar

1/4 cup red wine vinegar

1 1/2 tsp black pepper

1 tsp salt

1 1/2 tsp thyme and oregano, chopped fine


Heat the oil in a medium hot skillet and add the onions and the sugar.   Cook for about 35-45 minutes or until the onions are soft and tender and slightly browned, stirring occasionally.  Once the onions start to caramelize, they will brown very quickly, so watch them carefully.  You do not want them to burn.  Add the rest of the ingredients along with 1/4 cup of water and cook for an additional 3 minutes or until the sauce begins to thicken.

IMG_2496

Saute the onions in hot oil with he sugar for about 35-45 minutes, stirring occasionally.  Once they start to caramelize, they will brown and burn very quickly if you do not watch them.

IMG_2497

IMG_2499

Once they start to caramelize, add the garlic and the rest of the ingredients and cook for an additional 3-4 minutes, being careful not to let them burn.

IMG_2501

IMG_2505

Onions in general are very versatile and can be used for almost any dish or recipe.  Caramelizing them just adds another dimension to your foods and really makes the flavors pop.  Don’t be afraid to add them to your next recipe.  Here are some ideas.

Focaccia with Caramelize Onion Marmalade

IMG_2517

Ham topped with Caramelized Onion Marmalade.

IMG_2506


Focaccia with Caramelized Onion Marmalade

Focaccia, as it is known by the Italians, is known to the French as fougasse.   Focaccia is a flat bread usually made with olive oil and simple ingredients.  It comes in many different shapes and forms.  It can be round or rectangular; thin and crunchy, high and soft or somewhere in between; it can also be crisp or chewy.   You can top it with simple toppings or make it is elaborate as you like.  It can be used as either a sweet or a savory dish, and is eaten at any time of day, anywhere you go.  As I have said many times, use your imagination and make it how you like it.  You can even fill it or use it for a sandwich.   Focaccia’s famous cousin, pizza, is similar, but unlike pizza, focaccia is never served hot, right out of the oven.  It is best when served warm or at room temperature.   Focaccia gets its name from the Latin word focus, or fire, and it’s adjective focacious meaning “cooked with fire”.   It dates back to the times of the Ancient Romans, and they often offered it to the Gods as a sacrifice.   Different varieties of focaccia are found all over Italy, but the region most famous for its focaccia is Genoa, in the Liguria region.  This is the region stretching in a thin arc from the French border to the northern edge of Tuscany.  Savory varieties of focaccia are found in every seafaring region of Italy, whereas breads that rise, or levened breads, are found more throughout the interior of the country.  Focaccia goes by many names, such as schiacciata, stiacciata, or ciaccia in various parts of Italy.  All these names mean flattened.  In Venice, it is known as fugassa which means cooked under the ashes.  However you want to say it though doesn’t really matter.  By whatever name it goes by, we just know it as delicious.   So Mangia!

IMG_2521

I am most definitely a bread person.  I love breads of all kinds and can easily make a meal of nothing but bread, either with olive oil or butter, or simply on its own.   I made the caramelized onion marmalade yesterday, and had just enough left over to make this fabulous focaccia.

First, I made the starter or the sponge, which was 1 tsp yeast, 1/2 cup of warm water (between 105-115*F) and 3/4 cup flour.  Mix the water and the yeast together and let sit for about 10 minutes before adding the flour.  Then mix in the flour, cover tightly with plastic wrap and let sit for 45 minutes and the sponge has doubled in size.

IMG_2509

Once the sponge is ready, add it to the rest of the dough.  Cover it and let it rise for about 1 1/4 hours, or until doubled in size once again.  This is called the first rise.

IMG_2510

After the first rise, add a little cornmeal to a greased 11×17 baking sheet, then press your dough into the pan, filling it as much as possible.  If the dough is not stretching, let is sit for about 10 minutes and start again.

IMG_2513

Let the dough rise again for about 1 more hour.  This is the second rise.  Once it has risen again, dimple it with your fingers, drizzle it with olive oil and add some coarse salt and your topping.  Bake at 400* F for about 25 minutes or until lightly golden.

IMG_2515

IMG_2517

Basic Focaccia


The Sponge

1 tsp dry active yeast

1/2 cup warm water – between 105-115*F

3/4 cup flour


Sprinkle the yeast over the water and whisk it together.  Let it sit for about 10 minutes or until frothy and creamy.  Stir in the flour and cover tightly with plastic wrap.  Let double in size for about 45 minutes.


The Dough

1 tsp dry active yeast

1 cup warm water – between 105-115*F

3 TBSP olive oil

3 1/4 cups flour

2 tsp salt

Start your dough the same as the sponge.  Sprinkle the yeast over the water and whisk it together.  Let it sit for about 10 minutes or until frothy and creamy.  Add 1 cup of the flour and mix in by hand.  Once the flour is incorporated, add the rest of the flour and mix in.  On a lightly floured surface, knead the dough together to form a ball for about 8-10 minutes.  Cover and let it rise for 1 1/4 hours or until doubled in size.

After the dough has risen, it will be soft, sticky and delicate.  Flatten it out onto an 11×17 baking sheet that has been sprayed with cooking spray.  If the dough is not cooperating, let it rest for about 10 minutes and then start again.  Stretch the dough to cover the pan.  Cover and let rise once again for about 1 more hour.

Preheat the oven to 425*F at least 1/2 hour before baking

After the second rise, dimple the dough with your fingertips and drizzle with olive oil.  Sprinkle a little coarse salt over the dough and add your topping of choice.  Place the dough in the hot oven and spray the oven walls and “floor” with water.   After 5 minutes, turn the oven temperature down to 400*F and spray the oven walls and floor again.  You want to spray the oven 3 times within the first 10 minutes of baking.   Let the focaccia continue to bake at 400* for about 20-25 minutes or until lightly golden.  Serve at room temperature.


Caramelized Onion Marmalade

1 red onion, sliced very thin

1 TBSP garlic

2 TBSP sugar

1/4 cup red wine vinegar

1 1/2 tsp black pepper

1 tsp salt

1 1/2 tsp thyme and oregano, chopped fine


Heat the oil in a medium hot skillet and add the onions and the sugar.   Cook for about 35-45 minutes or until the onions are soft and tender and slightly browned, stirring occasionally.  Once the onions start to caramelize, they will brown very quickly, so watch them carefully.  You do not want them to burn.  Add the rest of the ingredients along with 1/4 cup of water and cook for an additional 3 minutes or until the sauce begins to thicken.


*** You can use any topping you like.  I made mine with a caramelized onion marmalade.


A Simple Steak Dinner

Sometimes simple is best and sometimes all we want is a good, tasty steak.   My husband is from Kansas, and Kansas is steak country after all.   In fact, the steak I used was from one of the cows his sister raised on her farm in Kansas.  We went in with some of my husband’s family and bought a 1/4 of a cow.  Our freezer is full of fresh beef.  There are many different cuts of beef, and each has its own unique style and personality.  With these unique personalities, come various cooking methods that will really make these cuts of meat shine and brings out their best qualities.   Steak used to be eaten on special occasions and was thought of as the symbol of American well-being and prosperity.  Today, people just enjoy it because it is so versatile and tasty.  There is no end to the ways that beef can be cooked and prepared.  Use your imagination, be bold, be creative.

Dinner tonight was a round steak that I marinated in a lemon-bourbon sauce for about 8 hours.  Once we cooked the steak, I used the same marinade to saute my mushrooms, and I added some butter and red pepper flakes and then I topped my steak with these.  For side dishes, I served a green bean salad made with grape tomatoes, red onions, red bell peppers and green beans tossed in a mustard vinaigrette and garlic roasted potatoes, with my left over lemony tomato-zucchini tart.  Lemony Tomato Zucchini Tart .  I finished everything off with a smooth Spanish temperanillo.  Simple and delicious.

IMG_2491

I marinated the steak in a sauce made from lemon juice, bourbon, garlic, black pepper and olive oil, for about 8 hours.  Then I grilled it up.  Searing this steak and braising it is very good too.

IMG_2479

While the steak was cooking up on the grill, I used the marinade to saute my mushrooms.  I also added some butter to make the sauce creamier as well as some red pepper flakes, to give a little more zing to the mushrooms.

IMG_2487

Round steaks have a tendency to be a little on the tough side, so marinating them for longer periods of time, braising them, and slicing them in thin strips against the grain of the meat are all simple ways to maximize the flavor while minimalizing the toughness of the cut.  A nice rare to medium rare is my favorite way to eat a steak.   It is still tender, juicy and full of flavor.

IMG_2489

I served the steak with this green bean salad, topped with some leftover tortilla strips I had.  Cool Green Bean Caesar Salad and some roasted red potatoes mixed with garlic, olive oil, salt & pepper and parsley.  We roast the potatoes in foil on the grill quite often.

IMG_2486


Lemon-Bourbon Steak with Mushrooms

1/4 cup olive oil

1 TBSP lemon juice

1 TBSP bourbon

1 heaping TBSP garlic

1/2 tsp black pepper

1 cup of beef broth (if searing)

2 TBSP butter

red pepper flakes to taste

1-1 1/2 lbs of chuck or round steak

1/2-3/4 cup of sliced mushrooms


Combine the first five ingredients and mix well.  Then pour over the steak and chill for 4-8 hours, turning at least once.  You can grill your steak or sear it on all sides.  If you are searing it, sear it in a little olive oil until all sides are browned, or about 3-4 minutes per side, then add the juices and the beef broth, along with the stems of the mushrooms and bring to a boil.  Reduce the heat and simmer for about 7 minutes, then turn the steak over and continue to simmer for another 7 minutes.  Saute the mushrooms separately, then add to the beef mixture, along with butter and red pepper flakes.  If you are grilling the meat, then just saute the mushrooms in the marinade, along with the butter and red pepper flakes and serve over your steak.  No need for beef broth is grilling the steak.


Happy, Healthy Dogs

Lucie and Vinnie love it when Mommy cooks for them.  They know they are always going to get something healthy, nutritious and tasty.  Not that they are the most critical food  connoisseurs out there, but they do know and appreciate good food.  They get a wide variety of meats mixed with dog-friendly fruits and vegetables, as well as their starches.  Everything I have read and studied about making my own dog food says to give them the same quality of foods you would cook for yourself.  So they always get good, lean meats and fresh dog-friendly fruits and vegetables, that are the same quality I would cook for and use myself.  Dogs need a lot of high proteins and low fats, particularly if you are trying to keep their weight down.  Again, just like humans.  Lucie and Vinnie’s vet is very happy with how healthy they are and how shiny their coats are.   And they both definitely have that sparkle in their eyes.  These are all good signs of a healthy dog.

Cooking dog food is easy.  I don’t dare venture into the world of cooking cat food though.  A friend of mine had asked me about making my own cat food not so very long ago.  I did look into, and did some research, but it is very cost prohibitive and cats need a lot of additional nutrients added to their foods.  Often times these additional items are very hard to find, and are expensive when you do find them.  Another good friend of mine, who loves her cats the way we love all our animals, said she tried making cat food once, and it was super expensive; she had to run all around looking for all the additional vitamins and nutrients; and then it was a major pain in the neck to make.  And after all that, she said her cats hated it and would not even touch it.  They just sniffed at it and turned their noses up and walked away.  She ended up throwing it all away.  So all in all, it was a big waste of time, money, and effort.  Stick with buying good, healthy cat foods rather than making it.  You and your cats will be happier and healthier for doing so.


Fritzie is supervising to make sure everything is all right.  This week, Lucie and Vinnie are dining on chicken, sweet potatoes, and celery mixed with peanut butter, parsley and a dash or two of cinnamon.  The cinnamon is full of nutrients and the parsley helps to fight their bad breath.  Believe me when I say that often their breath needs all the help it can get too.  Peanut butter is very high in protein.  Celery is very good and high in fiber.  So bottom line, this is a very healthy meal for the “kids”.

IMG_2381

Once the chicken and vegetables were cooked, I added the parsley and cinnamon and stirred them into the chicken and vegetable mixture.  Then I incorporated the peanut butter.  I do not have any specific recipe for this.  I used about 2-3 lbs of meat, 1 sweet large potato, cut into a small dice, along with 3-4 stalks of celery that had been cleaned and also diced into a small dice.  I used about 2 tsp of cinnamon and about 1 TBSP of dried parsley.   When it was all cooked, I added about 1-1 1/2 cups of peanut butter.  We add about 1 cup of the wet food each to their dry food on their evening meal only.  This will last about 1 week.

IMG_2383

IMG_2395

They both got their chance to clean the peanut butter jar as best as they could.  I think this picture sums it up pretty well.  I think they liked it.

IMG_2402


Snacks for My Swimmers

Today is our official “end of season” party for my swim team, The Front Range Barracudas.   I had to really fight the urge to make things fancy, but I had to keep telling myself I am cooking for kids, and they don’t like fancy stuff, nor do they really care about presentation so much.  Anyone who has ever cooked for kids knows it is full of challenges.  Then there are all kinds of food allergies to think about as well, and I want their snacks to be healthy too, which makes things even more challenging.   Swimmers, just like all other athletes, need foods high in protein and low in fats.  Peanut butter and cheese are great snacks for all athletes.  As you can see, I was faced with many different dilemmas, but I decided on a couple of “kid friendly” items that I hope go over well.  They were all super easy to make, and all they needed was some assembly.  One of the best things to remember when cooking for kids is “to keep it simple”.  Making it fun, and using fun names doesn’t hurt either.

These are “Ants on a Log”.

IMG_2468

There are only three simple, healthy ingredients used for “ants on a log” – celery rinsed and cut into “logs” about 2″ long, raisins and peanut butter.  I piped the peanut butter onto the celery logs and placed the golden raisins or sultanas on them.  You can use any kind of raisins and either crunchy or creamy peanut butter (or any other type of nut butter).

IMG_2466

IMG_2467

I had to come up with something else as well, because unfortunately, there are a lot of people who don’t eat nuts or have nut allergies.  So I also made cheese and pretzel squares and some “spiders on a string” or string cheese with pitted black olives.

IMG_2475

You can use any type of cheese you like, but I used a mild cheddar that I cut into small squares that fit perfectly onto the square pretzels, and then I sandwiched them together.  I baked them for about 7-8 minutes at 350* F, or just long enough to melt the cheese so they would stick together and make a pretzel sandwich.


IMG_2464

IMG_2472


Chocolate Nutella Banana Brownies

Gianduja, or Nutella as we know it today, has a very long history, dating as far back as 1806 in the Alba, Piedmont region of Italy, during the times of Napoleon Bonaparte’s Continental Blockade in Europe.  The Piedmont region of Italy was known for having the world’s best chocolate at that time, and chocolate was very difficult to obtain and was also very expensive even when it was attainable because of the blockade.   So with a shortage of chocolate, another plan was conceived that would still satisfy the world’s ever increasing sweet tooth and its desire for chocolate.  Piedmont had an abundance of hazelnuts and the ingredients for cocoa were very difficult and expensive to obtain.   The original gianduja was created by an Italian pastry chef by mixing hazelnuts, that were very prevalent in the Piedmont region, with just a hint of chocolate.   Once Napoleon’s Continental Blockade ended and chocolate once again became easily obtainable, gianduja lost it’s popularity.  It became popular throughout Italy and the rest of Europe once again after World War II, when once more, chocolate and the ingredients necessary for making chocolate, were in short supply.  The gianduja was mixed with cream to make a creamy, more chocolatety texture and was called Supercrema Gianduja, by an Italian pastry chef named Pietro Ferrero; yes, the same Ferrero from the world famous chocolate hazelnut concoction known and loved by the world as Ferrero Rochere.  But this was a mouthful. and in 1964, the name was changed from Supercrema Gianduja to Nutella.  Nutella has been an Italian and European staple ever since.  It has only recently started gaining a lot of popularity in the United States, but I think it is a staple here too, and is now here to stay.  Today, Nutella is used in many different and delicious recipes worldwide.

I paid tribute to my love of Nutella by making Nutella banana brownies.  Yum!  Brownies are a beloved tradition here in the United States, and by making them with Nutella, they took on a little more of an international and European flair.  Adding bananas just made them even more exotic.  They are full of flavor and full of personality.  You are going to love them; I promise.


These ooey-gooey brownies just melt in your mouth and are like a little bit of Heaven with every bite.  Make sure you have plenty of napkins, because they are very messy.

IMG_2455


When you have bananas that look like this, don’t throw them away.  They are just perfect for baking.

IMG_2441

Mash the bananas into chunky pieces and mix with the Nutella and chocolate chips.

IMG_2442

Layer the brownie mixture and the Nutella-banana mixture, ending with the Nutella-banana mixture on top and bake.

IMG_2443

Once the brownie mixture is set and no longer wiggles and jiggles, the brownies are done.  Remove from them the oven and let cool completely before cutting.  They will be very soft and very ooey and gooey.  This is exactly the texture you are looking for.

IMG_2445

Chocolate Nutella Banana Brownies

3/4 cups butter, melted

3/4 cups brown sugar

1 tsp vanilla

2 eggs, lightly beaten

2 very ripe bananas, mashed

3/4 cup flour

3/4 cups cocoa powder

1 tsp baking powder

1/2 cup Nutella

1/2-3/4 cup chocolate chips


Preheat oven to 350* F


Spray cooking spray into a 9×9 baking pan

Mash the bananas and mix with the Nutella and chocolate chips and set aside.  Mix together all the dry ingredients and set aside.  Then mix the melted butter, eggs, vanilla and sugar.  Add the egg and butter mixture to the brownie mixture.  Pour 1/2 the batter into the prepared baking pan.  Add about 1/2 of the Nutella mixture and repeat.  Bake for about 30-40 minutes or until the mixture sets and the brownies do not jiggle.  Do not over cook.  You want the brownies to be soft, ooey and gooey.  Cool completely before cutting.  Dust with powdered sugar if desired.


Lemony Tomato Zucchini Tart

A good friend of mine gave me some zucchini from her garden that were absolutely HUGE!  I am still coming up with some good zucchini recipes that do them justice.  They are so delicious!  Fresh is always best, and even better when they have been grown with love.   I make tomato tarts quite often, and I use a wide variety of tomatoes.  I  especially love using the heirloom tomatoes.  This was the first time I decided to make them with zucchini though.  I don’t know why I never tried this before because I love both tomatoes and zucchini, as well as almost all other vegetables, but there is a first time for everything I guess.  Now I know I will definitely be doing this again; real soon.  Adding lemon to dishes really seems to make them perfect for spring and summer, and it just seems to make them really fresh and brings their flavors to life.  I served it with my Andouille sausage and black-eyed peas.  (See Cooking From A to Z ).

IMG_2435

These few simple and basic ingredients turned into this colorful and delicious tart.

IMG_2413

I used my basic go-to tart dough, only I added black pepper and lemon pepper to the dough while I was making it, to make it more of a savory tart.  (Have No Fear, the Queen of Leftovers is Here ).  The best way to get your dough into the pan you are using is to lightly coat your rolling pin with flour and just roll your dough over the rolling pin, then place it on top of the pan.  Roll your rolling pin over the edges to cut the excess dough away.  Press the dough firmly into the pan and around the edges of the pan to set it in place.

IMG_2428

Once the dough is set in place, brush it with a light mixture of garlic, olive oil, basil, lemon verbena (optional) and salt and pepper.  Then add some grated Parmagiano cheese.

IMG_2426

IMG_2430

Once this is done, starting from the outside and working your way around to the center, start alternating thin slices of tomatoes and zucchini until finished.  I sliced both the tomatoes and the zucchini about 1/4″ in thickness.  Because my zucchini was so large, and so wide, I cut the slices in 1/2, making them 1/2 circle slices.

IMG_2432

Once all the tomatoes and zucchini are placed, brush them with the remaining olive oil and garlic mixture and top with more Parmagiano cheese.  Then bake until done.

IMG_2433


Lemony Tomato Zucchini Tart (filling)

1/4 cup olive oil

1/4 cup fresh basil or a combination of basil and lemon verbena (optional), cut in a chiffonade, or thin strips

1-1/2 heaping TBSP garlic

1/3 cup grated Parmagiano cheese

1 lb Roma tomatoes, sliced about 1/4 ”

1 lb zucchini, sliced about 1/4 ”

salt and pepper to taste


Jeanne’s Master Dough

1 1/2 cups flour

6 TBSP COLD butter, cubed

a pinch of salt

1 egg

about 6 TBSP heavy whipping cream


Mix together the flour, butter and salt in a food processor until everything is well incorporated.  Then add the egg and the cream and mix everything together until the dough forms into a ball.  Remove from the food processor and wrap in plastic wrap.  Let the dough chill in the refrigerator for at least 30 minutes before using.  The dough will keep up to about 3 days in the refrigerator.  When you are ready to use your dough, let it come to room temperature before rolling it out on a lightly floured surface.  I usually add a little flour to my rolling pin as well.  Then roll to your desired thickness and and shape it however you like.  I use this same recipe for my tarts as well.  If I am making a sweet tart or dough, the only difference is that I also add about 3 TBSP of powdered sugar.  This is called a pate sucre.  Sometimes, when I am making a savory dough, I add black and/or lemon pepper and other spices to my dough as well.  Again, be creative and use your imagination.

Bake at 350* F for about 30 minutes or until done.  If the edges start to get to brown, cover the tart with aluminum foil until done.

***This recipe is completely vegetarian.  To make it vegan, you will have to alter the recipe for the dough, by substituting vegan butter, soft 2 oz of soft tofu for the egg, and a vegan cream/milk alternative or water.


Cooking From A to Z

We love sausages of all kinds.  Our local Sprouts Market makes their own, and they are all very tasty.  When they put them on sale, I usually stock up and I buy quite a few different varieties at a time.    I think we have tried them all at some point.  One of the types I recently purchased was Andouille, which is a spicy Cajun style sausage.  We love it and eat it quite often.   I get tired of eating and cooking things the same way all the time, so I am always on the lookout for new recipes and ideas.   I found a recipe that was with black-eyed peas and Andouille sausage that looked really good, and of course, I had to give it a try.  It is very similar to red beans and rice.  The Andouille sausage is the “A”.  I covered the “B”, “E” and “P” with the black-eyed peas.  I served all this with a tomato-zucchini tart, which gives me two “T’s” , one for the tomatoes and the other for the tart.  I ended with a “Z” by using zucchini.   In my house, you can always add a “W” to anything I cook and serve as well, since I always have wine.  I did not set out to cook the alphabet, but it was a fun, tasty way to cook.  It just kind of happened.

Black-eyed peas are a Southern staple.  They are a member of the legume family and are rich in protein and nutrients.  They are very healthy for you and are very low in calories.  Eating black-eyed peas is supposed to bring good luck and prosperity to all those who eat them, especially if you eat them on New Year’s Day.  It is a Southern tradition to eat black-eyed peas on New Year’s Day.  My mother was from Southeast Texas, and I grew up with this tradition, and still continue it every New Year’s Day.  Anyone from the South can tell you the same thing.   Black-eyed peas are known by a few names all throughout the South.  Some of the other names they go by are purple hull peas, the Southern pea and a cowpea.   They were introduced into the Southern menu back in the days of the slave trades from Niger and the rest of Africa.  At first, they were food only for the black community, but soon became very popular with everyone, and then became a regular part of the diet.  They were also used to feed the livestock, and hence the name “cowpea” came about.

IMG_2424

It only takes a few simple ingredients to make this delicious Southern recipe.

IMG_2416

Cook the beans according to the directions on the package.  I brought them to a boil and let them boil for 3 minutes, then in the same water, I turned off the heat and let them sit for about 1 1/2 hours.  Then I drained and rinsed them before cooking them again with with everything else.

IMG_2418

While the black-eyed peas are “resting”, cook the sausages and prepare all the other ingredients.

IMG_2420

Once everything is cooked and ready from the initial cooking phase, then it is time to cook them all again together.  Add 1 1/2 cups of rice and the cooked black-eyed peas to the sauteed vegetables, along with 3-4 cups of chicken stock.  Carefully place the cooked sausages on top of the liquid, cover and bring to a boil.  Once the mixture comes to a boil, reduce the heat to a simmer, and continue to cook until the liquid is all gone, or about 20-30 minutes.  Stir occasionally to make sure it does not stick.

IMG_2422

IMG_2437

Black-Eyed Peas and Andouille Sausage

1 1-lb bag of dried black-eyed peas (you can also use frozen peas, and skip the initial cooking phase for them)

1 1/2-2 lbs Andouille sausage or any other spicy sausage

3/4 onion, chopped fine

1-2 heaping TBSP garlic

1-2 jalapeno, chopped fine

1/2 each red and green bell pepper, chopped fine

salt & pepper to taste

Tobasco or other hot sauce to taste (optional)

1 1/2 cups uncooked rice

3-4 cups chicken stock

cilantro, chopped fine


Cook the black-eyed peas according to the package directions.  Cook your sausage.   Saute the vegetables.  Once the vegetables are cooked, add the cooked black-eyed peas the seasonings, hot sauce (if using) and the chicken stock.  Carefully place the cooked sausages on top of the liquid, making sure to cover them as much as possible.  Cover and bring to a boil.  Once it comes to a boil, reduce the heat and simmer for about 20-30 minutes or until the liquid is gone.  Stir occasionally.  Before serving, add the chopped cilantro.  Y’all are goin’ to like it.  I gare-un-tee it!


I’ve Been Nominated for The Blogger’s Recognition Award

WOW!!!!  This is an honor.  This is my second nomination for a blogger’s award.  Thank you all so much.  I have only been doing my blog since March.  I must be doing something right.  This would not be possible without all of you and your support.  I am glad you like my blog, my recipes and my fun food facts.  I cook because I love to and I love to share what I cook with others.  Food is best when shared, even if only sharing through recipes and pictures.

Blogger Recognition Award

I started my blog almost as a dare from a dear friend of mine, but now it has become so much more.  I am really enjoying it, and enjoying the journey.  Who knows where it will lead or where it will take me, but I am definitely enjoying the ride so far.

My advice to fellow bloggers is to speak from your heart.  Write about something you know.  Be yourself.  Your passion will shine through and make you sparkle.  Enjoy what you do.

I would like to thank mencanmakehomes for the nomination.  Thank you so much.  This is quite an honor.

And in keeping with the idea of paying it forward, I would like to nominate these fellow bloggers as well:

  1.   sasegirls
  2.   Snapshotsincursive
  3.   The Little Mermaid
  4.   miakouppa
  5.   adventures of a foodie mom/ auroramac
  6.  dray0308
  7.   a little Swiss, a little Canadian
  8.   PlantsandBeyond
  9.    GP Cox
  10.    Pique Images
  11.   kmwhitaker – Just Borking Around
  12.   BallesWorld
  13.   SaltyBiscotti
  14.   Quotes, Blogs and Rad Tech
  15.   Building The Love Shack
  16.   indianeskitchen


I wish you all the best of luck.  May the best blogger win the award.  You are all great inspirations.  I enjoy and learn so much from all of your blogs.  Keep up the good work.


Sometimes It’s All About the Wine

We are wine members at InVINtions, A Creative Winery, in Greenwood Village, CO.  We have been for a few years now.  Part of our membership includes two free bottles of wine per month.  Last month, we were not able to make it, so we had four bottles to pick up on this visit.  We can only carry it over for one month or we loose it.  And of course, we are not going to let good wine go to waste.  InVINtions has a wide variety of wines from dry, semi-dry, light bodied-reds, all the way up to full bodied reds, with sweet and semi-semi varietals as well.  They also offer a wide range of ports.  All are delicious.  Over the years, and the many trips we have made there, we have tried most of their wines, though every now and then, they bring out some new varietals as well.  We are part of the InVINtions family now.   You should check them out at their website http://www.InVINtionsWinery.com, or better yet, go visit them in person.

IMG_2350

While we we there this last time, we picked up a South African white blend (a new wine for us, but very good), a cool climate Pinot Noir, a Mossofiota Rosso, which is my favorite full-bodied red, and a a Mocha Mint port.   The Mocha Mint port is especially good around the holidays, but you can enjoy it all throughout the year.  The other port is one of our favorites InVINtions has on their menu, and it is the Deux Creme Caramel, which is so smooth and flavorful.  (This one we already had at home).  It pairs well with just about any dessert or you can just simply enjoy it all on it’s own as well,  No matter what you sample at InVINtions, you will not be disappointed.    All the wines at InVINtions are ready to drink now.  No aging required or necessary.  You will enjoy your whole wining experience with Marcus, Cory and crew.  So raise a glass, salud, a votre sante and happy wining.