How To Cook A Steak

Steak is a favorite all over the Untied States and in many other parts of the world as well. It is certainly a favorite in our house too. But what is the best way to cook a steak? What is the best temperature and level of doneness to enjoy it? Well, those are questions we will never have definitive answers for. The level of doneness is a very personal decision, and varies for everyone. And where you live also plays a role in determining how to cook a steak.

That being said, however, most steak masters and chefs will say a beautiful medium-rare is the best way to enjoy a good steak. If you were to ask a professional chef how they would want their steak to be cooked, nine times out of ten they would tell you medium-rare is the way to go. Medium rare steaks are red only in the very middle of the steak. The rest should be various shades of pink, with the outer edges browned. Cooking a steak medium-rare lets the natural beef flavor come out without being too cooked. The result is a steak that’s tender, juicy, and full of rich flavor. When you cook a steak to medium-rare the internal temperature is hot enough to allow excess moisture to escape through vapor or steam, keeping your steak juicy and flavorful. Medium or well-done steak not only exceeds the just right zone of protein balance, but it also causes moisture to evaporate from your meat, making the meat tough and dry.

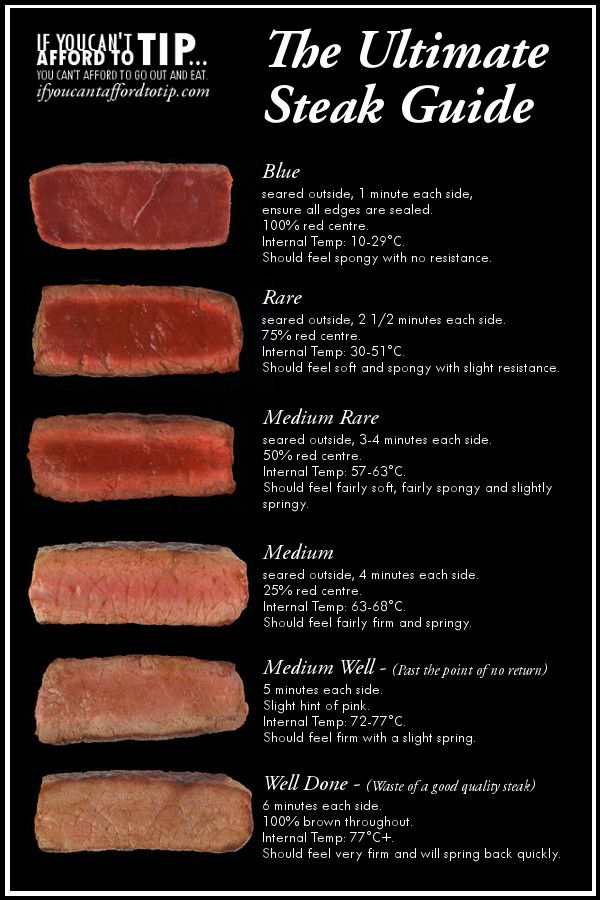
My dad was an Aussie, and most Aussies, or at least when he was growing up, liked their steaks well done. To me, that is like eating shoe leather. YUCK! I, on the other hand, like it nice and rare; not quite still mooing, but close. Based on the above chart, a perfect steak for me is somewhere between 2-3. For Larry, it is more between 3-4. My friend Leslie prefers her steaks au bleu, or number 1 on the chart. But regardless of the temperature you like your steak, the best way to eat it and enjoy it is to eat it one bite at a time. 🙂

Here are some different cuts of beef and where they come from. Different cuts of beef also determine how to cook the meat. Different cuts lend themselves to different cooking methods, cooking times and temperatures.

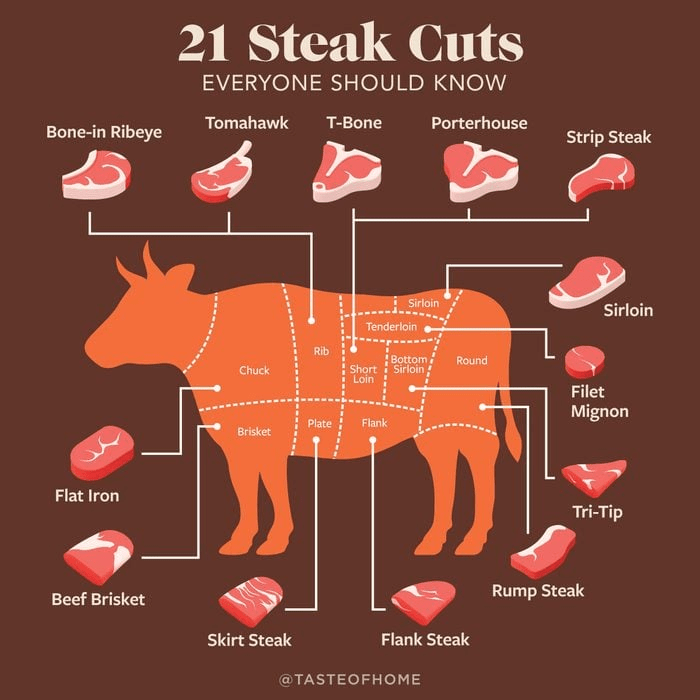
Where’s the beef? Now you know. If you a steak eater, and have questions, hopefully this has helped a little.

Have a great day and make everyday great. Stay safe and stay well. ‘Til next time.

Nature Walks – The Watcher

The other day, while walking at Metzger Farm, I saw my ever watchful Red-Tailed Hawk before I saw my deer. Nature Walks – Oh Deer! I would have left very happy indeed just by seeing my hawk, perched up high in the tree, surveying the area. I was VERY happy indeed with the shots I got too. But my day just kept getting better and better. 🙂

Have a great day and make everyday great. Stay safe and stay well. ‘Til next time.

Tuscan Style Pork Loin With Garlic & Rosemary

We’ve been eating a lot of steak and chicken lately, so it was time for some pork. We had a delicious pork loin that I cooked Tuscan style, with garlic and rosemary.

Tuscan Style Pork Loin with Garlic & Rosemary

Brine the pork first for about 2 hours in the refrigerator before cooking. The brine helps keep the pork juicy and tender, while adding additional flavor as well.

The Brine

4 lbs pork loin

2 1/3 cup firmly packed brown sugar

1 cup coarse salt

10 cloves whole garlic

4-5 sprigs fresh rosemary

1 TBSP olive oil

1 cup dry white wine

pepper to taste

Combine everything together, except the wine, and mix well, then pour over the pork. Cover and refrigerate for at least 2 hours.

Garlic Rosemary Paste

8 cloves garlic

2 sprigs fresh rosemary removed from the stems

1 TBSP olive oil

salt & pepper to taste

Place everything in the food processor and blend until it becomes a thick paste.

Preheat the oven to 325* F or 163* C.

Pat the pork dry with a paper towel.

Get a large skillet very hot and add butter and olive oil. Brown the pork, fat side down, for about 8 minutes, or until well browned. Add 1 cup dry white wine to the skillet, bring to a boil and scrape the skillet.

Slice the pork down the middle and generously spread the garlic rosemary paste on both sides of the pork loin.

Place the pork in a baking dish sprayed with cooking spray, with the browned side down. Add more of the garlic rosemary paste on top.

Pour the wine mixture into the baking dish and on top of the pork. Roast for about 65-80 minutes, coating with the juices about every 20 minutes. Add water if needed. You want the internal temperature of the pork to be at least 140* F or 60*C before serving.

Once the roast is done, remove it from the heat and let it rest for about 15 minutes before slicing. Top it with some of the cooking juice.

I served it alongside creamy mashed potatoes, a blend of roasted fall vegetables, my Italian torta Torta di Testo di Prosciutti e Formaggio and the same dry white wine I used for the sauce. Delicious! It was a perfect fall dinner.


Have a great day and make everyday great. Stay safe and stay well. ’til next time.

Nature Walks – Oh Deer!

I am so blessed and lucky to live where I do. Even in the “burbs”, we are surrounded by nature and all kinds of wildlife. I am always excited when I see the wildlife. But yesterday, OMG!!!! That excitement was elevated by a factor of about 10+.

I always hope to see deer, or elk, or maybe even a moose, when we are up in the mountains, but I NEVER expected to see deer a mile away from my house. And not just one deer, but two. WHOOOOO HOOOOOO!!!

I was walking along the trail at Metzger Farm, when I saw two very large ears way off in the distance. I thought my eyes were deceiving me, so I zoomed in as much as I could with my camera. I couldn’t believe it. I saw not one, but two white tailed mule deer. I apologize for the graininess and mediocre quality of the pictures, but the deer were at least 150-200 yards away. At least I got them though.

Life is great. It is always full of surprises. You just never know what to expect. Make the most out of every chance you get.

Mocha Caramel is Born

It is that time of year once again. Time to make my caramels once more. Priscilla and I will be continuing our tradition of making our caramels together, but I wanted to try something new as well.

I created a new caramel flavor. Mocha Caramel. I haven’t cut it yet, but I have tasted it. OH YEAH! I like it – A LOT!

Making caramels can be tricky. You have to get each boil to a certain temperature in order for the caramel to set just right. Here in Colorado, that temperature varies depending on the weather. You have to use a candy thermometer, and the temperature, for both boils, needs to be somewhere between 235-240*F. If the temperature isn’t high enough, the caramel won’t set. If it is too high, it will not be soft caramel, but will be more like a hard toffee instead, which is still good, just not what I am striving for when making caramels.

I thought I was at the right temperature when I made it the other day, but when I tried to cut my caramel, it was way too soft and didn’t set. So I scraped the whole batch back into the pot and boiled it again, this time getting the temperature a little higher than I did the other day. After pouring it into the prepared pan, you have to let it set for at least 1 day before cutting it. I felt it today, and stuck a knife in it earlier, and I think it will be fine to cut today.

Jeanne’s Caramel

My basic recipe has only four ingredients; sugar, butter, Karo dark syrup, and heavy whipping cream. I always make a double batch since I make it for Christmas gifts.

4 sticks of butter

4 cups sugar

4 cups Karo dark syrup

4 cups heavy whipping cream, divided

Prepare a 9×13 baking pan with cooking spray and butter rubbed all over.

Combine everything together in a large, heavy pot, using only 1/2 the cream. Bring to a boil of at least 235*F, stirring constantly with a wooden spoon. Add the rest of the cream at this point, and bring to a boil once again, getting the temperature to somewhere between 235-240*F once more, again stirring constantly.

Once the second boil is complete, carefully pour the mixture into the prepared pan. Cover with wax paper and let set overnight before cutting.

For my mocha caramel, the basic recipe is the same, but I added 8-10 oz of chocolate and 2 TBSP of espresso powder to the mix, along with the second addition of cream after the first boil.

Oh it just melts in your mouth, literally. This is my first batch of mocha caramel, but it definitely is now on the permanent list, with our plain caramel and our chocolate pecan caramel, another creation of mine. 🙂

Have a great day and make everyday great. Stay safe, stay sweet and stay well. ‘Til next time.

Nature Walks – Spooky Spider

Yesterday, when out walking I came across a big spider creeping on the sidewalk, into the grass. Spiders do not bother me, so I got as close as I could without scaring it away and took a few pictures. I thought a spooky spider was just perfect for the Halloween season. 🙂

I know it’s a bit early, but have a Spooktacular Halloween. 🙂

Torta di Testo di Prosciutti e Formaggio

I love bread and I love to make bread too. I can easily make bread a meal all by itself, and have done so on many occasions. But usually I don’t eat just bread alone, not any more at least, since we all know, man cannot survive on bread alone. I usually serve bread on the side. We eat it most nights. And I love having fresh baked, warm bread with soup too.

When I made my creamy pumpkin and turkey soup, Creamy Pumpkin and Turkey Soup I was also making some Italian bread with prosciutto and Swiss cheese, also known as torta di testo di prosciutti e formaggio. It is even stated in the recipe notes how this delicious bread goes very well with soup. It’s like they knew I would serve it with soup. 🙂 Had I read the directions before making it though, I would have known I needed to start the bread making process much earlier than I did in order to have it it with our first round of soup. We enjoyed it the next day and then again while enjoying our soup leftovers.

Torta di Testo di Proscuitti e Formaggio

This bread takes about 5-6 hours to make from start to finish. It is a labor of love, but definitely worth every minute put into it. It is not difficult to make, it is just time consuming.

2 1/4 tsp dry active yeast

1/3 cup +2 TBSP warm water

3 1/2 cups flour

1 1/2 tsp salt

1/2 tsp fresh ground black pepper

pinch of nutmeg

1/2 cup softened butter

4 eggs, beaten

5 oz prosciutto, chopped

5 oz Swiss or Emmental cheese, diced

olive oil

Mix the yeast and water together and let dissolve.

Mix the flour, salt and butter together until it resembles coarse sand.

Add the cheese and prosciutto to the flour mixture and mix well.

Mix the eggs with the yeast mixture. Make a well in the center of the flour mixture, then add the eggs and yeast and work in to the flour, from the inside out, until it is all mixed together and you have a soft, sticky dough.

Knead on a lightly floured surface for about 10 minutes, or until the dough is silky and elastic. Then put the dough into a lightly oiled bowl, cover and let rise for about 2 hours.

Punch the dough and let rest for an additional 10 minutes, then shape it into a round loaf. Lightly oil a baking pan and place the dough on the oiled pan to let proof for another hour. I used chili olive oil, for just a little extra pizzazz, but olive oil is perfectly fine.

When ready to bake, preheat the oven to 350*F or 180*C. Then bake for 1 1/2 hours or until golden brown. Allow it to cool before slicing.

This bread is delicious no matter what, but I think it is best when served warm or hot, smeared with butter. 🙂

Whenever I make a meal of soup and bread, I always think of my picture that hangs in my kitchen. It hung in my kitchen all while growing up and now it proudly hangs in my own kitchen too. In fact, it will always hang in my kitchen, no matter where my kitchen happens to be. I just love this picture.

Sorry for the glare. It is what it is.

Have a great day and make everyday great. Stay safe and stay well. ‘Til next time.

Nature Walks – Lots And Lots Of Squirrels

This year I have seen so many squirrels. They are everywhere. And no matter how many times I see them, I always enjoy their company. No matter what they are doing, they are always so full of personality. They seem to love me, or at least the camera, as much as I love them too. They are always posing for the camera.

These two got caught.

Do you need a massage? Let me help.

I can’t quite get out all the knots. Let me try biting them out.

Have a fun, squirrely day.

Creamy Pumpkin and Turkey Soup

Fall is in the air. The weather is much cooler and crisper, and it is the perfect time of year for soup. Not just any soup, but thick, hearty soups that stick to your ribs and warm the cockles of your heart. Thanks to our friend the Ohiocook at https://beatcancer2010.wordpress.com/ and Whole and Heavenly Oven at https://wholeandheavenlyoven.com/ for the inspiration for this delicious, hearty soup.

Creamy Pumpkin and Turkey Soup

As always, I was inspired by their recipe and then expanded on it to make it my own. 🙂 I added turkey and a lot of vegetables, including both pureed pumpkin and whole pumpkin, celery and peppers. The result – DELICIOUS! And when I make soups, I make soups! I always have a big pot. Some for now and some for later, or better yet, some to share.

You can use chicken instead of turkey if you like, but I had some leftover turkey in the freezer that I pulled out to use.

3 lbs cooked turkey or chicken, cubed

1 onion, diced

1 TBSP garlic

1 cup carrots, diced

1 cup celery, diced

1-1 1/2 cups peppers, diced

1-2 cups, pumpkin, peeled and diced

1 can pumpkin puree

2 cups uncooked wild rice

6-8 cups chicken broth

2 cups heavy whipping cream

salt & pepper to taste

red pepper flakes to taste

2 TBSP fresh rosemary, chopped fine

olive oil for cooking

Get a large soup pot very hot and add your oil for cooking, then add all the heartier vegetables and cook for about 5-7 minutes, stirring frequently, or until the onions are translucent and the vegetables have softened a bit.

Whisk together the cream, pumpkin puree and chopped rosemary.

Add the chopped pumpkin, turkey, chicken broth and seasonings to the pot and mix together thoroughly.

Add the wild rice, mix thoroughly, and bring to a boil, then reduce the heat to a simmer and continue to cook for about 20-30 minutes, or until the rice is cooked, stirring occasionally.

Add the pumpkin puree and cream mixture, and adjust the seasonings as needed. Again, bring to a boil, then reduce the heat to a simmer and continue to cook for about 10 minutes or so, stirring frequently.

Then bowl it up and sprinkle a few roasted pepita seeds on top and enjoy. This soup goes really well with breads of all kinds. I made a delicious Italian bread with prosciutto and cheese to go with it, but more on that later, and served it all with a delicious, white Verdicchio on the side, an Italian white wine we made last time we made wine from InVINtions.

Soup is good soul food and warms you up from the inside out. It is perfect for cold, blustery days.

Have a great day and make everyday great. Stay safe and stay well. ‘Til next time.

My Argentine Feast – Part 7 – Dulce de Leche Panqueques

What dinner party would be complete without dessert, right?! This is the last of my Argentine Feast series, and it is all about the dessert of course. The piece de resistance, and our last course of the evening was some Argentine crepes, or dulce de leche panqueques.

Dulce de leche is a very popular dessert in the Latin world, but Argentina is renowned for their dulce de leche. Dulce de leche is a thick, silky, smooth, and glossy confection made from milk and sugar that has been caramelized. The name translates to “sweet from milk” in Spanish. It is a beloved part of Argentinian culture and cuisine. In fact, it is so popular in Argentina, that they even celebrate International Dulce de Leche Day on October 11 to honor the national delicacy. Dulce de leche is a source of national pride in Argentina and Uruguay, and is considered a regional staple. In 2003, Argentina attempted to declare dulce de leche a national patrimony, but other countries in South and Central America objected.

Dulce de leche is used in many ways. You can spread it on or add it to anything you want to sweeten up a bit. And after all, we all know the world needs a lot more sweeteners. 🙂

No one really knows the story of how ducle de leche was actually created, but one rumor has it that Napoleon’s cook heated a blend of milk and sugar for far too long way back in 1804. Some say it was an accidental discovery made by a cook for Argentinian leader Juan Manuel de Rosas, when she left sweetened milk on the stove, only to come back and find it had transformed into a thick and creamy mixture, back in 1829. Other theories suggest that dulce de leche originated in Indonesia in the 6th century and was brought to the Americas by Napoleon or Rosas. Again, no one really knows, and we may never know. All that we know, and all that really matters, is that it is an excellent dessert. 🙂

In keeping with the Argentine theme for the evening, I finished it off with some delicious dulce de leche panqueques, or crepes.

Dulce de Leche Panqueques

I made the batter ahead of time and let it set in the refrigerator for a few hours before making the crepes. It is a basic crepe recipe.

1 1/2 cups flour

1/2 tsp salt

4 large eggs

1 cup cold water

1 cup cold milk

4 TBSP butter, melted

dulce de leche sauce

Combine all the ingredients, except the dulce de leche, and whisk together well. Let set in the refrigerator for a minimum of 1 hour and up to 24 hours before making the crepes.

When ready to make the crepes, take the batter out of the refrigerator a little before cooking. Get a small skillet very hot, then spray with cooking spray and add a dash of butter to the pan and swirl it all around to coat the skillet. Add about 1/4 cup of batter and immediately swirl it all around to coat the bottom of the skillet with a very thin layer of batter. Cook for about 1-1 1/2 minutes, then carefully flip over and cook for an additional 1-1/12 minutes. Remove from the skillet and transfer to a plate. Do this for every crepe until the batter is finished.

While the crepe is still hot, and another one is in the skillet cooking, spread about 1 TBSP of the dulce de leche all over the crepe, then roll it up.

!Esta perfecto! I don’t think it needs anything else, but Larry being the ice cream lover that he is, thought it needed to be topped with ice cream as well. 🙂

This is a very simple dessert, made with very simple, basic ingredients, but it was a huge hit. As I often say, simple is always the best. 🙂

This concludes my Argentine feast series. I hope you all enjoyed my Argentine dinner party as much as we did. !Desfruta!

Have a great day and make everyday great. Stay sweet, stay safe and stay well. ‘Til next time.