The Chef’s Night Off

Yesterday my husband and I celebrated our 15th wedding anniversary.  I cook all the time, and by now you must know I absolutely love to cook and create new taste sensations in the kitchen.  Food and cooking are passions of mine, right up there with diving and swimming.  But every now and then, I like to step away from my kitchen and have others cook for me.  My anniversary is good time for that.  Besides getting a break from the kitchen and having someone cook for me for a change, going out every now and then also makes my creative juices flow even more.  I try new things and learn about new ways to work with food.  So going out to dinner is kind of like doing research or a little sabbatical for me.

As you know, we love seafood, and eat quite a bit of it too.  However, Denver is known more for its steak rather than its seafood, although there are some very good seafood restaurants here too.  One such restaurant is Bonefish.  Yes, Bonefish is part of a restaurant chain, and I much prefer unique, privately owned restaurants to chains, but some chain restaurants are good too.  Bonefish is an upscale restaurant that specializes in seafood, and there just happens to be one not far from our house, in Westminster, CO.  We tend to go there for special occasions.

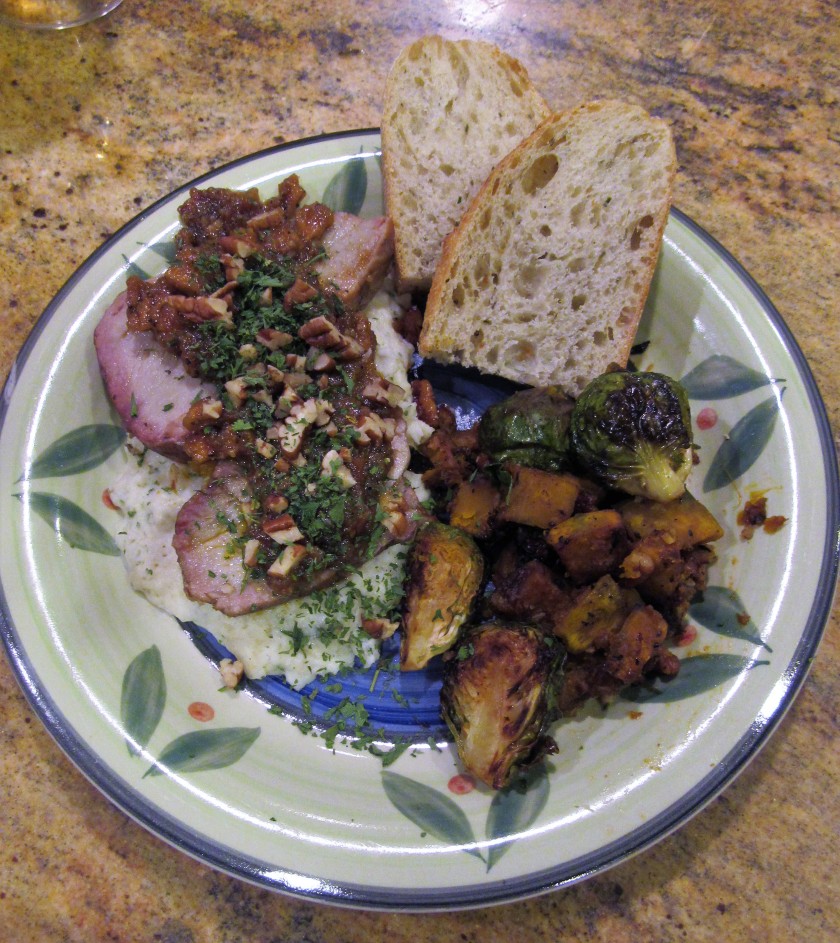
As soon as we sat down, our server brought us some warm bread with olive oil and pesto for a dipping sauce.  I love bread and I love to dip my bread in olive oil, so this is always a good start to a meal.

IMG_3176

Once the bread was brought out, we started our meal with a delicious corn and lump crab chowder.  It was just perfect for a cool fall evening.  It was nice and thick, just the way I like it too, especially topped with a little cracked black pepper.

IMG_3177

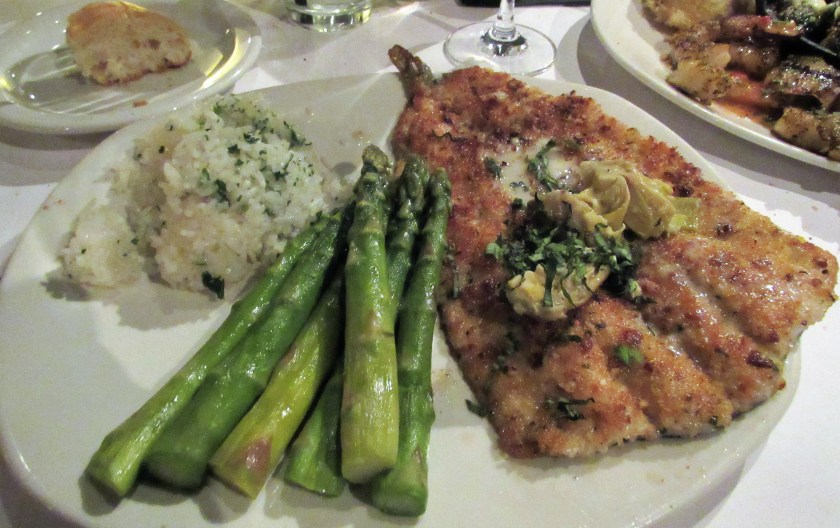
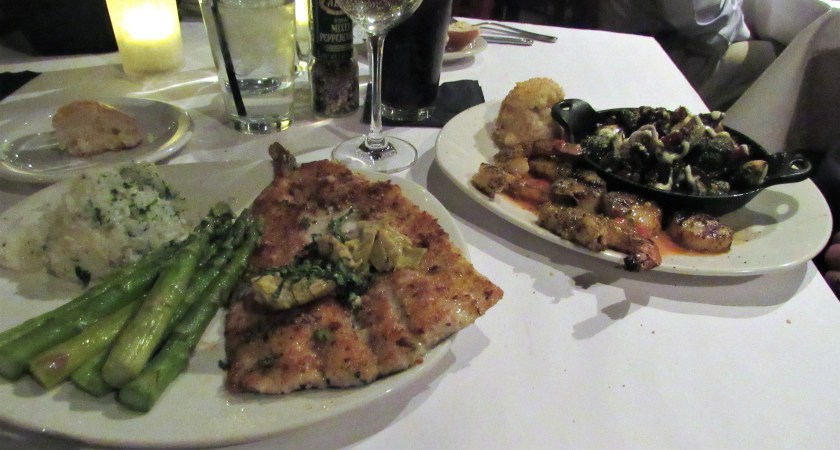
Then our main courses came.  I ordered pecan crusted trout with a lemon butter sauce and a sprinkling of artichoke hearts, along with grilled asparagus and white Jasmine rice.  Larry had grilled shrimp and scallops with a garlic-tomato-lime sauce served with grilled Brussels sprouts and potatoes au gratin.  Both were cooked to perfection, although I had to ask for a little more sauce for my trout, which the server graciously brought out immediately.  What can I say, I am a “saucy” kind of girl.  My wine choice for the evening was a smooth, light, semi-sweet Chateau St. Michelle Riesling that paired perfectly with my trout.

IMG_3179

IMG_3182

IMG_3183

IMG_3180

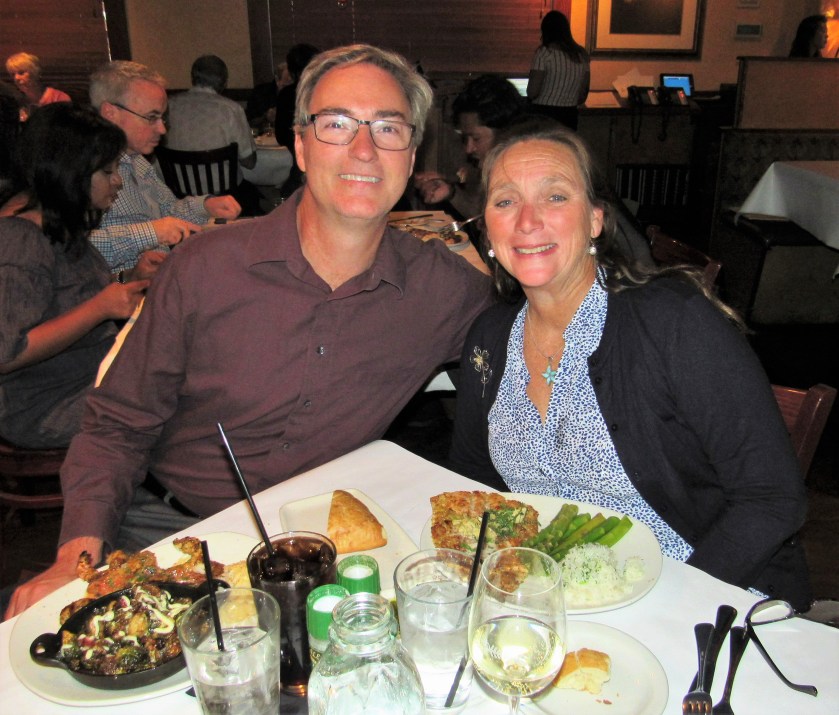
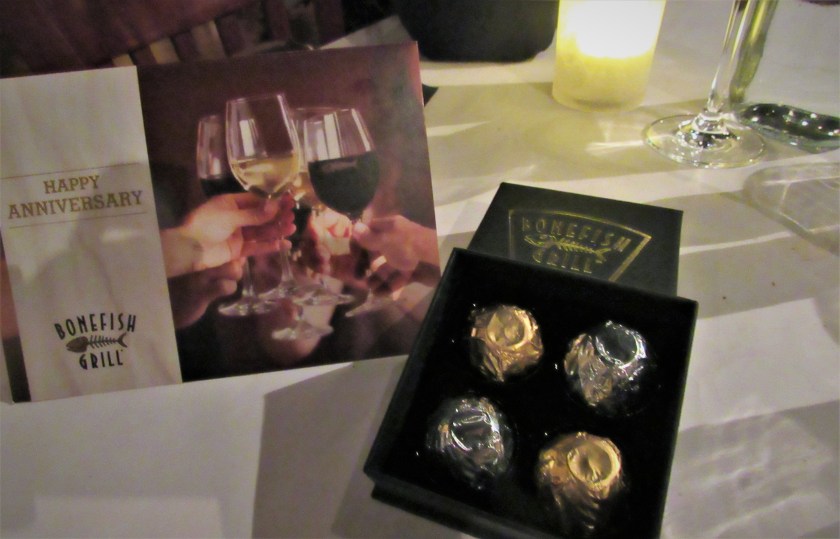
After we had finished our delicious dinner, we told our server we were celebrating our anniversary.  A few minutes later, the manager came out with a card that the whole staff had signed and a box of truffles and wished us a happy anniversary.  That extra special little touch just made the evening.  The restaurant, the manager, the chef and the whole staff just went above and beyond our expectations and made our evening very special.  Thank you to all.

IMG_3184


Fajitas y Frijoles

Anyone who has ever eaten in a Mexican restaurant is familiar with fajitas.  They are a platter full of sizzling meats with peppers and onions, served with warm tortillas and a are a staple in any Mexican restaurant, anywhere you go.  They come in beef, chicken, shrimp or a combination thereof, as well as other meat and seafood combinations.  This is the modern version of fajitas.   The modern version is completely different than the traditional version.  Traditionally, fajitas are only made with skirt steak.  In Mexico, fajitas are known as arracheras.

Fajitas, or arracheras, are a true Tex-Mex creation, originating along the Rio Grande borders of Texas and Mexico, sometime between the 1930’s and the 1940’s.  They are a blending of the Texas cowboy and the Mexican panchero foods.  When the cowboys would process the steers for meet, they often gave the Mexican ranch workers meat as part of their wages.  However, the cowboys often gave the least desirable parts of the cow to the ranch workers, which was the skirt part of the cow.  With necessity often being the mother of invention, the workers and their families took these skirt steaks that were tough, and tried different methods of making them palatable, which eventually led to the creation of arracheras, or fajitas as they are now most commonly known.  The word fajitas is derived from the word faja, which is the Spanish word for belt or girdle. A skirt steak is the the belt or girdle of the cow.

I grew up in Southern California and I grew up with great Mexican food as well, fajitas being among those wonderful foods.  I make fajitas quite often, and yes, I make the modern versions, using all types of meats and seafood, rather than just the traditional version of only using skirt steak.  Although I do make steak fajitas as well.  Last night, it was shrimp fajitas, served with Cubano style black beans (frijoles negro) over rice, with some tortillas on the side.  And of course, I had a margarita especial to make the meal complete.

IMG_3173

I like using a lot of colors, and again, as you can see, a lot of vegetables too.  Chicken, Sausage and Vegetable Alfredo I used red, yellow and orange bell peppers, an Anaheim, or hatch chili, and jalapeno pepper, red onion and mushrooms, along with fresh oregano, thyme, sage and cilantro, and of course garlic, cumin, and salt and pepper.

IMG_3159

Cook all the vegetables first, until they are tender, then remove from the pan and set aside.

IMG_3161

I cooked my shrimp in the same pan, along with my herbs and spices.  I had some leftover pumpkin vinaigrette (optional) that I also added to the shrimp and herbs too, to add a little more zest to the dish.

IMG_3165

Once the shrimp was cooked, I added the vegetables back to the pan and mixed everything together.  It is now ready to eat.

IMG_3166

I love black beans, and I especially love them Cubano style.  Cubano style black beans, or frijoles negro, are cooked with cumin and lots of colorful vegetables.  I used corn, red pepper, jalapeno, garlic and red onion in my mixture, as well as more sage, cilantro thyme and oregano.

IMG_3168

Cook everything together until the vegetables are soft and tender, then add the beans.  You can eat it as is, or serve it over rice.  I served the frijoles negro over white rice.

IMG_3171

La comida Latino es listo.  Top with avocado slices and/or sour cream if you like, add a margarita or two, and dinner is served.

IMG_3173

Because there are so many different versions of fajitas, I am not going to give an actual recipe, but it is basically a combination of peppers, onions, garlic, cumin, and the meat of your choice (or not if making it vegetarian) all cooked together.  Traditionally it is served with rice and beans and warm tortillas.  Desfruitas!


Chicken Pot Pie

The weather is finally getting cool enough to bake and enjoy some hearty foods of the season.  I thought it was the perfect time to make chicken pot pies.  I load them up with “lots of stuff” as my husband would say, making them very filling and satisfyingly tasty. They are a complete meal all by themselves.  No need for anything else except a glass of wine, and you are all set for dinner.

IMG_3158

I made my basic, go-to dough and let it chill for about an hour before I rolled it out to make my crust.  As my dough was chilling and setting, I cut and cooked my vegetables and chicken.  I used about 1 1/2-2 lbs of cooked chicken, 2 large carrots, 1 onion, 1 large russet potato, 1 1/2 TBSP garlic and about 1 cup of frozen peas.  I cut all my vegetables into a small dice.  When cutting vegetables, try to cut everything fairly similar in size to make it more consistent and to help everything cook more evenly.

IMG_3142

Cook the potatoes, onions and carrots first, since they are heartier vegetables and need a longer cooking time.  Cook them for about about 10 or so minutes, or until they are soft and the onions are translucent.

IMG_3145

Once the carrots, onions and potatoes are cooked, add the garlic, peas and chicken and mix thoroughly.  Then make your white sauce or bechemal sauce.  You can either make it separately and then add it to your chicken and vegetable mixture or you can just make the sauce in the same pan along with the mixture.  I almost always just make my sauce in the same pan.  That way, I am getting all the drippings that may be stuck to the bottom of the pan.  For my bechamel sauce, I used about 1-1 1/2 cups of milk, about 3-4 TBSP flour, about 1 tsp each of salt and pepper and about 1 tsp each of fresh, chopped thyme and oregano.  Mix everything together and continue to cook at a low simmer for about 10 minutes.

IMG_3148

The dough recipe is enough for four medium/large ramekins, with both a bottom filling and a top crust.  I find it is too much breading to have it come up the sides of the ramekins, so I just do the tops and bottoms.   Use the ramekins as the guide and cut your dough to fit the dish.  Spray the inside with cooking spray, then add your bottom layer.  Once you have the bottom layer in the ramekins, start spooning in the chicken and vegetable mixture.  I added about 8 oz of my filling and then topped it with another layer of my dough to make the crust.

IMG_3149

I used a little extra dough to wrap around the edges of the ramekins as a seal and pinched the edges.  Once your have the crust in place score a couple of large slices into the top of the crust so it can breathe while it is cooking and won’t explode.  Then brush the tops and the edges with an egg wash.  The pies are now ready to bake.

IMG_3152

For my egg wash, I used one egg and a little heavy whipping cream and them whisked them together.  Some people use water, others use milk, and some use heavy whipping cream.  I prefer using the heavy whipping cream because it has more sugar in it, which provides a little better browning, but it is all a personal choice.  There is no right or wrong way to make an egg wash.  Bake the pies at 375* F for about 1 hour or until the crust is golden brown and light and flaky.

IMG_3153

IMG_3156

Chicken Pot Pie

Dough

1 1/2 cups flour

6 TBSP cold butter, cubed

1/2 tsp salt

1 egg

4-6 TBSP heavy whipping cream


Blend the flour, butter and salt in the food processor until it is light and crumbly and well incorporated.  Then add the egg and the heavy whipping cream and continue to process until it forms into a ball.  Wrap the dough in plastic wrap and chill for at least 30-60 minutes, or up to 2 days, before using.

Once the dough is set, roll it out on a lightly floured surface and shape.


Chicken Pot Pie Filling

1 1/2-2 lbs cooked chicken, cubed

2 large carrots, small dice

1 medium onion, small dice

1 large russet potato, small dice

1 cup frozen peas

1 1/2 TBSP garlic

salt & pepper to taste

1 cup milk, add more a needed

olive oil and/or butter

3-4 TBSP flour

1 tsp each fresh thyme and oregano, chopped fine


Saute the carrots, onions and potatoes in either olive oil or butter, or a combination of both until cooked and the onions are translucent.  Then add the garlic, peas and chicken and mix thoroughly.  Add the milk, flour, salt & pepper and fresh herbs and combine well.  Reduce the heat to a simmer and continue to cook for about 10 minutes.

Preheat the oven to 375*F

Spray the ramekins with cooking spray and add the bottom layer of dough.  Fill the ramekins with the chicken filling then add the crust and a rim to make a tight seal around the edges.  Score the top and brush with egg wash.  Bake for about 1 hour or until the dough is golden brown and is light and flaky.


**** When making a white sauce or a bechamel sauce, you want to use roughly equal amounts of fat (oil and/or butter) and flour, to make a roux, which will thicken your milk sauce.  Once all the ingredients are mixed in, bring the sauce to a boil, then reduce to a simmer and continue to cook for about 10 minutes to make sure the flour is cooked.


The Flavors of Fall

It’s official!!!!!  Fall is now here.  I love it!  The weather is not yet reflecting fall, and our leaves are only just starting to change colors, but the calendar says it is officially here, so I am going with that.   Soon houses and homes everywhere will be filled with the scents and flavors of fall.   This includes warm cinnamon and apples; lots of pumpkins and pumpkin pie; toasted pecans; maple syrup; and so much more.   I started some fall cooking a few weeks ago, but now that it is officially the fall season, you can expect to see a lot more seasonal cooking and baking from me.

Here in the United States, we tend to think of pumpkins only for pumpkin pie.  Pumpkin pie is certainly delicious, but there is so much more you can do with pumpkin than just pie.  What we call squash is known to the rest of the world as pumpkin, so you will find I use the two terms interchangeably.  Pumpkins, like their cousins in the squash family, are part of the cucurbita family or gourd family.  Spaghetti Squash with Sausage and Mushrooms  Pumpkins, or squash, are eaten all over the world and are a staple in many people’s diet.  They are very healthy for you as well as being very tasty.  Pumpkin is also very versatile.  There are s many different ways you can cook it.  I love pumpkin any which way it is cooked, and I tend to cook a lot of pumpkin dishes in the fall.  Dinner  was most definitely a meal of the fall season, complete with lots of of the flavors of fall.  We pulled some pork loin that we had already cooked from the freezer and I made a delicious pumpkin-apple butter sauce (I made my apple butter quite awhile ago.  It is almost time to make some more, and when I do, the recipe will follow)  with toasted pecans to top it off.  I served it atop garlic mashed potatoes and served it with roasted pumpkin and Brussels sprouts, also with with toasted pecans.

IMG_3138

The ingredients for my sauce:  Apple butter (I made that quite awhile ago), dried apples (I had them already, but normally I would use fresh apples), canned pumpkin, salt, pepper, toasted pecans and pumpkin vinaigrette (I actually used my own that I made, but for the picture, I had a store-bought pumpkin vinaigrette.  This was actually the inspiration for me making my own).   This is a zesty, flavorful sauce that is perfect for a fall dinner.  I served it over pork, but it is also very good with chicken too.

IMG_3136

Pumpkin-Apple Pecan Sauce

3/4 cup toasted pecans, chopped and set aside

1/2 cup canned pumpkin puree

1.4 cup apples, diced small – dried or fresh is fine

1/2 tsp each salt & pepper

2/3 cup apple butter

1/2 cup pumpkin vinaigrette

Just mix everything except the pecans together and cook in a saucepan for about 10 minutes, at a low simmer.  Then top your meat with the sauce and add the toasted, chopped pecans.


Everything I need for my maple roasted vegetables.  I used kobaishi squash, but you can use any type of hard gourd-like squash or pumpkins you like.  I use a wide variety of squash and pumpkins all the time.  Their flavors are all pretty similar.

IMG_3130

The recipe I was using said to cook the pumpkin first, then add the Brussels sprouts and pecans later and continue to cook for an additional 20 minutes.  Well, I tried that at first, but if I had continued to follow the recipe, my squash would have been mush.  So, after cooking the squash, I removed it from my pan and then cooked my Brussels sprouts and pecans and added the squash later.  From here on out, I will just cook everything all at once.

IMG_3131

Maple Roasted Pumpkin, Brussels Sprouts and Pecans

1/2 cup pecans, chopped

1 lb of your favorite pumpkin or hearty squash, skinned and cubed

1 lb Brussels Sprouts, cut in half lengthwise

salt & pepper to taste

2  TBSP pure maple syrup

2 TBSP olive oil


Preheat the oven to 400*F

Toss everything together and bake for about 20-25 minutes or until the squash and Brussels sprouts are cooked and tender.

The flavors of fall – pork loin topped with a pumpkin-apple butter sauce with toasted pecans served atop garlic mashed potatoes, with maple roasted pumpkin, Brussels sprouts and pecans.  I served it with a chardonnay with hints of apples and citrus.    Let the fall season begin!

IMG_3137


Chicken, Sausage and Vegetable Alfredo

I love vegetables.  All kinds.  I have to really think hard to find a vegetable I do not like.  Because I love vegetables so much, and because they are so healthy for us, we eat a lot of them.  In fact, we eat a much larger variety of vegetables than a lot of vegetarians and vegans we know.  Strange as they may sound, it is very true.   It is recommended we eat at least five servings of vegetables per day.  Easy-peasy.    I always use a wide variety of vegetables in almost every meal I prepare.  I serve vegetables with more vegetables, and I mix all colors and textures of vegetables too, which also ensures we get a wide variety  of nutrients.  Often times, we have 5-7, or more, varieties of vegetables in one meal alone.  There is definitely no problem with us eating our daily recommended amount of vegetables in this house.  I could easily be a vegetarian if only I didn’t like meat so much.  I am definitely an omnivore and eat everything, so there is also a fair amount of meat in our diet as well.  My husband eats more meat than I do, and he wants it with every meal.  I am quite satisfied with eating it once a day.

I started off wanting to making just a simple chicken, broccoli, mushroom Alfredo, but it turned into much, much more.  Along with the chicken, broccoli and mushrooms, I also added carrots, red peppers, both white and green onions, Anaheim peppers and a jalapeno pepper, along with sausage, basil thyme and oregano.  So just in this one meal alone, I used eight different vegetables and three different fresh herbs.  I also added some sausage as well.  This is very typical of how I cook.  Because I love so many different kinds of food, and I am definitely NOT a picky eater, I always add more.  More is better, right?!  (Not always, but often this is the case).

IMG_3010

I bought a rotisserie chicken from Costco that I shredded and cooked my sausage and set them aside.  I sliced all my vegetables and sauteed them together until they were cooked and softened.

IMG_3011

If you do not want to add any meat, the vegetables alone would make a great meal in and of themselves, served with Alfredo sauce and pasta.

IMG_3013

Once the vegetables were all cooked, I removed them from my pan and made my Alfredo sauce.  In the same pan, with all the drippings from the vegetables and sausages, I poured in about 1 cup of a dry white wine.   Let the wine reduce down to about half, then added about 1 1/2-2 cups of heavy whipping cream and mozzarella cheese.

IMG_3014

Add the vegetables and meat, mix well and continue to cook at a low simmer for about 10-15 minutes, stirring occasionally.  Add the seasonings and herbs.

IMG_3015

Once it has all cooked and the sauce has thickened a bit, it is ready to add over your favorite cooked pasta. Because this is a thick, hearty sauce,  I would recommend using a heavier pasta, like fettuccine or farfalle (bow-tie).  Add a little garlic cheese bread, more cheese to the pasta if you like, and serve with the wine of your choice.  I used a light, crisp viognier to help balance out the meal since I served it with a heavy, hearty sauce.  Mangia!  (The wine is from one of our local wineries, that is only about 5 minutes from where we live.  It is from Turquoise Mesa Winery, in Broomfield, CO).  This is definitely one of those meals where there is no specific recipe and I just used what I had on hand.  We always have a wide variety of vegetables.

IMG_3017

Garlic Alfredo Sauce

1 cup dry white wine

1 1/2-2 cups heavy whipping cream

1/2 cup mozzarella cheese

salt & pepper to taste

1 TBSP garlic

1-2 TBSP butter, + more after the sauce is cooked as a finish (optional)


Saute the garlic in butter for about 2-3 minutes.  Add the wine and reduce by about 1/2.  Add the heavy whipping cream and cheese and mix well.  Add salt and pepper to your taste, and any additional seasonings and/or herbs and mix well.  You can use this sauce as is, or serve it with vegetables and/or chicken, sausage, shrimp or scallops, and serve over cooked pasta.

*** I almost always serve a garlic-herb cheese bread when i make this meal, and I add the leftover butter from my bread to my sauce.


The Battle of the Peanut Butter Cups

Everyone in America is very familiar with the beloved Reese’s Peanut Butter Cup candy.  Reese’s candies have been around since 1928.  They are an American classic originating in Hershey, PA by the HB Reese Candy Company, which Mr. Reese founded in his basement.  Although he had a lot of different candies, his peanut butter candies were his most popular.  In 1963, the HB Reese Candy Company merged with The Hershey Chocolate Company and history was made, and Reese’s Peanut Butter Cups were born.  Reese’s Peanut Butter cups are among the most popular candies in America today.

IMG_3023

Enter the challenger, the new “kid” on the block, The Kirkland Brand Peanut Butter Cups from Costco.   Almost everyone knows of Costco, and most people love the Costco brands, myself included.  They have created their own brand, the Kirkland brand, and they have a wide variety of delicious, very good quality food products, including their version of America’s beloved peanut butter cups.

IMG_3025

Both the favorite, Reese’s Peanut Butter Cups and the challenger, The Kirkland Brand Peanut Butter Cups, are delicious mouthfuls of milk chocolate that have a peanut butter filling.  Both are irresistible, and make it very difficult to stop at just one.

IMG_3021

The contenders sit side by side on my kitchen counter, ready for battle.  Both are slowly peeled from their foil wrappers, and are ready for battle.  The favorite is wrapped in gold and the contender in bright red.  Both are prepared for this epic fight and have plenty of backup just in case one accidentally gets eaten before the finish of the battle.  Both are prepared to put up a good contest to defend their honor.  Both contenders go to their prospective corners.

IMG_3022

They meet, bite mark to bite mark, and size each other up.  They look pretty evenly matched, although The Kirkland Brand has a little more pizzazz to it’s bite.  Both contenders are ready.  Let the battle begin.

IMG_3024

The crowd favorite, wrapped in gold is looking a little flat and does not have as much style and flair as the challenger, but we all know it is substance rather than style right?!  Is the peanut butter filling of The Reese’s cup good enough to beat out the challenger?  Can it stand up to the taste test? The judge has nibbled equally from both.  She has let the chocolate and peanut butter flavors melt in her mouth to get the full essence and consistency of both.  She takes another nibble from each contestant and weighs in again.  After there is nothing left of either contender, they fought to their deaths and gave their all, the verdict is in.  And the winner is ……… Ladies and Gentlemen, we have a new winner in the house!  After careful consideration, and quite a few tastings later, the judge has decided the new kid on the block, The Kirkland Brand, is the winner.   What lead the judge to her decision you might ask.  There were actually a few factors that lead to her decision.  She liked the lighter, fluffier appearance of the Kirkland Brand for one.  She thought it had a little more personality than the tried and true Reese’s Peanut Butter Cup.  But more importantly than the appearance, the judge really thought the peanut butter filling in the Kirkland Brand had a better, more “peanut buttery” taste and had a creamier consistency, again, more like actual peanut butter than the favorite.  It just melted in her mouth.  Though she still loves the favorite, it is not HER favorite.  The judge prefers the challenger, The Kirkland Brand, hands down.  I’m off to Costco.  I need more peanut butter cups.

Bacon Wrapped Shrimp with a Tomato-Herb Vinaigrette

We  love shrimp and we eat it a lot.  We also eat bacon wrapped shrimp quite often as well.  To make it different, I make and use different sauces, depending on my mood and what I have on hand at the time.  This time I made it with a delicious,  fresh tomato-herb vinaigrette.   This gave the shrimp a little bit of a Spanish flair, since this vinaigrette is found all over Spain.  By adding a little Spanish paprika to the dressing, you are also adding a little of the Spanish terroir, or personality of the land, to the dish as well.  You can use whatever type of tomato you like.  Whatever type of tomato you use will give the vinaigrette a slightly different personality each time, which makes it kind of fun and different.  This particular time, I used Roma tomatoes, but it would be also be delicious with heirloom tomatoes, or perhaps yellow sunshine tomatoes, or grape tomatoes, or any other tomato of your choice.  Use your imagination and play around a little.  Have fun experimenting with different kinds of tomatoes and trying the different flavors of each one.    This vinaigrette is just as good on shrimp as it is on salad and/or chicken too.

I served my bacon wrapped shrimp over wild rice, then added some green beans with toasted almonds and served it all with a cool, crisp chardonnay that had hints of apples and melon, for a perfect end of summer meal.

IMG_3006

IMG_2999

I just put all my ingredients into the food processor and blended everything together until it was a slightly chunky-liquid mixture.  I made my dressing first, because I also marinated my shrimp in it before wrapping them in the bacon and skewering them up.  I only marinated them for about 15 minutes.  The acidity from the tomatoes and the vinegar will “cook” the shrimp, like a ceviche, if left in too long.  If they “cook” from the acidity, then cook again on the grill, they shrimp will become tough and rubbery and over cooked.

IMG_3000

Par-cook the bacon on a baking sheet for about 15-20 minutes in the oven at 350* F before wrapping the shrimp.  You want it to be soft and pliable.  Also bacon takes longer to cook than shrimp and you definitely do not want to eat it raw.  By par-cooking it first, then wrapping the shrimp, it will cook up just right on the grill without over cooking the shrimp.

IMG_3001

Once I had all the shrimp wrapped and skewered, I poured the rest of the vinaigrette on top of the bacon, then let it chill in the refrigerator until I was ready to grill it.

IMG_3003

IMG_3008

Tomato-Herb Vinaigrette

3-4 medium sized tomatoes of your choice, cut into a medium dice (or about 1 lb, depending on what kind of tomatoes you are using)

1 1/2 TBSP garlic

1 TBSP Spanish paprika

1 1/2 tsp cumin

1 tsp salt

1 tsp black pepper

1/2 cup olive oil

3-4 TBSP sherry vinegar

3-4 TBSP red wine vinegar

1 tsp each thyme, basil, oregano

Put everything together in the food processor and blend for about 1 minute, or until everything is liquified and well blended.   It will still be slightly chunky, and that’s perfect.  It just adds more character and texture to either your salad or to your marinade.


A Poem By The Stroppy Git Who Hates Poetry

Normally I do not reblog other people’s blogs and ideas, but this was to funny not to share.

the britchy one's avatarBitchin’ in the Kitchen

My much loved fellow blogger, Kristian found a challenge on a blog I haven’t come across before but will have to start following I think!

Esther of Esther Newton Blog set a challenge to write a poem about food.

Yes you read that right. A Poem.

Me. The girl who’s idea of a classy sonnet is ‘The Boy Stood On The Burning Deck…

I make no secret of the fact I’m not a fan of poetry. I’m a big, Big, BIG fan of Kristian though so I read every thing he writes. As should you! Seriously, I love his stories. He’s one of my absolute favorite bloggers.

So poems. Poems and me. I went there. Apologies in advance but the devil made me do it!

I never thought that I should see

A food that couldn’t quite please me

A filthy psycho chose to tease

And thus invented cottage cheese

View original post 188 more words

Tuscan Steak

After our wonderful Caribbean vacation, where we ate mostly seafood, we came back really wanting and craving steak.   Like with everything else I cook, I like to make things in a variety of ways to keep our meals fun and exciting, so I am always coming with new twists to old classics.

I used a nice flank steak that I marinated with salt, pepper, red pepper flakes, paprika and Worcestershire sauce.  I let it marinate for about 4 hours before grilling it up.  To me, the best way to eat a steak is medium rare.  That’s when it is really juicy and tender and all the flavors just really pop.  But, as I always say, cook it how you like it.

IMG_2993

To make my steak Tuscan style, I used fresh baby spinach, tomatoes, garlic, onions, mushrooms and butter beans.  Normally I use the smaller cannellini beans, but I accidentally picked up the wrong can.  I usually have a wide variety of beans on my shelves, both canned and dry.  In the end, it really does not matter.  Cannellini beans are smaller, but their flavor is pretty similar to butter beans.  Any white beans will do.  I removed all the stems from the spinach and diced all the vegetables.

IMG_2989

Once everything was cut, I was ready to cook my vegetables.  I sauteed them all in olive oil with salt, pepper, garlic, oregano, basil and thyme.  I use both dried and fresh herbs.  It really just depends on what I have on hand at the time.  If you are using fresh herbs, a general rule of thumb is to add them towards the end of the cooking process so they do not get lost in the cooking process, whereas with dried herbs, you can add them at any stage of the cooking process and the flavors will incorporate into whatever you are cooking.  Also, when using fresh herbs, you will use a bit more than if you are using dried herbs.  With dried herbs, the flavors are more concentrated than they are with fresh herbs.  I prefer fresh when I have them, but dried is certainly a great alternative.  Usually, unless a recipe calls for specific amounts (although if you have been following me, you should probably know by now, I rarely follow a recipe when cooking), I use about 1 tsp of each herb.

IMG_2990

After the vegetables were cooked and softened, I added the beans. Drain and rinse the beans before adding them to the vegetables, then continue to cook for an additional 5-7 minutes.

IMG_2991

I layered my plate by starting with the beans and vegetables, then added the cooked steak, and finished with a little more beans and spinach on top.  I added a slice of polenta with caramelized onions and herbs Caramelized Onion, Herb & Polenta Loaf then completed the meal with a smooth, medium-bodied fruity red blend.  This was a perfect end of summer meal that we enjoyed out on our deck.

IMG_2995

Tuscan Steak

2 lbs flank steak, cooked

2-3 cups fresh spinach, stems removed and chopped

1/2 cup mushrooms, quartered or diced

1/2 cup chopped tomatoes

1 heaping TBSP garlic

1/3-1/2 cup onions, diced small

1 can of cannellini or butter beans, drained and rinsed

olive oil

salt & pepper to taste

1 tsp each basil, oregano, thyme


Cook your steak to your liking.

Saute all the vegetables and herbs together in olive oil.  When the vegetables are done, add the beans, and continue to cook for about 5-7 minutes.  Layer your plate with the spinach and bean mixture, then add the steak, and if you like, add a touch more spinach and beans on top of your cooked steak.


Spaghetti Squash with Sausage and Mushrooms

I love pasta.  I can eat pasta all the time, in many, different ways, and never get tired of it.  However, pasta is high in carbs and eaten all the time, it can be very fattening and because of the sugar content, it can wreak havoc on someone who is trying to control their sugar intake.  A healthy alternative to eating pasta is to substitute spaghetti squash for pasta.   The two are similar in that spaghetti is in the name of both, and they can both be used in a similar way, but that is where the similarities end.  For one serving of pasta, add about 100 calories to the meal, whereas the same serving size of spaghetti squash only adds 20 calories.  Spaghetti squash is also very high in fiber and antioxidants, as well as vitamins A, B complex and C, making this a much healthier, less fatty alternative to eating pasta.    Spaghetti squash is in the same family as pumpkins, zucchini, acorn squash and cucumbers.  They are all part of the winter squash family known as the cucurbita family or gourd family.

I used my spaghetti squash last night and added a rich and hearty sausage and mushroom bolognaise sauce, served with a nice little side salad and a rich, crusty chiabbata dipped in olive oil with garlic, pepper and balsamic vinegar.   I added a rich red blend to complete the meal.  I actually used the spaghetti squash as a little “boat”, and just topped the sauce right on top along with mozzarella and baked it all together.

IMG_2987

I add wines to my sauces all the time, but not usually when I make a bolognaise sauce.  Every now and then though, I change things up a bit and vary my recipes, just to give them a kick and do something a little different.  This was one of those times when I added red wine to my bolognaise sauce.   I had some red wine that I just did not like at all, and could not drink.   I very rarely find a bottle of wine that I do not like, but believe it or not, it does happen every now and then (I am not going to reveal the name of the unliked wine).  Well, I hate to waste anything, so even if I do not like things in their original form, I will always try my best to re-purpose it in other ways.  This time it was in making my sauce.  I admit, as much as I try my best to make everything from scratch, I very rarely make my own pasta sauce from scratch, mainly due to lack of time.  Instead, I enhance ready-made sauces and make them my own.  These are the ingredients I used, along with my favorite ready-made sauce.

IMG_2976

The spaghetti squash was in the oven baking with salt, pepper, and olive oil, at 350* F for about 10-12 minutes to soften while I pan-fried my sausages and was cutting all my other ingredients for my sauce.   After the sausages were cooked, using the same pan, I sauteed my mushrooms, garlic, onions and red pepper flakes in olive oil, then added the red wine.  By using the same pan, you get all the flavors and drippings from the sausages that add to the flavor of the sauce.  This time, I used a chicken-basil sausage, but you can use whatever type of sausage you like.  We eat a lot of sausage, and we try all kinds.  Because spaghetti is such a staple here in the United states, and everyone has their own “favorite” version of bolognaise sauce, I would not even think of stepping on those time-honored traditions by giving an actual recipe.  For some reason spaghetti and spaghetti sauce takes on the personality of the person who prepares it.  Often times these recipes are family heirlooms that have been passed through the generations.  So make your spaghetti sauce in your own favorite way and try it with the spaghetti squash to add a new twist to things.

IMG_2978

After the mushrooms, garlic and onions have softened,  add the sauce, the remaining ingredients, including the spices and herbs (dried herbs.  If using fresh, wait until the last few minutes of cooking or add just before serving so the flavors and textures do not get lost in the cooking process); and the sausage.  Incorporate everything well, bring to a boil, then reduce the heat to a simmer and continue to simmer for an additional 10-20 minutes, or until the sauce reaches your desired consistency.

IMG_2982

I was going for a baked and crusted effect, so I spooned my sauce over my squash boats and topped them with mozzarella cheese.  Then I baked them for an additional 20-30 minutes, or until my cheese was completely melted and had a nice brown crust on it.  You can also just spoon it over the cooked and scraped squash to make it look more like “spaghetti” too if you prefer.  It was just a different presentation and a slightly different taste, but basically it is the same.

IMG_2984

IMG_2986

Buon Apitito e mangia!