Christmas Cookies Day 3 – Raspberry Pinwheels

The cookie baking has been going on all week. All my cookies are finally DONE!!!!!! I have a couple more yummy recipes to share with you before my Christmas Cookie series will be done too.

Today I bring you raspberry pinwheels. I dressed them up a bit though, and when they were completely cooled, I added a dusting of powdered sugar on top too.

Raspberry Pinwheels

You can use any kind of jam or fruit preserves for these. Mix them up a bit and make them with what you like. The recipe is pretty basic and can be left to your imagination to make it how you like it.
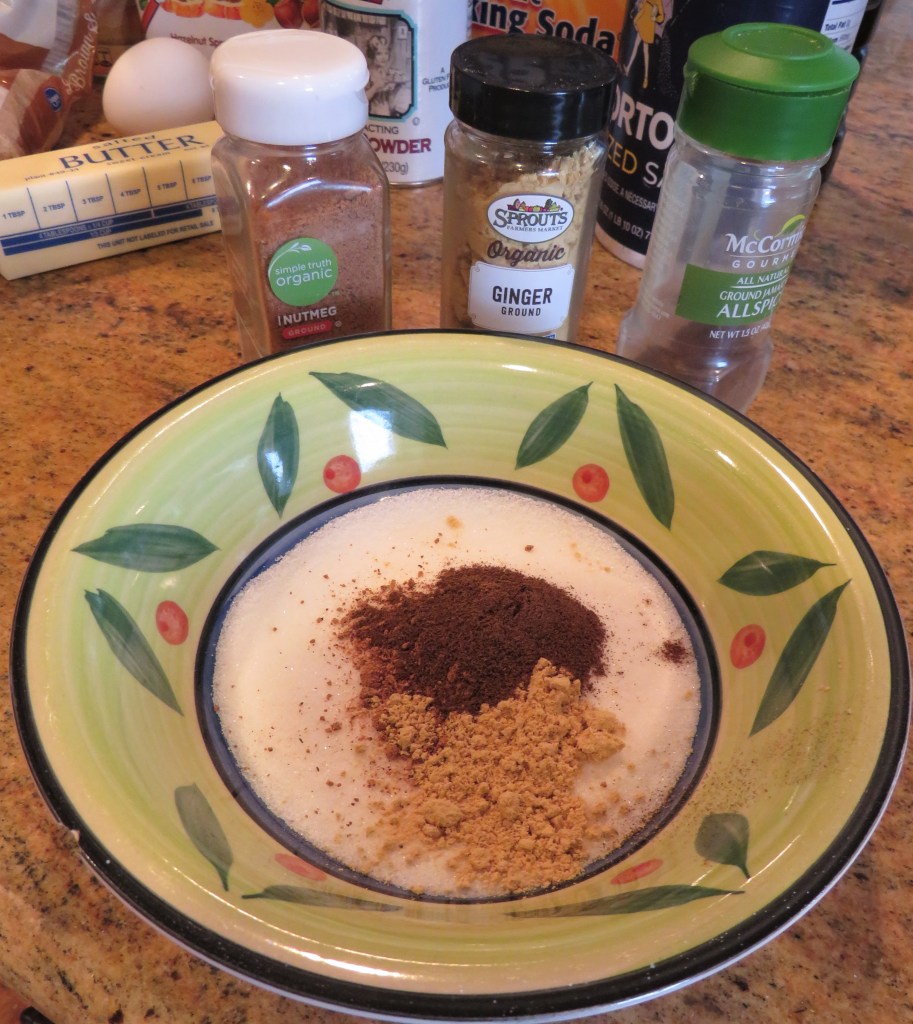
2 1/2 cup flour

1 tsp salt

1/2 tsp baking soda

1 cup or 2 sticks of softened butter

1/2 cup granulated sugar

1/2 cup firmly packed brown sugar

2 eggs

1 3/4 cup raspberry jam or jam of your choice

powdered sugar for dusting, optional

Combine the dry ingredients then set aside.

Mix butter and sugars together until creamy, then add the eggs, one at a time, mixing in between each addition. Add the flour mixture 1/2 at a time, mixing in between. Mix until everything is just blended together. Do not over mix.

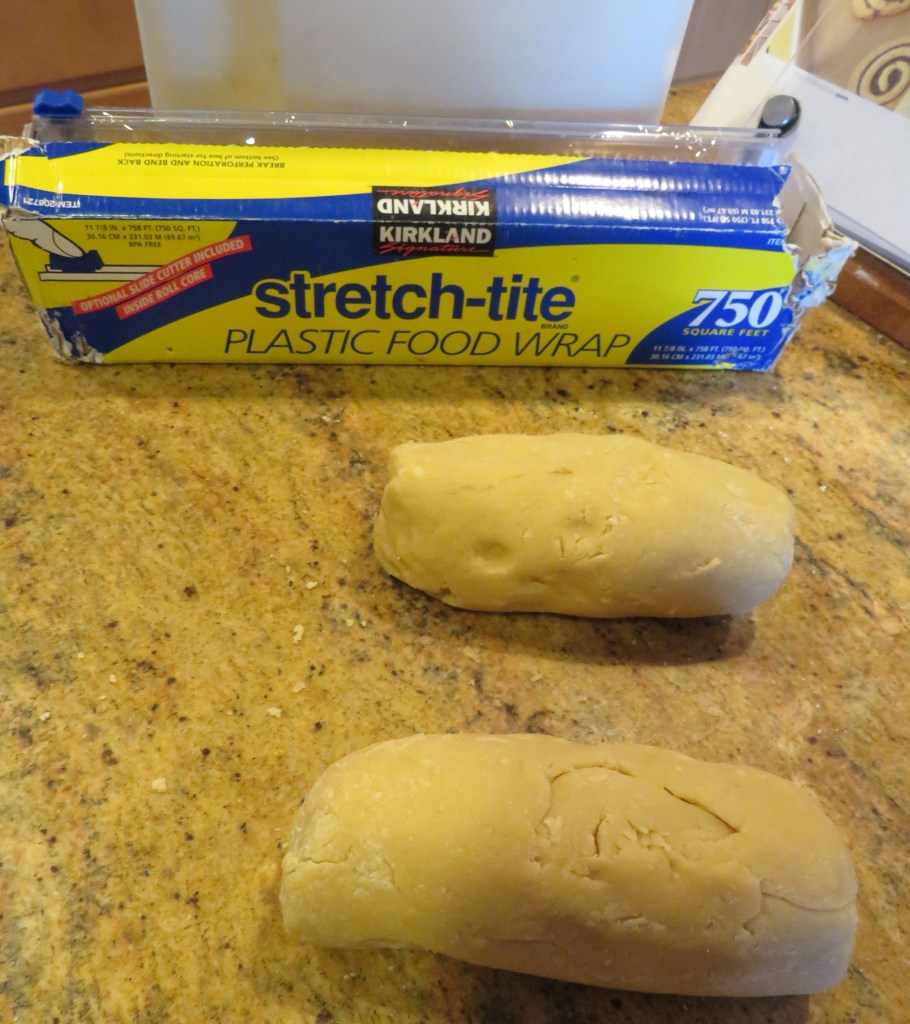
Form the dough into 2 dough balls, then shape into logs, wrap with plastic wrap and refrigerate for at least 1 hour and up to 24 hours before using.

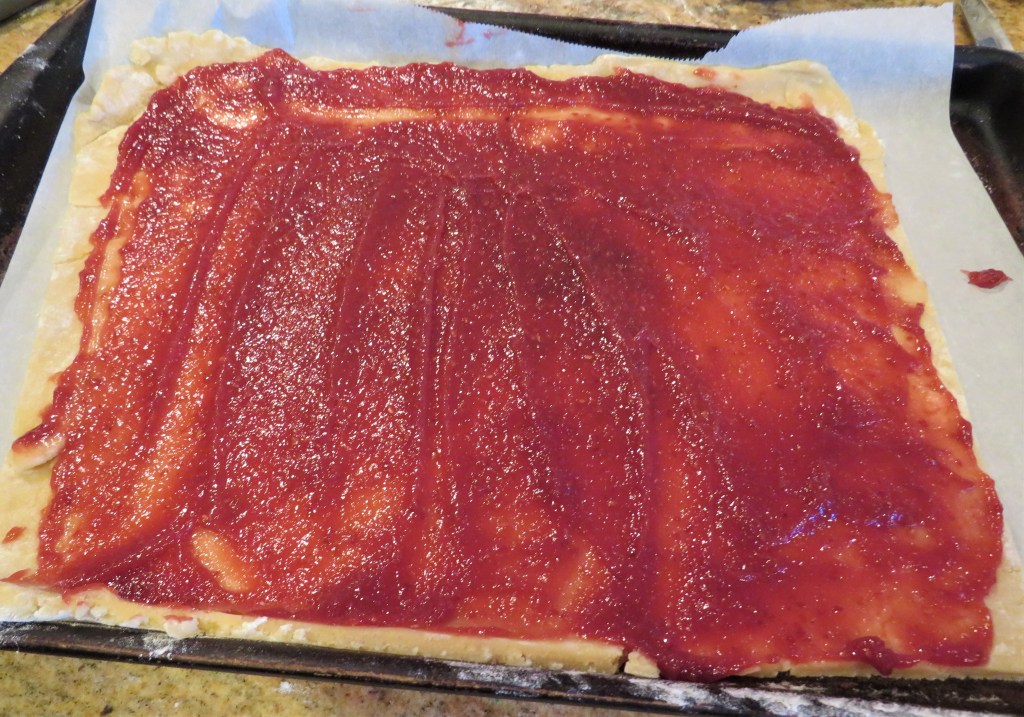
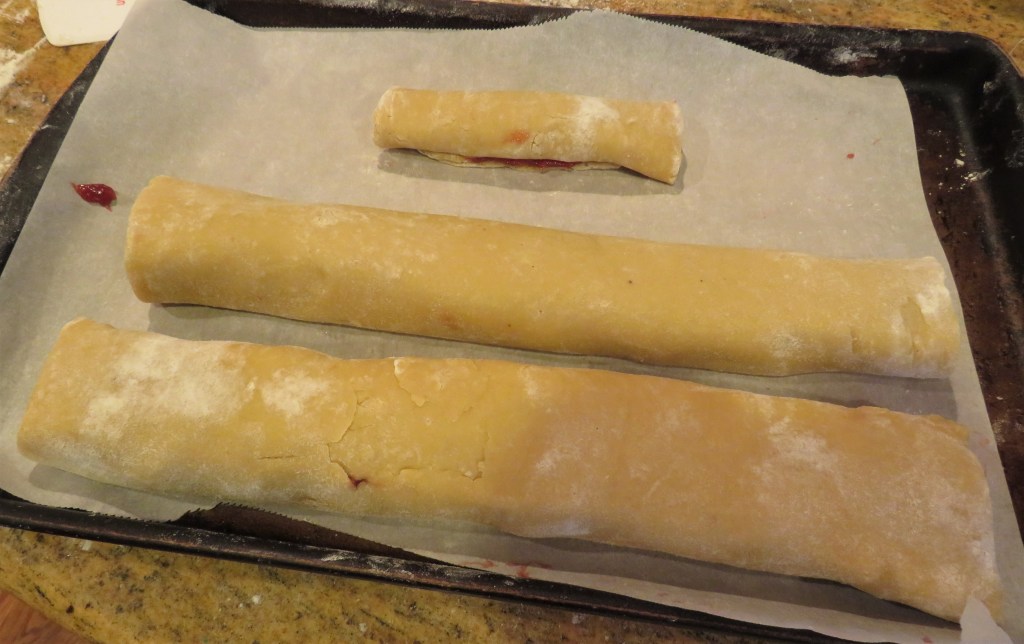
On a lightly floured surface, roll the dough out to a rectangle. Spread the jam over the entire surface, leaving a little bit around the edges.

Roll the dough tightly from the long side to make your rolls. Cover with plastic wrap and once again, refrigerated for about an hour before slicing.

Preheat the oven to 350* F or 190* C.

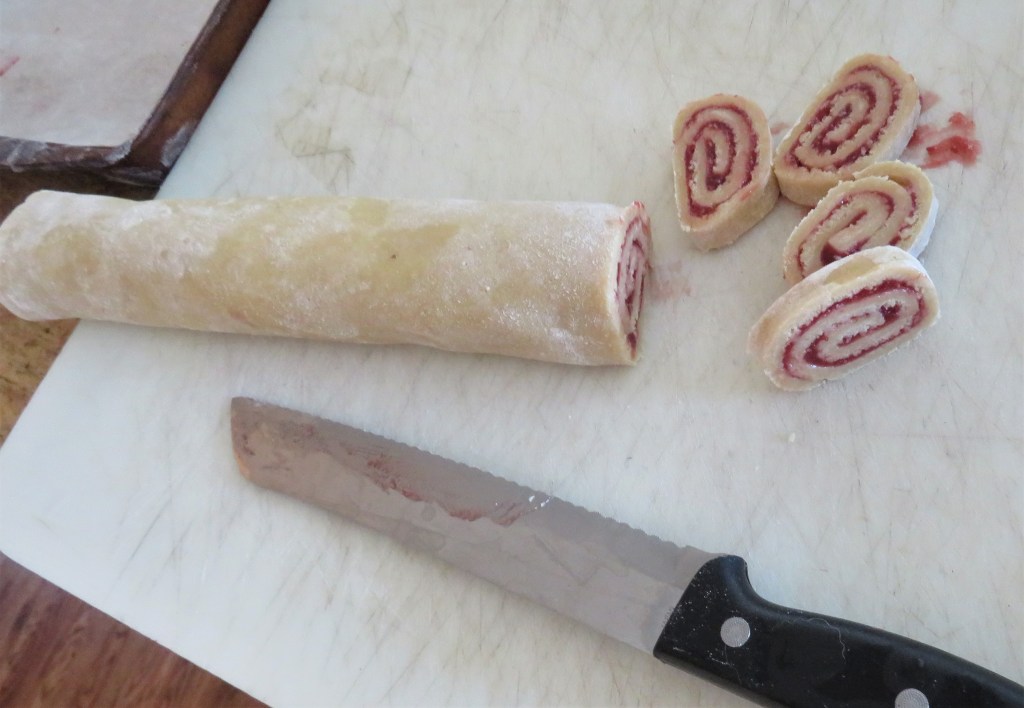
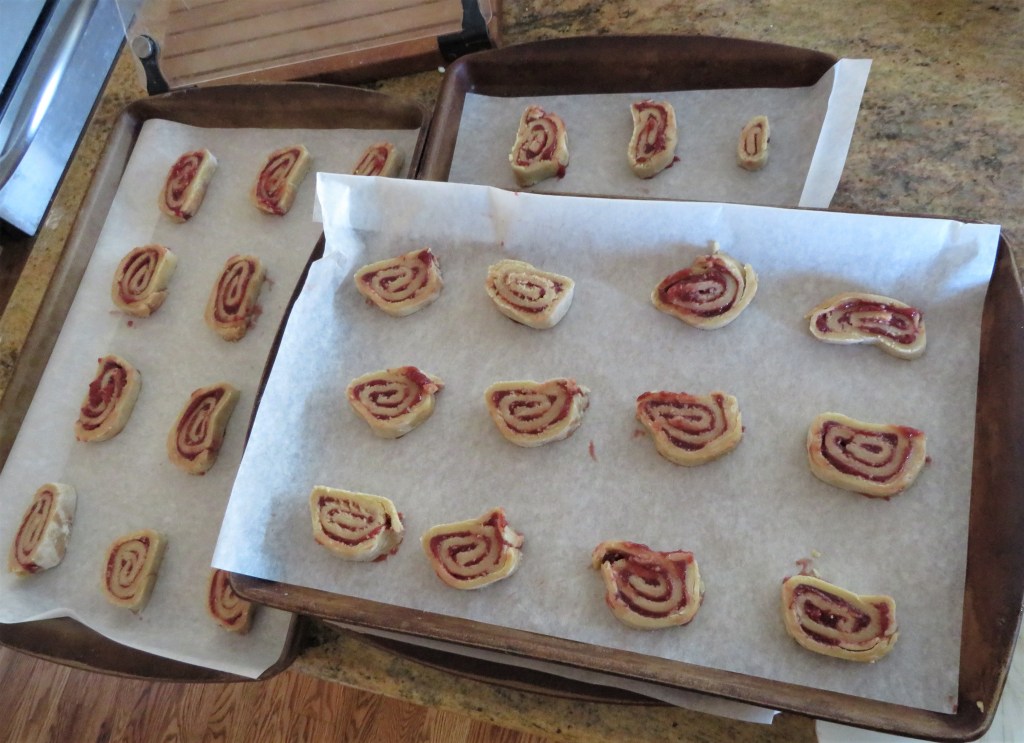
Line the baking sheets with parchment paper.

Slice the dough into slices about 1/4 thick with a sharp, serrated knife. Place the slices flat ono the prepared baking sheets, about 2 inches apart.

Bake for about 15-18 minutes, or just until the edges start to crisp up a bit and a are lightly golden.

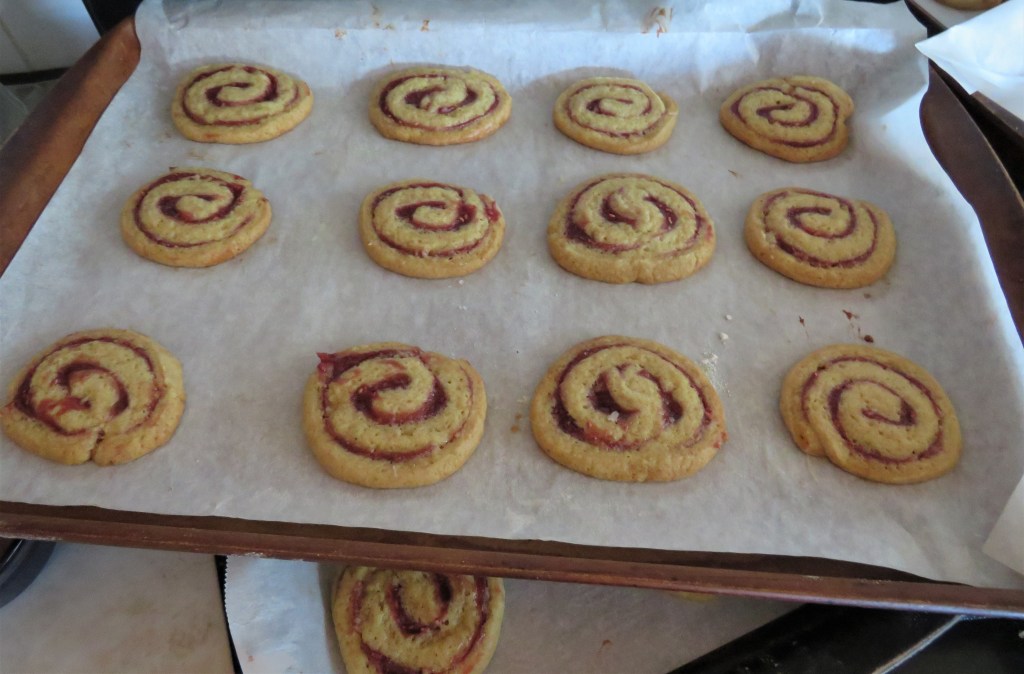
You can definitely eat them as is, but they are not very sweet. So I added a dusting of powdered sugar once they had cooled completely. Besides, they look much more festive with the powdered sugar on top too.

Enjoy! Merry Christmas, Happy Chanukkah and Happy Holidays to all. May your holidays be merry and bright. Stay warm, stay safe and stay well. ‘Til next time.

Christmas Cookies Day 2 – Cashew Caramel Shortbread Cookies

Today is the first full official day of winter and boy did it come in with a BANG! This is a screen shot of today’s temperatures where I live. For those of you on Celsius, this is in FARENHEIT and believe me, this is VERY COLD! I know some of you are even colder right now.

This is the view from my bedroom window. All of our lakes/ponds are completely frozen over. Directly behind these trees in our backyard is a lake, but it is an ice skating rink right now. The geese are frozen in place.

With weather like this, I am very glad I will be indoors, baking today. It is a perfect day for baking more cookies.

Today’s cookies are cashew caramel shortbread cookies. I used my own caramels for the sauce/topping. Some have plain caramels and some have the salted cashew and chocolate caramels. The Caramels Are Done! I have added another 6 dozen to my batch for tomorrow’s services. A couple of more batches, and tomorrow’s cookies will be done. Store bought caramels are perfectly fine to use as well. Don’t feel like you have to make your own. I just had some leftover from when I did make them, and I have to say, my caramels are MUCH BETTER than store bought ones. 🙂

Cashew Caramel Shortbread Cookies

1 2/3 cup flour

1/2 tsp salt

2 1/2 cups roasted, salted cashews, divided

2 TBSP + 1 tsp canola oil

1/2 cup or 1 stick of softened butter

3/4 cup firmly packed brown sugar

1/2 cup granulated sugar

1 egg

1 tsp vanilla

24 caramels or about 1 cup of cararmels

1/2 cup heavy whipping cream

Preheat the oven to 350*F.

Line cookie sheets with parchment paper.

Coarsely chop 1 cup of the cashews and set aside. Put the remaining cashews, along with the canola oil into a food processor and pulse until you have a creamy butter, for about 2 minutes.

Combine the flour and salt together and set aside.

Mix the butter, sugars, egg, vanilla and cashew butter together, then add the flour and salt and mix just until everything is blended. Do not over mix or you will have tough cookies.

Fold in the chopped cashews.

Drop about 1 TBSP of dough onto the parchment paper lined baking sheets and form into a ball. Press lightly and bake for about 10-12 minutes, or just until the edges turn a light golden brown.

Allow the cookies to cool completely before adding the caramel topping. For the topping melt the caramels together with the cream until it is all melted and creamy. Then drizzle over the cookies.

Allow the caramel sauce to set, then you can store them until you are ready to eat them all up. YUMMY! They are rich and creamy and buttery and nutty all at the same time.

For those of you who live in these cold, frigid parts like I do, stay inside, stay warm, and stay safe. Merry Christmas, Happy Chanukkah and Happy Holidays to all. ‘Til next time.

Juneau, Larry, aka the Daddy Dog and Vinnie all say Merry Christmas.

I don’t think Juneau likes her Santa hat. 🙂

Christmas Cookies Day 1 – Chocolate Mint Thumbprints

Yesterday I was literally in the kitchen for most of the day, baking cookies. I baked about 13 dozen cookies, but only two kinds so far. One I still have to finish and decorate, so you will see those later. I am only about half way done too. As soon as I finish writing this, I will be back in the kitchen once more, baking yet again.

I am sharing my chocolate mint thumbprints with you today. I ran out of the mint kisses, so there are two different kinds of chocolate mints used here, but they all taste good, and look good, too, which is really all that counts. 🙂

As usual, I took a recipe and made it my own. The recipe I used was way to dry and needed some more moisture, so I added an egg. Then I made it chocolate instead of plain. You can make these either plain of chocolate. If making them chocolate, just add 2/3 cup of cocoa powder to the mix. Initially I was going to roll them in sprinkles before baking them, but the sprinkles didn’t stick to the dough. No worries. Time for Plan B. I rolled them in sugar instead. They came out just fine. Delicious! 🙂

Chocolate Mint Thumbprints

Preheat oven to 350* F or 190*C.

Line your cookie sheets with parchment paper.

1 bag of chocolate mint Kisses (or whatever chocolate if you prefer)

1 cup or 2 sticks of softened butter

1 cup powdered or confectioner’s sugar

1/4 tsp salt

2 1/2 cups flour

1 egg

2/3 cup cocoa powder

sugar for rolling the dough balls in

Mix the butter, powdered sugar, egg and vanilla together until creamy, then add the chocolate flour mixture and mix just until everything is blended.

Form the dough into dough balls, then roll each ball into the sugar. Place on the prepared baking sheets. Lightly press the balls to flatten them. Press a well into the center of each cookie, gently with your thumb, and place 1 Kiss or chocolate in the center of the well.

Bake for about 10-15 minutes, or until the cookies are set. Allow to cool for a couple of minutes on the baking sheet then remove and transfer the cookies to a wire rack to cool completely.

There are plenty more cookies coming your way, so stay tuned. It’s cookie time!

Merry Christmas, Happy Chanukkah, and Happy Holidays. Stay safe and stay well Everyone. ‘Til next time.

Wine Crafts

Yesterday was devoted to making some little Christmas gifts for my BSF group. I had no idea they would take as long as they did. I have a tendency to just jump right into things first and working out the details as I go. But, it is always a learning experience, and often a challenge. I love challenges. These Christmas trees took the better part of most of yesterday to get them all done, but get them done I did. They are now done and are ready to give to my ladies tomorrow morning.

You all know I LOVE my wines, but I also love crafting too. I save my wine corks and bottles then creatively reuse them later. I turn them into all kinds of things. This is what I made with them yesterday. These are my little gifts for my BSF (Bible Study Fellowship) group.

Making these was definitely a labor of love. Step 1) I had to cut the corks and glue them together in the shape of a Christmas tree. Before I could do anything else with them, I had to let the glue dry completely and let them set. That took a while. I actually started these on Friday or Saturday in order to let them dry completely. Because corks are a type of wood, I used wood glue. I have found this works the best for the first gluing.

Step 2) I painted all the trees, and once again, I had to wait until the paint dried before I could move on to step 3. I just used an acrylic paint.

Step 3) Adding the decorations. I found some little shiny dots that I used as my “lights” for the tree. Step 4) After placing the “lights” on the trees, I added another coating of glue. This time I used a MOD glue, that was not only a glue, but also makes everything nice and shiny. Again, I had to let it dry. So much of this little project of mine was waiting for things to dry and set before I could move on.

Step 5) The final step was to add the ribbons to the trees. I just cut some pretty, festive ribbon then nailed it on to the corks. I used the very tiny nails to hold my ribbons in place. And voila! My little wine cork Christmas trees are done. Don’t they look fun and festive?

I must have been channeling my mother while making these. She and I used to do all kinds of crafts together all the time. She would have been proud of these and would have been right there helping me with them too if she could have been.

Here are some other ideas for both the corks and the bottles. I made this one a couple of years ago, and have made many others, and double hearts as well, since then. This was my first attempt at the corked heart.

Since then, I have progressed and made them more elaborate.

My friend Roxann made this wine bottle dish. I actually have a few of them. I use them all the time for various things. I like to use them as a butter dish when I am entertaining.

I painted this wine bottle light too. You can’t see the little lights too well, but the cork has a little battery pack with mini lights attached to it.

I did not make this wind chime, but I think I know how now, so don’t be too surprised if I make these at some point and you see it again.

I used to have a wine bottle succulent terrarium as well, but it broke. I love making these little funky, creative things. My point is, everything can be reused and repurposed. All it takes is a little imagination and lots of time and patience. Lots of time and patience. 🙂

Today and the rest of the week will be devoted to making cookies. Lots and lots of cookies. We have two services on Friday, and I need to make all the cookies for both of those for my coffee cart.

Merry Christmas and Happy Holidays Everyone. Make them merry and bright and stay safe and stay well. ‘Til next time.

More Holiday Funnies

I thought I had everything under control for Christmas. I got the cards out early. The house was all decorated. We had our Christmas party. Everything that was supposed to be mailed was already mailed. And then ….. it hit me. YIKES!!!!! Christmas is here and I still have oh so much to left to do. PANIC!!!!!!

So if you are like me, and need a few good holiday laughs to keep you going, here are some fun things to help you keep up the holiday cheer to last throughout the year.

Christmas is the season when you buy this year’s gifts with next year’s money.

Don’t stress out so much. Enjoy the magic of the season. Spread the joy and cheer. It only comes once a year. 🙂

Merry Christmas, Happy Hanukkah and Happy Holidays to one and to all.

Just A Light Nibblie Tray

‘Tis the season. I know, and I love this time of year. It is my favorite time of year. But it’s not all about the holidays. Sometimes, it’s just about doing normal everyday things too. Make every day special and fun and enjoy all your days.

We pick up wines from InVINtions every month, and when we go, we almost always go with friends or family too. It makes it a much more social event. It was that time to go once again, and we went with Mike & Lauren. We always bring snacks and nibblies too. We really tried to keep the nibblies simple this time. The hard part is only bringing small amounts of nibblies, especailly since Lauren, Janet and I all love to cook. No one will ever go hungry when they are around us, that’s for sure. 🙂 We were pretty good this time though, especially since we were going to a small party after.

I made a small little tray with some chicken salad, crackers, dolmas and cheese. You know, juts some light nibblies that go well with wine. The pairing with well with wine is always an important part of what we decide to make. After all, the wine is the star of the day. 🙂

As you know, I am always experimenting with something. I was trying my best to use up some of my leftovers, as I love to do. So I used a little of my red pepper coulis in my chicken salad and some of my leftover chicken as well, along with some green onions, red bell peppers and shredded carrots. I diced everything very small and mixed it all together, and then tossed it with the sauce.

The sauce was just about 1 cup of mayonnaise mixed with about 2-3 TBSP of my red pepper coulis and some fresh ground black pepper. That’s it. Easy-peasy.

The salad was super easy to make and very tasty, especially spread on some flavored wheat thins. YUM. Who says things have to be complicated to taste good? When you are busy and pressed for time, just keep it simple. Remember the K.I.S.S rule. 🙂

Have a great day. Happy Hanukkah and Merry Christmas. ‘Til next time.

Nature Walks – Ducks On The Pond

Our mallards, as well as as quite a few other duck species and our Canadian geese, are back in droves. They are loving the cool icy waters of our ponds. We always see a lot, but it seems this year I am seeing much more than in years past. That is perfectly OK by me. I will take them all. This is who I saw on yesterday’s walk.

We have our Buffleheads.

Our Barrow’s Goldeneyes.

Our Canadians.

And of course our Mallards.

Have a ducky day.

Chocolate Mint Bundt Cake

The history of chocolate can be traced back more than 3,000 years to the Maya, Toltec, and Aztec people who prepared a beverage from the fruit of the cocoa bean. The Maya considered chocolate to be the food of the gods, held the cacao tree to be sacred, and buried dignitaries with bowls of chocolate. It was originally used as a drink, that was often bitter, so when the Europeans brought chocolate back from South America, they often sweetened it with sugars and other flavors, including mint.

The combination of chocolate and mint is a favored combination that dates back to the 16h century Europeans. You get the flavors of rich chocolate blended together with the cool and refreshing flavors of mint. Just perfect. It has always been one of my favorites too. Today, the combination of chocolate and mint is used for many sweets and treats.

Chocolate and mint is often a holiday favorite as well. So for the upcoming Christmas holidays, I made a chocolate mint bundt cake. I love making bundt cakes for a lot of reasons. I think they are prettier and more festive, plus they also tend to feed a few more people than just a regular round cake.

Mint Chocolate Bundt Cake

I started off with a basic chocolate bundt cake recipe then added the minty flavors and toppings to make it more festive and special.

3 cups flour

1 cup unsweetened cocoa

1/2 tsp baking powder

1 1/2 cups or 3 sticks softened butter

2 3/4 cups sugar

1 tsp vanilla

1 tsp mint extract

5 large eggs

1 1/2 cups milk

2 oz chopped chocolate chocolate morsels – I used mint M & M’s.

Chocolate ganache, optional

Preheat the oven to 350* F or 180* C.

Spray a bundt cake pan with cooking spray and then add a light dusting of flour to coat the pan.

Combine the dry ingredients together and set aside.

Mix the butter and sugar together until creamy, then add the eggs, 1 at a time, blending in between each addition. Add the vanilla and mint. Alternate the flour and milk, adding 1/2 at a time and mixing in between each addition.

Pour 1/2 the batter into the prepared bundt pan then add your chocolate around the middle. Add the remaining batter on top. You can also incorporate the chocolate into the batter so it is not jus in the center. But because I was adding the mint M & M’s, I chose to just have them in the center. Hopefully the center will have a colorful ribbon around it.

Bake for about 1 1/2 hours, or until a toothpick inserted in the middle comes out clean. Let the cake cool completely before topping.

I drizzled some chocolate ganache on my cake then added the rest of my mint M & M’s around the top tp make it more festive. They kept sliding off at first, so some of my M & M’s got a little more chocolaty from their slide down the cake. 🙂

If you start with the basics, you can make slight variations and changes that will completely change the whole personality of the original. Have fun with it and be creative. 🙂

Merry Christmas and Happy Holidays to all. Stay safe and stay well. ‘Til next time.

Nature Walks – Here’s Looking At You

This year I have seen more Robins than I ever remember seeing. I love it too. This one was taken from my deck. He was just sitting in the tree looking right at me and my camera. He was just waiting to be discovered.

Pumpkin Nutella Snickerdoodles

I know that pumpkin season has pretty much ended, however, pumpkin is always associated with the holidays here in the United States. So, with the holiday season still in full swing, there are still a few more pumpkin recipes in store.

Snickerdoodle cookies are a popular favorite here in the States. They were originated by the Dutch and German immigrants who came to the United States in the late 19th century. Cinnamon is a main ingredient used in both German and Dutch baking. They are also particularly popular in the Amish and Mennonite cultures, which are also both Dutch and German in origin. The word snickerdoodle comes from the German word Schneckennudel, meaning snail noodles, though they don’t have anything to do with snails or noodles, but are instead a German cinnamon roll. The word snickerdoodle is really just a fun word that we all like to say, and better yet, a type of cinnamon cookie that we all love to eat too. The addition of pumpkin to the recipe is a relatively new addition, but it is delicious all the same. And adding Nutella, or other ingredients, is an even newer idea to an old classic.

I did both. I added pumpkin and Nutella to my latest snickerdoodle adventure.

Pumpkin Nutella Snickerdoodles

1/2 cup softened butter

3/4 cup firmly packed brown sugar

2 TBSP molasses

1 egg

1 tsp vanilla

1 cup pureed pumpkin

2 1/2 cups flour

2 tsp baking powder

1/2 tsp baking soda

1 tsp salt

1 tsp cinnamon

1/4 granulated sugar

1 tsp nutmeg

1/2 tsp ginger

1/2 tsp allspice or pumpkin pie spice

Nutella

Preheat the oven to 350* F or 180* C.

Combine all the dry ingredients together and mix well, except for the sugar and spices. Combine those separately and set aside.

Mix the butter and brown sugar together until creamy. Add the egg and mix again. Then add the molasses and vanilla and mix once more. Add the flour mixture 1/2 at a time and mix in between each addition.

When everything is mixed together, form the dough into balls about 1 TBSP in size and roll into the sugar and spice mixture, then place on a baking sheet lined with parchment paper.

Press slightly and bake for about 18 minutes or until set. You can also roll your cookies in more of the sugar and spice mixture when they are still hot too, and then let the cool completely before adding the Nutella. While the cookies are still hot, make a slight impression in the center of each cookie with your thumb.

I tried to pipe the Nutella onto the cookies, but I guess it was too sticky. All I did was to make a big gooey mess. So instead, I just spooned a dollop of Nutella into the center of each cookie well. To make them look more festive, I added some holiday sprinkles to them as well.

Every bite is a perfect mouthful of spicy pumpkin cookie and Nutella. YUM!

Happy Holidays and happy baking Everyone. Stay safe and stay well. ‘Til next time.