Tamale Meatloaf

A tamale is a traditional Mesoamerican dish made of a corn-based dough (masa) that is filled with various ingredients, wrapped in a corn husk or banana leaf, and steamed. The filling can include meats, cheeses, or other ingredients, and the wrapping is discarded before eating. I love tamales. They are a traditional dish usually served around the holidays or for special occasions, mainly because they are labor intensive and take a lot of time and effort to prepare. You can fill them with anything you like from sweet to savory.

If you like tamales but you don’t have the time to make them, a good alternative is either a tamale pie or a tamale meatloaf. I am getting into my Texas and Tex-Mex frame of mind since we are heading out to Texas for Thanksgiving with some of my cousins. Ground beef was in our weekly meat rotation, so I made a tamale meatloaf. It had all the goodness of a tamale without the hassle. It was all baked underneath the cornbread topping. 🙂

Tamale Meatloaf

Preheat the oven to 350* F or 180* C.

Spray a loaf pan with cooking spray.

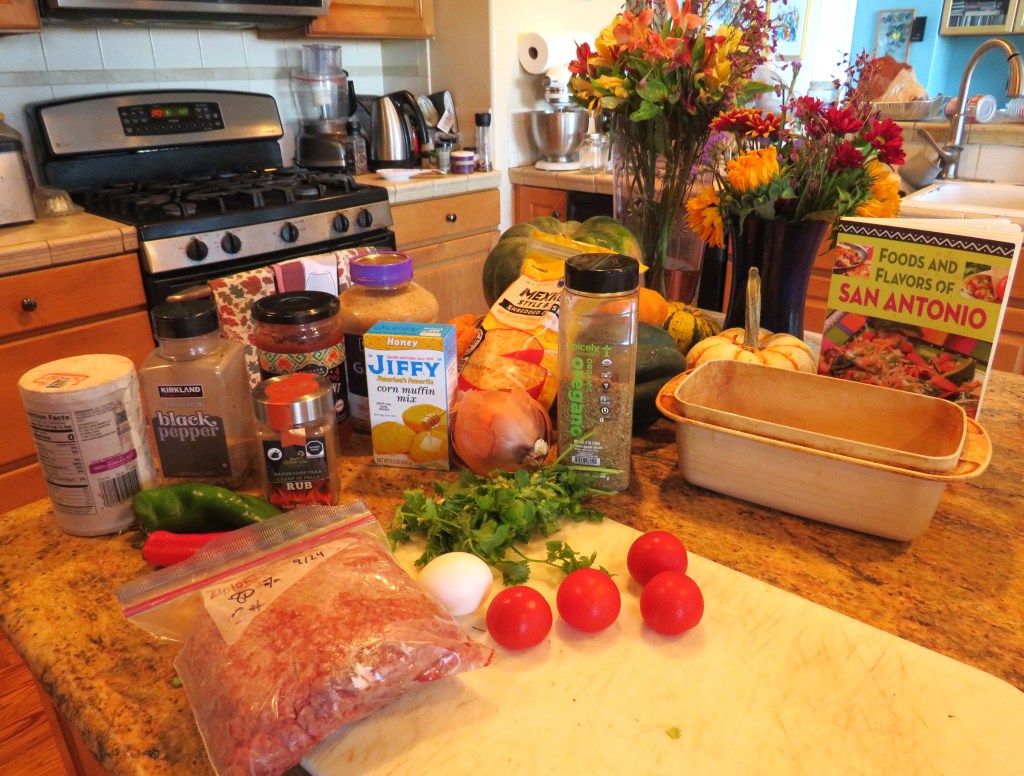
1- 1 1/2 lbs lean ground beef

1 egg

1 onion, chopped

1/2 cup salsa

2 TBSP chili powder

salt & pepper to taste

4-5 tomatoes, chopped

1 jalapeno, diced fine

1 Anaheim pepper, diced

1 TBSP garlic

1/4 cup fresh cilantro, chopped, plus more for topping

1-2 tsp dried oregano

1 8.5 oz package corn muffin mix

1/2 cup shredded cheese

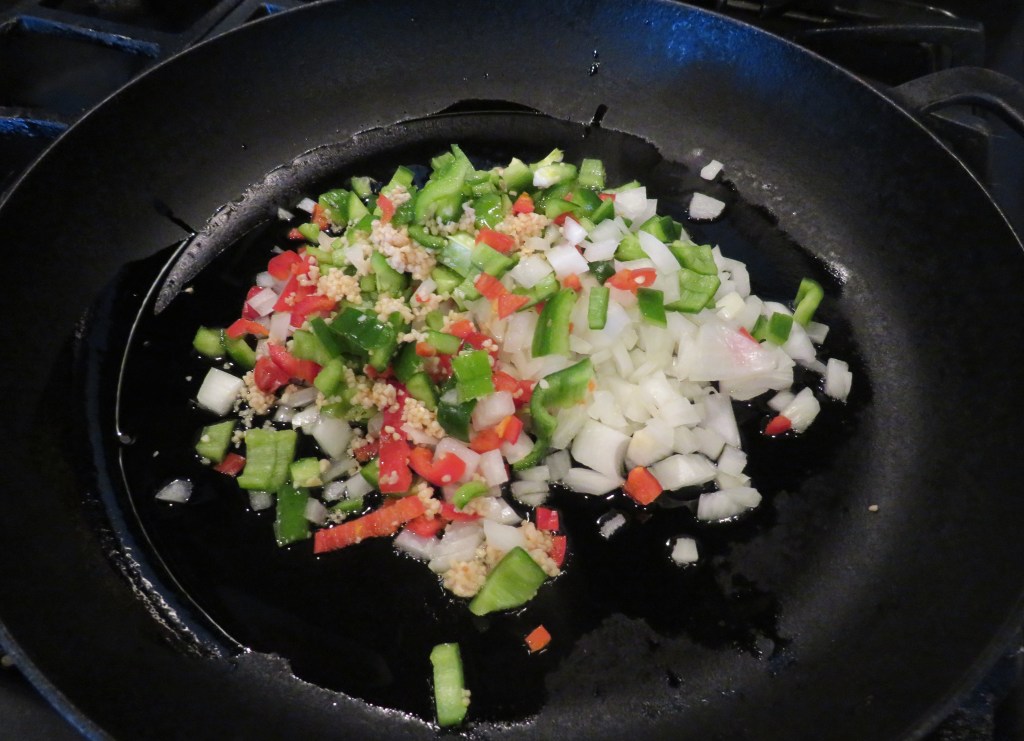
Saute the onions, peppers and garlic for about 3 minutes or until softened and the onions are translucent.

Combine all the ingredients together, except for the corn muffin mix and mix together thoroughly. Put it all in the prepared loaf pan and pat down firmly. Bake for about 40 minutes.

Remove from the oven after it has cooked and drain off the excess grease. Prepare the muffin mix according to the package directions and spread on top of the meat mixture.

Bake again for an additional 20-30 minutes, or until the cornbread is cooked and golden brown. Immediately top with the shredded cheese, salsa and a little more fresh cilantro and serve next to your favorite Mexican side dishes. Esta mui rico!

The cornbread muffin mix I got was very sweet, which I think took away from the dish itself. I don’t like my cornbread sweet. You can easily make your own cornbread too, and I should have, but I ran out of time and “cheated”. Next time, I will make my own cornbread. But it is nice to know you can use a mix in a pinch. 🙂

Have a great day and make everyday great. Stay safe and stay well. ‘Til next time.

Nature Walks – Widgeon Waters

My lakes have been pretty quiet for the last fee months, but now all friends are beginning to come back and come back in droves too. I had a lot of American Widgeons on the water too. More than we usually have, and that is perfectly OK by me. 🙂

I love it when all my friends come back to my lakes. 🙂

Seafood Pie

We ate a lot of French and French inspired foods while on our Canada trip. Since we’ve been home, I have continued with that theme a bit too. Although, to be fair, we eat a lot of different ethnically inspired foods all the time. 🙂 Canada, even Quebec, is a blend of French, Irish, Scottish and British influences, and these different cultures are all still represented in their foods and culture today.

While up in Canada, I purchased a French/English cookbook too, to help me to continue to learn more about more French inspired foods from our neighbors north east of us.

One of the dishes I made was a seafood pie, similar to the seafood cassoulet I enjoyed while dining at Chateau Frontenac. Great Eats In the Great North – Part 7 – Chateau Frontenac

Seafood pies, also known as fishermen’s pie, or stargazer’s pie, have their origins dating back to the Medieval times, where most religious people were abstaining from eating meat on Fridays. Seafood pies were popular both in British and Celtic regions specifically, though they were also popular anywhere along a coastline. Legend has it that 500d years ago, on a cold and stormy eve in the Cornish village of Mousehole, the sea was so violent that no fish could be caught for the community. Unable to watch the village starve, fisherman Tom Bawcock braved the elements and brought home a catch so large that no one went hungry.  Originally they were made with cheaper leftover pieces of fish that was readily available to the masses; seven types of fish were used in the pies made: sand eels, horse mackerel, pilchards, herring, dogfish, ling and an unknown seventh fish. They were also very popular in WWII as well, when people would eat whatever was available. Today, things have changed and they are made with a variety of good quality fish. Originally they were made with a pastry crust, like how I made mine, but today, they are also made with a mashed potato or cheese “crust” like what is used to top a Shepherd’s pie.

Some believe eating seafood and seafood pies were made popular after Julius Caesar and the Romans were in Britain as early as 55 BC. Fish was eaten to honor the Roman goddess Venus.

Seafood Pie

For my seafood pie, I used large prawns and some of my Cole’s Tinned Salmon and and Smoked Muscles. I was definitely not skimping when it came to quality or amounts of seafood in my pies. But then I never skimp on anything I cook. 🙂

I started off making my go-to dough for the crust.

The Crust

1 1/2 cups flour

6 TBSP cold butter, cubed small

1 tsp salt

1 egg

5-6 TBSP heavy whipping cream

In a food processor, blend the flour, salt and butter together until it resembles a coarse sand. Then add the egg and the cream and blend again until it all comes together in a dough ball. Wrap the dough in plastic wrap and refrigerate for at least 30 minutes before using.

The Seafood Filling

You can use any kind of seafood you like. I used what I had. Juneau and Dorrie were happy too, because they got the fish oil mixed in with their food too. Nothing goes to waste in our house and we are all happy. 🙂

1- 1 1/2 lbs large shrimp or prawns, peeled, rinsed and deveined

1 can Cole’s Tinned Smoked Muscles, drained

1 can Cole’s Tinned Smoked Salmon, drained

3-5 slices of bacon, cooked and cut into small pieces.

1-2 potatoes, diced

2 carrots, diced

1 cup peas

3-4 green onions, sliced

1/2 red bell pepper, diced

1-1 1/2 cups heavy whipping cream

1/2 cup flour

salt & fresh ground black pepper to taste

1 tsp dried thyme

olive oil for cooking

Preheat the oven to 375* F or 191* C.

Spray medium ramekins with cooking sporay.

Cut the shrimp into pieces and cook in olive oil for about 3 minutes, or until completely cooked. Remove and set aside.

Cook the bacon to a medium-crisp. Let cool for a bit until it is cool enough to work with, then cut into small pieces.

Cook the carrots, potatoes and peas until softened. I used leftover potatoes that were already cooked. When done, add the cooked shrimp, cream, flour and seasonings. You are looking for a sauce with a medium consistency, like a bechamel sauce.

Mix together well and bring to a boil, then reduce the heat to a simmer and continue to cook for about 5-7 minutes, stirring frequently. Add the tinned fish, bacon and green onions. Mix together thoroughly once again and turn off the heat.

On a lightly floured surface, roll the dough out nice and thin to cover the ramekins.

Fill the prepared ramekins with the seafood mixture. Top with the dough and pinch around the edges to make a tight seal. With a sharp serrated knife, make some slits in the top of the dough.

Brush the tops with an egg wash then place in the oven to bake. Bake for about an hour or until the crusts are golden brown and crisp and flaky.

This is a hearty meal in and of itself. No need for anything extra except a glass or two of a cool, crisp white wine. Enjoy.

Have a great day and make everyday great. Stay safe and stay well. ‘Til next time.

Nature Walks – Hawk Patrol

I see hawks all the time. Mostly they are perched up high so they can scan the area, but I see them flying all around too, usually moving in after they have spotted their prey. Red-tailed Hawks are the most prevalent hawks we have here, but we do see a lot of other types of hawks as well. I love all the birds of prey, bus especially the hawks. They are so proud and majestic, and of course very beautiful.

Garlic and Herb Swirl Bread

When we went over to Jonathan and Priscilla’s to make a batch of caramels together A Whole Lot Of Caramels we also enjoyed a delicious dinner and great company too, as we always do. When Priscilla and I get together, we always share the food preparations and menu. She told me was she was going to make, and I asked what she wanted me to bring. She said she was going to buy some bread, and I offered to make some instead. I love baking bread. There is something very therapeutic about it to me. I will find and make any opportunity to bake bread. Having dinner with great friends is a great opportunity for me to bake some bread. I chose to make a garlic and herb swirl bread for the occasion. It went perfectly with the steak, smashed potatoes and salad that Priscilla had made.

Garlic & Herb Swirl Bread

3 1/2-4 cups flour

2 1/4 tsp dry active yeast

3/4 cup warmed milk

6 TBSP butter

2 TBSP sugar

1 tsp salt

3 eggs lightly beaten

1-2 tsp each dried basil, oregano, thyme & marjoram – You can also use fresh herbs, but it would be about 1 TBSP of each herb

1/4 cup shredded Parmigiano cheese

2 TBSP sun-dried tomatoes in oil, chopped fine

1 TBSP garlic

1/4 tsp red pepper flakes

melted butter

Mix the dry ingredients together, including the yeast. In a small saucepan, add the milk, 2 TBSP of butter, sugar and salt and bring to about 120-130* F or 48-54*C. Then add to the flour mixture. Add the eggs, cheese, sun-dried tomatoes and garlic. Stir in as much as you can. This will be a very soft, sticky dough.

Turn the flour mixture onto a floured surface with the remaining flour and start kneading it all together to make a soft dough. Shape into a ball and rub a large bowl with olive oil and add the dough. Cover and let rise for about 1 hour or until the dough doubles in size.

Once the dough has doubled in size, punch it down and let it rest for about 10 minutes. Then turn it onto a lightly floured surface once again and roll into a rectangle about 18″ long.

Roll it up and pinch the seam tightly to seal. With a sharp serrated knife, slice down the center of the roll, leaving the ends connected. Then start twisting the dough in a braided fashion.

Once the dough is braided, start forming into an “S” shape, rolling both ends to the center in the opposite direction. Tuck the ends in at the bottom.

Place the loaf on a parchment lined baking pan, cover and let rise once again for about 45-60 minutes.

Preheat the oven to 375*F or 191*C.

Brush some melted butter on the top of the bread and bake for about 30 minutes, or until the bread is golden brown and hollow when tapped on the bottom.

If you like, you can add more melted butter as soon as the bread comes out of the oven and top with fresh chopped herbs right before serving.

This bread was so soft, tender and moist and was a huge hit. All of us loved it. I need to make some more again real soon too. 🙂

Have a great day and make everyday great. Life is always better when served with great friends and great food. Stay safe and stay well. ‘Til next time.

A Whole Lot Of Caramels

I am FINALLY done with my caramels for this year! PHEW!!!!! I have been busy working on them since just a few days after I returned home from Canada. I just just finished the last batch a little while ago. This year I made 4 different batches and 4 different flavors. Each batch (double batch, which we make) makes 8 lbs of caramels, so that means I made 32 lbs this year. Every caramel has been hand cut and hand wrapped. This is definitely a labor of love. And silly me, I am already talking about adding another flavor/batch next year too. I guess I will just have to start earlier. 🙂

Priscilla and I made a batch of plain caramels together, just like we’ve been doing for years.

I also made a batch of chocolate pecan,

a batch of this year’s new flavor, Mexican spice, or chocolate and cinnamon,

and a batch of mocha caramels.

Just in case you have ever wondered what 32 lbs of caramels looks like, now you know.

This year, both Priscilla and I had our challenges in getting the temperatures just right, even though we have been making our caramels for years and years. After all these years, we are still trying to perfect the recipe. 🙂 If the caramel does not get hot enough at the boil stages, the caramels will not set, and you have to reboil them again. If the boiling temperature gets too high, the caramels will get too hard, making them difficult to cut. I experienced both issues this year. I would love to say there is a set temperature that we are aiming for, and maybe there is else where, but here in our high and dry altitude, nothing is predictable, and you always have to readjust things as you cook. You have to adjust temperatures and cooking times, and how much of certain ingredients you use, such as flour and baking soda and/or powder, and liquids, and all kinds of other things too. There are specific cookbooks dedicated to high altitude cooking. I even have a few. But with all the challenges I faced, they are now ALL DONE! WHOOOOO HOOOOOO!!!!! I am done with caramels until this time next year. 🙂

The basic caramel recipe only requires 4 ingredients. This makes a double batch, or 8 lbs, and fills 1 9×13 baking pan.

4 cups sugar

4 cups Karo dark syrup

1 lb or 4 sticks of butter

4 cups of heavy whipping cream, divided

Put all the ingredients together, except only 2 cups of the cream, into a very large, heavy pot. Stir constantly with a wooden spoon until you reach your first boil, at about 235* F or 113*C, using a candy thermometer. Then add the rest of the cream, and whatever other flavorings you are using and bring the temperature back to the same temperature once again, then immediately pour into a greased baking dish. I usually rub soft butter into my baking dish and spray it with cooking spray. Let the caramels sit overnight at a minimum before you start cutting them. As I mentioned above, you are just going to have to play around with the actual temperatures, and they will vary from place to place, and in different climates. Needless to say, they are very temperamental, but worth all the effort in the end. Everyone who is lucky enough to receive our caramels always rave that they are the best caramels they’ve ever tasted and they just melt in your mouth.

Try your hand at caramel making and let me know your results. 🙂

Have a great day and make everyday great. Stay safe and stay well. ‘Til next time.

Nature Walks – Pie-Billed Grebe

I just never know what I am going to run into on my walks. Everyday is a surprise. Sometimes I don’t see anything, and other times I see a whole lot of things. And sometimes, I discover new things, or at least things that are new to me.

We have lived in our house almost 19 years, and I had never seen a Pie-Billed Grebe before now. I only saw the one, but he was happily swimming along, without a care in the world. Because I had never seen one before, I checked my bird book as soon as I got back home to see what it was. Now I know. He is a little guy, much smaller than our normal resident Mallards.

Life is full of surprises. I love it! 🙂

Steak With Toasted Spice Vinaigrette

Steak is always a favorite in our house. We eat quite a bit, though I have to make mine into smaller and smaller portions because my tummy just can’t handle it the way it used to. Because steak is a staple in our house, I am always looking for new and creative ways to cook and serve it.

Right now our weather is all over the place. We are still having warm days mixed in with cooler days, which makes menu planning a bit challenging. It was one of our warmer days, and steak was in our weekly meat rotation. I wanted a steak dish that was a bit lighter to go better with the warmer weather. I found a delicious steak recipe that was just perfect. I seared my steak to a delicious rare-medium rare and served it over cannellini beans and spinach, then topped it with tomatoes. I topped it all with a toasted spice vinaigrette.

Steak with Toasted Spice Vinaigrette

I generously coated my steak with salt, fresh ground black pepper and olive oil and let it set for about an hour covered and at room temperature before searing it.

Next I made the vinaigrette.

1 tsp cumin

1 tsp fennel

1 tsp coriander

1/3 cup olive oil

2-3 TBSP white wine vinegar or Prosecco vinegar

1 tsp Dijon mustard

t-2 tsp Worcestershire Sauce

fresh ground black pepper and salt

Toast the spices in a small skillet for about 2-3 minutes, or until they become fragrant, then mix in with the oil, vinegar, Worcestershire Sauce and mustard and whisk everything together and let it set until ready to use.

My steak still needed something else, so I sauteed spinach with onions and garlic, salt, pepper and olive oil. Once the spinach was cooked, I tossed in a can of drained and rinsed cannellini beans. I used this as my base and built it all up from there.

Once everything was cooked and prepared, I just layered it all up, starting with the spinach and beans, then the steak, with the sliced tomatoes next. The final step was to drizzle the vinaigrette on top of everything while the steak and spinach were still hot. I had some leftover mashed potatoes that I added just to finish them off. You all know how I love to use up my leftovers. 🙂 A nice glass or two of Cabernet Sauvignon was a perfect addition to complete the meal.

You can also serve this steak, with the tomatoes and dressing over a bed of greens to make a nice steak salad too if you prefer. However you choose to serve it, it is definitely a very tasty choice. I think you will like it a lot. 🙂

Have a great day and make everyday great. Stay safe and stay well. ‘Til next time.

Janet’s Birthday At North Italia

There were a lot of birthdays that needed to to be celebrated while we were gallivanting around Canada, which means we celebrated once we got back. I bought presents back from our travels for all the celebrants. I told you about Lauren’s birthday dinner, that I cooked. Lauren’s Birthday Celebration. Janet’s birthday was a few days later. She wanted us all to go out to an Italian restaurant in Cherry Creek, called North Italia.

North Italia is an upscale Italian Restaurant that opened 20 years ago. North Italia was founded on two essential principles: exceptional Italian cuisine and great hospitality. It specializes in combining traditional Italian flavors with innovation. Everything is always evolving at North Italia. It’s a place where details matter and every guest is welcomed and treated as guest in their house. This is how every successful restaurant stands head and shoulders above the rest. (This is also how my staff and I always treated everyone who entered our establishments too). Treating every guest like they are a guest in your house is what transforms the ordinary into the extraordinary. At North Italia, their motto is “From the ingredients we source to the wine we pour, every bite and sip you take was made with excellence in mind”.

While we were waiting for our wine and starters, Janet opened her presents. This beautiful scarf, a big bottle of pure Canadian maple syrup, and a maple chocolate bar were her presents from us. The scarf matched her sweater perfectly. 🙂

We started off with a bottle of some delicious wine and grilled ciabatta bread for the table.

Larry and I split a salad before our entrees and Janet and Bob split a bowl of lentil soup.

We all ordered something different for our main entrees. Janet ordered the tortellini.

Bob ordered the salmon.

Larry decided on lasagna. He likes to order lasagna when we go to Italian restaurants because I rarely cook it. It is far too cheesy for me, so I don’t eat it. But Larry loves it. 🙂

I ordered a chicken and pepper dish.

Everything was very good and we thoroughly enjoyed our dinners. Because it was a birthday, we actually did save room for dessert too.

The birthday girl ordered the tiramisu.

Normally, we just get one dessert to share, but Larry is not a tiramisu fan. He doesn’t like anything coffee flavored. So we ordered a hazelnut cake that we shared. I tried the tiramisu though, and it was divine. Once again, everything was delicious!

Janet, Bob and I all ordered a latte or cappuccino afterwards too.

It was yet another fabulously fun evening shared with great friends who are really more like family. Happy Birthday Janet, with many more to come.

North Italia is a chain of restaurants with locations across the United States, mostly in California. We went to the only location (so far) in Colorado, located at 190 Clayton Lane, Denver, CO 80206. Reservations are required, and everything fills up fast. So call (720) 941-7700 or go online. This is a North Italian dining experience you won’t want to miss.

Have a great day and make everyday great. And everything you do will always be better when celebrated with great friends and great food. Stay safe and stay well. ‘Til next time.

Spinach Salad With Warm Prosciutto Dressing

Foods travel and cross paths into many different cultures and countries, all claiming those recipes to be their own. The precursor to the modern spinach salad was likely a “wilted” or “kilt” salad using dandelion greens, dressed with hot bacon fat, vinegar, and sometimes sugar. It was originally rooted in both Dutch and German traditions, but quickly became an American salad. It was specifically a Pennsylvania Dutch recipe from the Lancaster County region of Pennsylvania. The original version of the salad was popular in the 19th century as these greens were among the first available after winter. Once the use of spinach took over, spinach quickly replaced dandelion greens and the salad’s popularity really started to take off. The classic spinach salad with hot bacon dressing reached peak popularity in the United States during the 1970s and into the 1980s. During this time, variations often included common additions like hard-boiled eggs, sliced red onions, and occasionally canned mandarin oranges or blue cheese. The use of pancetta, an Italian cured pork belly, is a more recent culinary adaptation, often seen as a way to update the classic dish. Pancetta offers a different flavor profile than traditional American bacon, and recipes using it, such as one by Chef Michael Chiarello, began appearing in the early 2000s and onward. The pancetta fat, like bacon grease, is used as the base for the warm dressing, often a vinaigrette.

And yet again, I added my own personal touches to this classic salad, making it my own recipe. Or as some would say, I “Jeannefied it”. 🙂

Spinach Salad with Warm Prosciutto Dressing

I did not have Pancetta but I did have Prosciutto. Pancetta and prosciutto are similar and are both Italian cured pork products, but pancetta comes from the pork belly while prosciutto comes from the hind leg, resulting in some key differences. Pancetta is typically diced and cooked before eating, with a more savory, fatty flavor, while prosciutto is thinly sliced and served uncooked, with a more complex, slightly sweet flavor. While pancetta is cured pork belly that’s typically cooked, prosciutto is air-dried ham, often eaten raw, and has a more delicate, less fatty texture. To substitute, cook the prosciutto until crisp or add it at the end of cooking, and be cautious with adding extra salt. Prosciutto is healthier than pancetta because it is made from a leaner cut of pork (the hind leg) while pancetta comes from the fattier pork belly. This results in prosciutto having a lower fat content and being less processed than pancetta. Of course I made a few other changes as well. 🙂

10-16 oz fresh baby spinach, rinsed and stems removed

8 sliced Prosciutto

2 TBSP olive oil

2-3 cloves garlic, sliced very thin

1 shallot, sliced very thin

1/4 cup red wine vinegar

1 tsp Dijon mustard

salt & fresh ground black pepper to taste

5-6 radishes, rinsed and sliced very thin

Saute the Prosciutto in a little olive oil until it is crispy, then remove from the pan and drain on a paper towel.

Add the garlic and shallot to the olive oil and saute for 1-2 minutes.

Pour the vinegar, mustard and salt & pepper into the garlic mixture and mix well. Pour the hot dressing over the spinach and add the Prosciutto on top of the salad. Add the radish slices all around the salad. Serve immediately while the dressing is still hot.

Have a great day and make everyday great. Stay safe and stay well. ‘Til next time.