I have created this site to help people have fun in the kitchen. I write about enjoying life both in and out of my kitchen. Life is short! Make the most of it and enjoy!
Lately I have been seeing a lot of Northern Flickers around our lakes. They are such pretty birds. The males have a bright red spot on their throats, whereas like so many other birds and animals, the females are more subdued. Usually I only see one, but this time, I saw one by himself, and a female by herself, then a pair of them together later.
I almost always have my trusted camera with me. I just never know what I might see, and I want to be ready to capture the moment when I do see something spectacular. Have a great day and make everyday great. 🙂
While I was working with my sun-dried tomatoes for my sun-dried tomato and olive bread Sun-Dried Tomato and Olive Bread, it made me realize how much I love sun-dried tomatoes. I hadn’t eaten them in awhile, where I used to use them for just about everything. I missed them. I don’t know what made me forget about them. I LOVE sun-dried tomatoes. Always have. Good thing too, because I have a large jar that needs to be used up, so I need to find more things to add them to. 🙂
Tomatoes drying in the sun have always been a popular thing in the Mediterranean countries, especially in Italy and Greece. Sun-drying tomatoes is a traditional method that concentrates the flavors and extends the shelf life of tomatoes. In Italy, tomatoes are a symbol of life and vitality.
Here are some tips for drying your own tomatoes at home. The tomatoes can be ready in about 4-10 days.
Choose the Right Tomatoes: Select ripe, firm tomatoes. Roma or other paste tomatoes are often used because of their meaty texture.
Wash and Cut: Wash the tomatoes thoroughly to remove any dirt. Cut them in half lengthwise. If using larger tomatoes, you may want to cut them into quarters.
Remove Seeds and Moisture: Gently squeeze the tomatoes to remove excess juice and seeds. This helps to reduce drying time.
Season (Optional): You can sprinkle the tomatoes with salt and herbs such as basil or oregano for additional flavor. This is optional, and the amount used can be adjusted to taste.
Prepare the Drying Surface: Lay out a clean and fine mesh or use drying racks, ideally made from food-grade stainless steel or plastic. Avoid using surfaces that may react with the tomatoes’ acidity, like galvanized or aluminum screens.
Place Tomatoes on the Surface: Arrange the tomatoes cut-side up on the drying surface. Make sure they are not touching, so air can circulate around them. Traditionally, they were dried right on the the tiled roofs all over Italy and Greece.
Sun Dry: Place the racks in a sunny spot where they will receive direct sunlight for most of the day. You’ll want a location that receives at least 6-8 hours of sunlight and has good air circulation.
Cover with a Net: To protect against insects and birds, cover the tomatoes with a fine net or cheesecloth.
Turn Regularly: Turn the tomatoes once a day to ensure even drying.
Bring Them Inside at Night: If there’s a chance of dew or rain, bring the tomatoes inside at night to prevent them from reabsorbing moisture.
Monitor the Drying Process: Sun-drying can take anywhere from several days to over a week, depending on the weather and humidity. Check the tomatoes regularly; they should be dry but still pliable when done.
Store Properly: Once dried, store the tomatoes in an airtight container in a cool, dark place. For longer storage, you can pack them in olive oil.
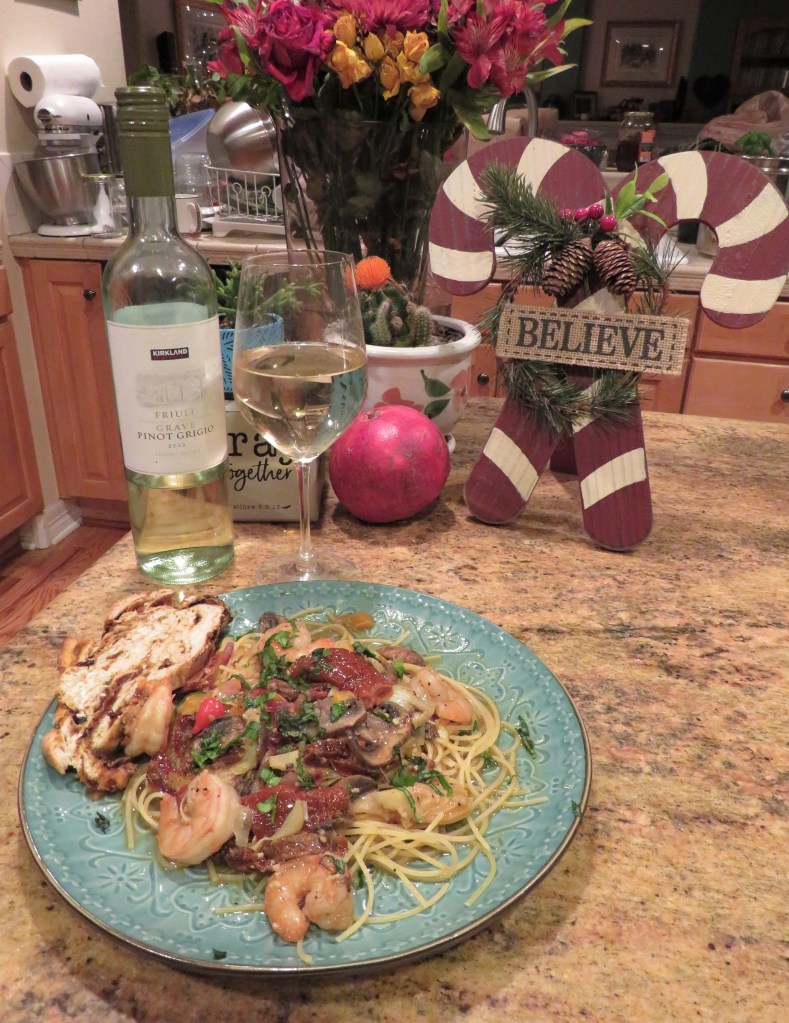
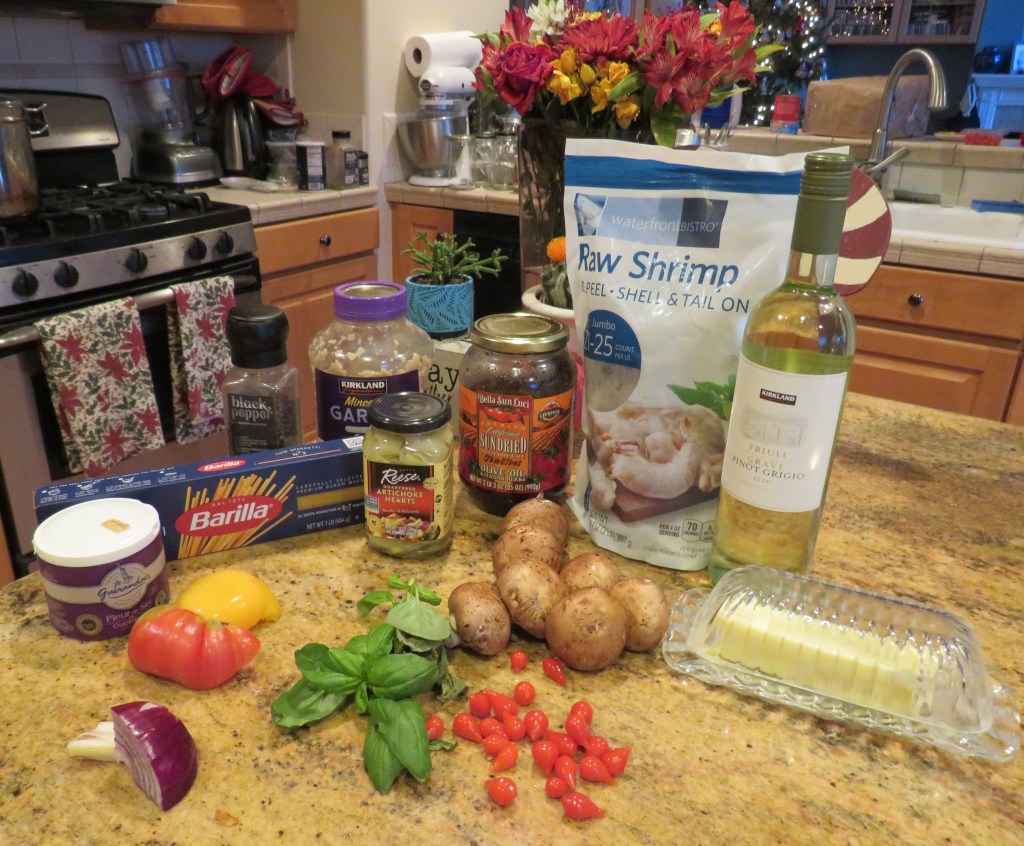
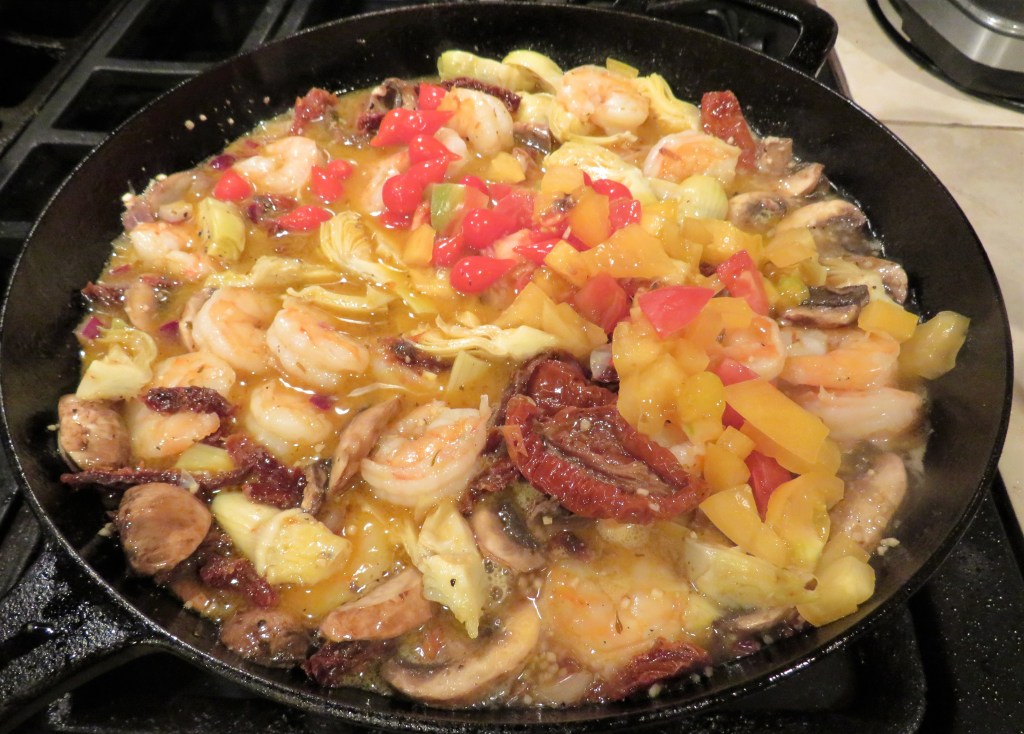
I found a great way to highlight my delicious sun-dried tomatoes. I made some pasta with shrimp, sun-dried tomatoes, mushrooms and artichoke hearts, with my sun-dried tomato and olive bread on the side. YUM!
This recipe is quick, easy-peasy and delicious, but then how could it be anything but delicious with these great ingredients. 🙂
Shrimp, Sun-Dried Tomato, Mushroom and Artichoke Heart Pasta
This is a light dish with a light sauce, so you do not want to use a heavy pasta. The flavors of the sauce will get lost if served over a heavy pasta. Angel hair or a very thin pasta will be best for this dish.
1 1/2-2 lbs large shrimp, peeled, deveined and rinsed
1- 2 cups sliced mushrooms
1 jar artichoke hearts, drained and quartered
1 cup sun dried tomatoes in oil, chopped
1 TBSP garlic
1/4 red onion sliced thin or diced
1 tomato diced
1-1 1/2 cups dry white wine
salt & pepper to taste
2-3 TBSP butter
1-2 TBSP Peruvian peppers, optional
2-3 TBSP fresh basil, chiffonade
angel hair or thin pasta, cooked
olive oil
Heat up a large skillet and get it very hot, then add the olive oil and shrimp. Cook the shrimp for about 2-3 minutes per side, or until it is completely cooked. Remove it from the heat and set aside and keep warm.
Add the mushrooms, onions and garlic and cook for about 3 minutes, or until the onions become translucent, stirring often.
Carefully add the wine. Let it cook for about 2-3 minutes. Add the sun-dried tomatoes, artichoke hearts, seasonings, and re-add the shrimp. Mix everything together well.
Cook for about 2 minutes, or just until everything is heated through. Add the Peruvian peppers, if using, and the chopped fresh tomatoes at the very end so they do not break down. Add the butter at this point too. The butter is a finishing touch to finish the sauce and make it a bit richer. Add 1/2 of the chopped basil and mix everything together.
When everything is ready, serve it over the cooked pasta and add the rest of the chopped basil. !Mangia! Buon appetito! Serve with the same dry white wine you used for the sauce and dinner will be complete. The thing that will take the most time is waiting for the water to boil for the pasta. 🙂
Have a great day and make everyday great. Stay safe, stay well. Merry Christmas, Happy Chanukkah and Happy Holidays. ‘Til next time.
I have been living and walking around my lakes for 17 years now, and I still see new things all the times. Life is never boring around here. Today, I had yet another first. I saw two mallards fighting each other. It was a test of who will be the king duck of the lake, and a little struggle of male domenence. There were lots of onlookers too – quite a few Canadians and Cacklings, as well as other Mallards. I think they finally kissed and made up though. I didn’t see any bloodshed.
I guess even in the world of ducks, boys will be boys. 🙂
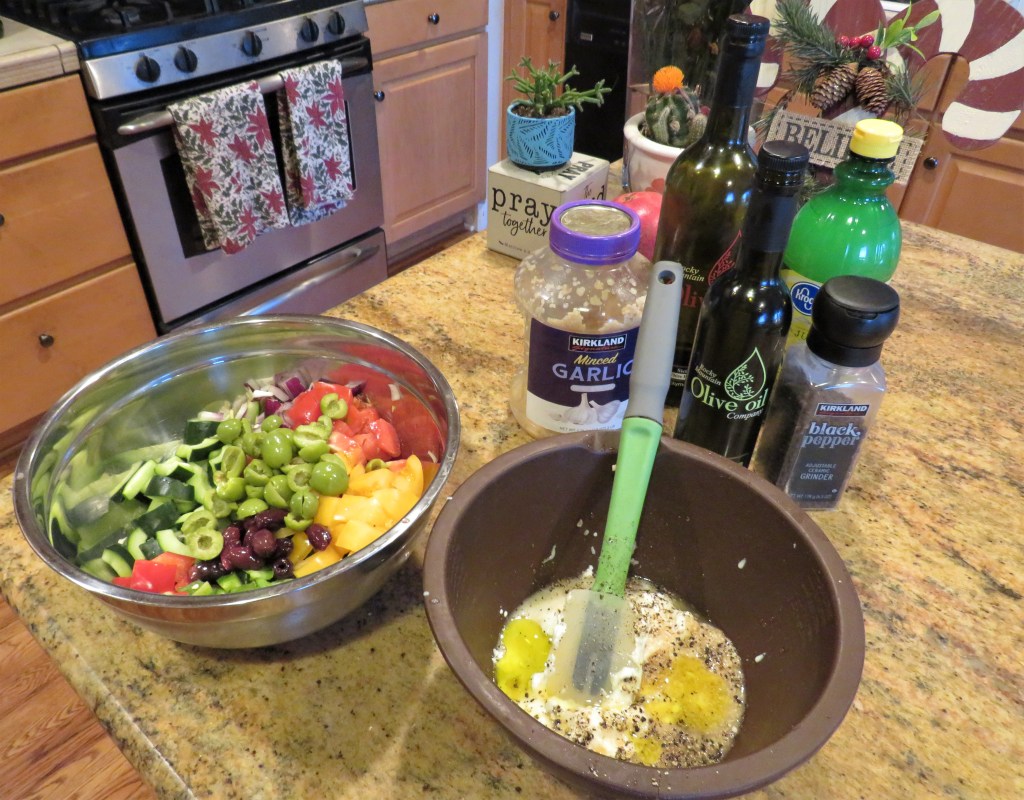
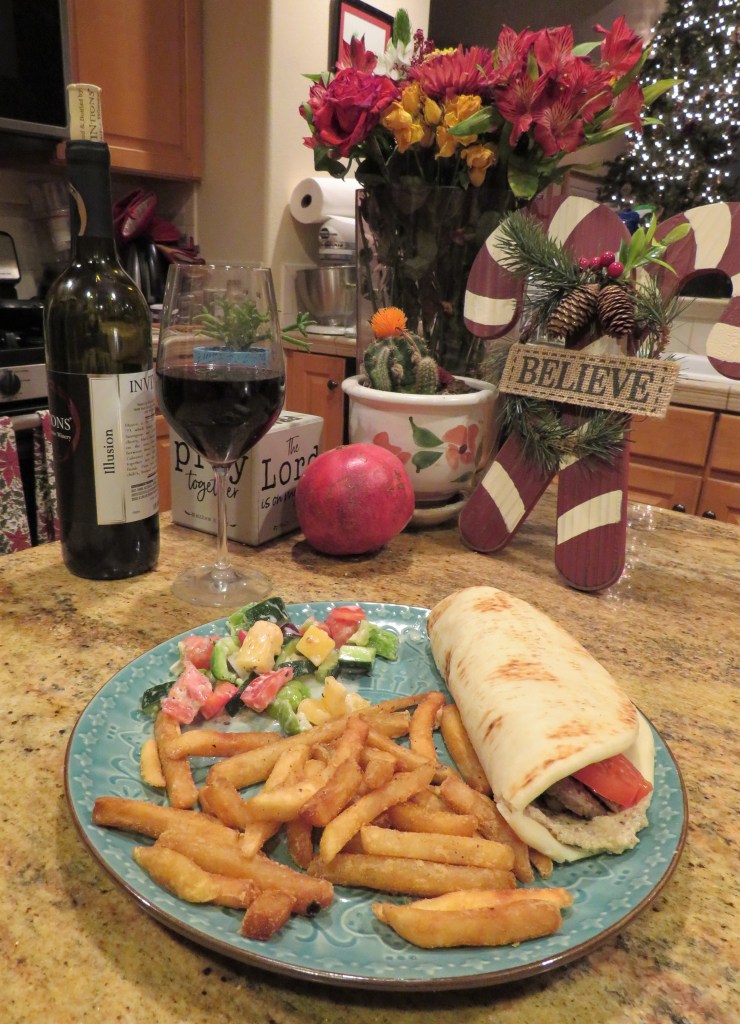
I like cooking in themes. For instance, if I am making Italian, the whole meal will be Italian, or Mexican, on in this case Greek. Once again, I was inspired by using up some of my leftovers and planned the rest of the meal around them. “The Queen” and I always get very creative when re-using our leftovers.
We have a friend staying with us for while and someone had given him some of their leftover lamb chops. I also had some hummus to use that my neighbor had given to us. Well, at the moment I am cooking for three, and there was no way I could stretch just one lamb chop three ways. I’m good, but I’m NOT that good. 🙂 So, I used that lamb chop and sliced it into thin strips and mixed it with some leftover steak, also cut into thin strips. Gyros were made with the meat. You’ve seen me do this before, a number of times. Quick and Easy Gyros, California Gyros OK. The main course is set. Now I just needed a side dish or two to go with it. I made a delicious Greek vegetable salad and some French fries to go with the gyros. I made this delicious and filling meal at home, using up some of my leftovers. Had we gone out to eat, a very similar meal would have cost us about $50 or more for all three of us.
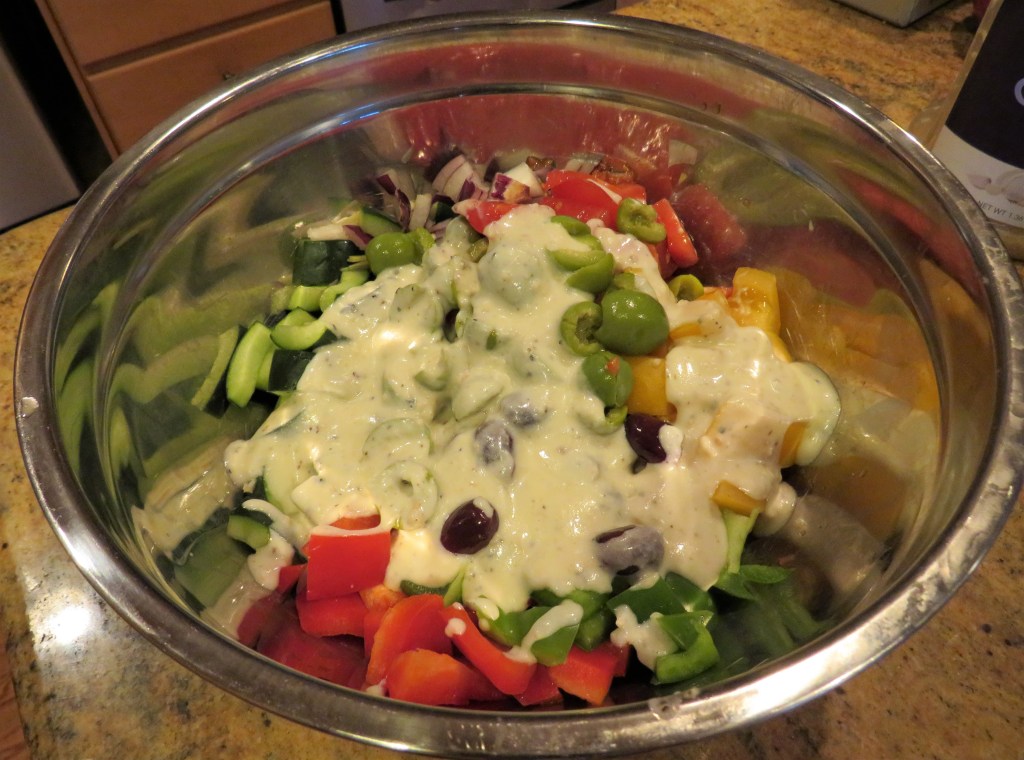
I used to make salads very similar to this all the time back when I was the Sous Chef for a catering company and had to feed the crew. This colorful salad is simple, easy-peasy and healthy because it is full of a variety of vegetables.
Greek Vegetable Salad
1 cucumber, seeded and quartered
1/2 red bell pepper, diced medium
1/2 green bell pepper, diced medium
1 cup mixed olives
1/2 red onion, diced medium
2 tomatoes, diced medium
1-2 tsp garlic
1 TBSP lemon juice
1 TBSP lemon olive oil, optional
1 TBSP lemon balsamic vinegar, optional
1/2 cup yogurt
1-2 tsp fresh ground black pepper, or to taste
Dice all the vegetables at a medium dice and toss together. A quick and easy way to remove the seeds from the cucumber is to cut the cucumber in half and run a spoon from the top of the cucumber to the bottom, right down the center. All the seeds will come out in an instant. I LOVE heirloom tomatoes, so I use them whenever and wherever I can. They were perfect in this salad. I also like to mix the colors, so I used one red and one yellow. Everything was so fresh and delicious.
Combine the yogurt, oil, vinegar, lemon juice, garlic and pepper together and mix well.
Add just enough dressing to the vegetables to coat them without having them swim in dressing. Toss well and refrigerate until ready to enjoy. I used the rest of the dressing in the gyros, along with some more tomato slices, that I sliced very thin and some red onions, also sliced very thin.
This simple salad will go well with just about anything, but as I said, I like to cook I themes, so I paired it with my Greek gyros and some red wine on the side. Simple perfection. It was like we were dining in Greece. 🙂
Good food doesn’t have to be fancy or hard to make. Often times, the simple foods are the best foods. So, remember the K.I.S.S. rule – keep it simple (stupid). 🙂 Have a great day and make everyday great. Stay safe and stay well. ‘Til next time.
Bread is probably my absolute favorite food in the whole world. I LOVE bread. ALL kinds of breads too. Bread, after all, is the food of life and has been almost since the beginning of time. Today, there are endless possibilities of types of bread from which to choose. Too many breads, not nearly enough time. 🙂
Breads of some sort have been around since at least 8000-10,000 BC, specifically coming from the Middle East and Egypt. But there is also evidence that has been found, dating bread back even further, to about 14,000 BC. Bread was eaten and enjoyed by everyone, from the Pharaohs down to the peasants. At first breads were unleavened, or flat. The fermentation process was discovered when someone accidently left dough out in the sun, and it rose. And leavened breads were born. Breads, both leavened and unleavened, have been revered all over the world ever since. According to World of Statistics, the 10 countries that are at the top of bread consumption per capita per year are Turkey (199.6 kg), Serbia (135 kg), Bulgaria (131.1 kg), Ukraine (88 kg ), Cyprus (74 kg), Argentina (72 kg), Portugal (70 kg), Poland (70 kg), Denmark (70 kg) and Greece (70 kg).
Here are some fun facts about bread that I bet you didn’t know.
Bread was often left at the tombs of the dead.
The ancient Greeks were already producing more than 80 types of bread in 2500 B.C.
Bread was so important to the Egyptian way of life that it was used as a type of currency.
Bakers were powerful credit brokers during the Middle Ages in France.
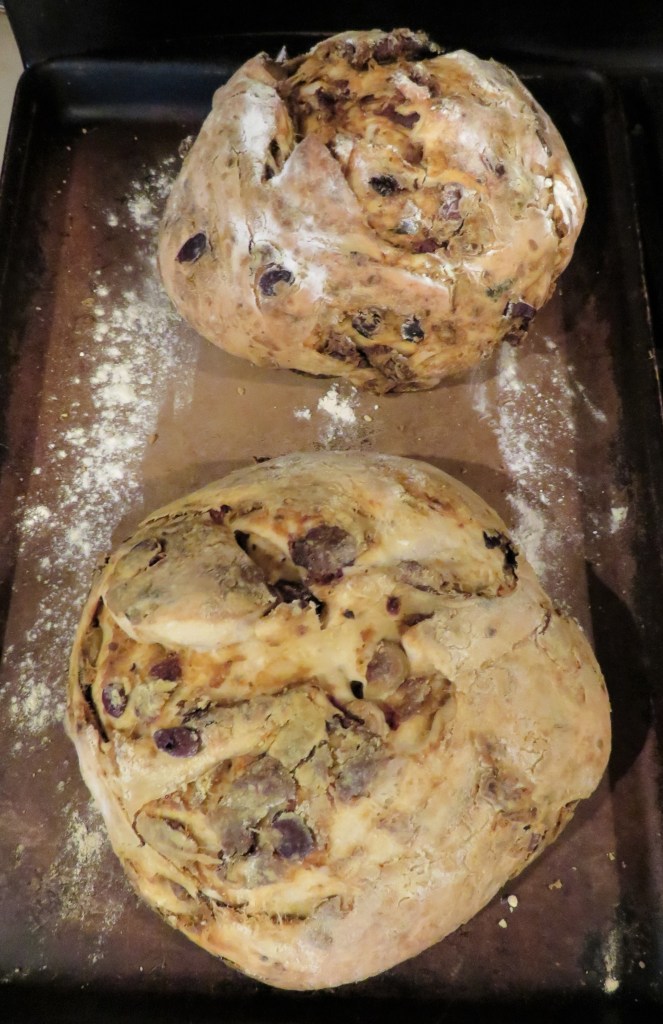
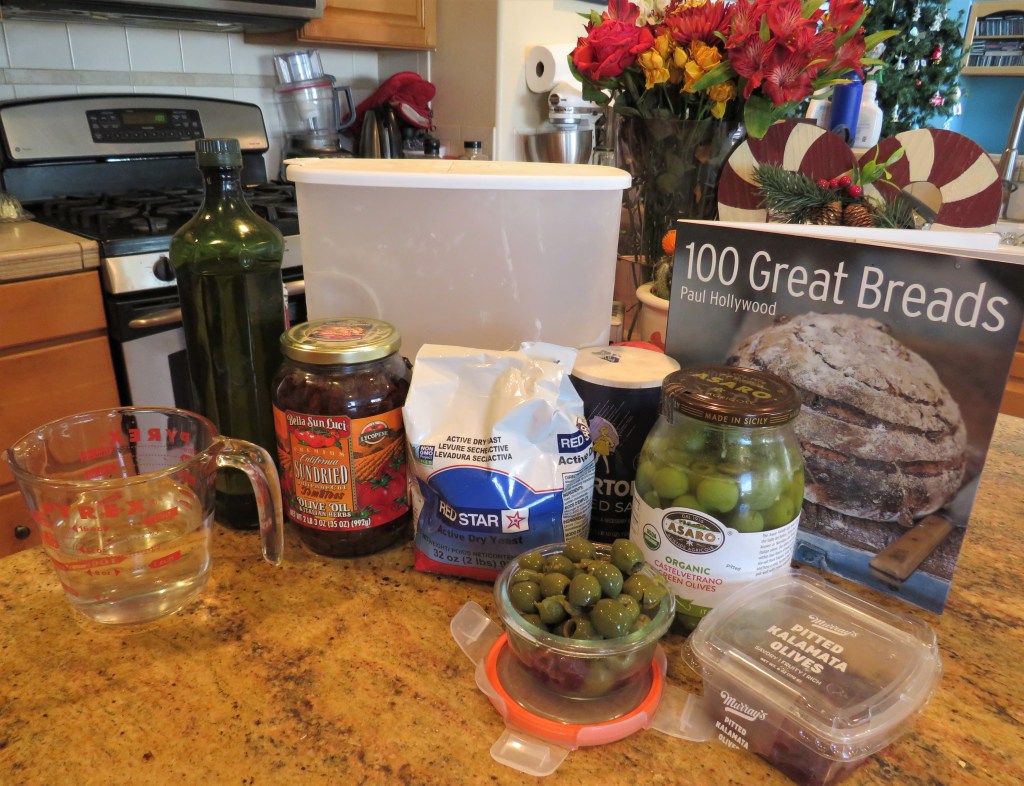
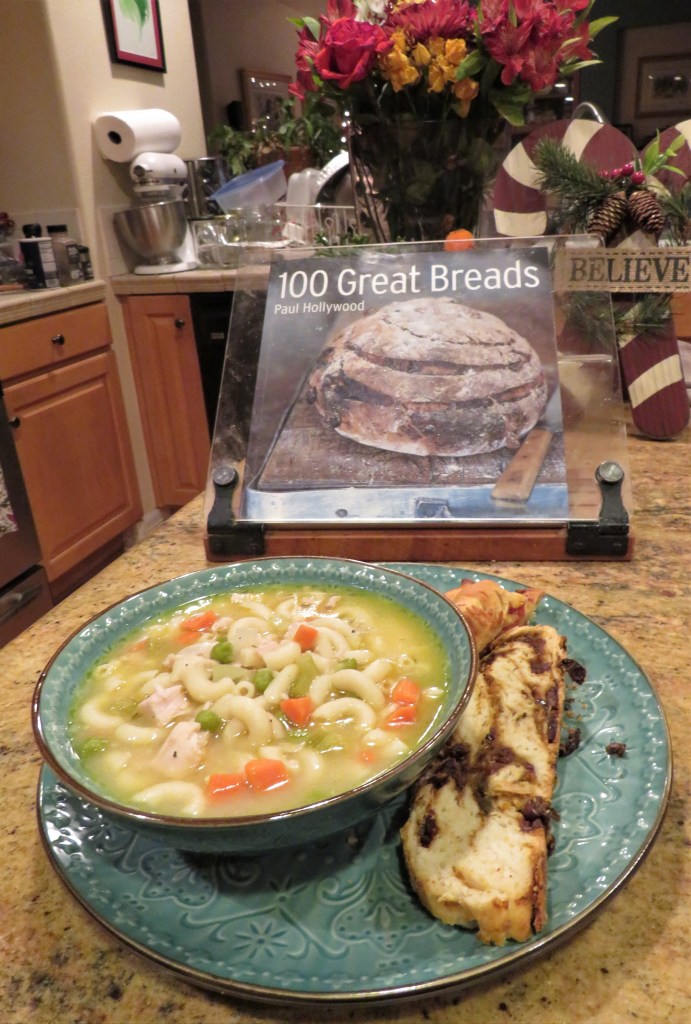
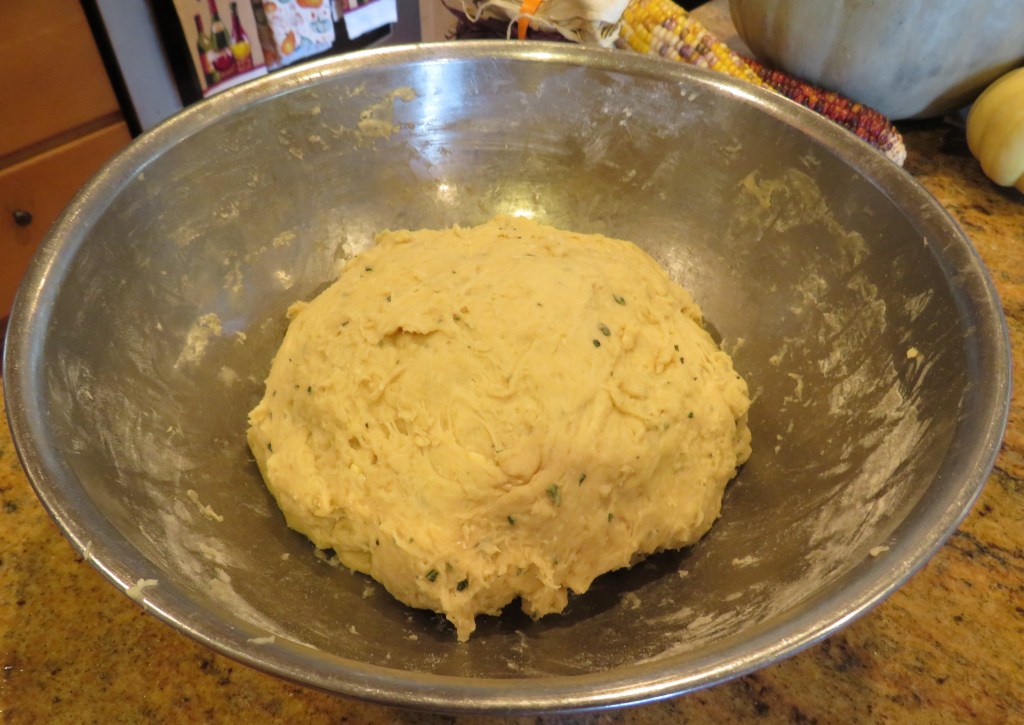
My latest bread baking adventure was the making of some delicious, rustic sun-dried tomato and olive bread. YUM!!!! We ate the better part of one the loaves the other night, with our turkey soup. Turkey Soup I still have another loaf left, that will most probably be enjoyed with dinner tonight. 🙂
I knew what kind of bread I wanted to make, but all of my recipes were asking for a starter, and since I started the bread making process later than I had intended, I didn’t have time to make a starter too. At last, I found just the recipe I was looking for, without a starter, and that was the bread I made. In the future, I will make a starter and then make the bread. I want to do a comparative study to see which one is better, or if there are any significant differences between the two styles of bread making for this recipe.
Sun-Dried Tomato and Olive Bread
You want this dough to be a soft dough, so just use a scant amount of flour, and don’t over knead or process it.
4 scant cups flour, + extra for dusting
1 1/2 tsp salt
3 scant TBSP olive oil
2 1/2 tsp dry active yeast, or one package
1 1/4 cups lukewarm water
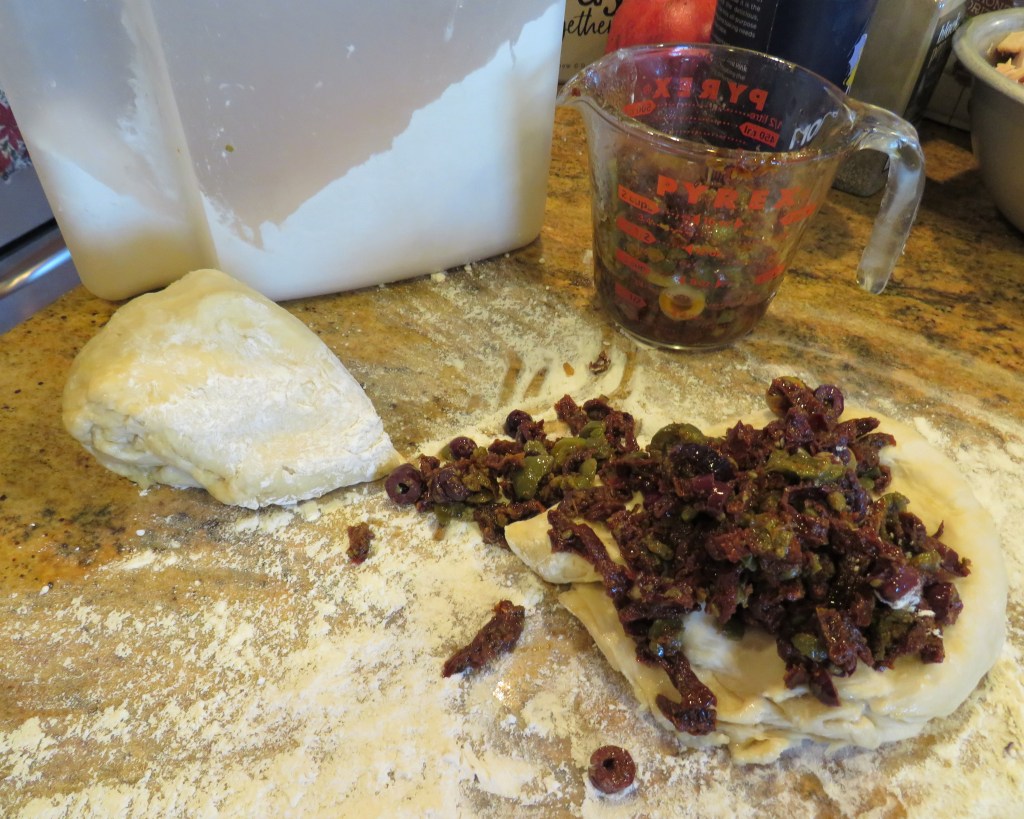
1 cup olives of your choice – I like to mix my olives
2 cups chopped sun-dried tomatoes
Combine the flour, salt, yeast and olive oil together, then slowly add the water. Work it all in until the dough becomes pliable. On a lightly floured surface, knead the dough for about 5 minutes, then shape into a round ball. Lightly oil a large bowl and place the rounded dough into the prepared bowl. Cover and let rise for about 1 hour in a warm place.
I followed the recipe and the instructions and added the the sun-dried tomatoes and olives before the second rise. However, I prefer the idea of adding them with all the other ingredients and letting the dough rise with them, on the first rise. Suit yourself, and do it how it works best for you. I find the dough easier to work with by adding them to the initial rising process. Either way you decide to work the olives and sun-dried tomatoes into the dough, work them into the dough until they are fully incorporated.
If you add the sun-dried tomatoes and olives before the first rise, then punch the dough down after about an hour and divide it into two. Shape each portion into a round ball.
Place the dough on the prepared pans, cut a cross into each dough rough and sprinkle with a little flour. Cover and let rise again for about another hour. If you add them at the beginning of the second rise, you are doing the same thing. You are just eliminating an extra step, that I find is really unnecessary.
Preheat the oven to 425* F or 220*C.
Bake for about 30 minutes or until golden brown. Let the bread cool for about 5-10 minutes before slicing. Enjoy! This bread is SOOOOO good served warm, with melted butter, or dipped in a flavored olive oil. You can’t go wrong with this Heavenly bread, no matter how you slice it. 🙂
Have a great day and make everyday great. Stay safe and stay well. ‘Til next time.
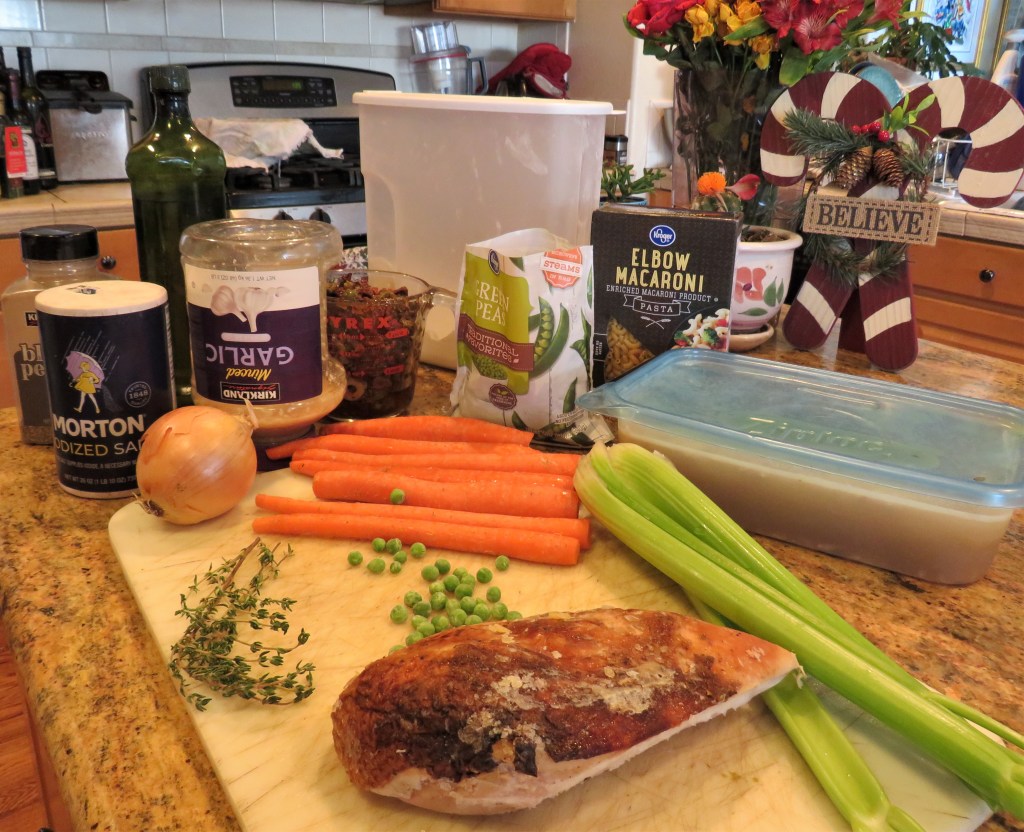
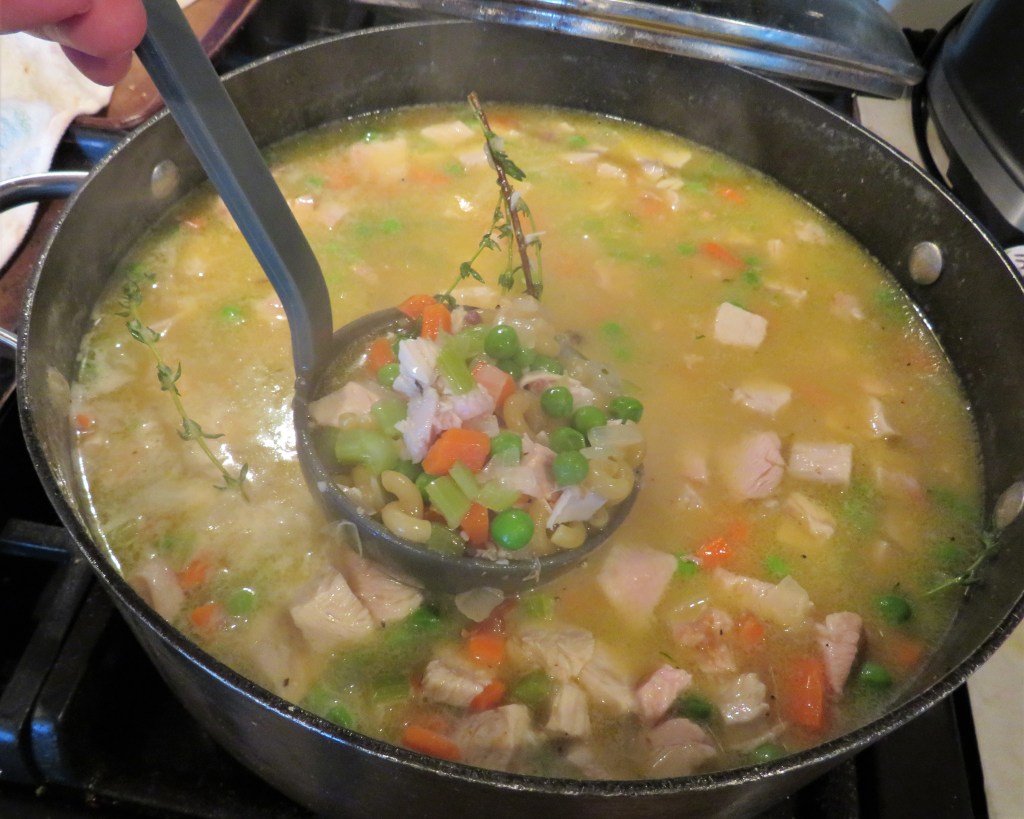
I would hazard a guess that after Thanksgiving, a lot of people use their leftover turkey to make turkey soup. And I did the exact same thing. Once again, our weather is getting a bit cooler, which means it is perfect soup weather. So turkey soup it was.
I made a big pot of soup, like I always do, so we invited Gabe, Mike and Lauren over for a quick, impromptu easy-peasy dinner of soup and homemade sun-dried tomato and olive bread and game night. We all ate well and had a lot of fun after.
When I make my soups, I like to load them up with all kinds of wholesome goodness. And I like to add big chunks of meat. I want people to know if they are eating a soup with meat, that you can actually see it and taste it. I want my guests to know it’s really in there, and not just in name only. Wasn’t that a line used for “Progresso Soups” a long time ago? There won’t be anyone asking “Where’s the [meat]” when they are eating my soups, that’s for sure. 🙂
Just like with anything, there is ALWAYS more than one way to make a soup. I thought I had some egg noodles, but didn’t so, I used elbow macaroni instead. Who cares?! It tasted good, and that’s really all that matters. 🙂
I started off by sauteing the carrots, onions, and celery in olive oil and butter, with about 1/2 cup of flour added as well.
When the vegetables had softened I added my turkey stock, salt & pepper and thyme sprigs and brought it to a boil. Next came the turkey and peas and I brought it all to a boil again, then reduced it down to a simmer.
The final addition was the pasta. Add the pasta about 30 minutes before you plan on serving the soup and readjust the seasonings if needed. If you add the pasta to soon, the pasta will absorb all the stock and you will have to add more. The pasta can also get mushy if you add it to soon as well.
When the pasta is ready, it’s time to serve it up and enjoy. It’s perfect for a cool, crisp fall or wintery day. 🙂 Soup’s on! it got rave reviews and everyone went back for seconds. After seconds and giving some away to everyone, I still have soup leftover. Like I said, I always make a big pot of soup when I make soup. 🙂
Have a great day and make everyday great. Stay safe and stay well. ‘Til next time.
Thanksgiving is now behind us, and it is time to focus on Christmas (or Hanukkah). Every year, it seems my Christmas checklist gets bigger and bigger, but every year, I manage to get everything all done in a timely manner. Today is December 1st, and I am in good shape for the holidays (I just wish I was in good shape in general, but that’s another story). I can breathe easy now. I have almost everything done. 🙂
Outside lights
We have a HUGE pine tree in our side yard that Larry decorates every year, as well as all the house lights. Larry is tall. He’s 6’4″, and he is standing on the top rung of the ladder, using his hockey stick to align the lights. But he STILL can’t get to the very top of this tree. And it just keeps growing and growing every year, which is perfectly OK by me.
2. Christmas decorations up
We have a big house and usually put up 3 trees every year. We have artificial trees, one of which is somewhere between 15-20 feet tall. This one goes in our family room.
Larry is checking all the lights and restringing them.
Nicky is helping Daddy.
We put up a colorful, smaller tree in the living room.
And we put an even smaller tree in the art niche atop of the stairs.
We also have lighted garlands curled around the railings of the stairs.
We have an ever growing collection of ornaments to decorate all these trees. Our ornaments are VERY eclectic. Each one has its own story. Some of are from my parents and are very old. Most are from our travels. We have specific ornaments for Larry and his activities and some for me and my activities. We have ornaments that represent each of our fur babies, both past and present. And we have a lot of ornaments from our annual ornament exchange parties too.
We had some help decorating this year too. Two of our “nieces” and their dad were helping out.
I am REALLY glad I am not buying a live tree this year, let alone three. Yesterday when I was out running errands, I saw a tree that was literally only about 1/2 the size of our big tree for $229. I was definitely in sticker shock, and probably would have had a heart attack on the spot if I was actually purchasing it.
3. Christmas cards, letters and pictures
All the Christmas cards, complete with their letters and photos all went out yesterday.
4. Presents – still working on them. I have most of the presents I am giving this year bought, though I still have a few more to buy. I still need to wrap all the presents for the locals, but most of my packages that needed to be shipped were shipped out yesterday.
5. Our annual ornament exchange and potluck party. Soon. This will be next Saturday, 12/9, at 3:00 PM. I still need to plan my menu and clean the house, But I still have a week for that. If any of you are in the area, come on by and help us ring in the season with glad tidings and good cheer, a lot of good food and good fun too. I always say the more the merrier. We even have some friends from Canada joining us this year. 🙂
So, bring on the Christmas season! We are ready to celebrate!!!!
We had three of our four fur babies for our annual Christmas picture, though just barely. Nicky was on the run, and Otis didn’t want any part of it. But Juneau and Dorrie were all in. They LOVE the camera, and the camera loves them too.
Happy Holidays Everyone! Merry Christmas, Happy Hanukkah, or a great holiday of your choice. Keep the holidays safe and stay well. ‘Til next time.
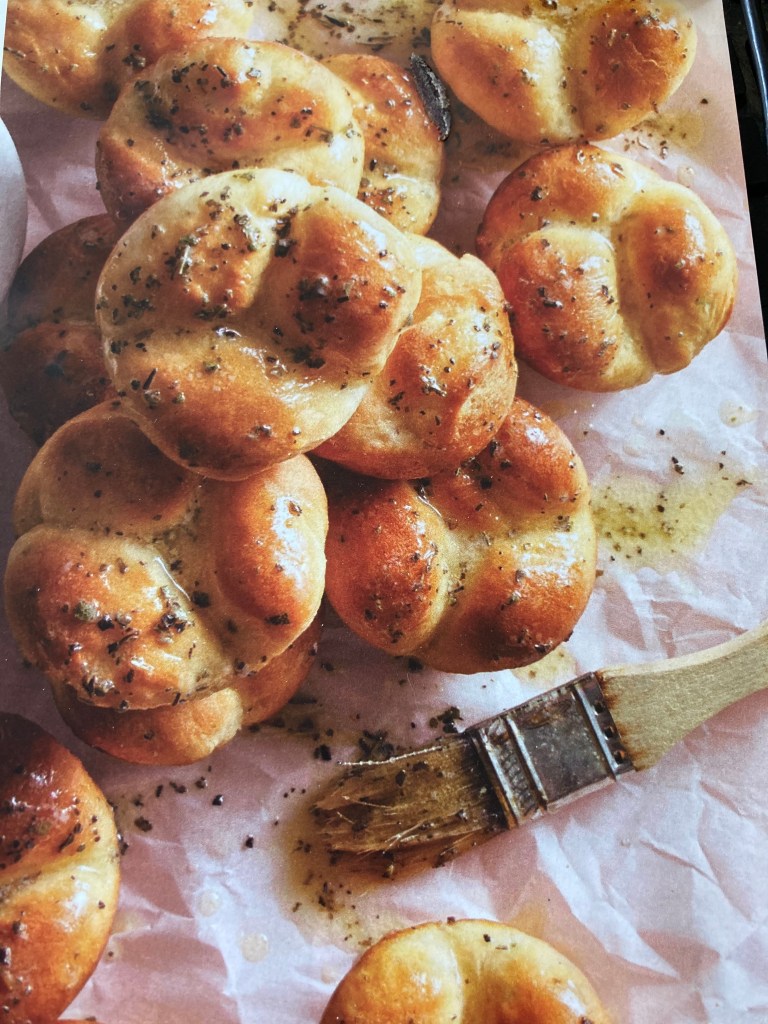
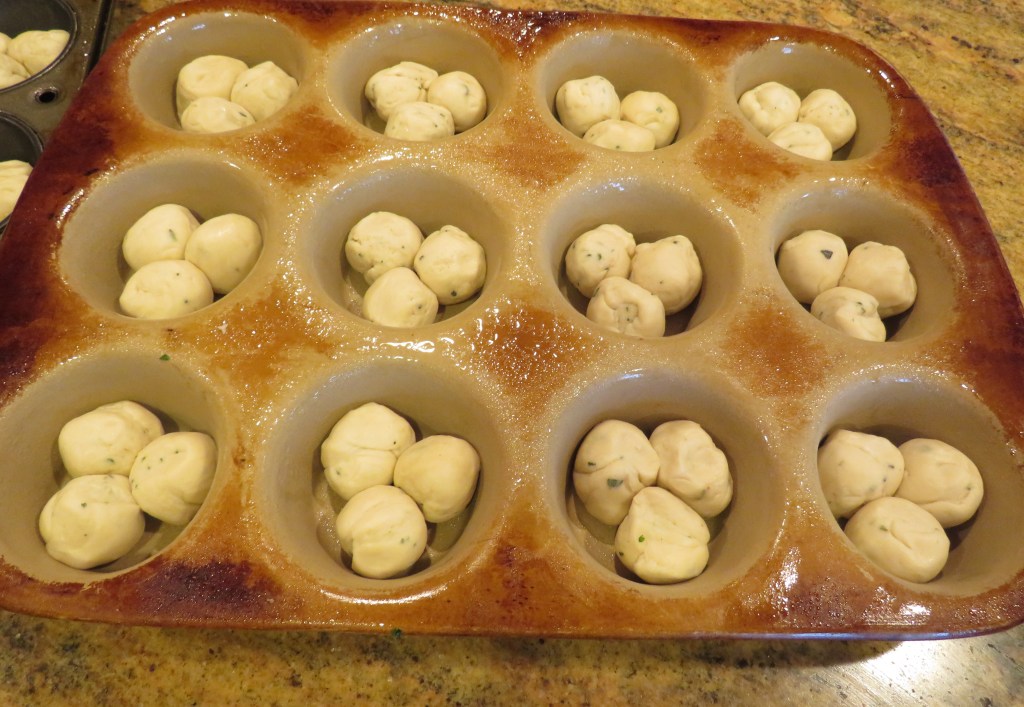
This is the last of my Thanksgiving menu items for this year. Every table at Thanksgiving has to have rolls or bread of some kind. Mine was no exception. This year I made some sage buttermilk rolls. They were delicious and were a part of our Thanksgiving meal, as well as a couple of other meals after.
Bread of all kinds is one of my downfalls. I LOVE bread. I could easily make any meal just on bread (and butter) alone, and have many times in the past. 🙂
Buttermilk Sage Rolls
1 stick or 8 TBSP butter
1-2 TBSP fresh sage chopped
3 TBSP sugar
1 1/2 cups buttermilk – I use the dried buttermilk mixed with milk
2 packages or 5 tsp of dry active yeast
1/2 cup lukewarm water
4 1/2 cups flour
2 tsp salt
1/2 tsp baking soda
1/2 tsp dry sage for the topping
3 TBSP melted butter for the topping
1 TBSP garlic, optional, for the topping
Combine the yeast with 1 TBSP of sugar and the water and mix together. Let it rest for about 10 minutes or until it becomes frothy.
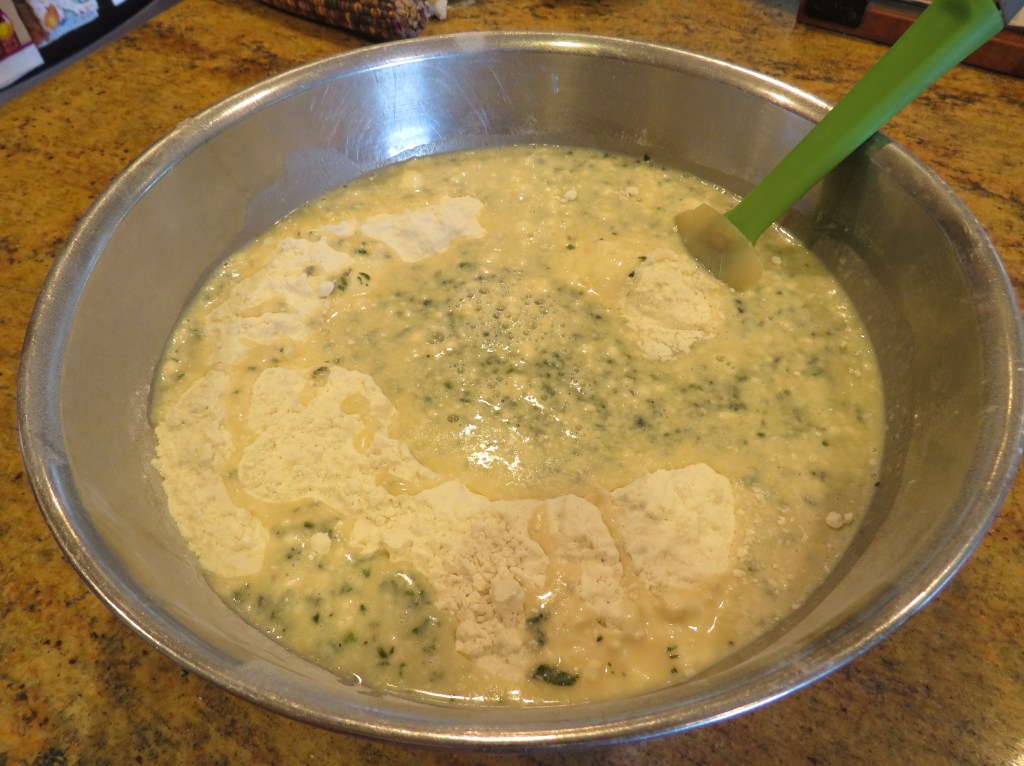
Combine the flour, salt and baking soda and mix together thoroughly.
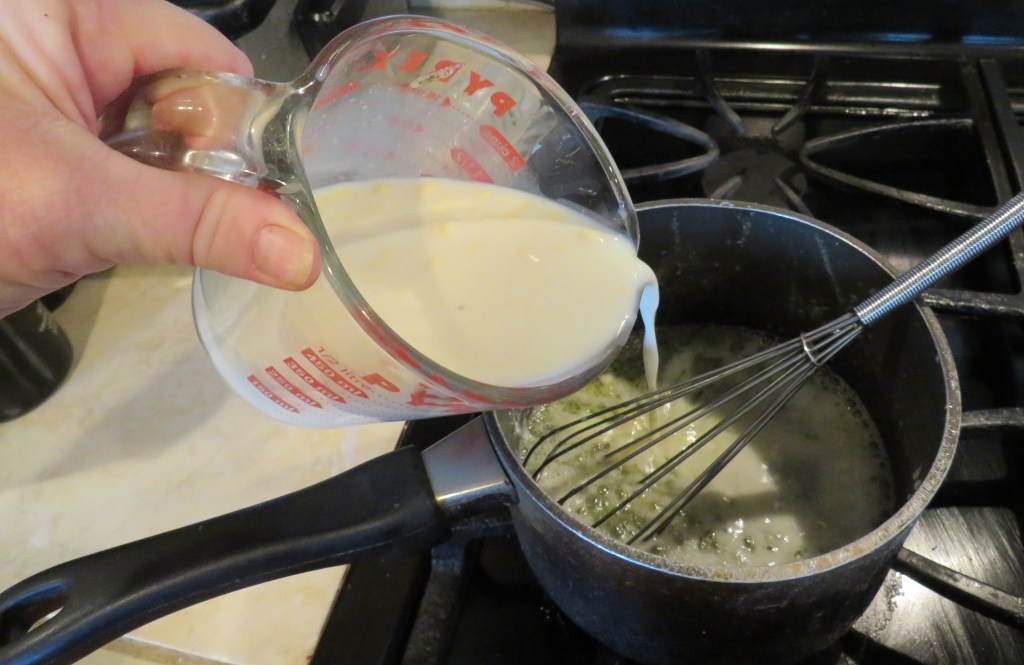
Melt the butter with the remaining 2 TBSP of sugar and sage. Cook just until the butter melts. Add the buttermilk and heat just until warmed. Let the mixture cool slightly, then add it to the yeast.
Make a well in the center of the flour mixture and add the yeast and buttermilk mixture in the center. Slowly start working the yeast mixture into the flour until it forms into a soft dough.
Form the dough into a ball and place in a large bowl that has been lightly oiled with olive oil. Cover and let rise in a warm area for about 30-40 minutes.
Preheat the oven to 375* F or 191* C. Spray cooking oil into muffin pans.
Knead the dough on a lightly floured surface until it is easy to work with. Cut or pinch small dough balls about 1 inch in size and roll into balls. Place 3 balls together in each muffin cup. You will have enough dough to make about 24 rolls. Cover and let rise again for another 45 minutes.
Mix the remaining melted butter, dried sage and garlic, if using and brush on top of the rolls before placing them in the oven. Bake for about 15 minutes or so or until golden brown. If you like to make the rolls shiny and bright, add some more melted butter on top right before serving. Serve warm. These delicious rolls are a good accompaniment to any dish. You’re going to love them, I promise. One of our guests commented on “how pretty” they looked.
Have a great day and make everyday great. Stay safe and stay well. ‘Til next time.
Once again, Larry had a big cut of beef down and wanted steak. I had some tomatoes that definitely needed to be used. How could I use them both and create something good for dinner? I know, I know!!!! How about steak pizzaiola.
What is steak pizzaiola you ask. Good question. It’s an Italian steak of course. Otherwise known as carne alla pizzaiola. I is believed the origins of this dish likely come from a Sicilian recipe using beef shoulder for the meat. Other ingredients, however, point to Naples, Italy as the origin of the recipe. Who really knows, other than it originated somewhere in Italy. Pizzaiola is the rich tomato and oregano sauce accompanying a braised cut of beef. The term pizzaiola means “in the manner of the pizza maker”. So, steak pizzaiola is a steak cooked in a sauce similar to a pizza sauce or steak made pizza style, though without the crust or the cheese.
Steak pizzaiola came about around the 1940’s when Italian cooks wanted to cook less tender cuts of meat, which were cheaper. These cheaper cuts of meat are tougher and more fibrous, so they need longer cooking times. The meat is first seared and crusted, then braised in a sauce, most notably a tomato sauce and cooked slow at a low temperature to break down the proteins.
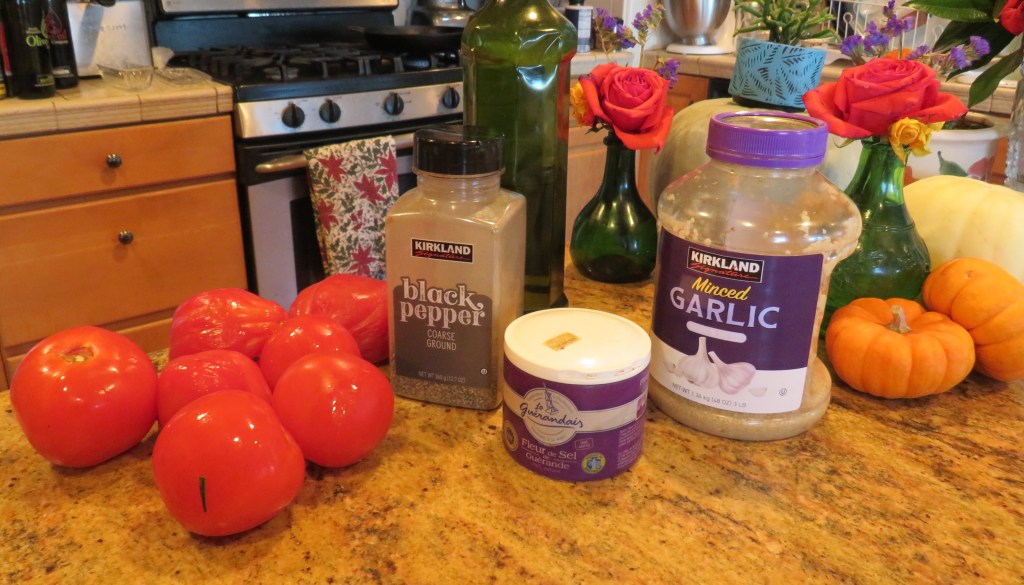
Steak Pizzaiola
6-8 medium to large tomatoes diced
3 TBSP olive oil
1-2 TBSP garlic
salt & pepper to taste
1-2 tsp each dried basil, oregano, thyme, marjoram, or any combination thereof
1 tsp red pepper flakes, or to taste
2 lbs steak
1/2 cup wine, red or white
Pat the steak dry with a paper towel, then season with salt, pepper and red pepper flakes on both sides. Press the seasonings into the steak. Cover and let rest for at least one hour before cooking.
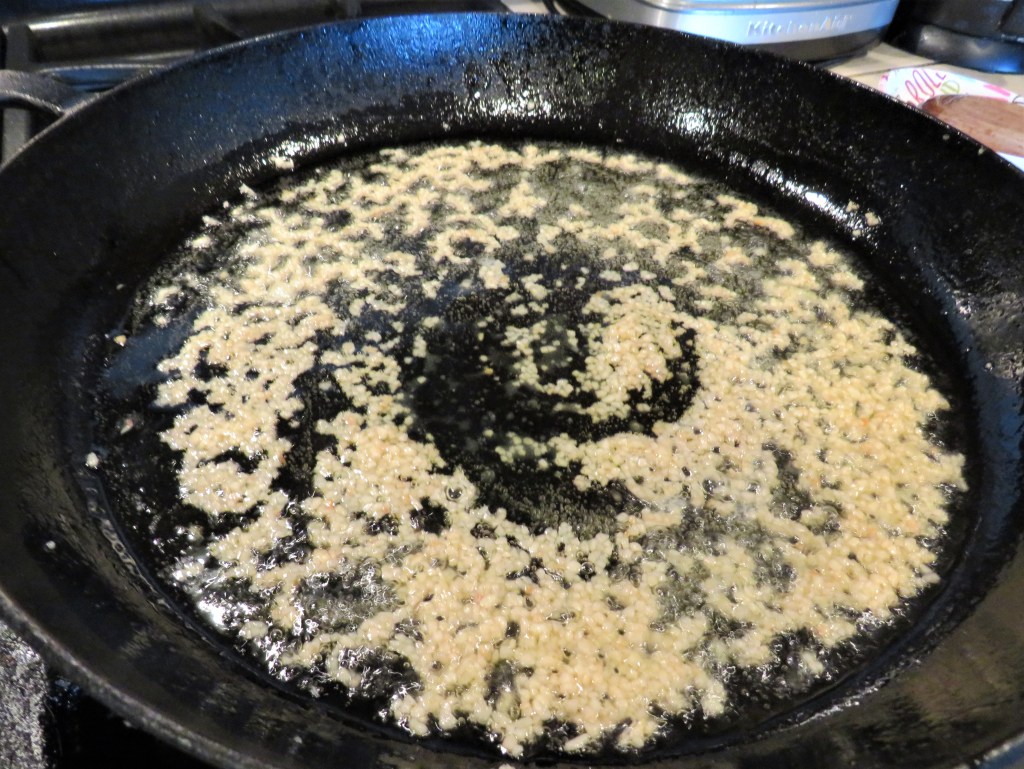
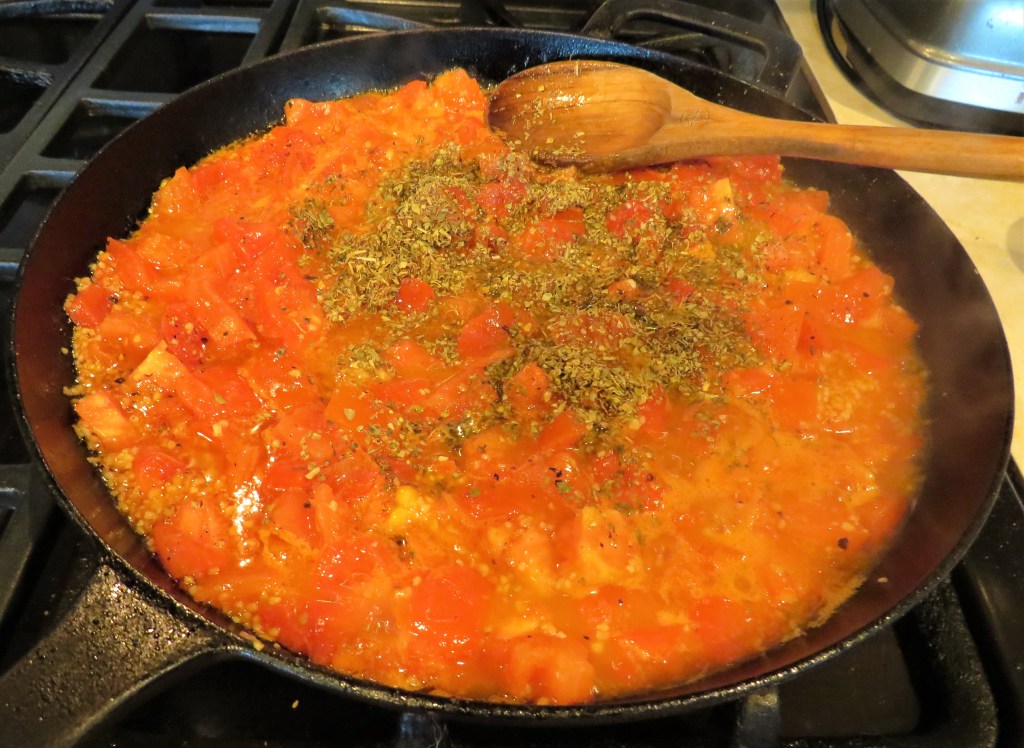
While the meat is setting, make the sauce. Get a large skillet or pan very hot, then add the olive oil and garlic. Cook for about 2-3 minutes, or until the garlic becomes aromatic.
Add the diced tomatoes, seasonings and herbs. You can substitute fresh for the dried herbs, but but add them towards the end of the cooking process instead. Usually if using fresh herbs rather than dreed herbs, the ratio is 1 TBPS fresh:1tsp dried.
Bring to a boil, then reduce the heat to a simmer and continue to cook for about 30 minutes, stirring frequently.
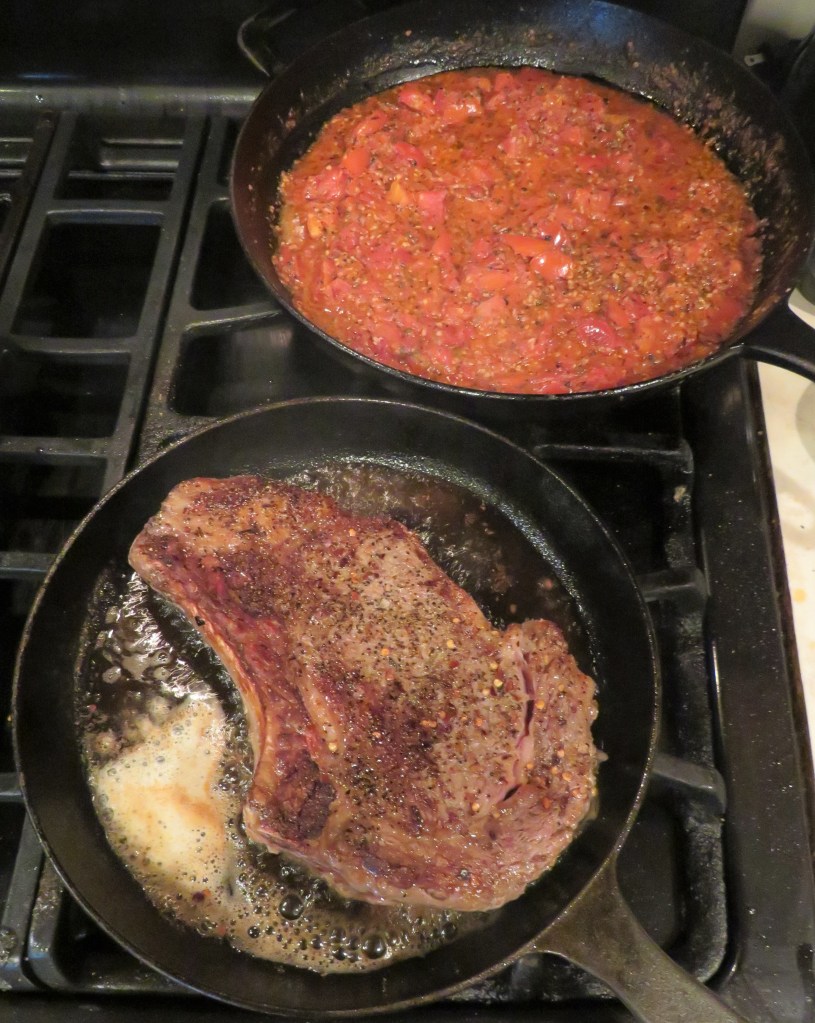
While the sauce is cooking, sear the meat in a very hot skillet or pan with a combination of both butter and olive oil for about 3 minutes per side, then once again for about 1-2 minutes per side, depending on the thickness of the meat, until you have a nice crust all around the meat.
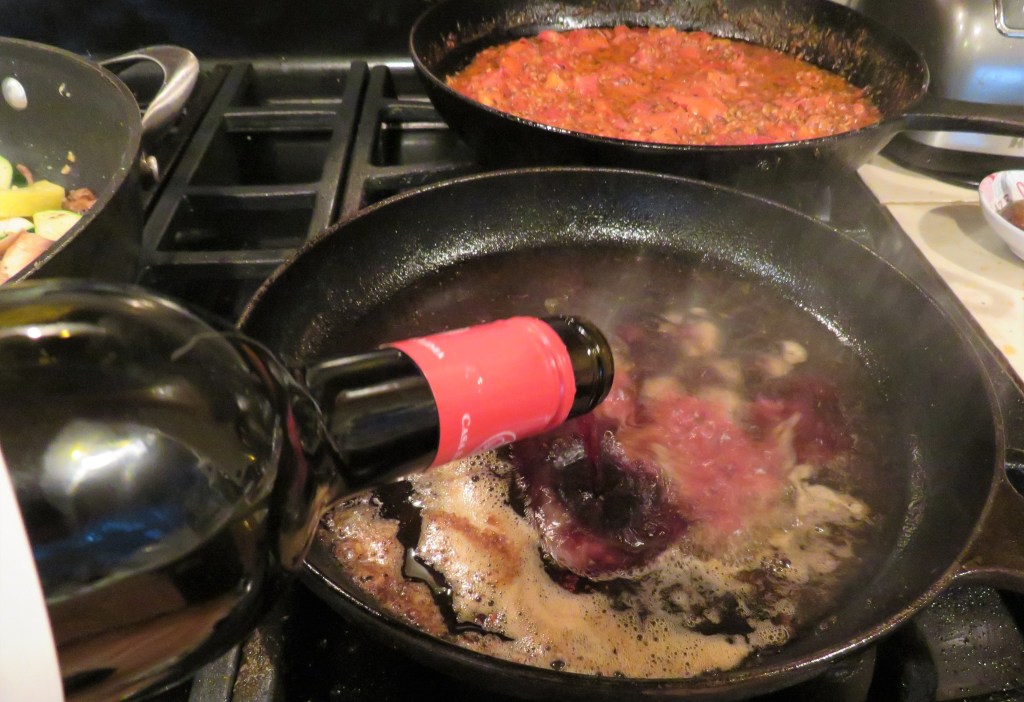
When the steak is crusted all over, remove it from the heat. Carefully add the wine to the pan and let the liquid reduce to about 1/2. Be careful when adding the wine because it will flare up and flambe. You can use either red or white wine. I used red wine because red wine goes better with a tomato sauce.
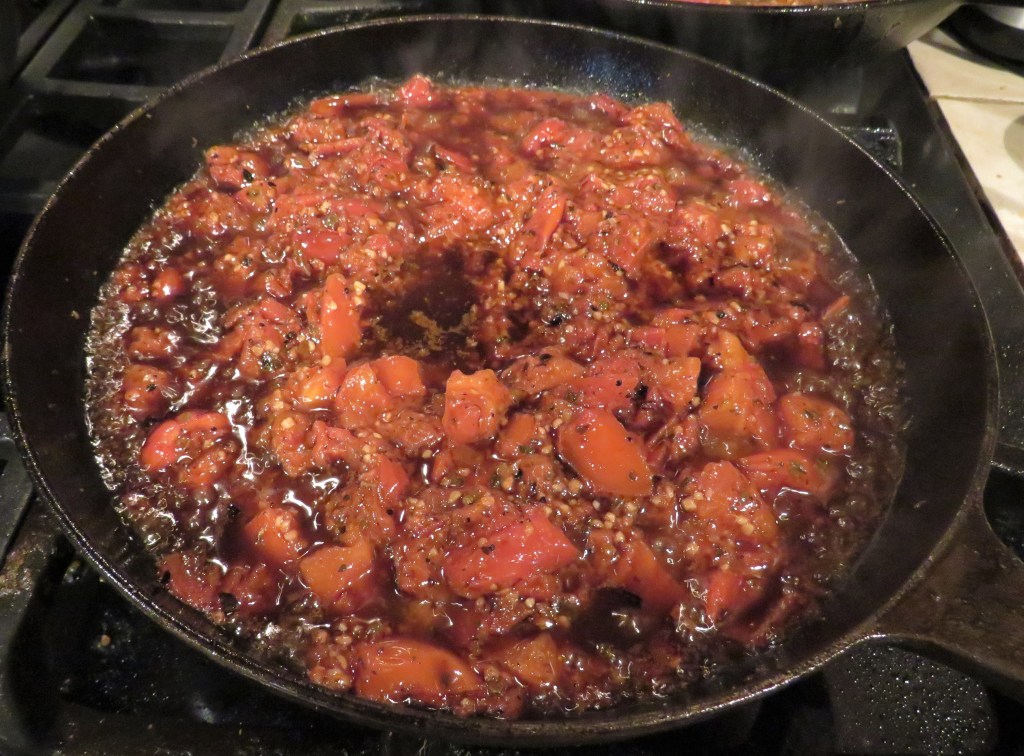
Add about 1-1 1/2 cups of the prepared tomato sauce to the wine and mix thoroughly. Re-add the steak to the sauce and cook for about 6-10 minutes per side, or until it is cooked to your liking. This recipe is NOT good for steaks that are overcooked.
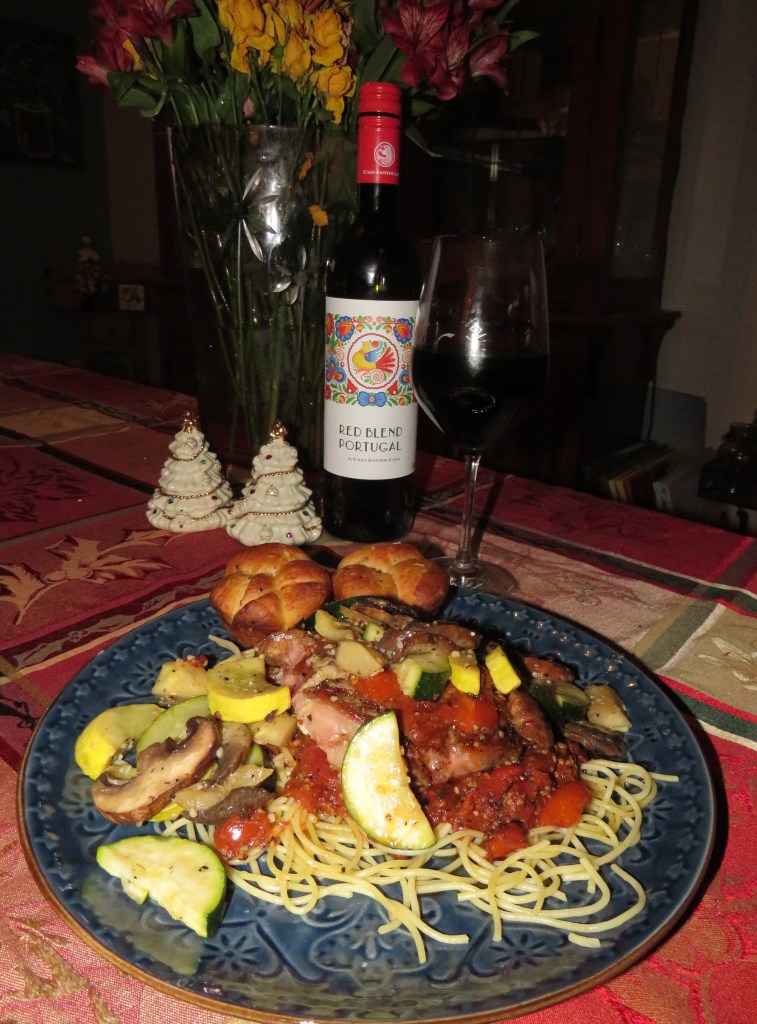
When everything is cooked, it’s time to serve it all up. I had some leftover pasta that I used as my base, then added a bit of the sauce on top. Next came the steak, with a bit more sauce. I served it with sauteed zucchini, crookneck and mushrooms too, with the last of my Thanksgiving rolls on the side. Of course there was red wine served with the meal too. You have to have wine, right?! A meal without wine is breakfast! 🙂 !!Buon Appetito!!
Have a great day and make everyday great. Stay safe and stay ell. ‘Til next time.
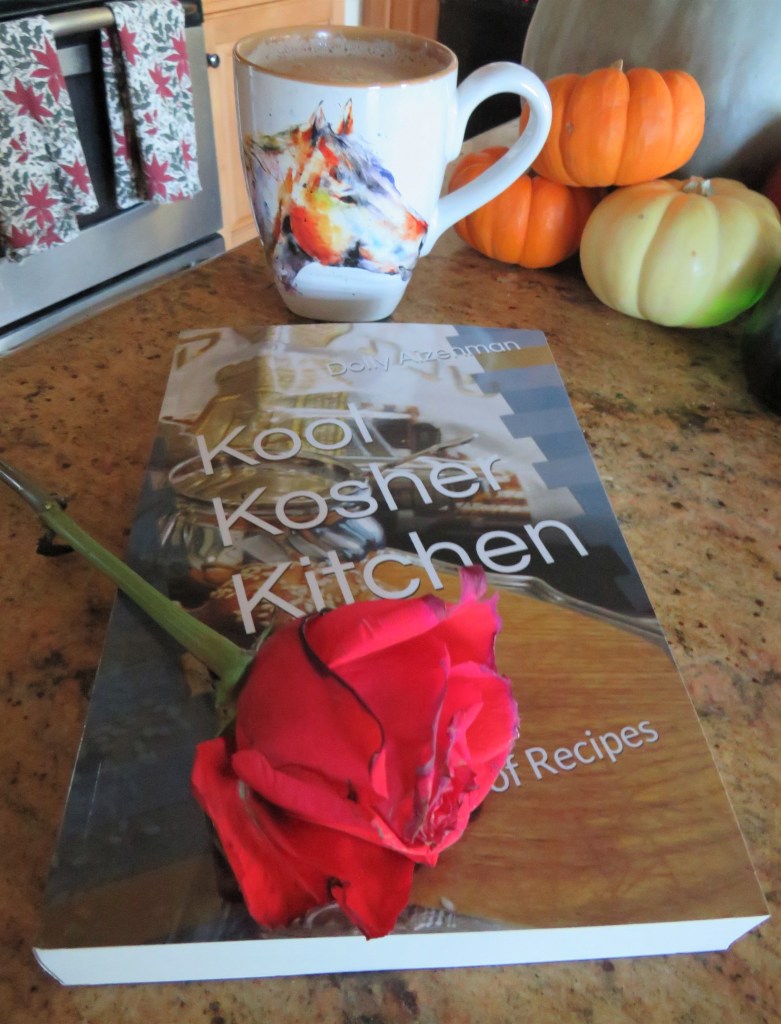
I got an early Christmas present that is also a Hanukkah present from my beautiful friend, and our very own, Dolly Aizenman, from Kool Kosher Kitchen at https://koolkosherkitchen.wordpress.com/. Dolly sent me her new cookbook by the same name, “Kool Kosher Kitchen – Collection of Recipes“.
Just like any good book, and yes, that most definitely includes cookbooks, I can’t wait to delve into it and try all of Dolly’s delicious traditional family recipes. 🙂 Mine will not be exactly like hers for a few reasons. My kitchen is not a Kosher kitchen for one, and then I don’t have her knowledge and expertise for another, but I will do my best, and hopefully make Dolly proud none the less. 🙂 The only thing that would make this beautiful, thoughtful gift better would be to actually get a chance to cook these recipes with Dolly, and to learn from the pro herself. I am looking forward to the day when we can actually make this happen.
Kool Kosher Kitchen – Collection of Recipes closely follows Dolly’s blog of the same name. The book is filled with Dolly’s family’s delicious and traditional recipes, and lots of stories and background for each and every recipe. I just received the book yesterday, and haven’t really had a chance to delve into it yet, since we had plans last night. But I have already picked out quite a few dishes that I am looking forward to making and reading about though, even in just a very short time. 🙂
One of my absolute favorite things about our wonderful WordPress family, is just that. I feel even though many of us have never actually met in person, we do get to know each other, and become friends; some of whom even become very dear friends. Dolly is definitely someone I consider to be a dear friend, whose friendship and support I value. We here on WordPress have our own little “family unit” that is quite special and unique.
Thank you Dolly, my beautiful friend. Thank you for your beautiful book, but YOU are truly the gift that I treasure.
The Holidays are a special time of year. To me, they bring us all together and make us realize it is the friendships and relationships in our lives that are the most important things. Let us ring in this Holiday season by wishing everyone good cheer and glad tidings. Have a great day and make everyday great. Stay safe and stay well. ‘Til next time.