I have created this site to help people have fun in the kitchen. I write about enjoying life both in and out of my kitchen. Life is short! Make the most of it and enjoy!
Author: ajeanneinthekitchen
I have worked in the restaurant and catering industry for over 35 years. I attended 2 culinary schools in Southern California, and have a degree in culinary arts from the Southern California School of Culinary Arts, as well as a few other degrees in other areas. I love to cook and I love to feed people.
Lasagna is a very popular Italian dish made with layers of pasta, ricotta cheese and sauce (or in traditional Italian or Greek style, with a white bechamel sauce). Sometimes the sauce has sausage and/or other meats and sometimes not. But believe it or not, lasagna actually originated in Ancient Greece, not Italy. The word lasagna is derived from the word “laganon”, which was the first form of pasta. Laganon was a reference to flat sheets of pasta dough cut into thin strips.
When transforming this lasagna-style dish into a South of the border dish, instead of keeping it with it’s Greek or Italian roots, tortillas are used instead of pasta. Substitute some kind of a salsa for the tomato bolognese type sauce or the bechamel sauce used in traditional Italian or Greek lasagna, and substitute a different kind of cheese, or cheeses, for the ricotta, and … voila, you now have a South of the Border or Southwestern type of “lasagna”. Bothstyless are very good, but are totally different, with totally different and unique personalities. Me personally, I much prefer the Southwestern version. I have never really been a big fan of traditional lasagna though. I made a Southwestern, San Antonio style lasagna for dinner, that I served with simple salad and a Spanish rioja. It is a good thing we liked it, a lot, because we have a lot leftover too.
San Antonio Lasagna
1-1 1/2 lbs lean ground beef
1 onion, diced fine
1 TBSP garlic
1-2 jalapenos, diced fine
2-3 tomatoes, diced fine
2 1/2 cups of either enchilada sauce, salsa, or sauce of your choice – I used some leftover Southwestern cream sauce
1 can black beans, drained and rinsed
1 cup corn
3-4 roasted green chilies, diced fine or 1 4.5 oz can
2 TBSP chili powder
1 tsp garlic chili powder, optional
1 tsp cumin
1 tsp dried oregano
salt & pepper to taste
about 15 or small flour tortillas
2 cups shredded cheese – I used a combination of jalapeno jack and cheddar
1/4 cup green onions
1/3 cup fresh cilantro, chopped fine
Olive oil for cooking
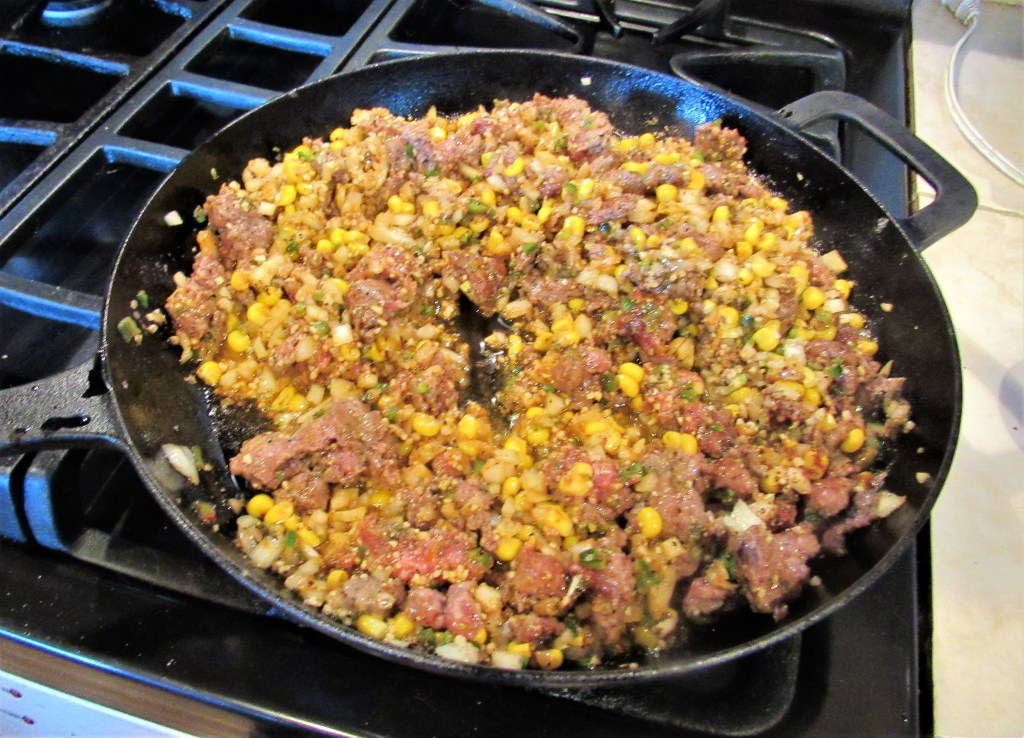
Cook the ground beef, corn, onions, garlic and jalapenos together in olive oil until the onions are translucent and the meat is completely cooked.
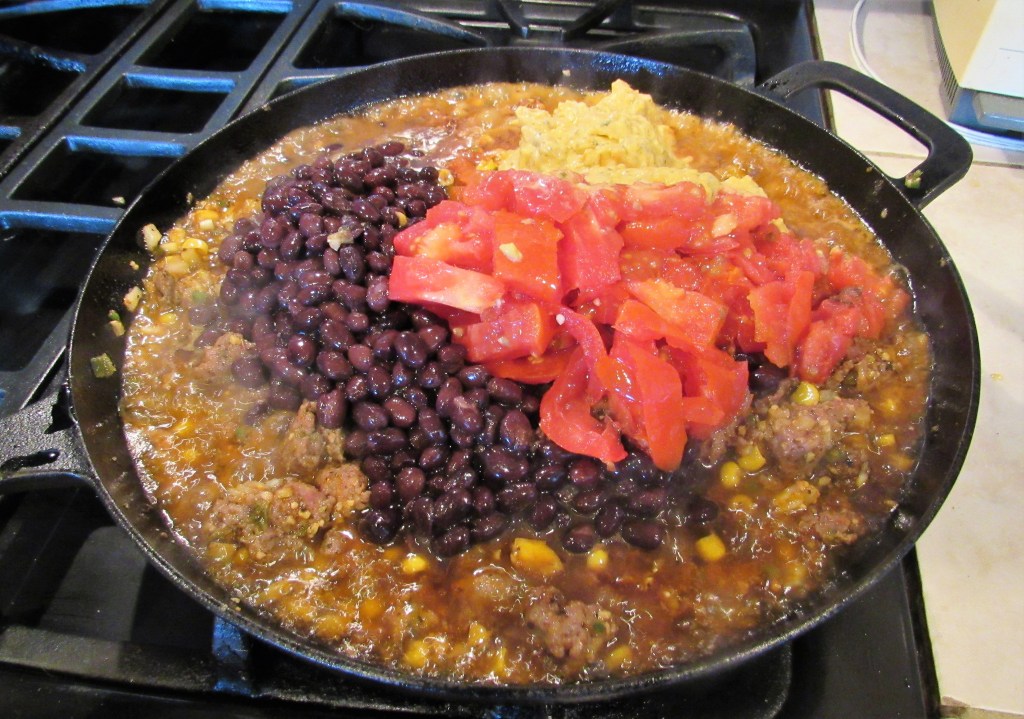
Add the beans, tomatoes and salsa of your choice. Mix everything together thoroughly and bring to a boil, then reduce the heat to a simmer and continue to cook for about 10 minutes, stirring frequently.
Preheat the oven to 350* F or about 180* C.
Spray a 9×13 baking pan with cooking spray.
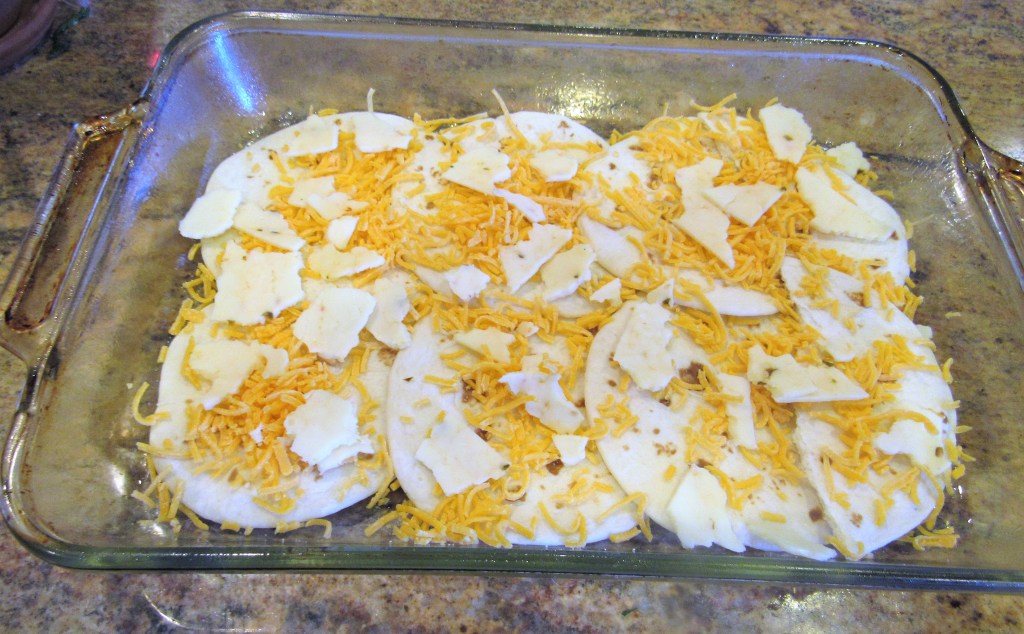
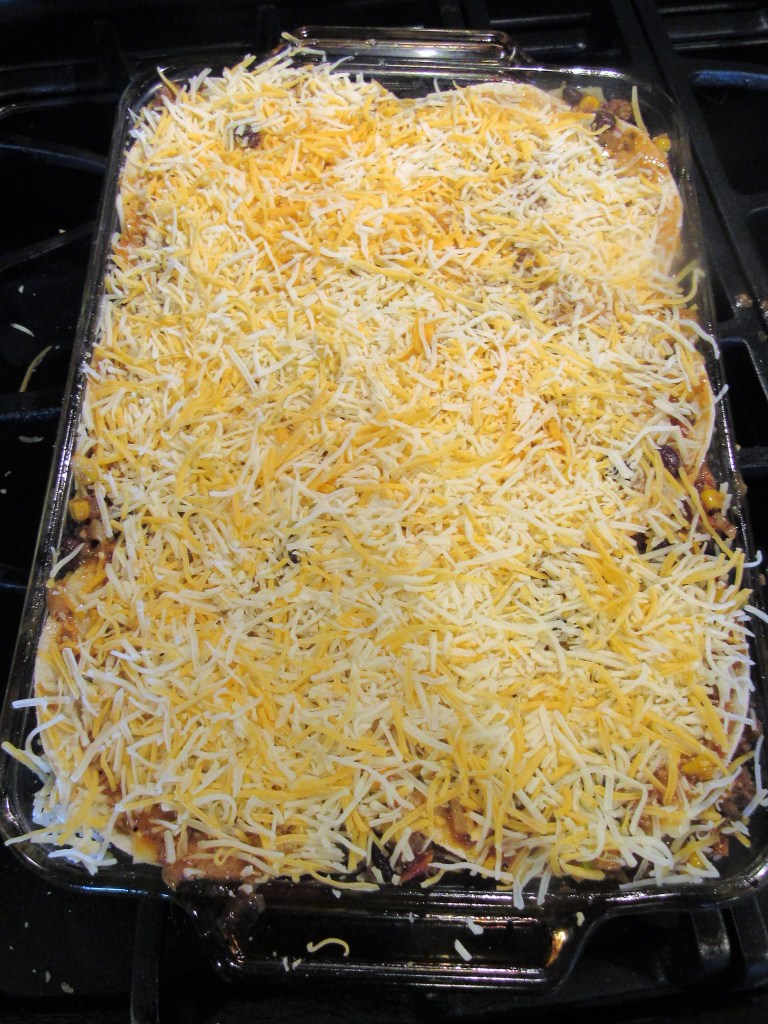
Layer the bottom of the pan with the tortillas, then add a layer of cheese on top. I used the small, 6″ street taco tortillas, but you can use any kind you like.
Add the meat sauce on top and continue layering the tortillas, cheese and sauce until the pan is full, ending with a layer of tortillas and cheese on top.
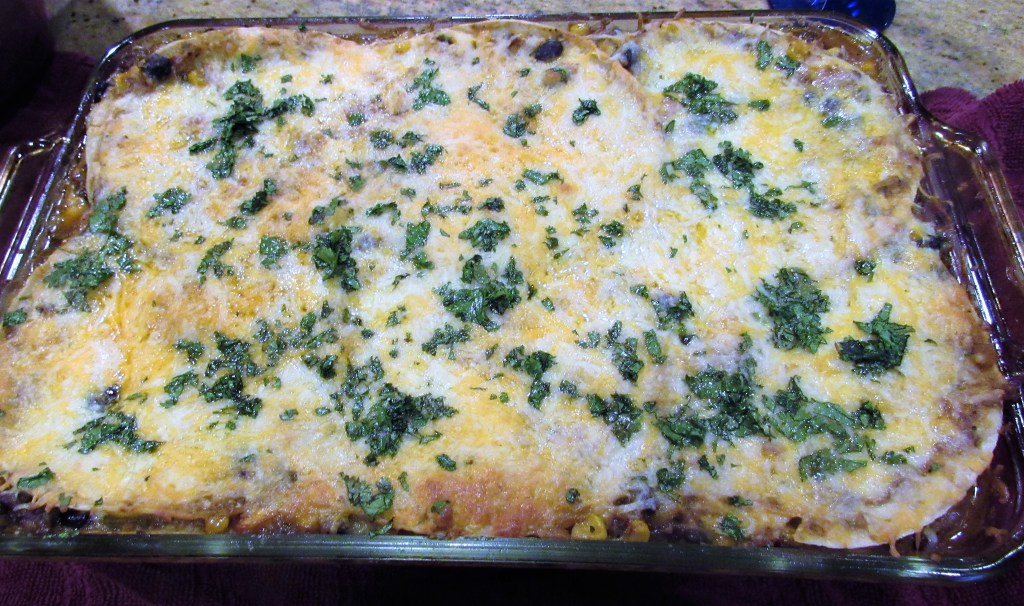
Spread the chopped cilantro and green onions on top of the cheese and bake uncovered for about 30-40 minutes, or until all the cheese is melted and a slight crust forms on top.
Let the dish rest for about 5 minutes or so before cutting it, then spoon it up and enjoy. !Esta mui delicioso! !Desfruitas!
Stay healthy and stay safe Everyone. ‘Til next time.
Baby Juneau is not venturing very far at the moment, since after all, she is still just a little baby. But she is having fun running around, trying to catch up with her big brother, Vinnie. It won’t be too long before they will be running and playing together. Vinnie is a GREAT big brother to Juni Bug. He is very gentle with her. But, he is also 140 ish lbs and can be a big goofball sometimes too, so we still don’t trust him alone with Juni Bug just yet. But they are so cute together, and they are almost always together. Juni Bug has already established SHE is the boss! Poor Vinnie, he just can’t win.
After running all around the big, scary back yard, it was nap time. Juni Bug takes a lot of naps, but then she is still just a tiny baby, and that’s what babies do. Now if we could only get her to sleep through the night. 🙂
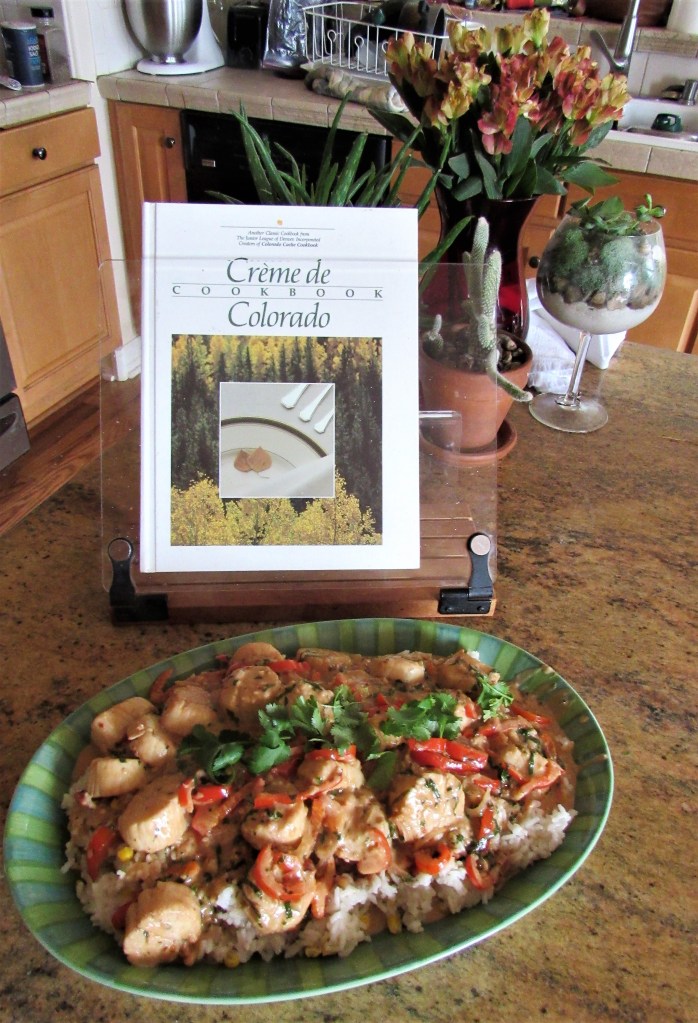
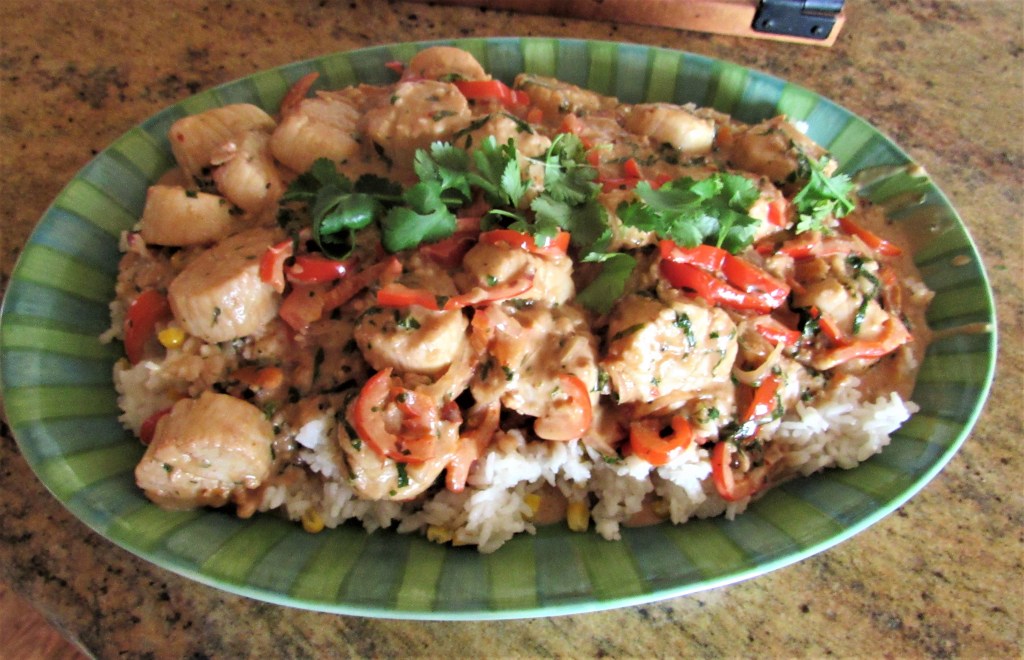
The other night, before the birthday celebrations took place, Another Birthday Celebration, Another Blue Cake we enjoyed a delicious dinner that was once again a combination of everyone bringing something to the table. Gabe had made some vegan mac and cheese for the girls, Priscilla made a delicious brushetta and I made some guacamole for starters and the main meal was the scallops in a spicy orange cream sauce. Everything, as usual, was a big hit. Once again, another successful get together in the books.
I served the scallops over white rice.
Priscilla’s Bruschetta
Scallops in a Spicy Orange Cream Sauce
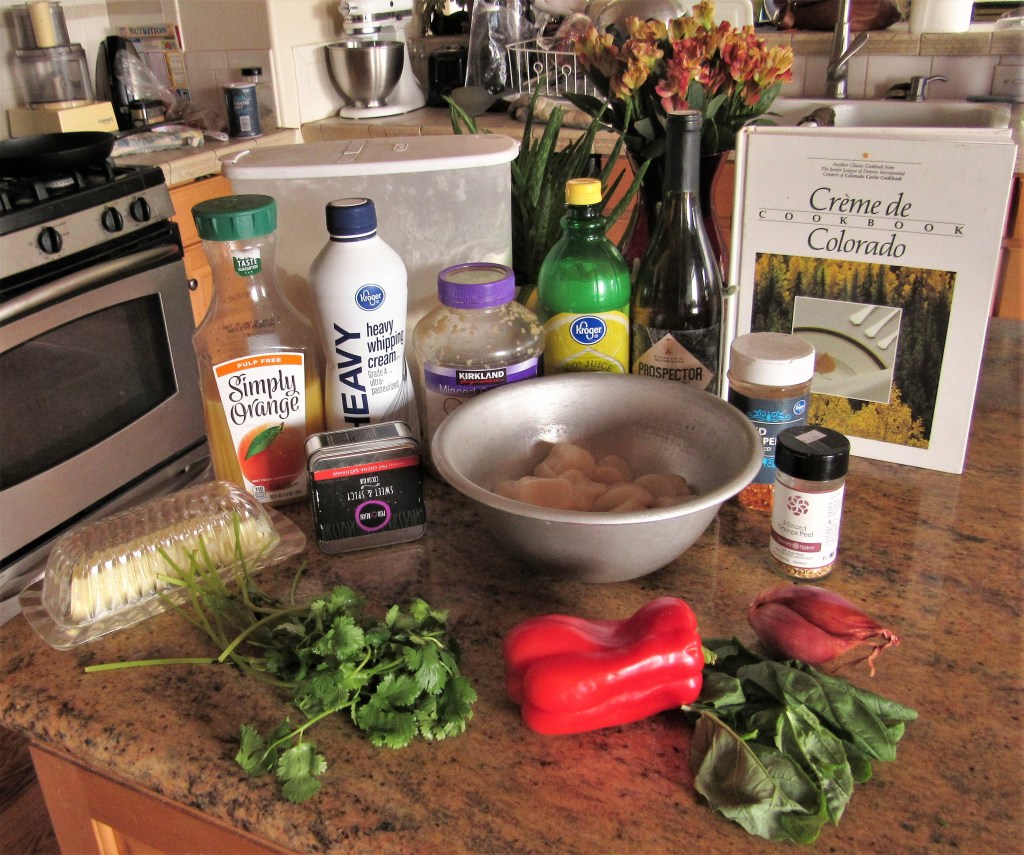
2 lbs sea scallops, rinsed
2-3 TBSP flour
4 TBSP butter
olive oil
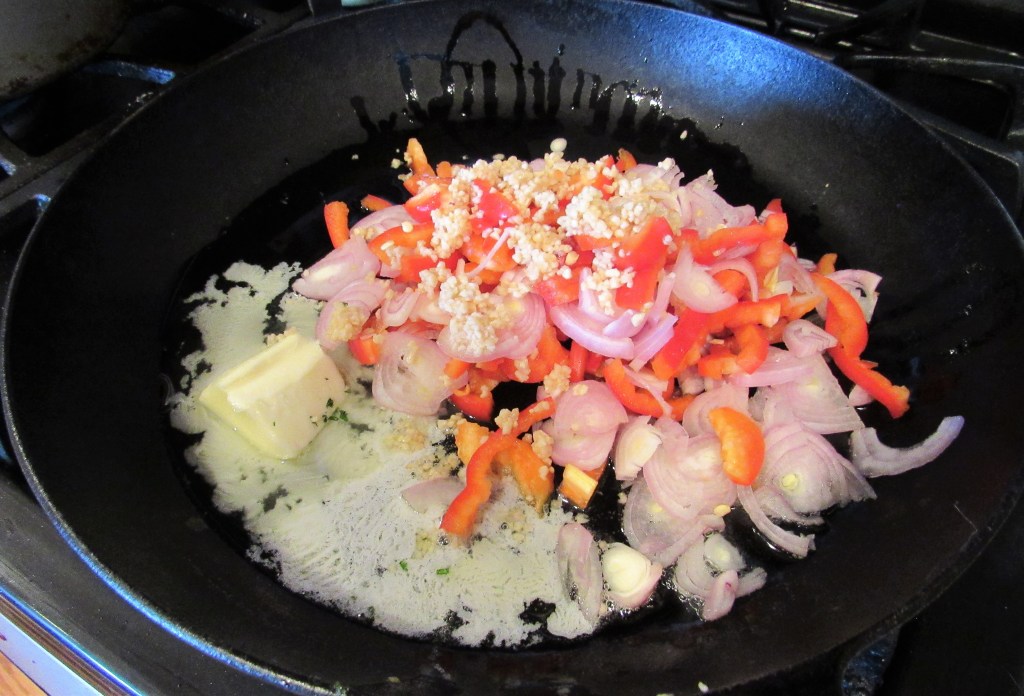
1 red bell pepper, cut into thin strips
2 shallots, sliced very thin
2-3 TBSP lemon juice
1 1/2 TBSP garlic
1/4 cup dry white wine or vermouth
2/3 cup orange juice
1 1/2 tsp spicy chocolate
1 cup heavy whipping cream
2 TBSP fresh basil, chiffonade into thin strips
2 TBSP fresh cilantro, chopped
Marinate the scallops in the spicy chocolate, lemon juice, flour and orange juice for about 30 minutes.
Heat the butter and olive oil in a large skillet and add the bell peppers, shallots and garlic. Cook for about 5 minutes, or until the peppers and onions are soft.
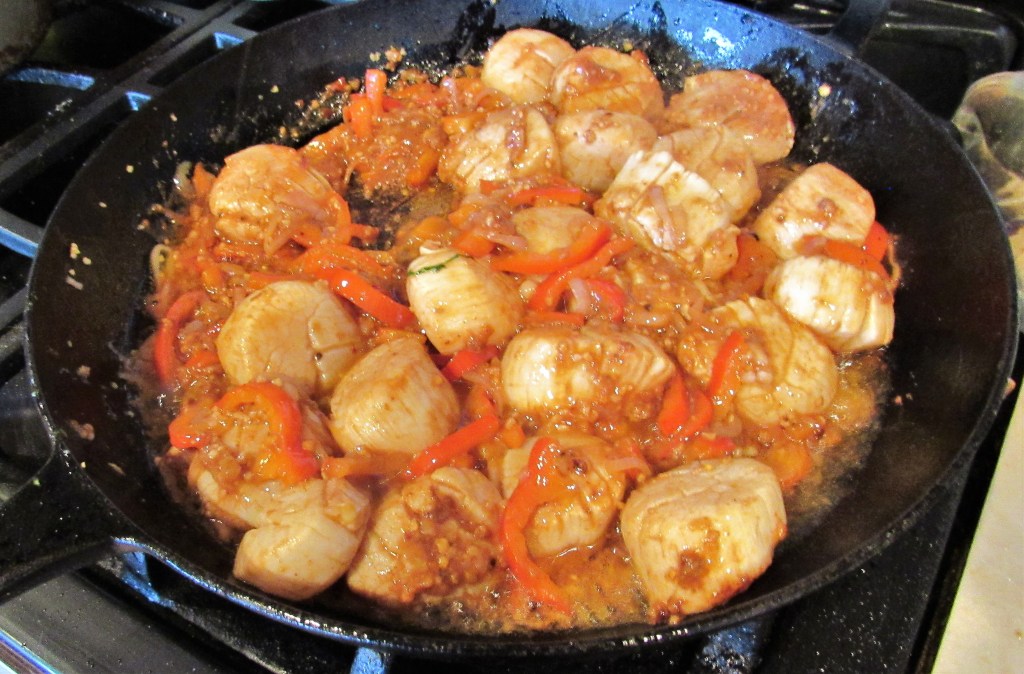
Add the scallops and the marinate, mix everything together thoroughly and continue to cook for about 5-7 minutes, or until the scallops are cooked.
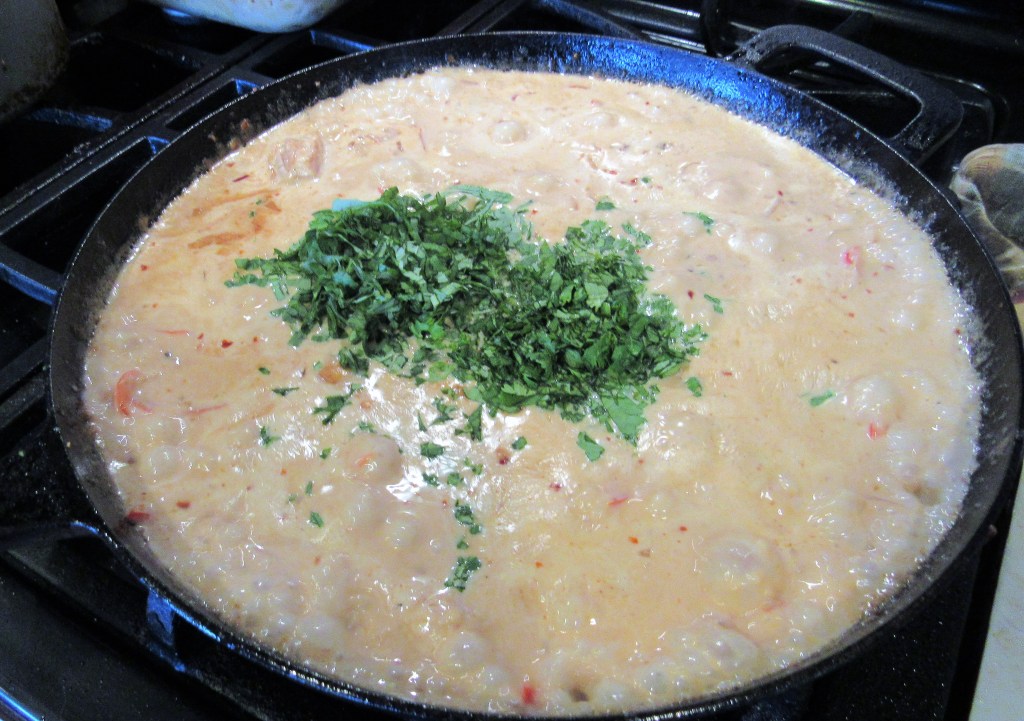
Add the wine and orange juice and continue to cook until the liquid has evaporated by about 1/2. Then add the cream, the basil and cilantro and continue to cook at a low heat for about 7 minutes.
When everything is done, serve the scallops over white rice and enjoy.
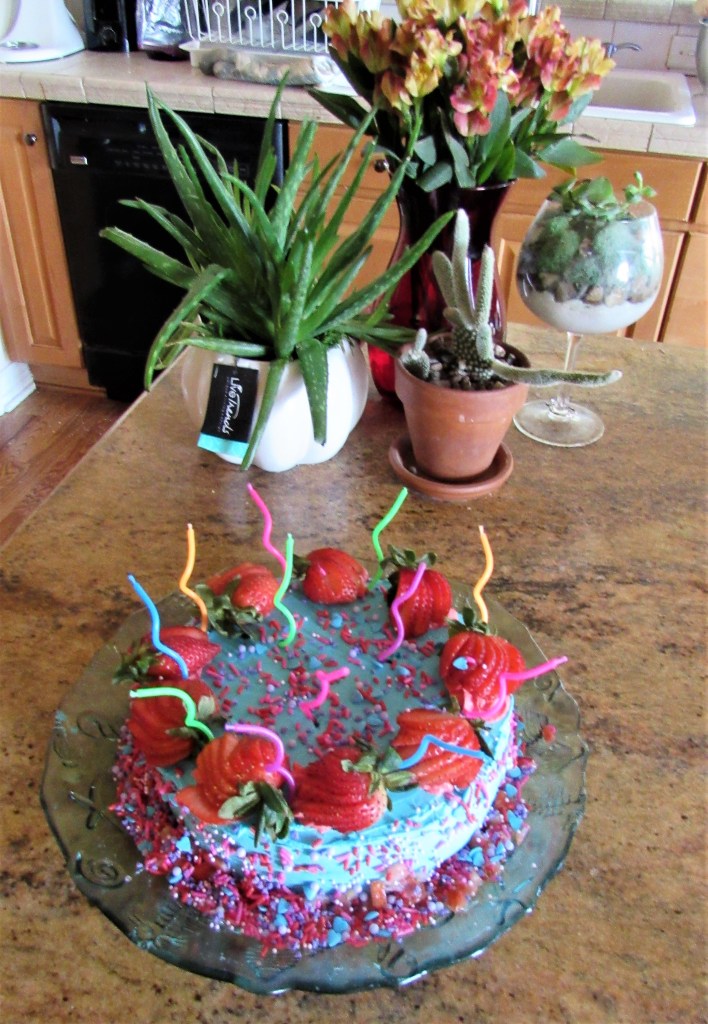
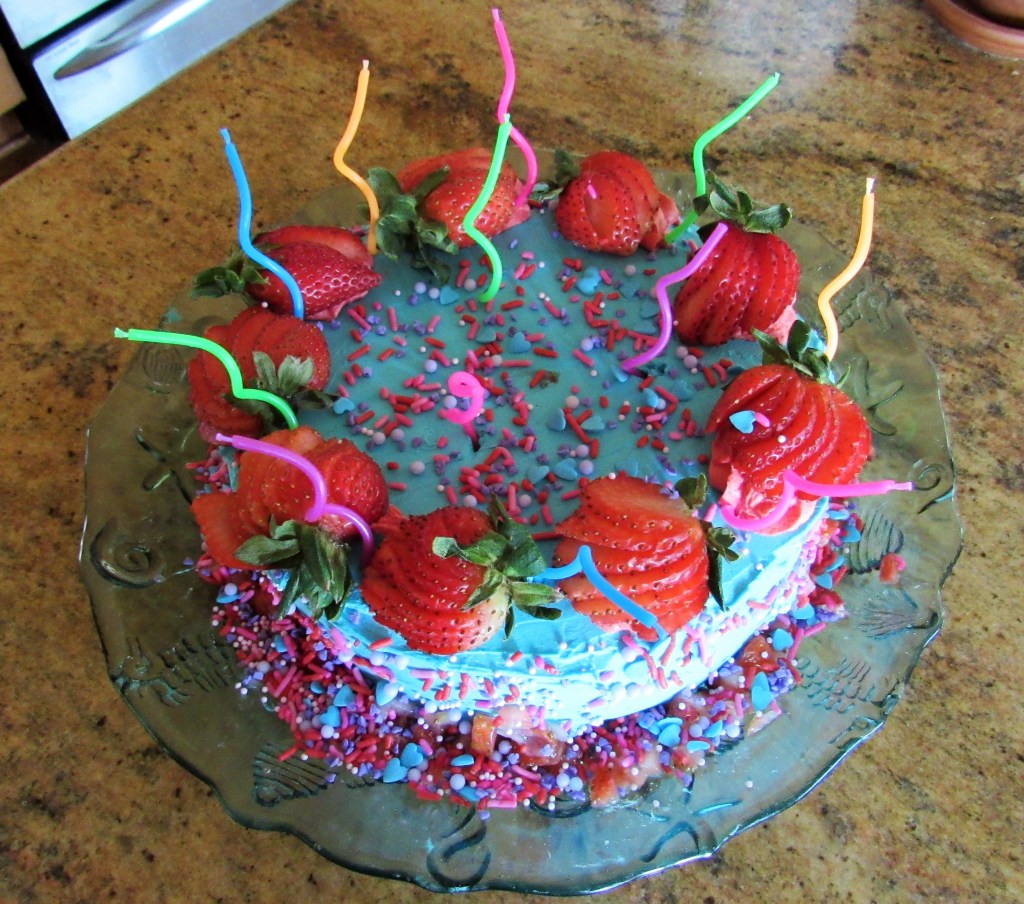
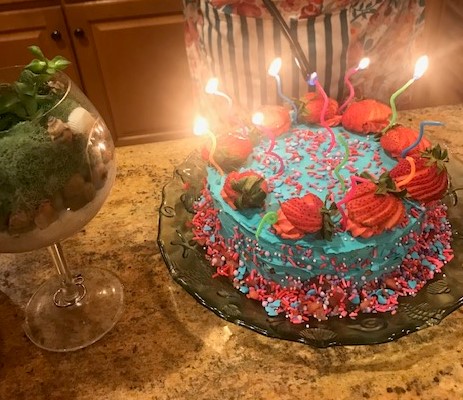
We celebrated the birthday of yet another niece. She too wanted a blue rainbow cake, like I made for her sisters, Nahila and Tehvia,so, another blue rainbow cake it was . They’re Growing Up So Fast I made it differently though, so Cora had a her own memories of her birthday and birthday cake.
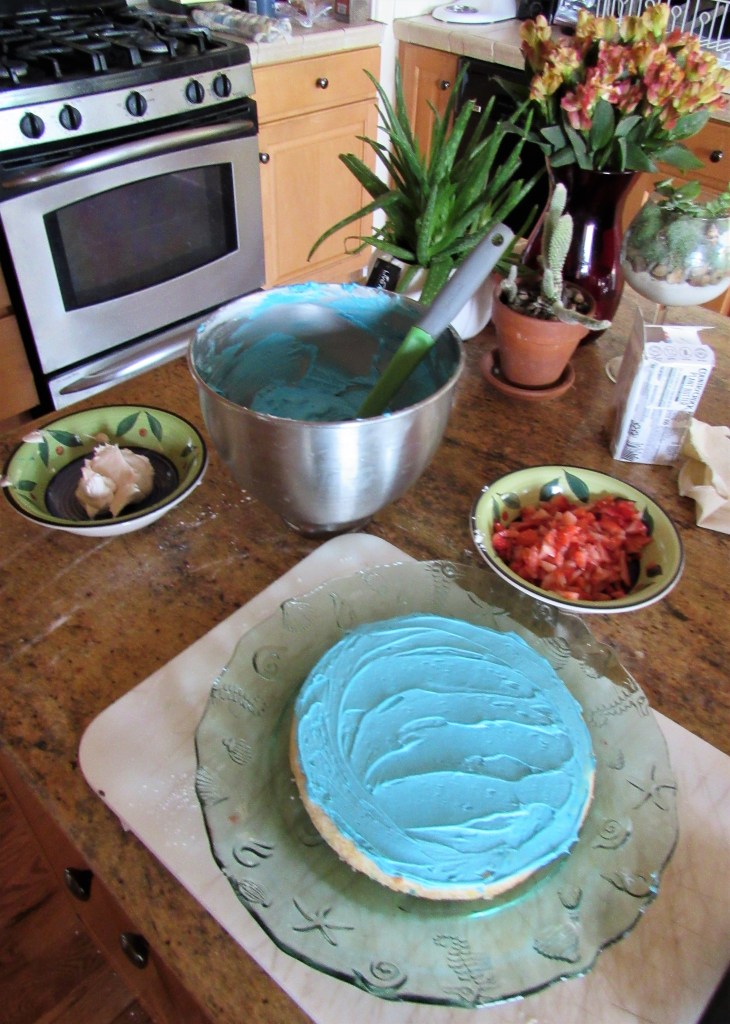
I started off with a box cake mix and made it vegan, since Cora is vegan too. Then I added strawberries and some fancy, funky candles.
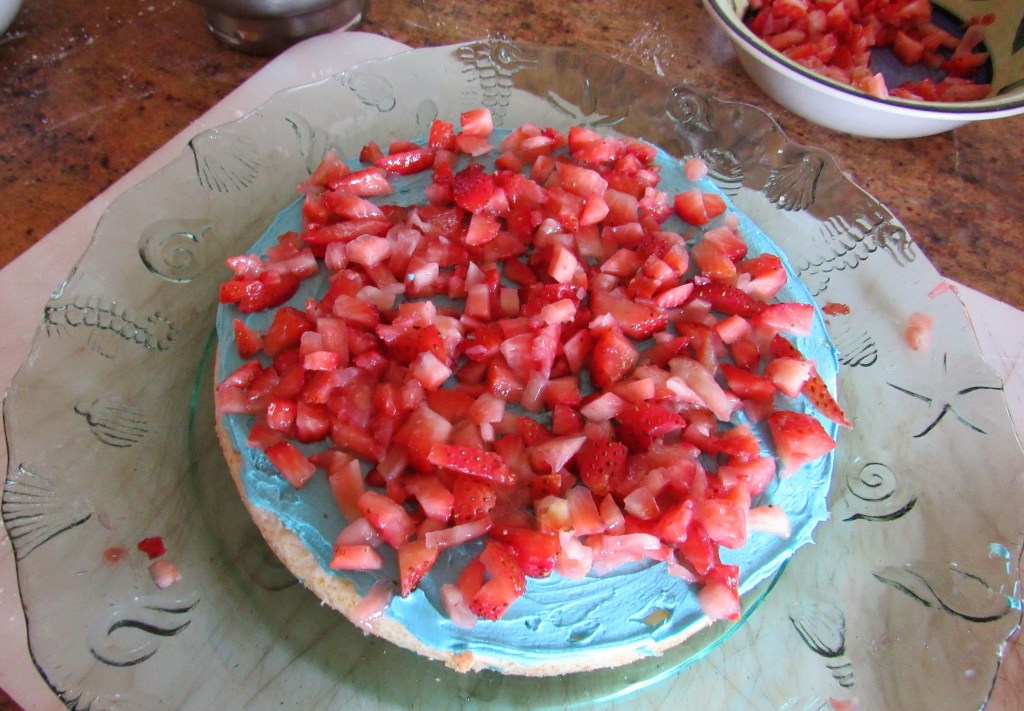
I made this a layered cake and filled it with diced strawberries.
The rest was just decorating and making it fun and festive.
It’s time to light up those candles and celebrate.
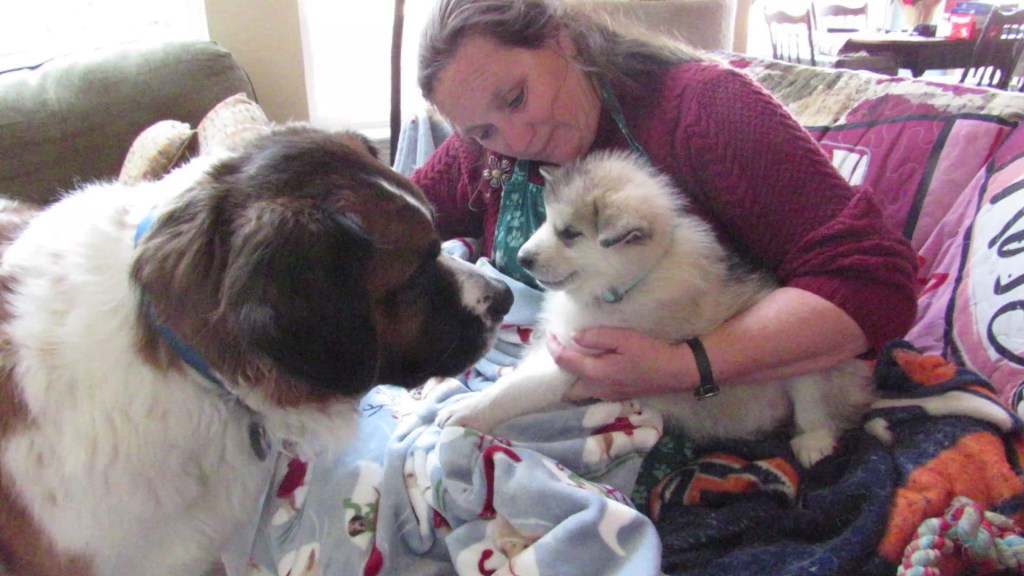
It was video time again, and our biggest news so far for the new year is that our baby girl Juneau, or Juni Bug, came home yesterday. So this video is different from my normal ones. It’s all about bringing Juni Bug home and how her first day went. So far, she is already a “silly billy”, which means she will fit in to our family just perfectly.
Juni Bug’s first encounter was with one of our cats, Nicodemus. Nicky wasn’t quite sure what to make of this little bundle of fur. Within minutes though, Juni Bug discovered the kitty box and thought that would be a perfect place to take a nap. She won’t be able to fit in here for too long.
After napping in the kitty box, it was time to meet her big brother, Vinnie. We weren’t sure how this would go, since Vinnie is normally the alpha male. Surprisingly though, it went very well. At first, Juni Bug saw this HUGE dog and was scared, so she went running as fast as her little legs would go. Then, as more time went by, Juni Bug was the one who approached Vinnie. Vinnie almost seems afraid of Juni Bug. I think I am already beginning to see who is going to rule the roust, and it’s not going to be Vinnie. 🙂
Juni Bug also had her first encounter with kitty claws. As we were eating dinner, Juni Bug went exploring a bit around the table, and all the kids were there. Otis swiped her across the nose. Juneau yelped and screamed, but all is OK. There was no damage or harm done, just surprise. Juneau sure has a healthy set of lungs though; no doubt about that.
It’s been a very long time since I last did puppy, and Larry has never done puppy before. We’ve already had our first sleepless night, with each of us taking our turns on floor duty, sleeping beside Juneau’s crate and getting up numerous times in the middle of the night for potty runs, but it is so worth every minute of it. Juneau is so full of love.
Juneau knows we are now her “pack” and that she has a very good, loving furever home. Everything is going to work out just fine. 🙂
Puppies always make the world a much better place. The world needs lots more puppies. 🙂
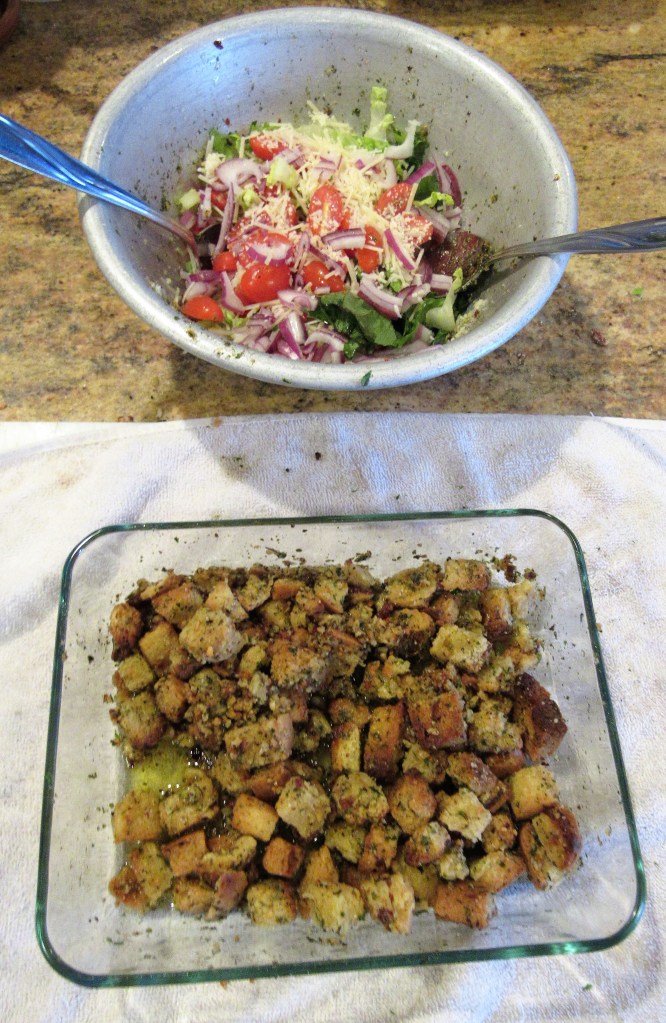
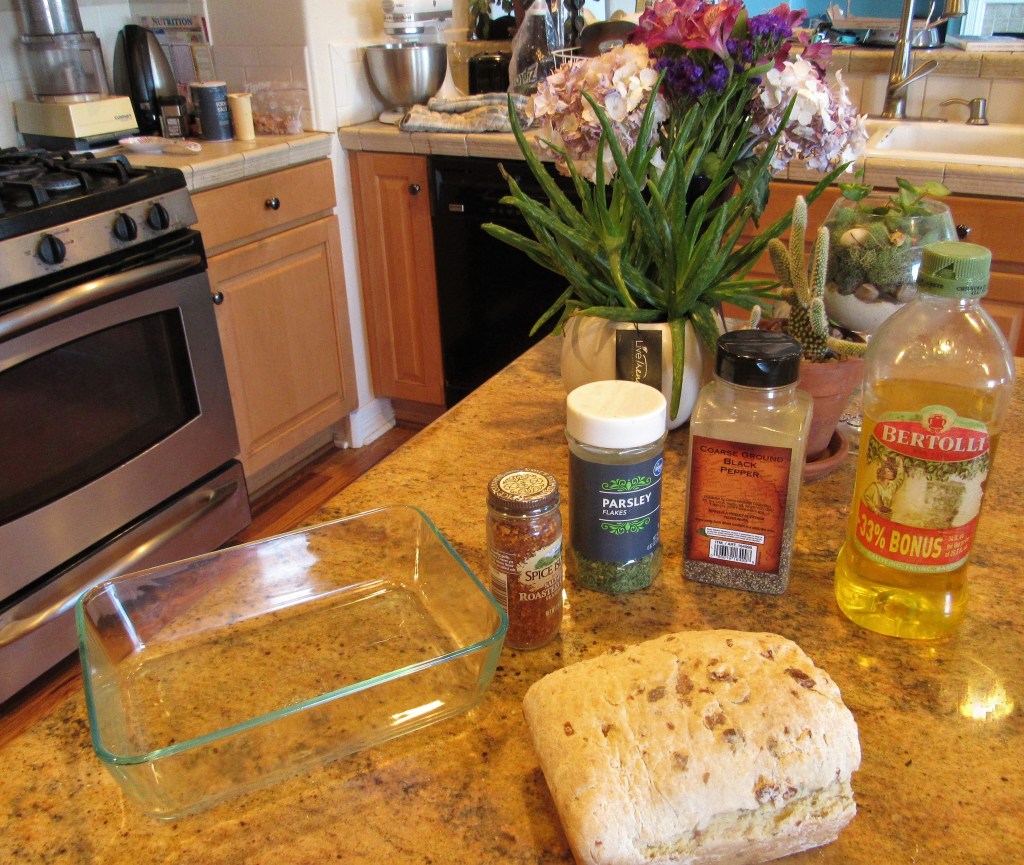
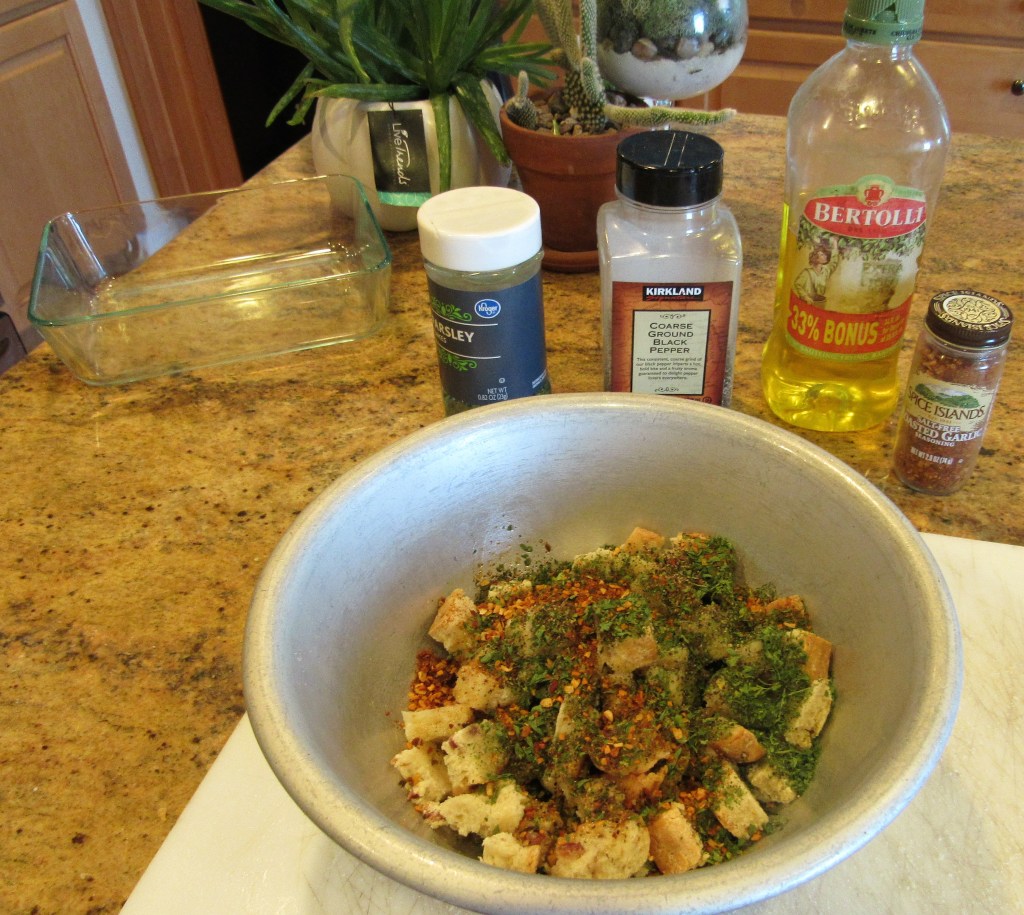
Don’t throw away your bread if it gets a bit too hard and crusty. No, no, no. Turn it in to croutons instead. When the bread is a bit to crusty on its own, just add some olive oil and seasonings and turn it into croutons. Crusty bread is just perfect for that.
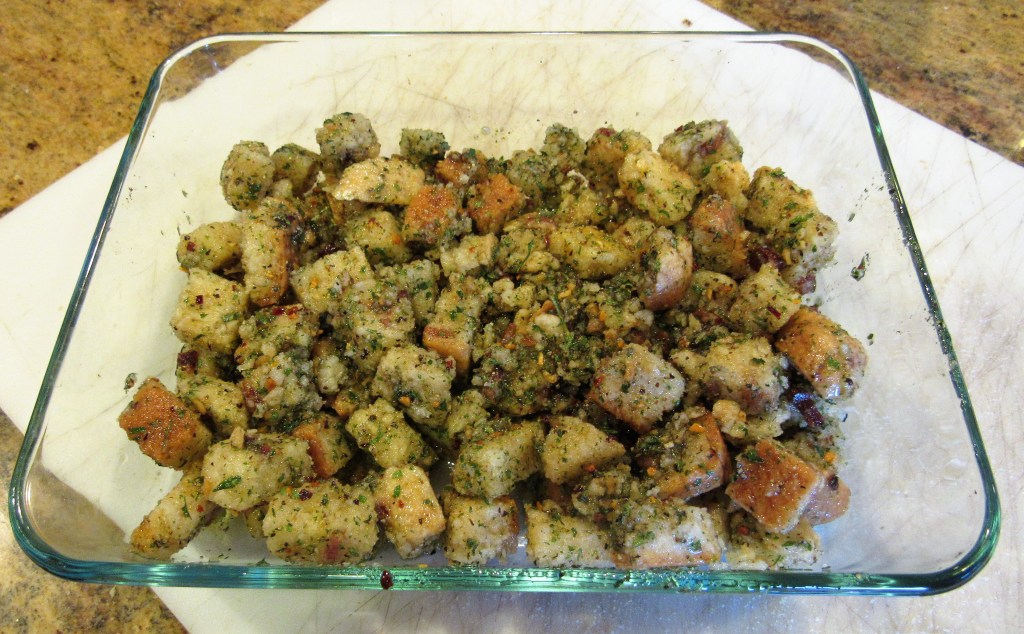
The ends of my maple, bacon and shallot bread started to get a bit too hard to really enjoy on their own Maple, Bacon and Shallot Bread so rather than throwing them away, I just cut them off and coated them with olive oil, pepper, roasted garlic and parsley, then roasted them until they were nice, golden brown croutons. When they were done, I added them to the salad. Delicious! The lunch, the salad and the croutons got rave reviews.
Preheat the oven to 400-425* F or 200-210* C.
I cut the ends off the bread and cubed them. You can make your croutons any size you like, just try to make them fairly even in size so they all cook properly and evenly.
Once the bread is cubed, coat it in olive oil and add the seasonings of your choice. Mix them up a bit. Croutons never have to be the same. This time I used dried roasted garlic, black pepper and parsley. Thoroughly coat the bread with the oil and the seasonings, then place it in a single layer on a baking sheet or in a baking pan.
Roast them for about 30-40 minutes, making sure to turn them and stir them at about the half way point. When they are golden brown and crunchy, they are ready to toss into your favorite salad; or, you can just munch on them one by one by themselves too. I think I munched on as many by themselves as I put into the salad. 🙂
Here in Colorado, we live life on OUR terms and we make our own rules. This philosophy is carried out in our cooking as well. We use whatever we have and cook things up just how we want, with big, bold flavors and combinations that others wouldn’t even dare to think about. Sure, there are recipes that don’t always work out as expected, but this is true with anything and any style of cooking. But more so than not, things work out just perfectly and the results are AWESOME! In case you haven’t figured it out already, I am a REBEL! Always have been and always will be too. Maybe this is why I love my adopted state so much. It just fits my personality and my persona. In the kitchen, I am FEARLESS (although this is pretty true in all aspects of my life too). I take bold, rebellious recipes and tweak them even more, giving them my own personality and my own twist. This recipe is no different. I add things; I delete things; I change the cooking methods; you name it, and I am going to find some way to tweak just about everything I make. That’s just who I am and just what I do. 🙂
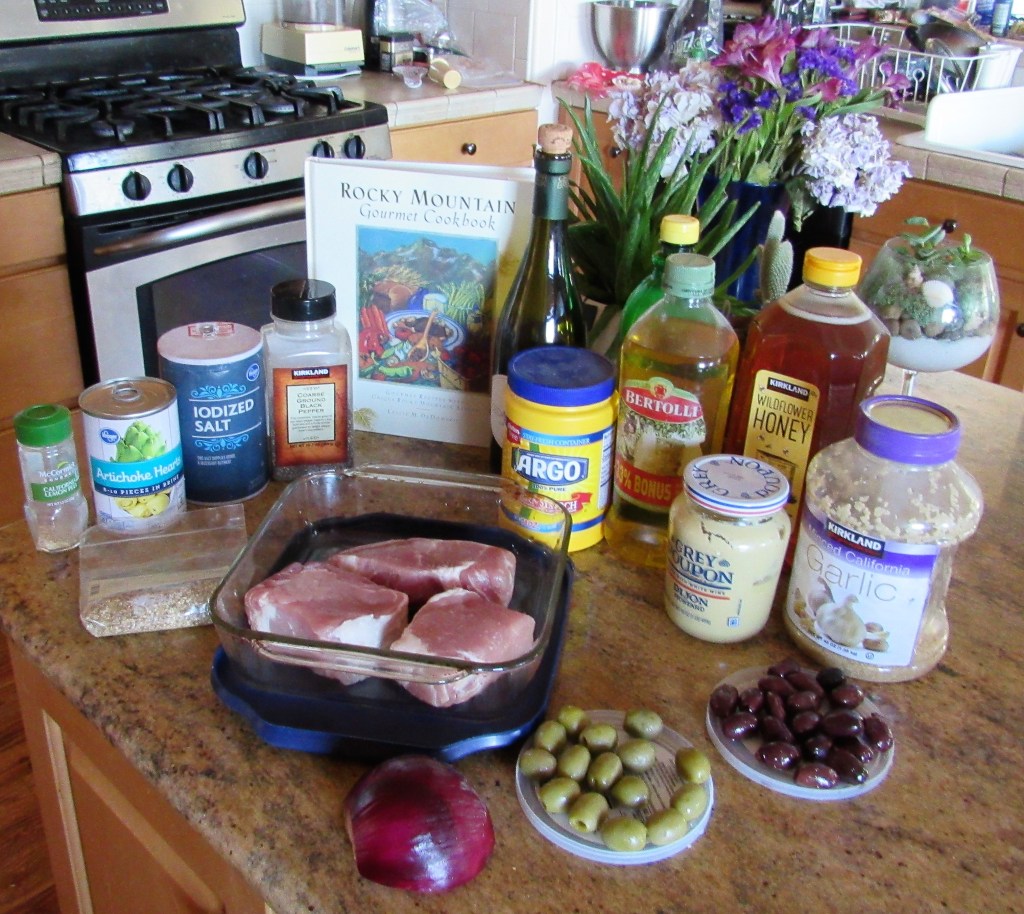
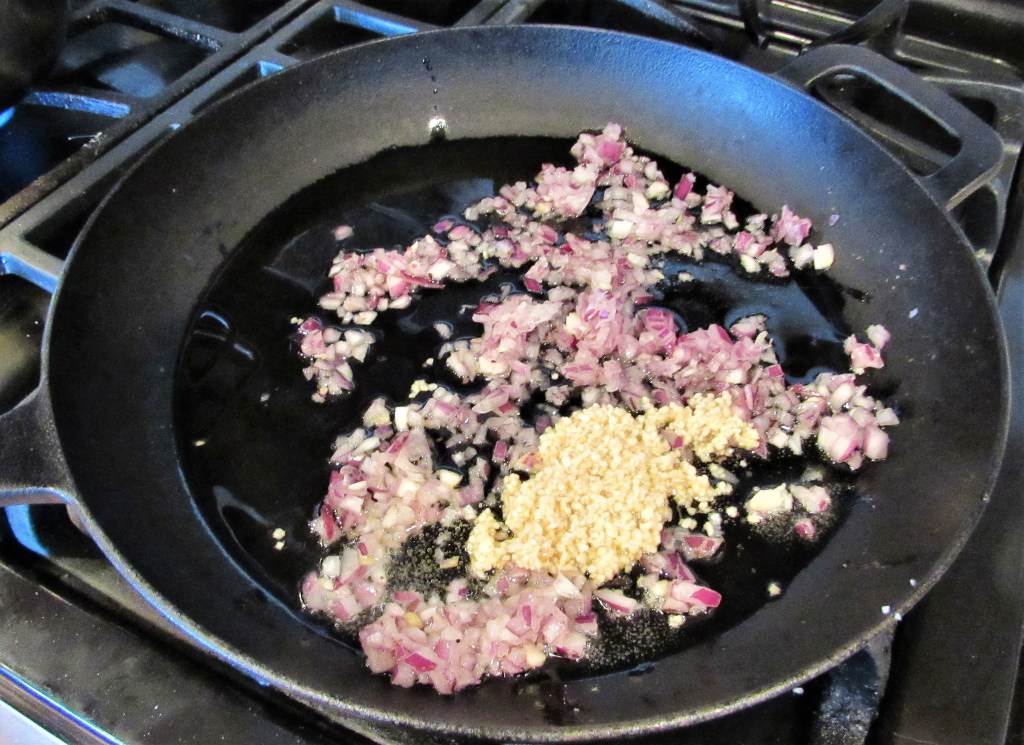
It was time for some pork in our meat rotation. For some reason, I was really craving something with a honey mustard base, but I also wanted something bigger and bolder too. I went to my Colorado cookbooks and instantly found something that fit the bill – roasted pork chops with olives and artichokes. It uses simple, basic ingredients, but it mixes them together in a different way.
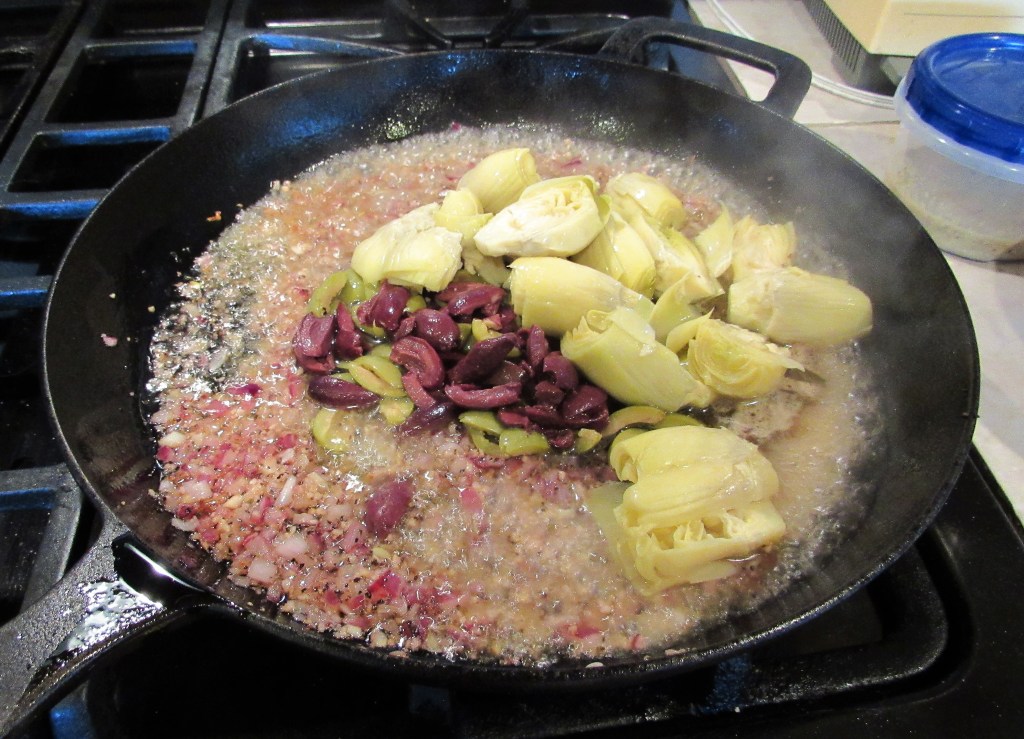
(Sorry for the poor quality of this photo. I couldn’t get it any clearer).
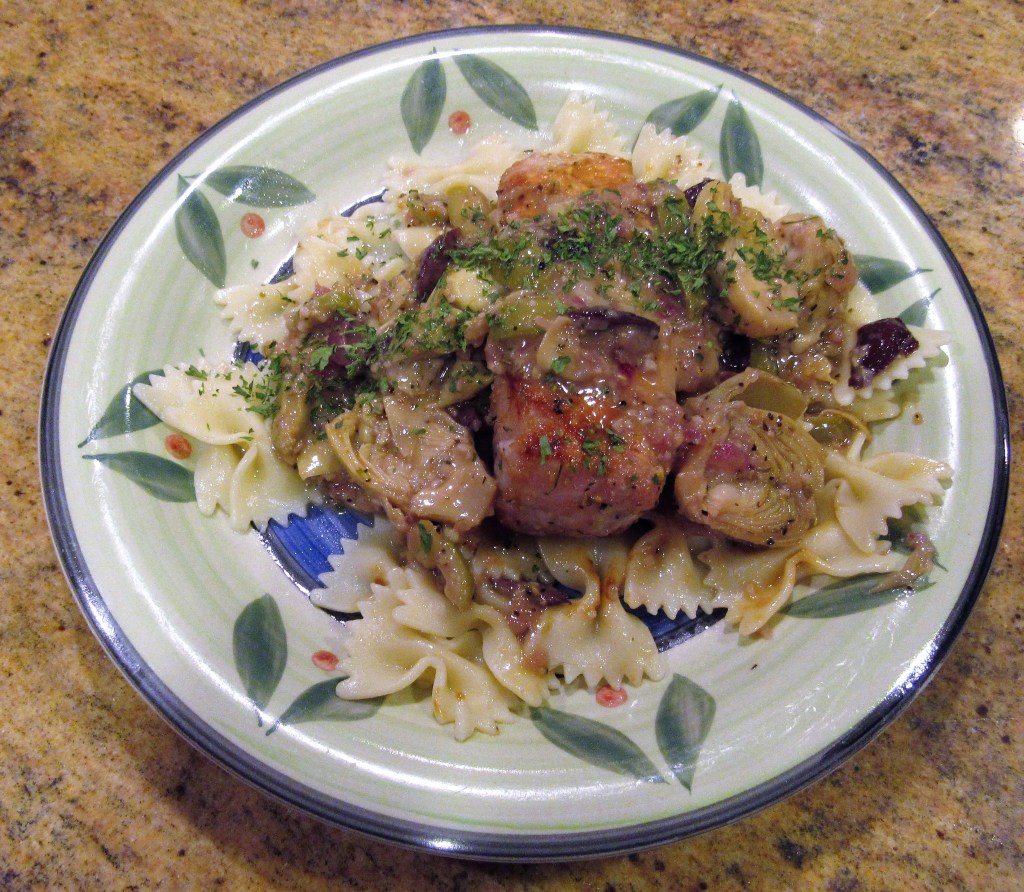
Rocky Mountain Pork Chops with Olives and Artichokes
2 lbs of pork, either chops or tenderloin
2 TBSP garlic, divided
2 TBSP lemon juice, divided
1 tsp lemon and/or lime zest – I used both
3 TBSP honey
2 TBSP Dijon mustard
1/2 red onion, diced fine
1 tsp dried, crushed rosemary
salt to taste
1 tsp black pepper
1 cup of mixed olives – I used 1/2 cup of Kalamata and 1/2 cup of Greek green olives
2 cans artichoke hearts, cut in 1/2, reserve the juice
3/4 cup dry white wine
1 tsp cornstarch
olive oil
Mix 1 TBSP of garlic with the honey, mustard, lemon or lime zest and most of the lemon juice and use as a marinade for the pork. (You can also use this for chicken too). Let it marinate in the refrigerator for at least 2 hours before cooking.
When you are ready to cook the meat, preheat the oven to 375* F or about 190* C. Roast the meat for about 30 minutes or until the internal temperature is 160* F.
While the pork is cooking, make the sauce. Saute the onions and the other TBSP of garlic in the hot olive oil for about 3-5 minutes or until the onions are soft and translucent.
Add the remaining lemon juice, salt, pepper, rosemary, olives, and the artichokes with their juice. I also added the rest of my marinade too, but you do not have to do this if you do not want to. Combine everything together well.
Combine the cornstarch and the wine, and add to the mixture. Bring everything to a boil, then reduce the heat to a simmer and continue to cook for an additional 10-15 minutes, stirring frequently.
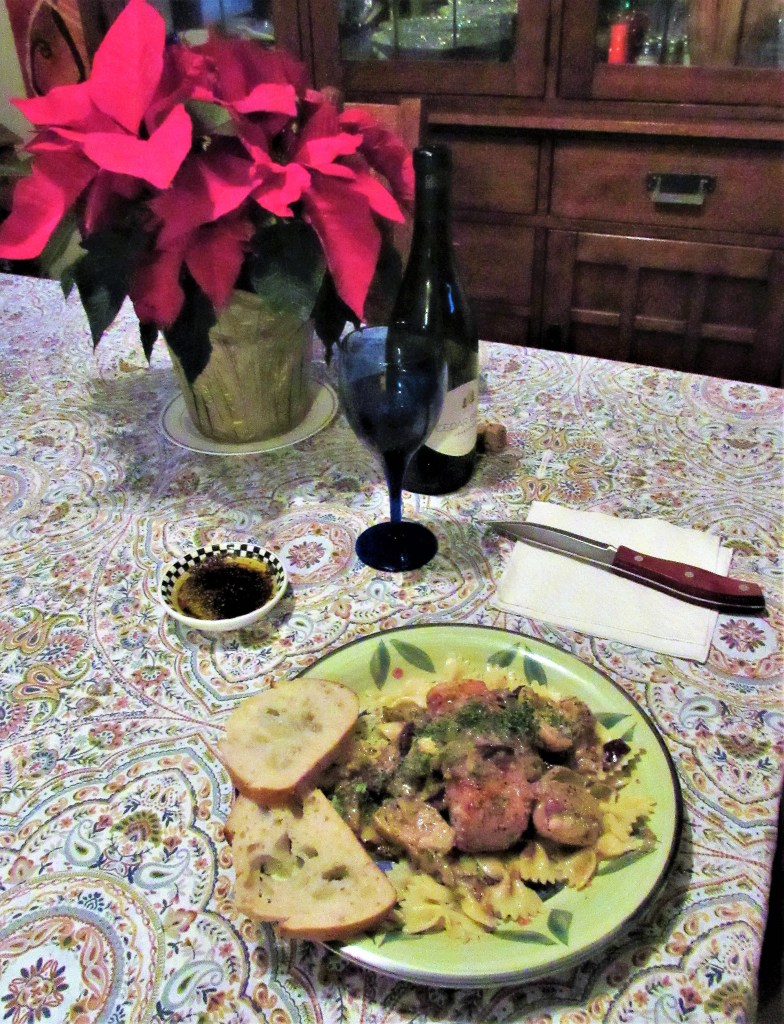
When the pork is completely cooked, serve it over either rice or pasta and spoon the sauce over the pork. This meal has it all. You have your protein, your starch and your vegetables, so no need to really serve it with anything else, unless you want to. I served it all along side some warmed bread with an olive oil dipping sauce and, of course, more of the same dry white wine I used for the sauce.
Welcome to the Rocky Mountain style of cooking. One bite and you will definitely be hooked, coming back for more.
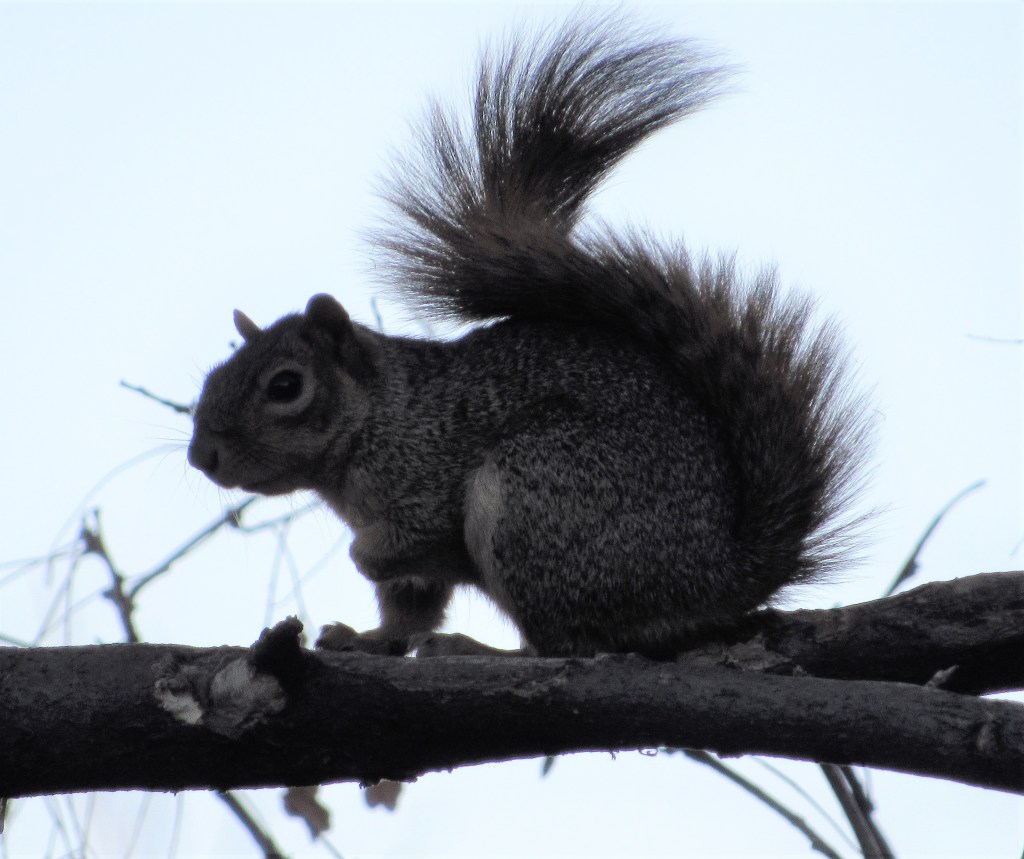
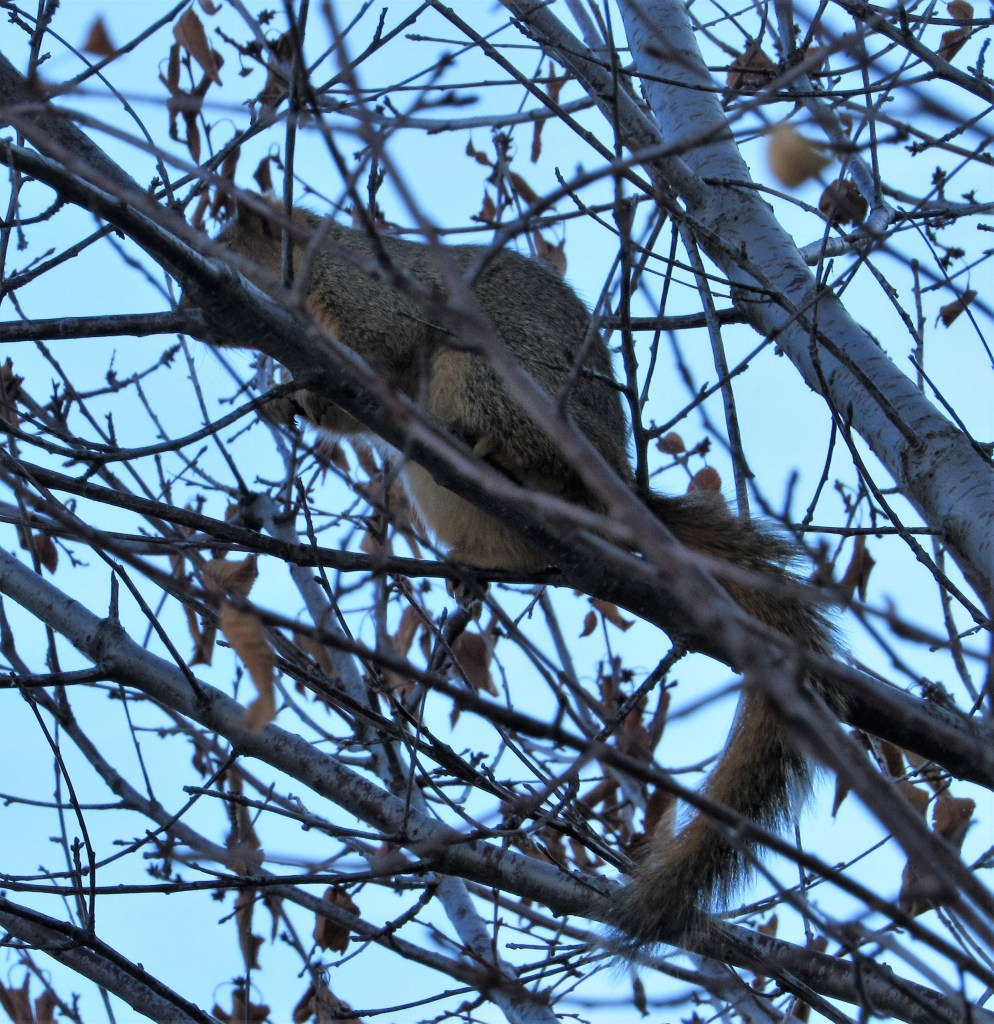
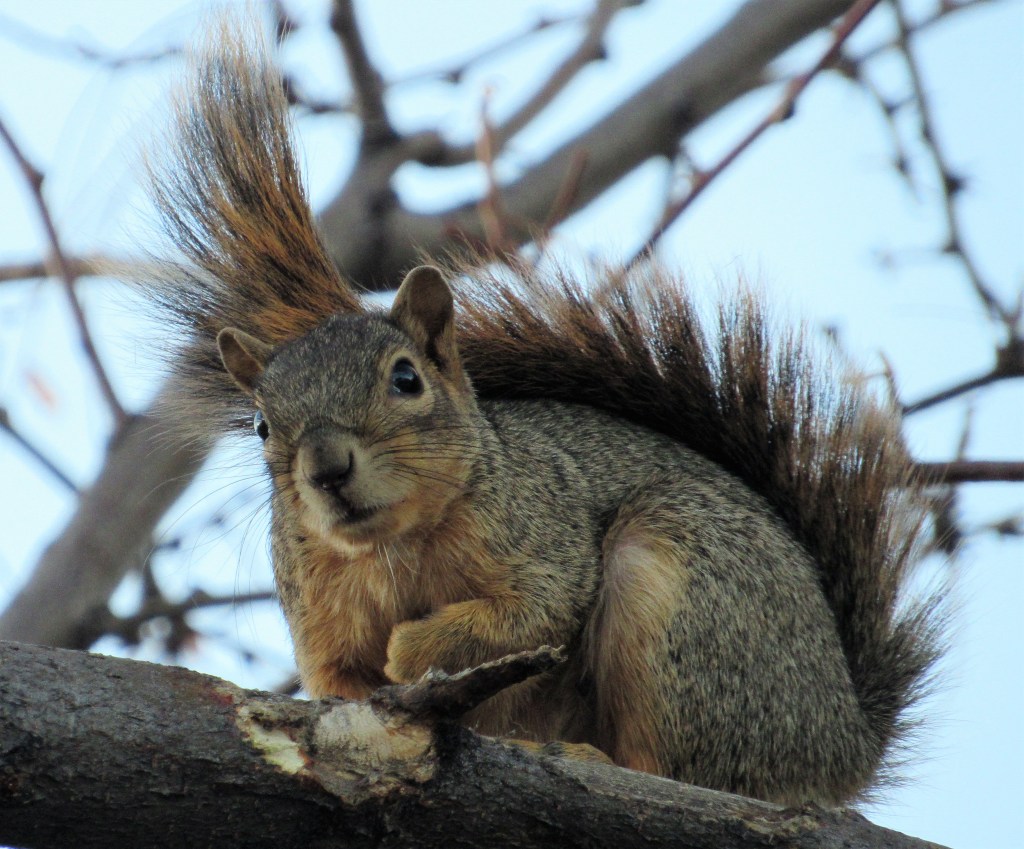
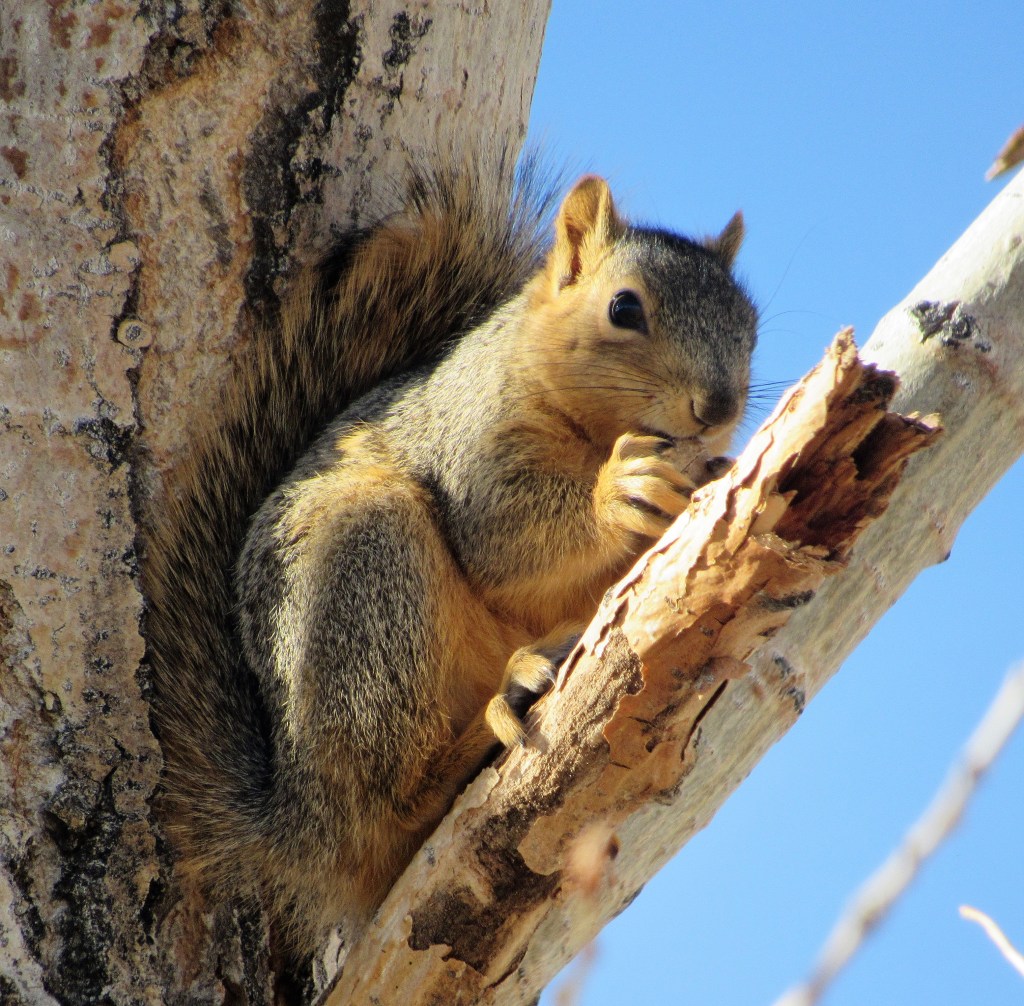
This season, I have seen more squirrels than I have seen in a long time. They are everywhere and it seems like I am seeing a whole bunch just about everyday. They always seem so curious and seem like they are having so much fun. Sometimes they are running along fences and walls and other times they are playing in the trees. And every now and then, I see them rustling through the leaves on the ground. They just love posing for my camera too.
Be like the squirrels and no matter what you do or how you do it, enjoy your days. 🙂
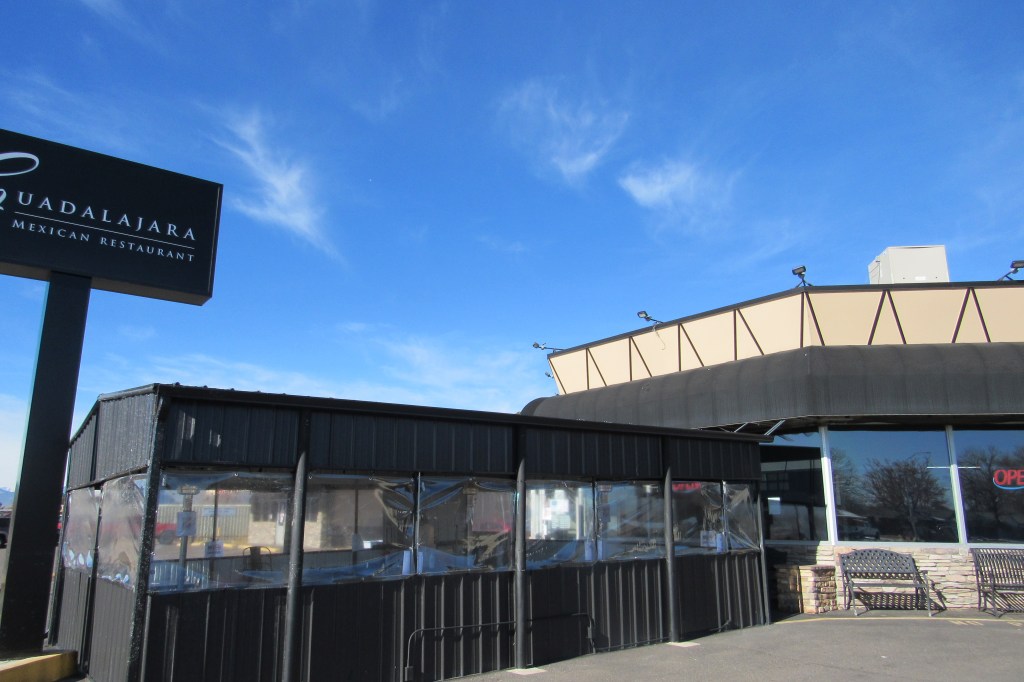
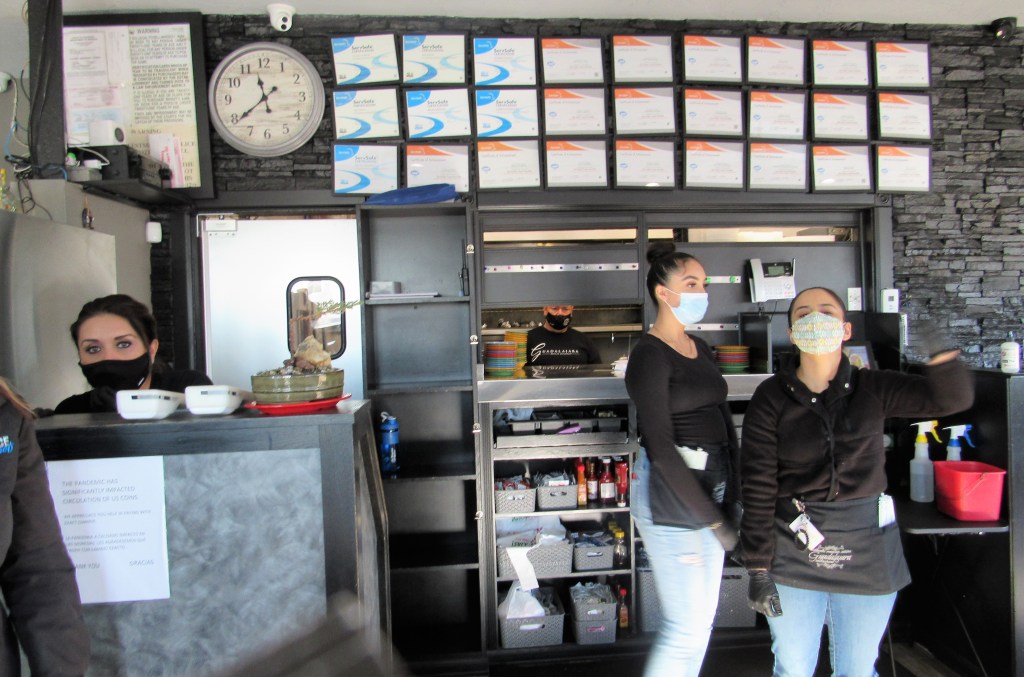
I wish it was a real trip to Guadalajara, but instead it was only a day trip to the restaurant Guadalajara with my friend Kathy. Kathy and I needed a break and we needed some good girlfriend time, so we decided on going out to lunch. We wanted to go some place new, so I literally just went to the “net” and searched for restaurants close by. We decided on Guadalajara in Westminster, not knowing anything about it at all. We were both very pleased with our choice. Guadalajara is an authentic, family owned and operated restaurant that has been in business for 16 years and counting. Business is booming too. The restaurant was started by Mr. Montes in 2004. Mr. Montes and his staff pride themselves on serving “some of the most authentic Mexican food in Colorado. Many of [their] recipes have been passed down from generation to generation giving old school traditional Mexican food straight from grandma’s kitchen” and some have been given a modern twist by their chef. Mr. Montes was born in Guadalajara, Mexico and when he came to Colorado he brought some of his favorite traditional recipes to share with us, in his restaurant Guadalajara, named after and to honor his birth place.
Like a lot of restaurants now, they have gone to a log in, virtual menu. I am not a fan of those, but then I am also a dinosaur too. These logs are good for some people, and definitely have their place, I suppose, but NOT everyone is comfortable with or has the capability to have this as the only type of menu to read from. I definitely fall into this category. You can also read a more traditional menu online and as we found out as we were leaving, they also have a traditional menu outside and on the wall above the kitchen too. This is good to know for next time, and there will definitely be a next time.
As soon as we walked through the doors, the staff greeted us with big smiles. They were very friendly and very helpful. The restaurant was spotlessly clean too. It was all very inviting and welcoming.
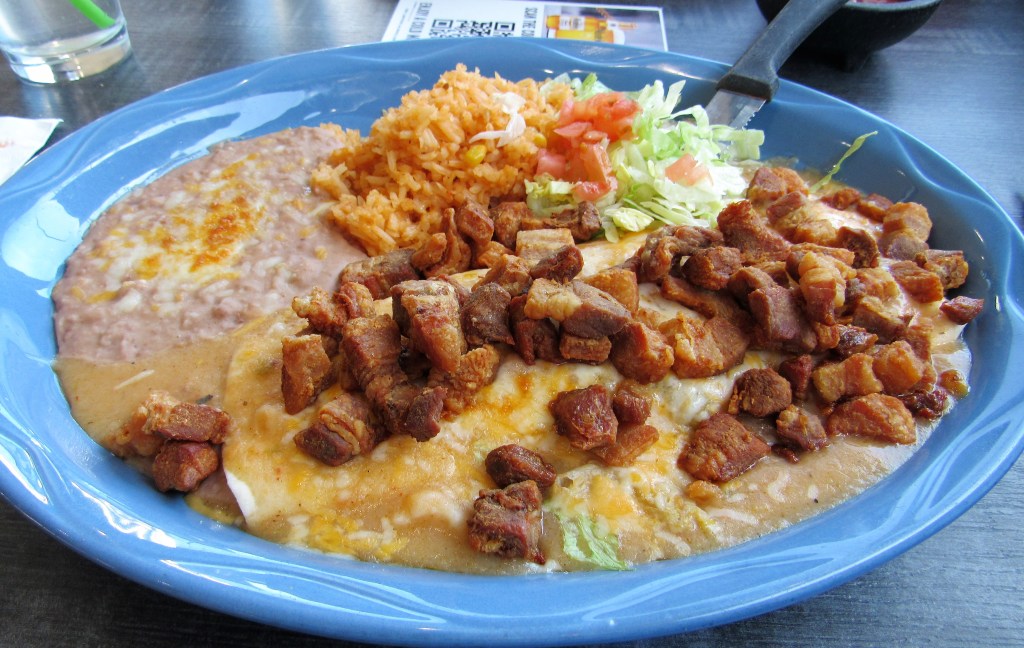
After munching on fresh made, warm chips and a delicious spicy fresh salsa, Kathy ordered the #1 – which was a combination plate that included a bean burrito, a beef tamale and a chili relleno.
I ordered something a little different. As you know, I am all about trying new things. So I ordered the #13, which was a roasted pork and bean burrito. The pork is actually served outside of the burrito, for an interesting change of pace.
Both dishes were fabulous, and the homemade freshness made them even better. Everything is made from scratch and made fresh everyday. As you can see, the portions are HUGE! You will definitely NOT leave the restaurant hungry, that’s for sure. Needless to say, we both brought home doggie boxes, and there was still plenty left over for us to enjoy yet another time.
Guadalajarais located at 2835 W. 72nd Avenue in Westminster, Co 80030. You can call ahead and order for either pick-up or dine in at (303) 426-9540, or you can contact them online at guaralajaramexicanrest.com. But just like any restaurant, the best experience comes when you enjoy it in person. Kathy and I both decided we will most definitely be going back for more. Thank you for a much needed break and a delicious dining experience.