I have created this site to help people have fun in the kitchen. I write about enjoying life both in and out of my kitchen. Life is short! Make the most of it and enjoy!
Author: ajeanneinthekitchen
I have worked in the restaurant and catering industry for over 35 years. I attended 2 culinary schools in Southern California, and have a degree in culinary arts from the Southern California School of Culinary Arts, as well as a few other degrees in other areas. I love to cook and I love to feed people.
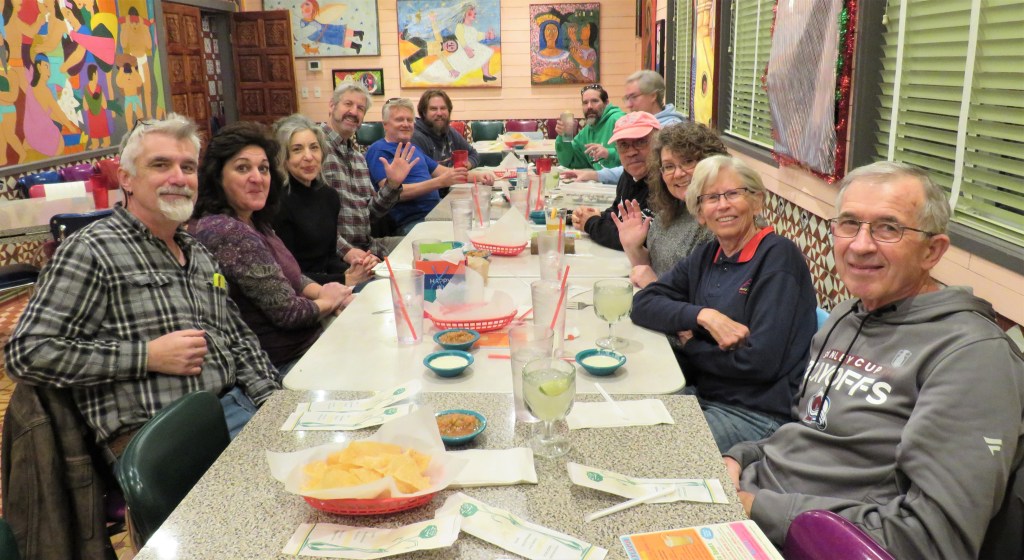
Larry celebrated another birthday this weekend and to celebrate, he wanted friends and family to watch him play hockey with his team, The Slapshots. It was a special birthday after all, ending in a 5.
I apologize for the poor quality of these pictures. They were taken behind a very dirty and beaten up shield around the ice, and at a distance at that. I love my zoom.
Larry in action.
We had a good time and cheered for the Boys in Blue, and especially #4, Larry.
And Larry taking one for the team, in the box.
A team meeting.
Bryan, the team Captain, showing the Boys how it’s done.
They put up a good fight, and it was a fun time and a good game, but The Slapshots still lost, 5-3. I always love seeing this at the end of every game. Win or lose, both teams do a skate-by and congratulate each other on a game well played.
After the game, we went out to dinner, where the fun and good times continued.
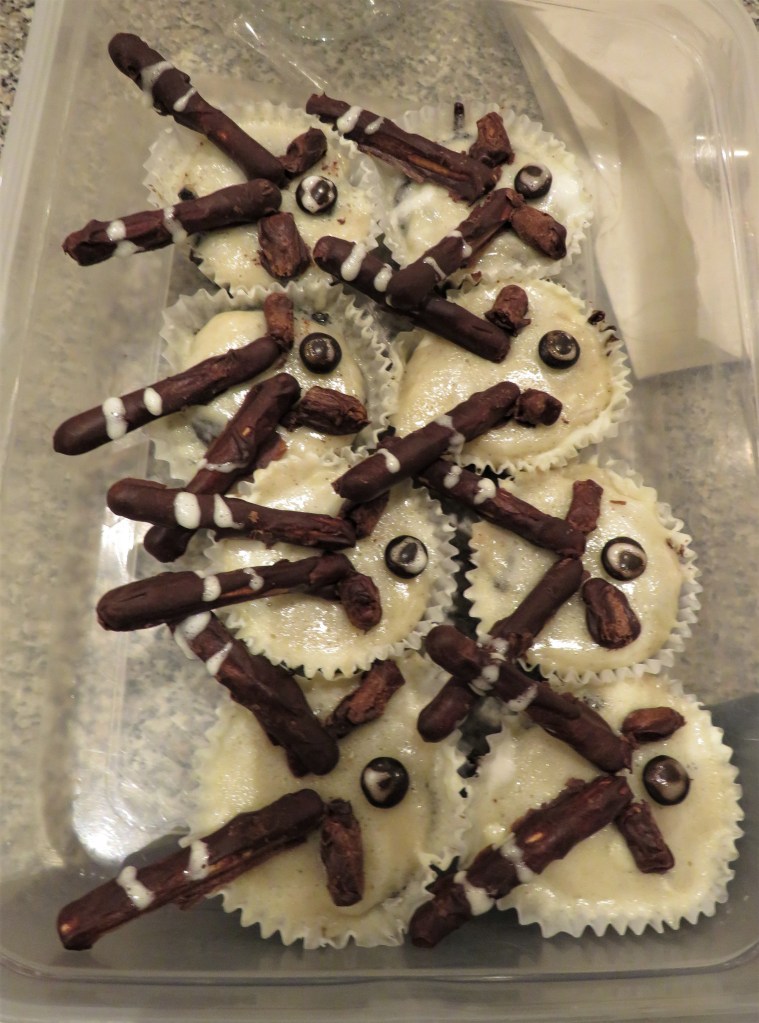
Lauren even made some hockey themed cupcakes. They disappeared quickly.
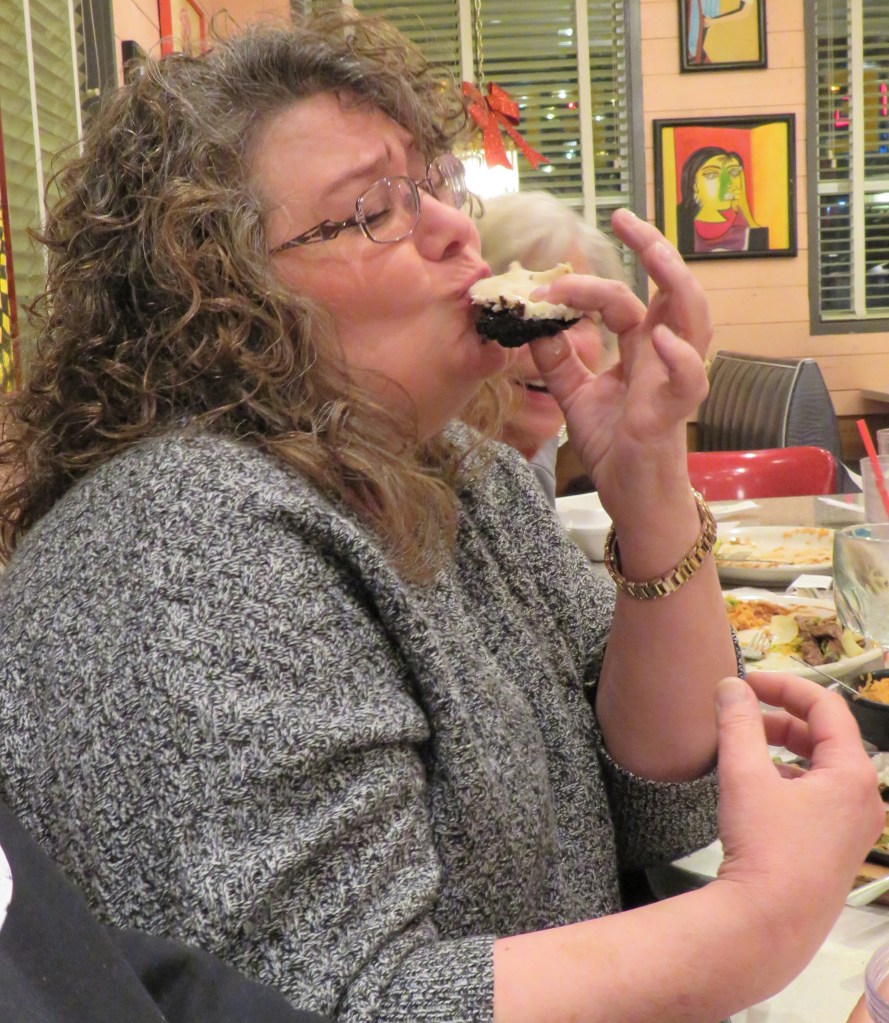
Wendy thoroughly enjoyed the cupcakes too.
Happy Birthday Larry, from your #1 fan. Love you always and forever.
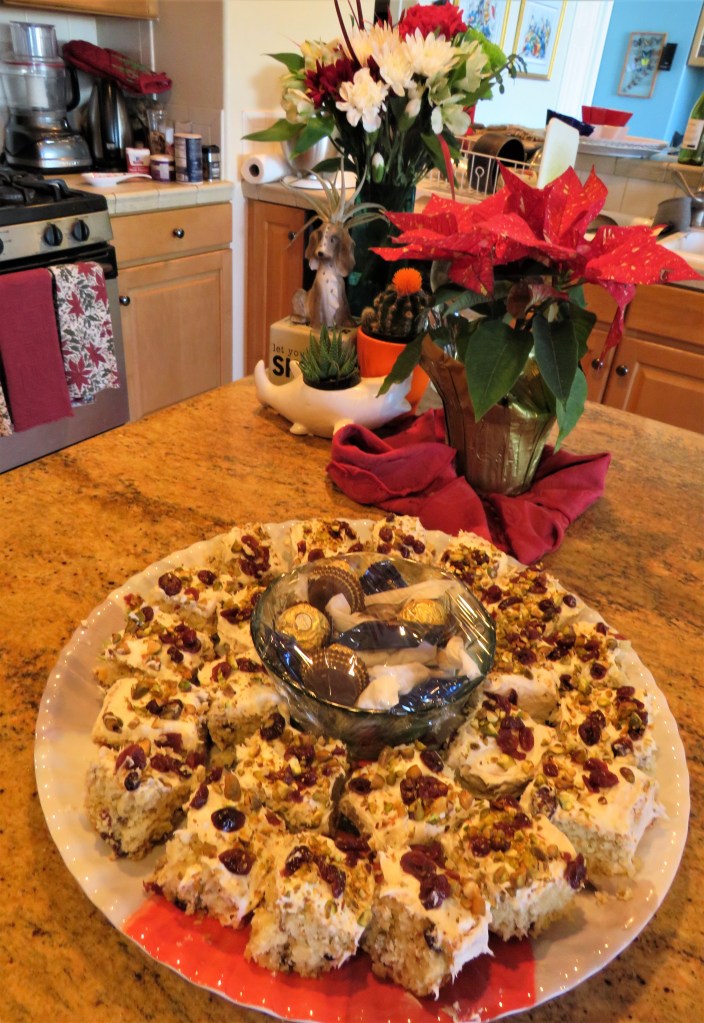
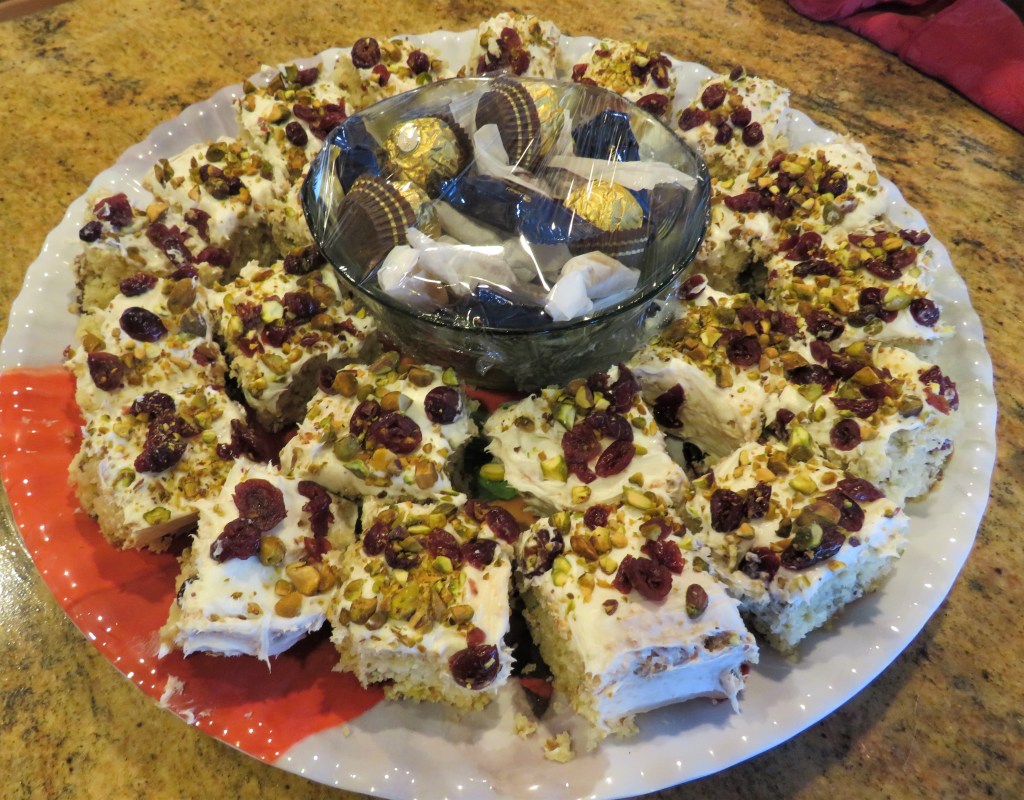
Tis the season for all kinds of parties and fun holidays foods. I love both; fun parties and fun festive foods. In the spirit of the season, I came across this idea for a Santa Claus cake that I just couldn’t wait to try. Of course I changed it from the original recipe. Would expect anything less?
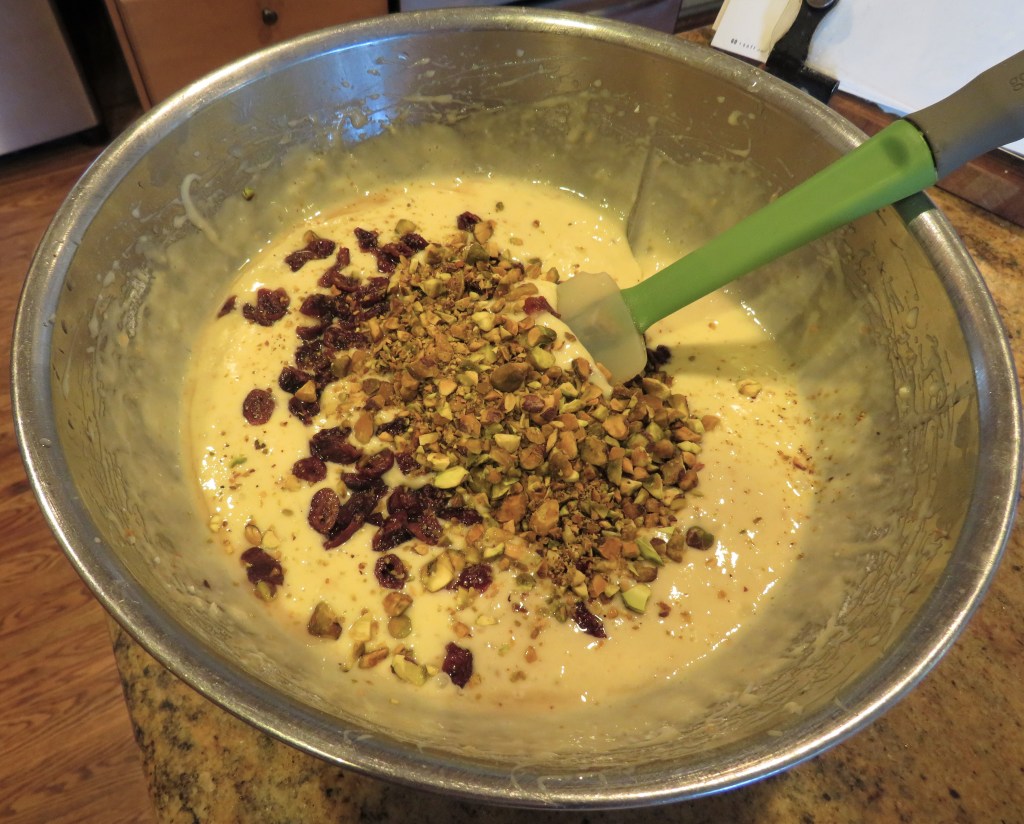
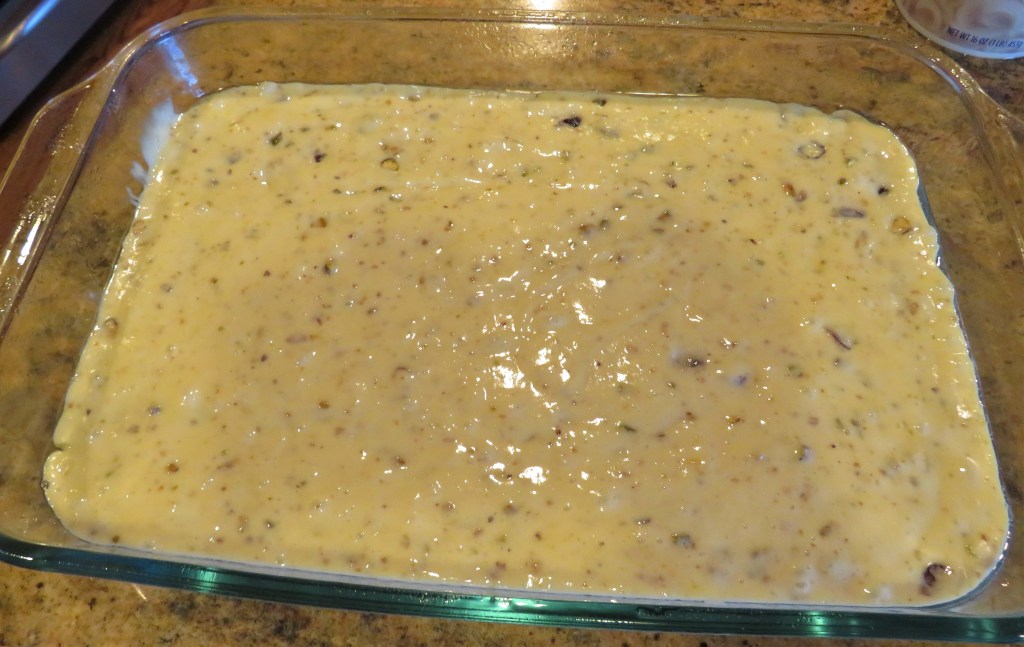
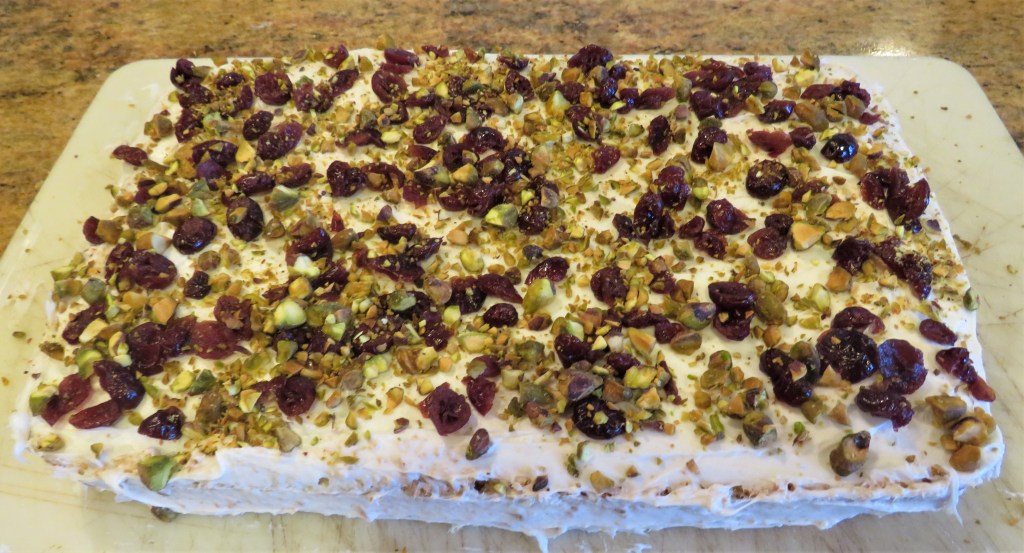
The original recipe called for walnuts, but I am not a big walnut fan, so I changed it to pistachios instead, which I think are far more festive anyway. 🙂 Also, because I was making the cake for a large group of people, and wanted the highest yield possible, I turned it into a sheet cake rather than a round cake. But obviously, you can make it whatever size you like. The cooking times may need to be adjusted though. I also cheated on the frosting, since I had white frosting that needed to be used, instead of making a cream cheese frosting that the recipe called for. Maybe next time. 🙂
There is absolutely nothing wrong with saving time and using a cake mix. Today, most of the mixes are pretty perfect, and don’t require a lot of time or effort, and the cakes come out delicious.
Santa Clause Cake
1 box of white cake mix
2 eggs
1 cup water
1/2 cup cooking oil
1 TBSP orange zest
2 cups dried cranberries, reconstituted in water
1-1 1/2 cup pistachios, chopped
Preheat the oven to 350* F or 190* C.
Spray your cake pan, whatever pan you are using, with cooking spray.
Make the cake according to the directions on the package and then fold in about 1/2 of the cranberries (discard the water) and the chopped pistachios. Reserve the rest for the topping.
Evenly spread the batter into your pan(s) and bake. If you are using a 9×13 baking pan, it will take about 30-35 minutes, or until it is golden brown and a toothpick that is inserted in the middle comes out clean.
Let the cake cool completely before adding the frosting. Then generously sprinkle the remaining pistachios and cranberries on the top of the frosting.
Slice and serve.
Tis the season to be jolly and merry, and to share the holiday cheer with everyone you meet. Have a great holiday season. Stay safe and stay well. ‘Til next time.
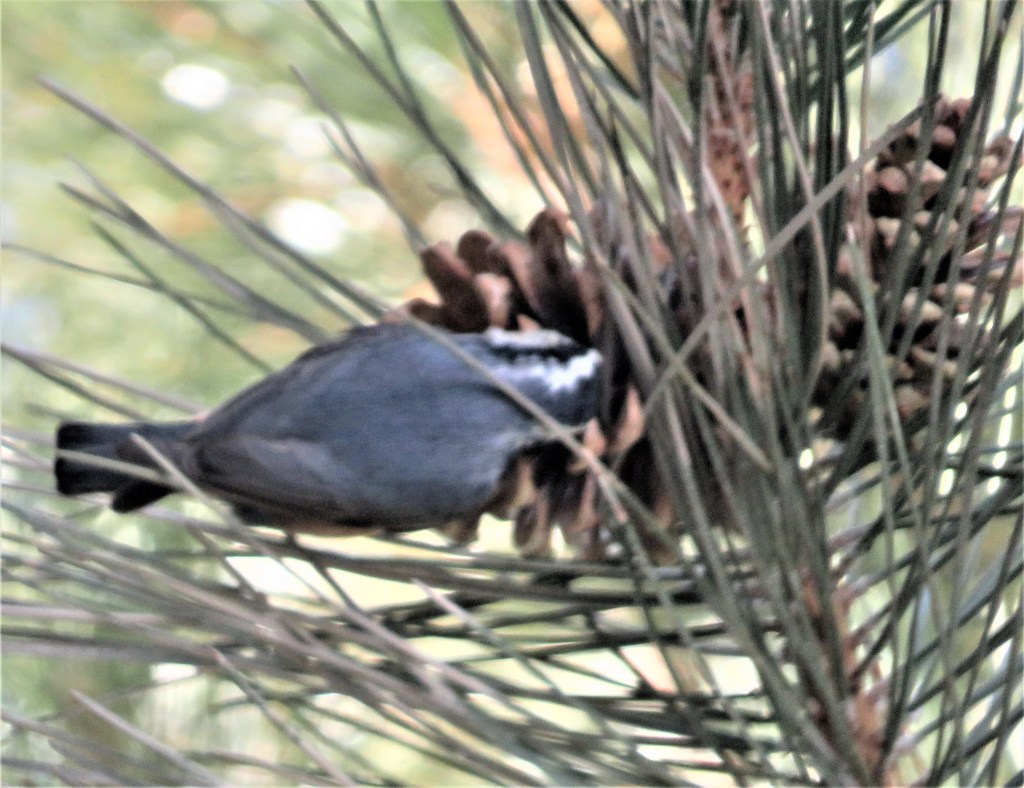
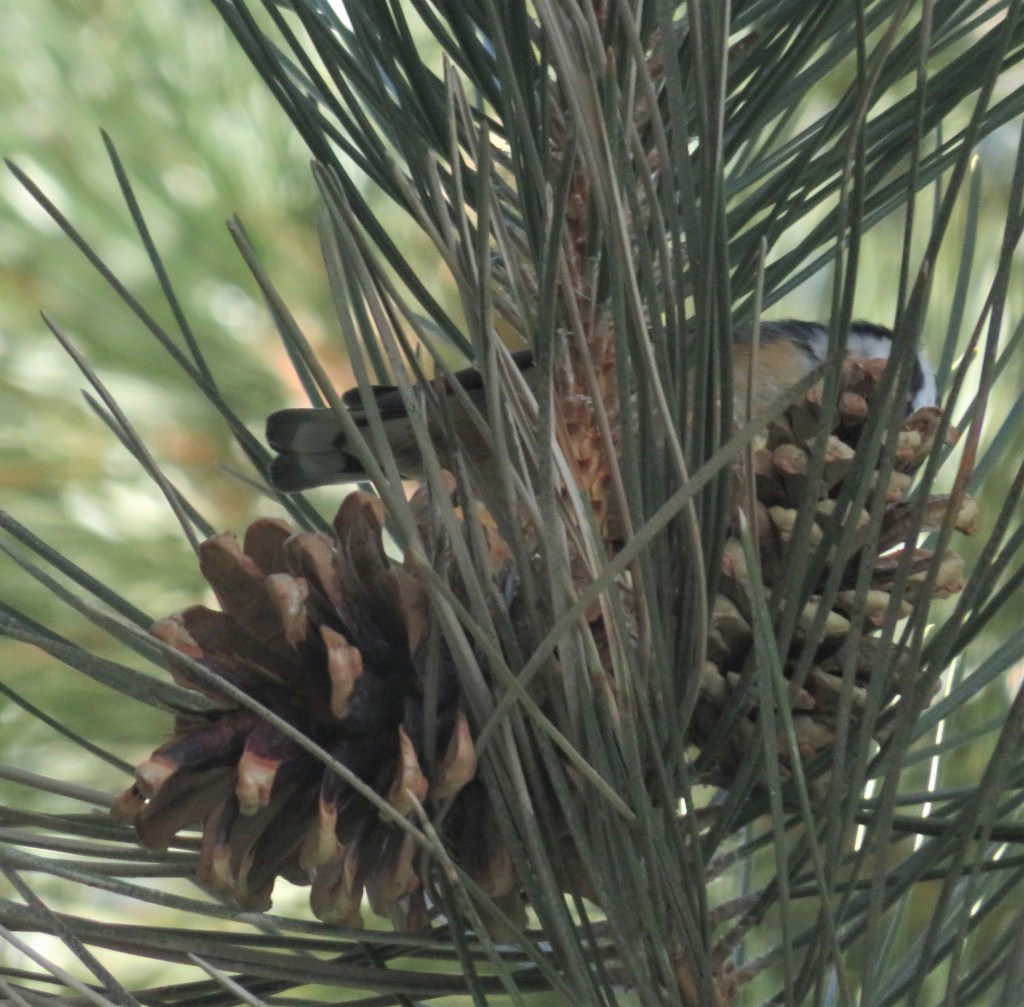
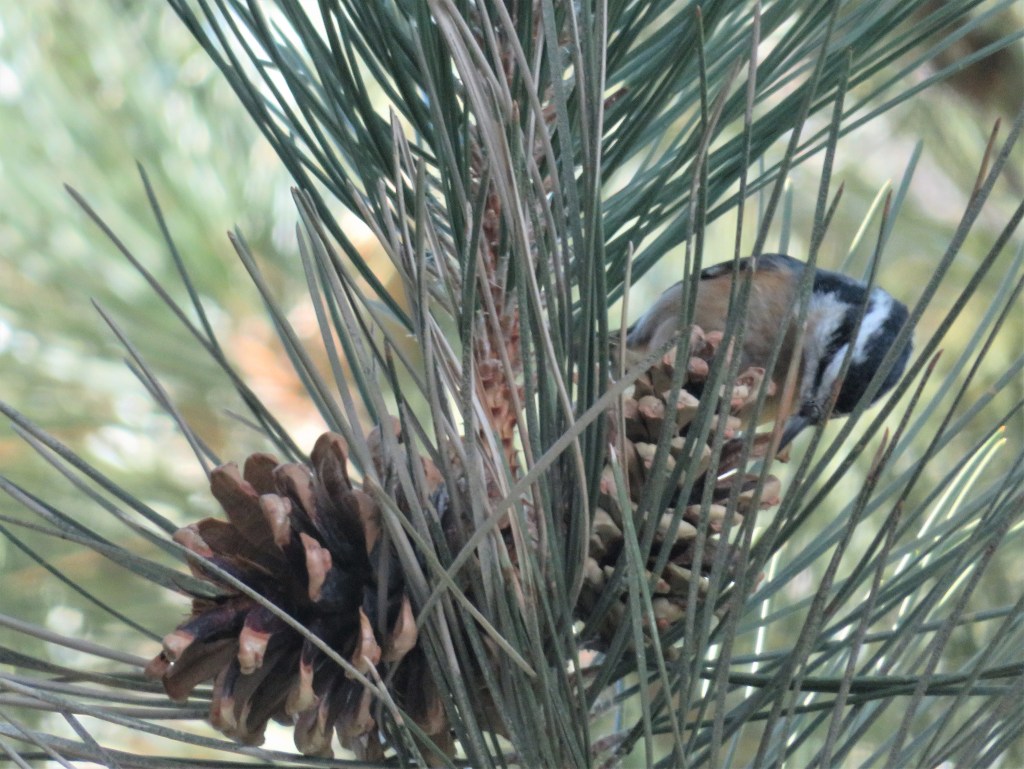
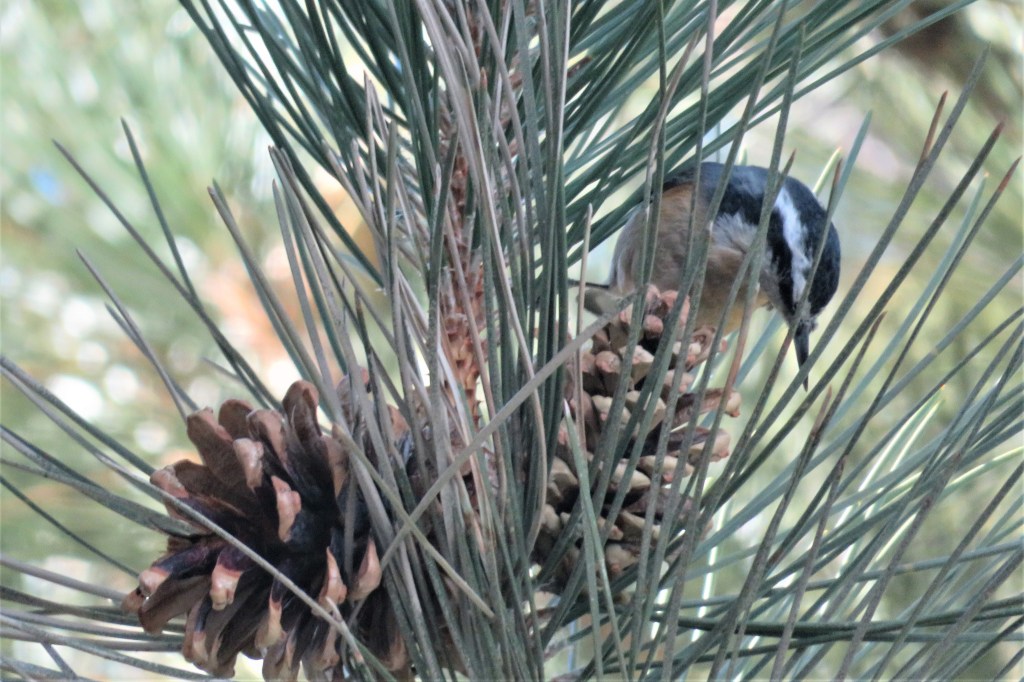
I didn’t have to go very far for this little gem of a bird. We were watching TV and I was distracted by a beautiful new little bird that was twittering around in the tree just out by our big window. In fact, there were quite a few of these little Red Breasted Nuthatches playing around in the tree. I had never seen them before, but I am sure glad I have discovered them now. They are beautiful little birds.
These pictures are not the greatest quality since they were literally taken by looking through the window. And the little nuthatches twitted around so fast that it was hard to get them too. So I apologize for the poor quality of the shots. Sometimes you just have to go with what you can get. 🙂
I am always prepared for the unexpected. Sometimes, that’s all we get. Have a great day.
One just never knows what is going to come our of my kitchen on any given day. It is always a mystery, sometimes even to myself. Often I know a basic food item I will be cooking, but I never know just how I am going to cook it until I do. Sometimes it is like cooking from a mystery box. It keeps life in my kitchen fun, interesting and challenging. You just never know what to expect, and I like it that way. 🙂
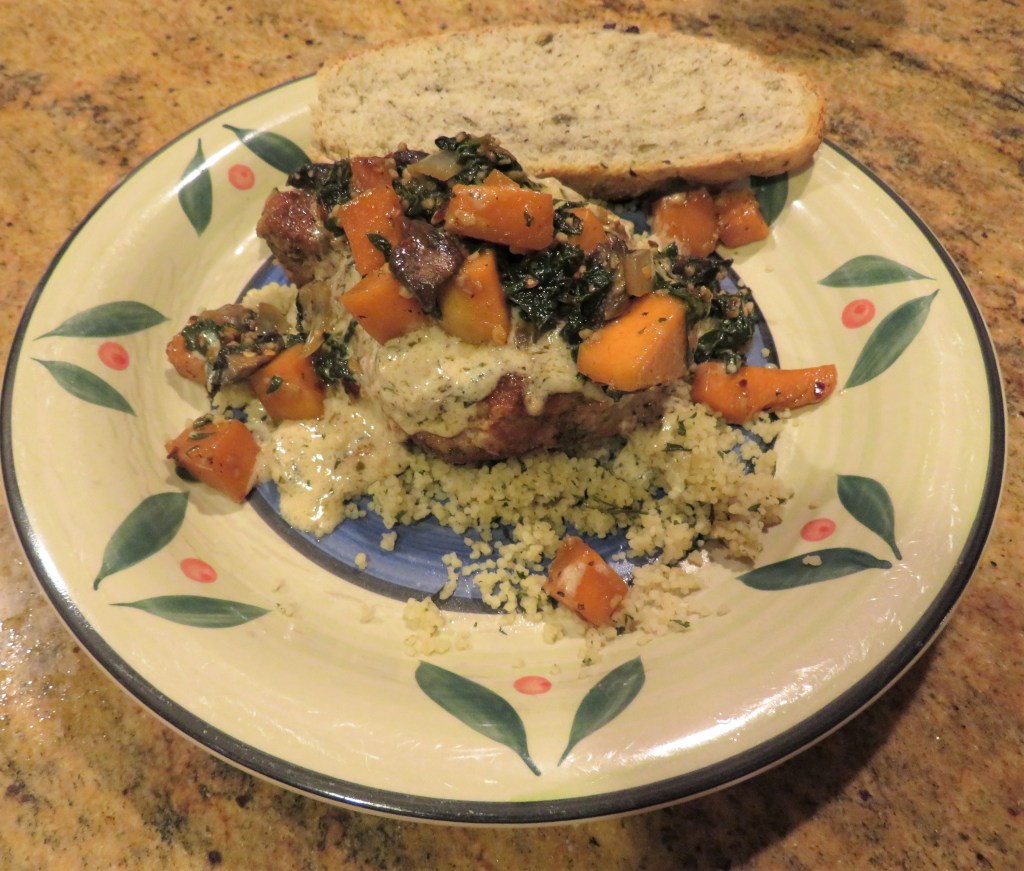
Such was the case with my latest batch of pork chops. I knew I was going to be cooking pork chops, but I wasn’t sure what I was going to do with them. Then I decided to bread them. And the rest you already know. I served it on top of a bed of couscous with my pumpkin and spinach mixture on top More Leafy Greens and my olive bread Tuscan Herbed Olive Bread on the side. Normally I am not much of a rose drinker, but we had some leftover from our party and I paired that with the dinner. It was actually pretty good and made for a good pairing. It wasn’t sweet, but was a dry rose. The sweetness is the part I am not fond of with roses or blush wines.
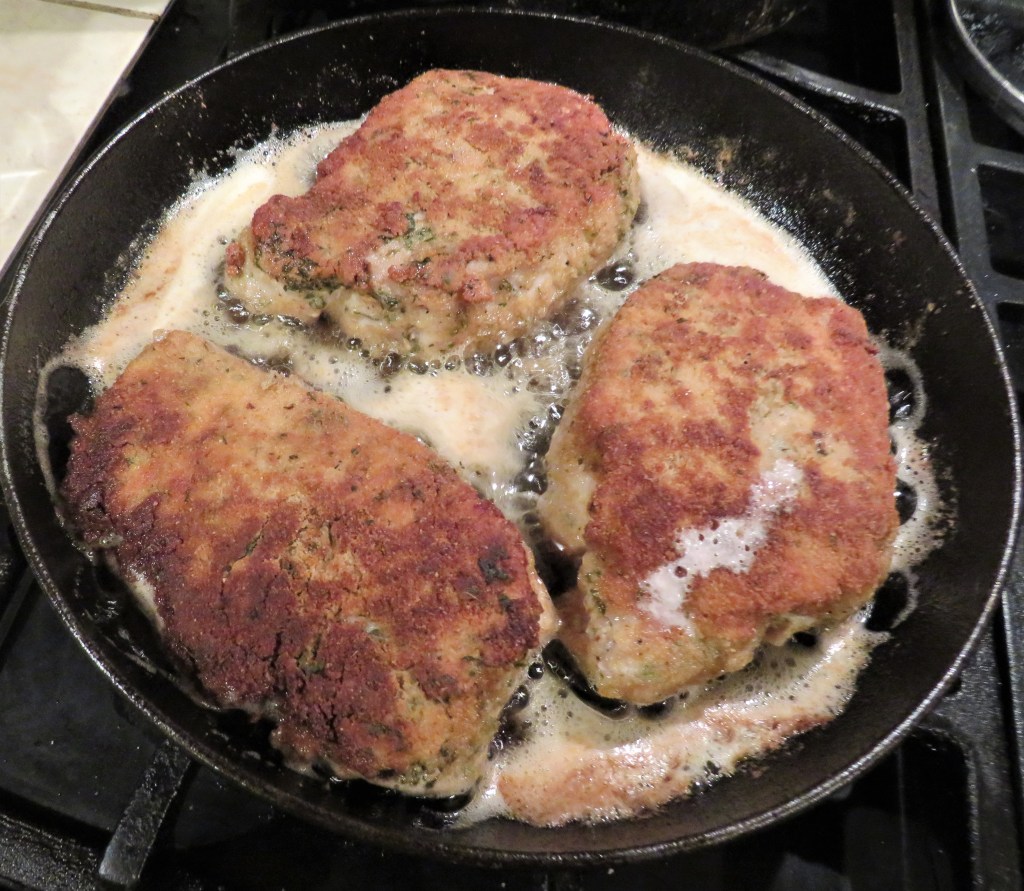
I coated my pork chops in an egg/milk dip first, then completely coated them in seasoned bread crumbs.
I seared them just like I would sear a steak, in a very hot skillet with a combination of butter and olive oil. I cooked them for about 3 minutes per side, or until the breadcrumbs were golden and I had a nice crust surrounding my pork.
After the crust was formed and was a nice golden brown, I popped them into the oven to finish cooking. I had the oven set at 400* F or about 200* C and continued to cook them for about 20-30 minutes, or until the internal temperature reached 165*F or 75*C.
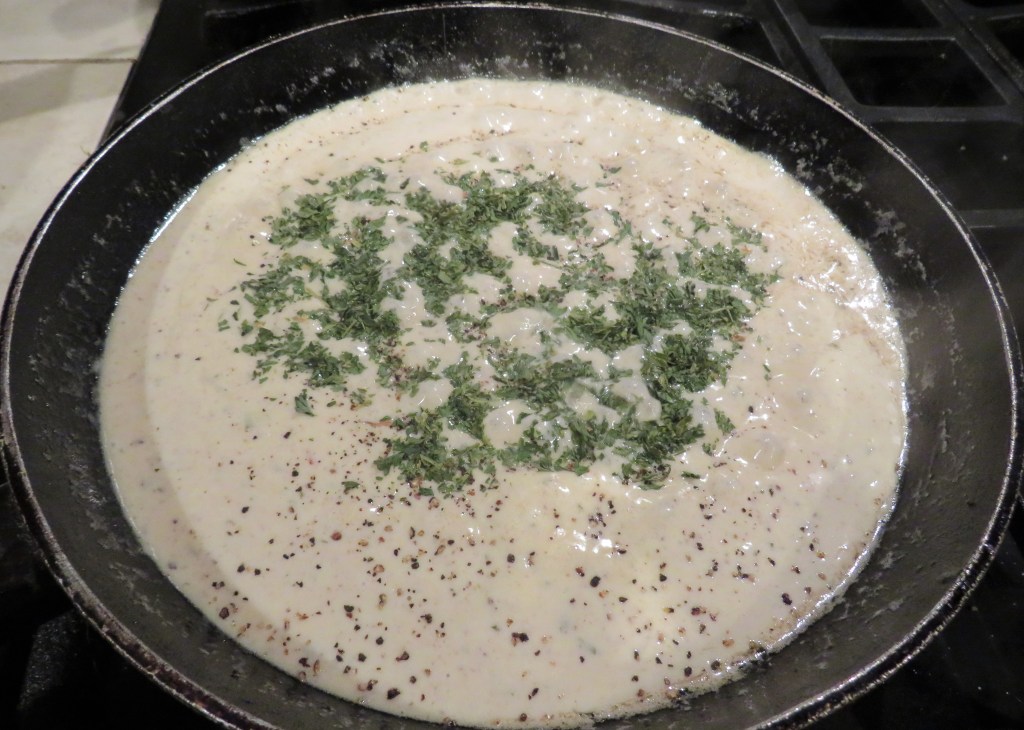
While the pork was cooking, I made a simple creamy garlic sauce. I had a little bit leftover from before, so that was my base, then I added more cream, garlic, salt and fresh ground black pepper and parsley to make my sauce.
and Voila! Dinner is served. It was delicious. The pork was crusty on the outside and juicy and tender on the inside. In a word – PERFECT!
As I always say, play with your food. You just might surprise yourself. 🙂
Have a great day. Stay safe and stay well Everyone. ‘Til next time.
Apparently it is goose season around my house. The Canadian geese are out by the 1000’s. They are everywhere. I guess they are all gathering together for the holidays. Everywhere I go, there is a gaggle of geese there too.
This is the back of my house.
Make your day a goosey day and make the most of of all your days.
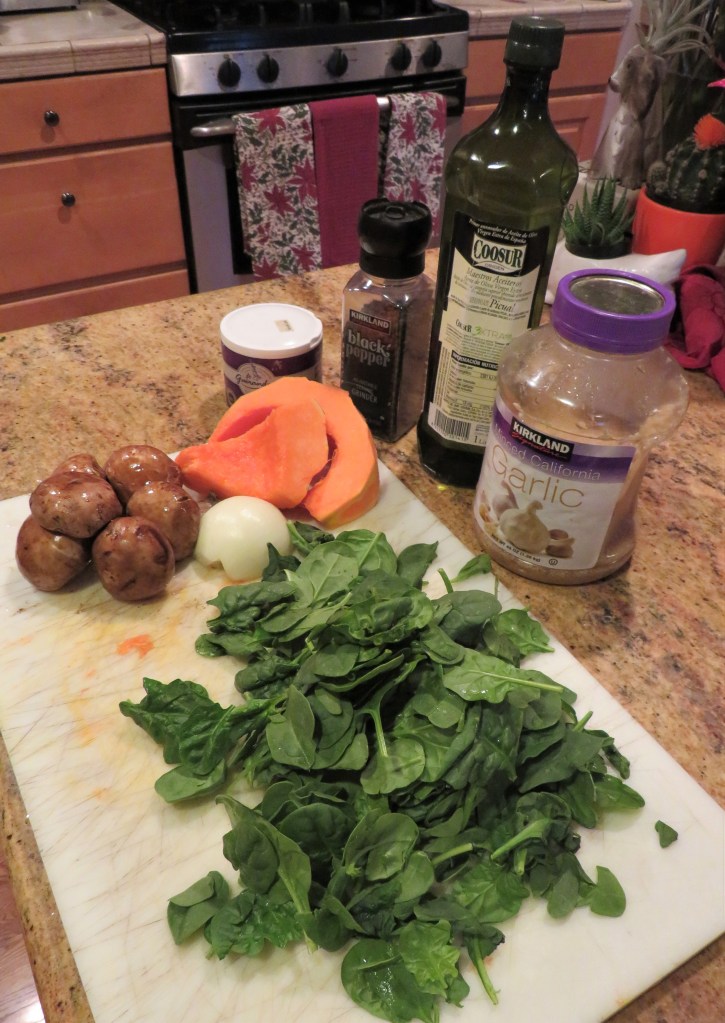
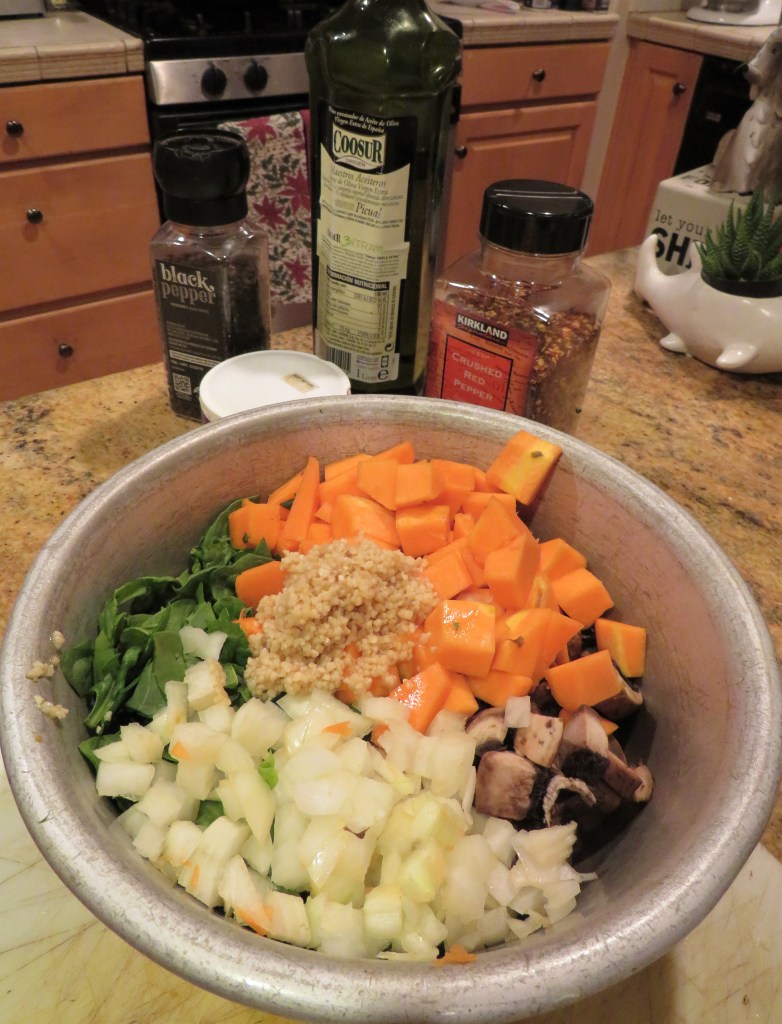
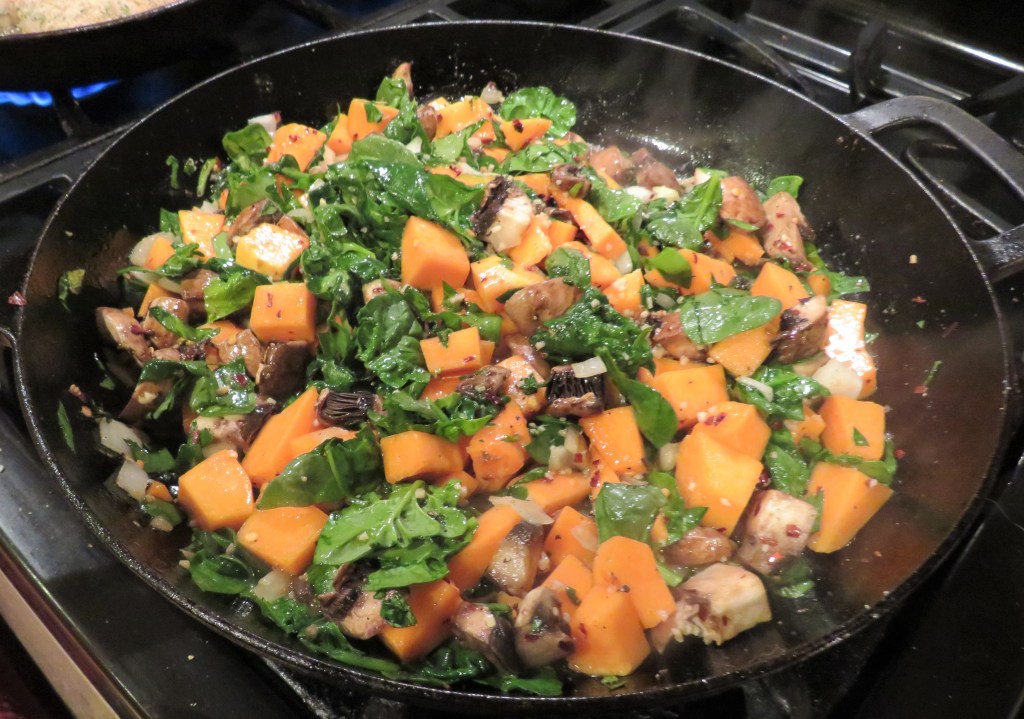
Yesterday, Larry and I both had to go to the eye doctor. One of the things the eye doctor told us was to eat our leafy greens. I almost burst out laughing. Does she know how many leafy greens, and vegetables in general, we actually do eat? I laugh when people tell me to eat my vegetables. We actually eat more and a much larger selection of vegetables than many vegetarians and/or vegans. But listening to the doctor’s orders, I did cook up spinach for dinner. I cooked it with pumpkin, onions, garlic and mushrooms too. We always eat a ton of vegetables, and yes, we eat a lot of leafy greens as well. 🙂
Leafy greens, which includes, spinach, kale, collard greens, chard, turnip greens, arugula, and watercress are known as super foods. They are full of nutrients and do wonders for the body. They are loaded with high levels of fiber, iron, magnesium, potassium and calcium. They also contain very little carbohydrates, sodium and cholesterol. The dark greens supply a significant amount of folate, a B vitamin that promotes heart health and helps prevent certain birth defects. Apparently leafy greens are good health foods for your eyes as well because of the lutein and zeaxanthin they contain.
I sauteed all of my vegetables together in a combination of olive oil and butter and salt & pepper.
I served them with some breaded pork chops over couscous and topped it all with a creamy garlic sauce, with my Tuscan olive bread on the side. Tuscan Herbed Olive Bread Delicious!
See. Sometimes I actually do follow directions. I just rework them to meet my needs. 🙂
Have a great day Everyone. Stay safe and stay well, and eat your leafy greens. ‘Til next time.
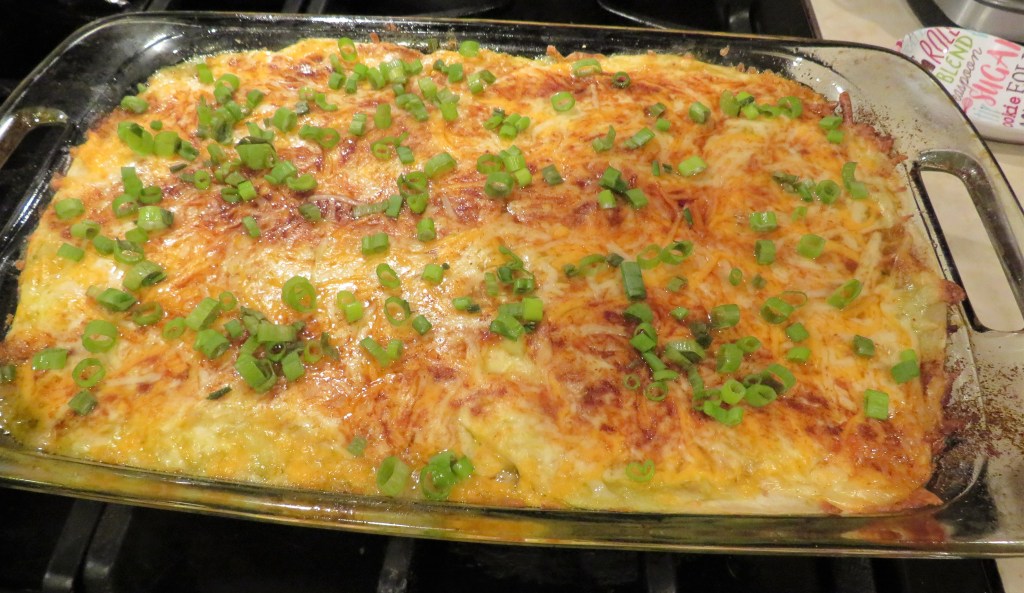
After cooking yet another turkey, that means there were more turkey leftovers too. Turkey And Tomatoes I couldn’t possibly make the same thing with the turkey leftovers that I did before, so of course I had to make something else. This time it was loaded turkey enchiladas.
Enchiladas are another catch all for just about anything you want to add to them. There is never just one way to make them, except of course for delicious. Enchiladas are usually corn tortillas, though I prefer flour tortillas, rolled around a savory mixture, covered with chili sauce and are baked. Another popular way of preparing enchiladas is to layer them instead of rolling them. I make mine both ways.
Enchiladas originated in Mexico, where the practice of rolling tortillas around other food dates back at least to Aztec and Mayan times. This way of eating foods wrapped in a tortilla was particularly popular in the Yucatan region of Mexico. The name “enchilada” comes from the Spanish word enchilar, which means to season with chili. Enchiladas are some of the most popular foods eaten in Mexico.
Larry has been hungry for enchiladas for quite some time so I figured it was time to make some for him. I had both flour and corn tortillas, though I didn’t realize I had the corn tortillas until after I had already made my enchiladas. I used some of my leftover turkey that I shredded, then added a whole bunch of other good things, like corn, onions, garlic, jalapenos, black beans, cilantro, cumin, and oregano.
Because corn tortillas are usually smaller than the flour tortillas, I usually roll my enchiladas when I use the corn tortillas and layer them when I use the flour tortillas. This time I used my flour tortillas, so I layered my enchiladas.
I sauteed the vegetables and seasonings first in olive oil and lime olive oil, then combined them with all the other ingredients.
Preheat the oven to 375* F or 190* C.
Spray a 9×13 baking dish with cooking spray.
Layer the bottom of the dish with your sauce. This time I used a salsa verde or a green tomatilla sauce. I like the green sauces with chicken or poultry, and usually use a red sauce for beef or pork. Then add the tortillas. Top with the filling, add a layer of cheese and repeat until the pan is filled. Ending with a top layer of cheese.
After my pan was filled, I sprinkled some paprika on top, then covered it with foil and baked it for about 40 minutes. After 30-40 minutes, remove the foil and continue to bake until there is a slight crusting of the cheese and/or the internal temperature reaches 165*F or 70 *C. This is the same procedure for either layered or rolled enchiladas. Top with your favorite toppings, and Desfruitas! Enjoy! I served it with some arroz verde, or green rice. Arroz verde is just rice with green onions, cilantro and jalapenos mixed in. !Esta mui delicioso!
Have a great day Everyone. Que tengan un gran dia a todas. Stay safe and stay well. ‘Til next time.
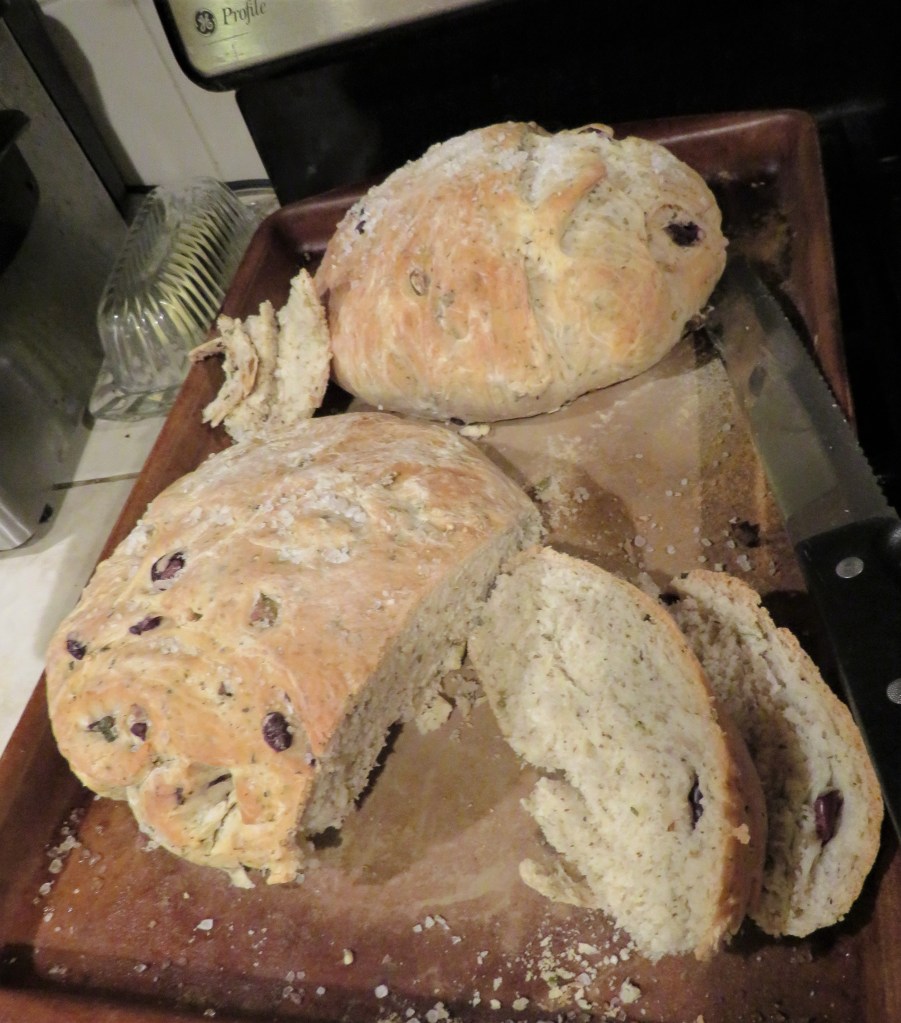
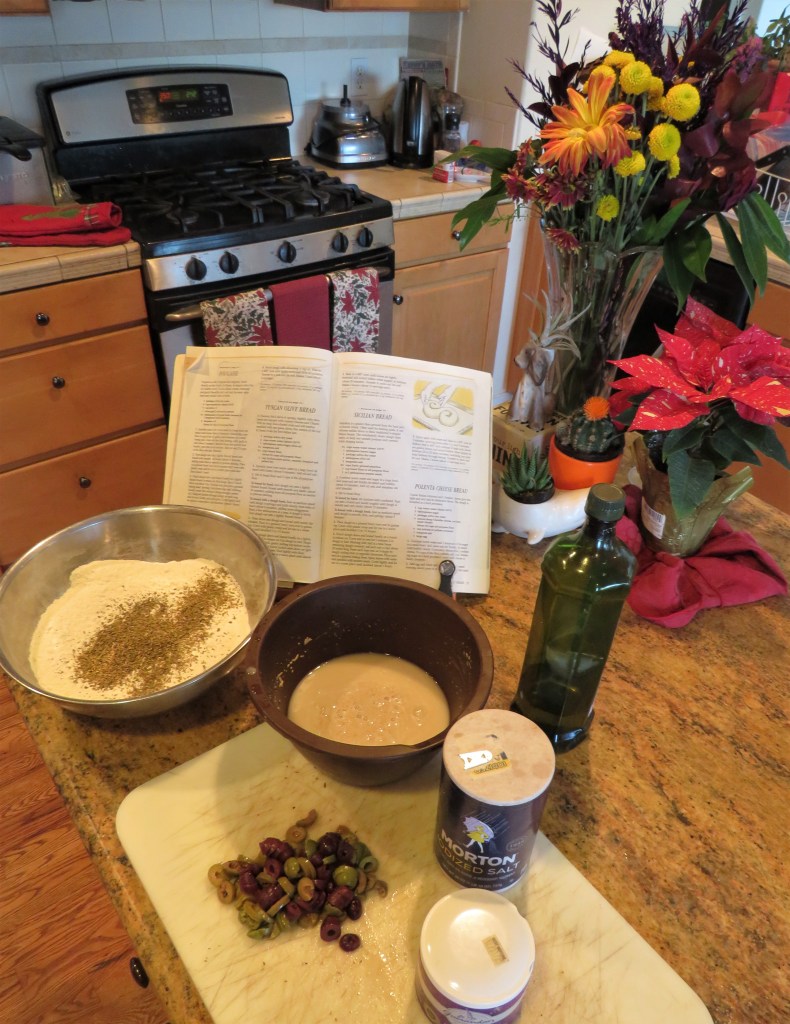
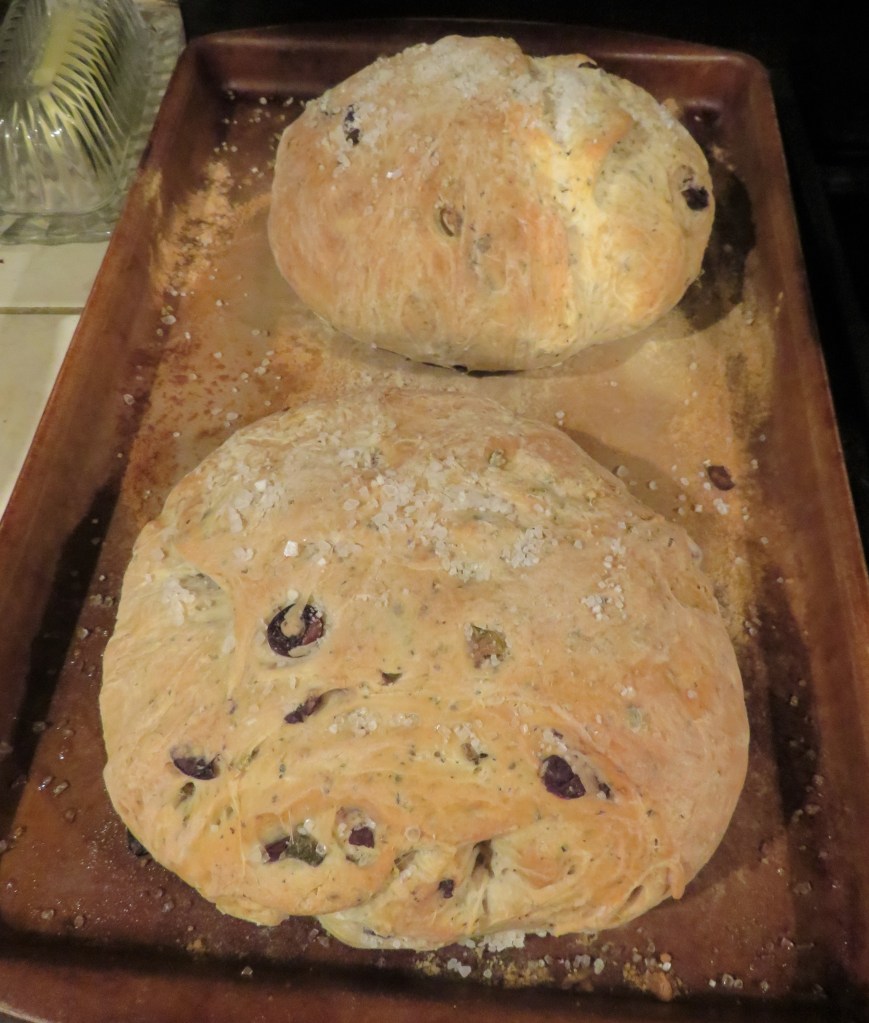
There is something very comforting abut making bread. I find it very therapeutic and relaxing. I like to make bread as often as I can. Apparently I like making olive bread too. This is my fourth recipe for olive bread. All of them are very good and very tasty, and there are only a few slight and subtle differences. Those slight differences, however, are what gives each recipe its own personality. I will NEVER turn down bread, and can easily eat the whole loaf, assuming here is enough butter. 🙂
The recipe made two loaves, but I only needed one, so I gave the other loaf to Janet and Bob. I like a variety of olives when I make my olive bread too. I think I had four different kinds of olives mixed together to make this delicious bread. You can leave the olives whole, but I prefer them sliced. There is no right or wrong way to make it.
As with a lot of bread recipes, there are only a few simple ingredients. The most important of which are love and time. if you don’t have the time to make the bread, don’t do it. Baking bread is a labor of love,
Tuscan Herbed Olive Bread
1 package or 2 1/4 tsp dry active yeast
2 cups warm water
1 TBSP olive oil, plus more to coat the bowl
1 1/2 tsp salt, plus some kosher salt to top, optional
2 1/2 cups all purpose flour
2 1/2 cups bread flour
1 cup sliced olives, sliced
1 TBSP dried basil
1 TBSP dried oregano
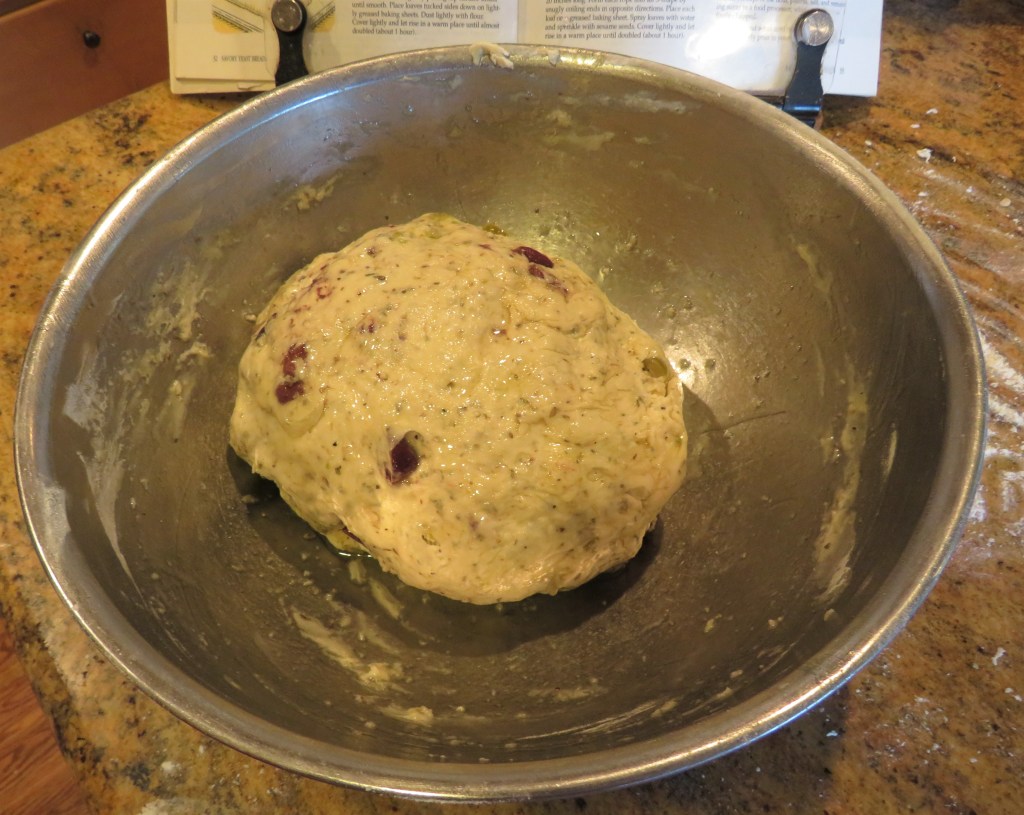
Mix the water and yeast together and let set for about 10 minutes or until frothy. Add the salt and the olive oil and mix well.
Combine all the rest of the ingredients together and make a well in the center and add the yeast mixture. Stir it all together.
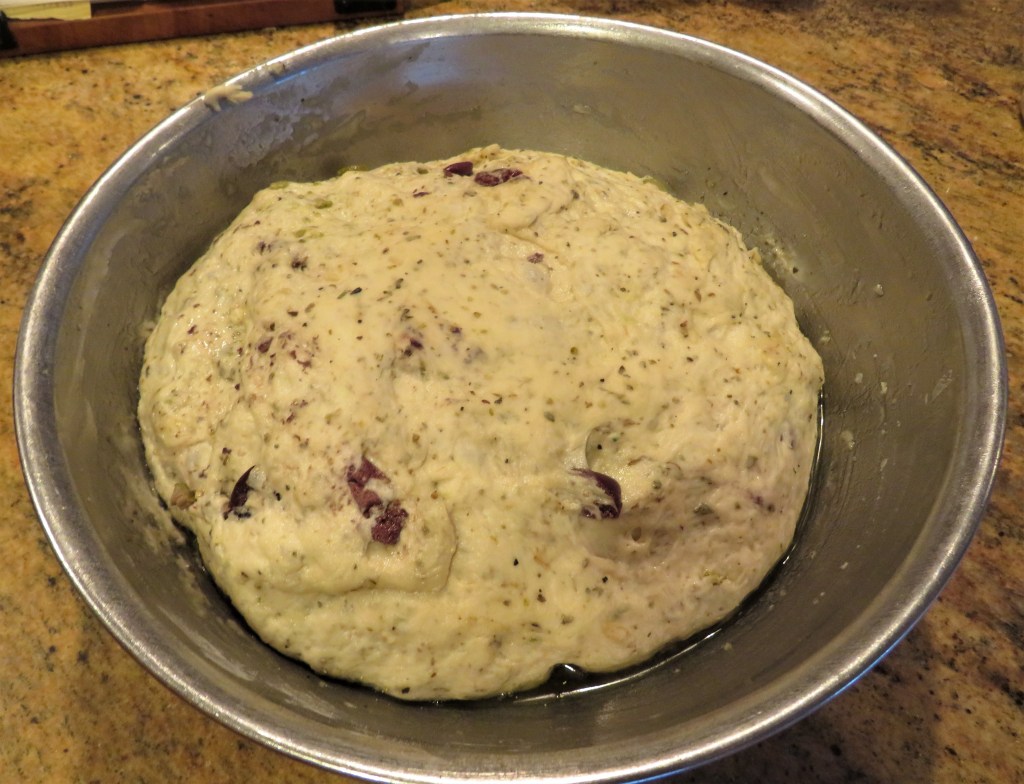
Mix everything together then turn onto a slightly floured surface and knead the dough until it forms into a soft elastic ball. Line a big bowl with olive oil then place the dough into the bowl and cover to let rise for about 1 1/2 hours, or until it is doubled in size. I usually coat my whole dough with the olive oil as well. This gives it extra flavor, helps keep it moist and also helps with the browning process.
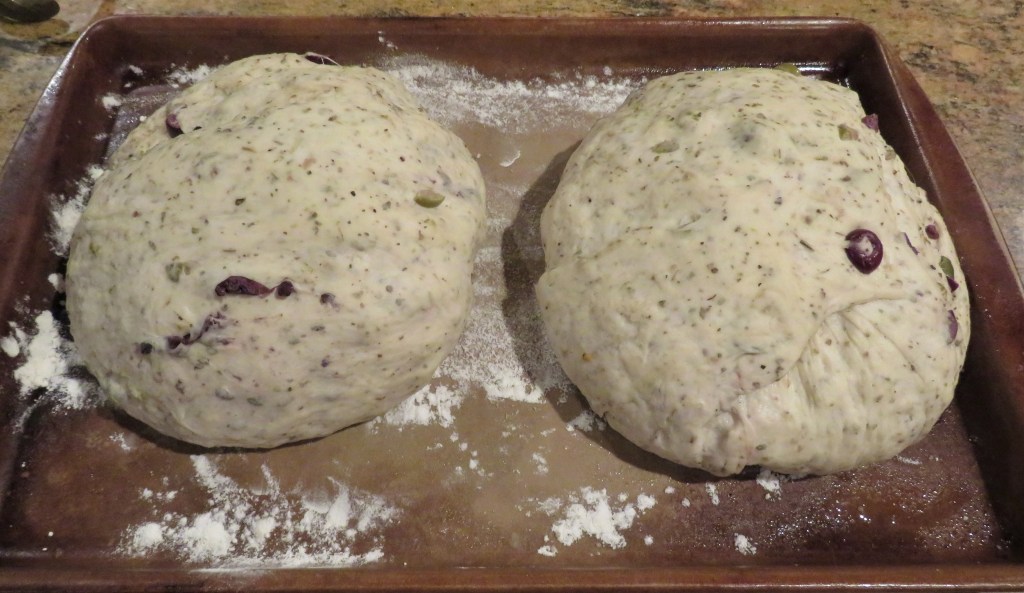
Turn the dough onto a slightly floured surface once again and split the dough into two and form two balls. Cover and let rise once again, for about another hour.
Preheat the oven to 400* F or about 200* C.
Place the dough onto a baking sheet that has been lightly floured on the bottom and bake for about 30 minutes or until the bread is golden brown and hollow when tapped.
Let cool for at least about 5 or so minutes before slicing, then share with friends and enjoy. !Mangia!
Happy Holidays Everyone. Stay safe and stay well ‘Til next time.
I am seeing more and more Hooded Mergansers on my walks these days, and that is OK by me. I think they are so festive. I just love their colorings. They don’t have any problems swimming side by side with all the bigger ducks and geese. They just go with the flow.
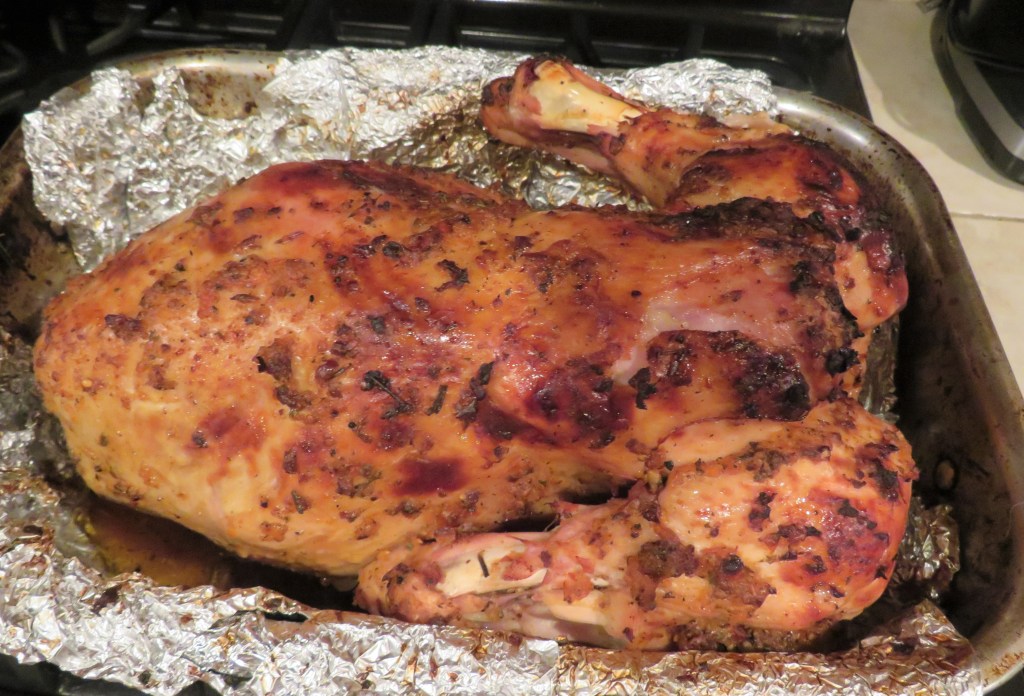
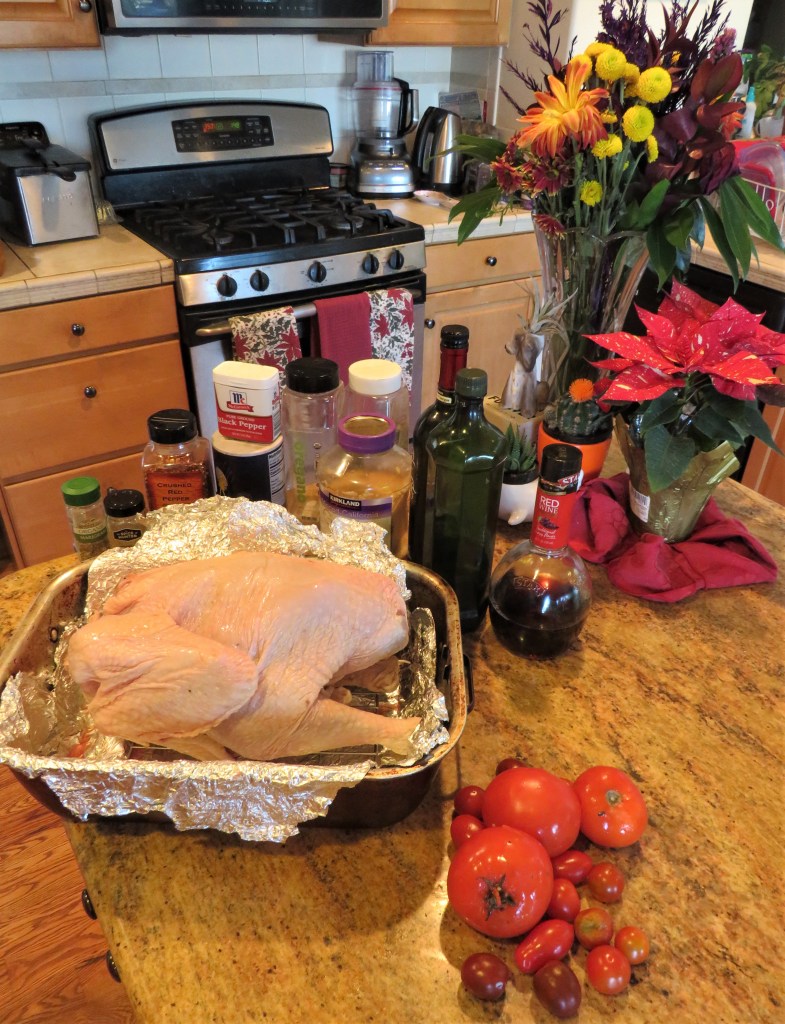
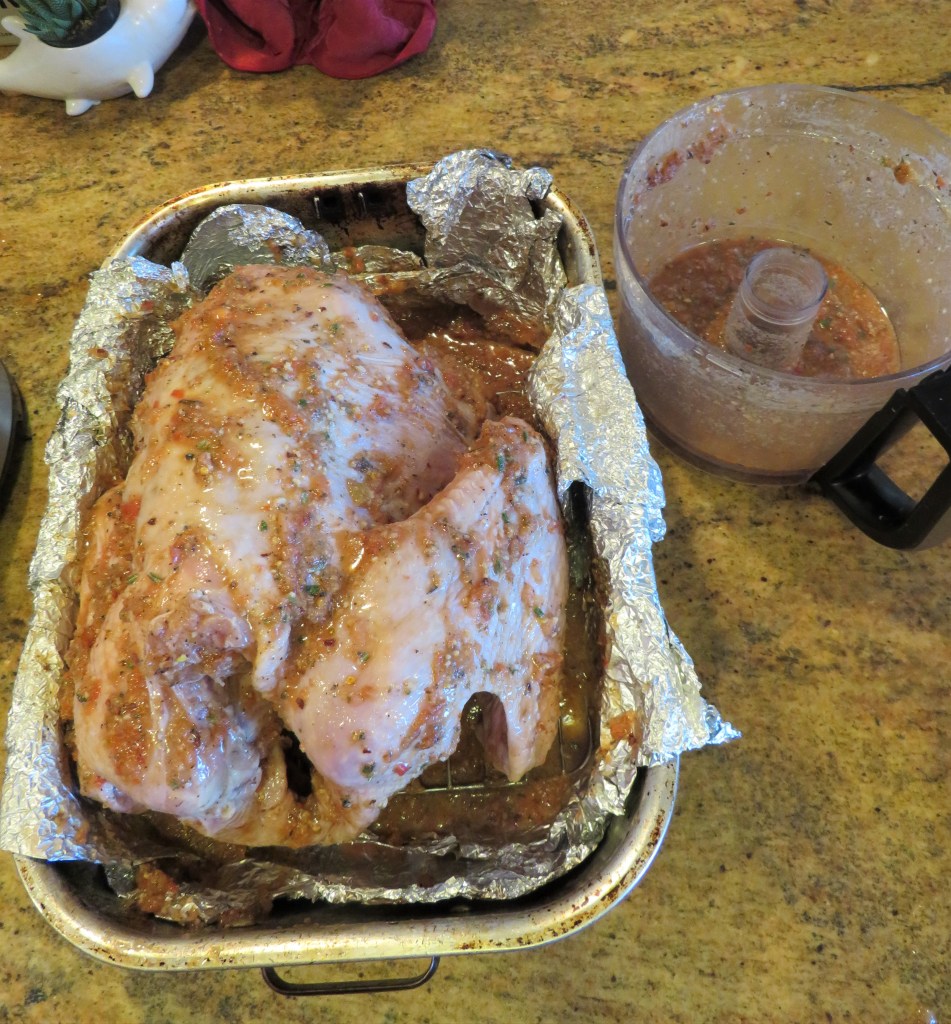
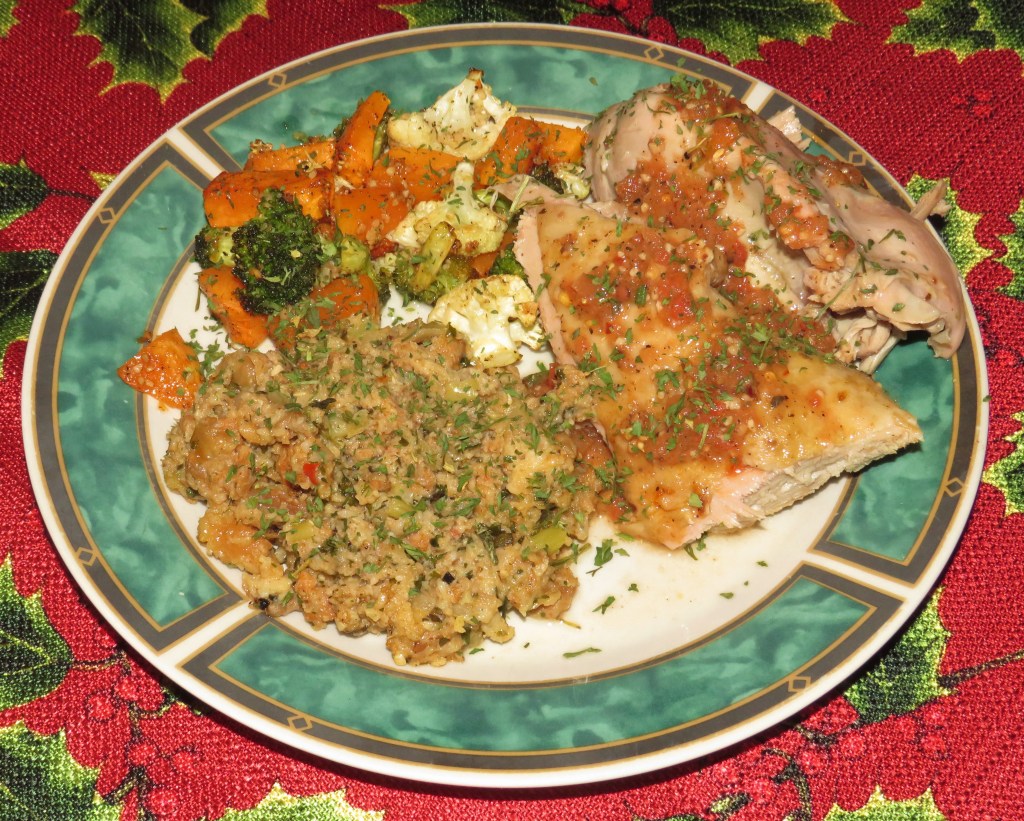
We stocked up on turkeys when the prices were down. So this makes our second turkey in just a couple of weeks. Our first turkey, of course was for Thanksgiving. Larry smoked that one. I made this one Italian style by cooking it in a tomato-herb vinaigrette. I decided to make an Italian tomato turkey for a couple of reasons. 1) I always love trying something new. 2) I love all kinds of Italian foods. and 3) I had some tomatoes that needed to be used.
This was only a partial turkey though. We used the breasts for our bacon wrapped turkey that I marinated in a chipotle lime sauce for our party. Another Fun Party
I made my vinaigrette first, then poured it over the turkey and roasted it all together. The house smelled just heavenly and the turkey was so tender and juicy and full of flavor. I used a combination of both fresh and dried herbs for the tomato vinaigrette. This vinaigrette is perfect for both a marinade as well as for a salad.
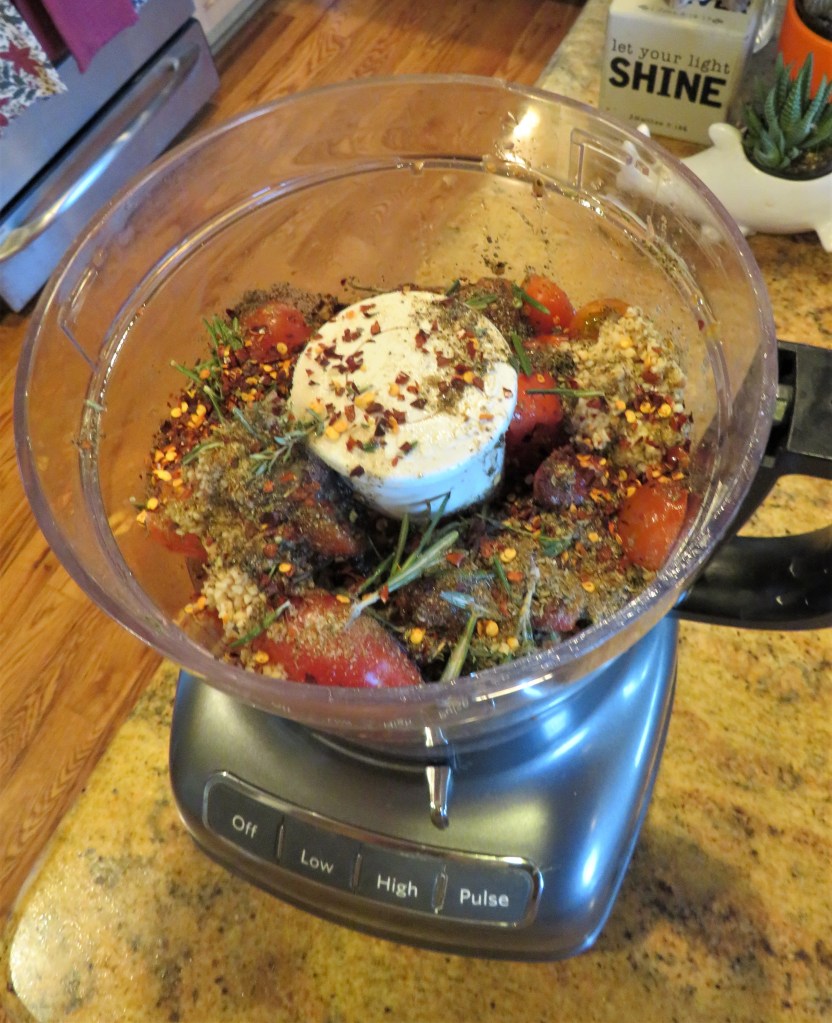
Tomato Herb Vinaigrette
1 1/2-2 lbs tomatoes
1-2 TBSP garlic
4-5 TBSP red wine vinegar
2-3 TBSP lemon balsamic vinegar, optional
salt & pepper to taste
1/3 cup olive oil
1 tsp red pepper flakes, or to taste
2 TBSP mixed herbs of your choice
Place everything in a food processor and blend until it is a liquid and everything is blended together.
This time, for my herbs, I used what I had on hand, and it was a combination of both dried and fresh herbs. I had some dried basil and oregano, then threw in some fresh rosemary and thyme. I have found the best ratio for dried vs fresh herbs is about 1:3. For every tsp of dried herbs, it is about 1 TBSP of fresh herbs. We eat a lot of tomatoes. So far I haven’t found a tomato I didn’t like, which means, I almost always have a variety of different tomatoes on hand at any given time too. So I love to mix and match my tomatoes.
Once the marinade is made, pour most of it all over the turkey, or chicken, and reserve some for later.
Preheat the oven to about 350* F or about 190* C. Cover the turkey in foil and roast for about 2 hours. Remove the foil and continue to roast, uncovered, until the internal temperature of the turkey reaches 165* F or about 75* C. Allow the turkey to cool for a few minutes before slicing. When serving the turkey, add a bit more vinaigrette on top. It was almost like a second Thanksgiving, because we still had a little dressing left and then I roasted up more vegetables to serve with it. (I still have about 1/2 of the big pumpkin left, so there is still more pumpkin in our future). 🙂
There are countless ways to cook a turkey, but I have to admit, the old fashioned way of roasting it in the oven is still my favorite way, by far. I just find it is always juiciest when roasted properly in the oven. We smoked our turkey for Thanksgiving, and it was very good, but I also thought it was a bit dry.
I made some herbed olive bread too, but I started it too late, and it was still in the oven when Larry was ready to eat. So, I had some olive bread for dessert instead. 🙂 More on the herbed olive bread later.
Happy Holidays Everyone. Stay safe and stay well. ‘Til next time.