Lamb Kebabs with Honey-Mustard-Tarragon Sauce

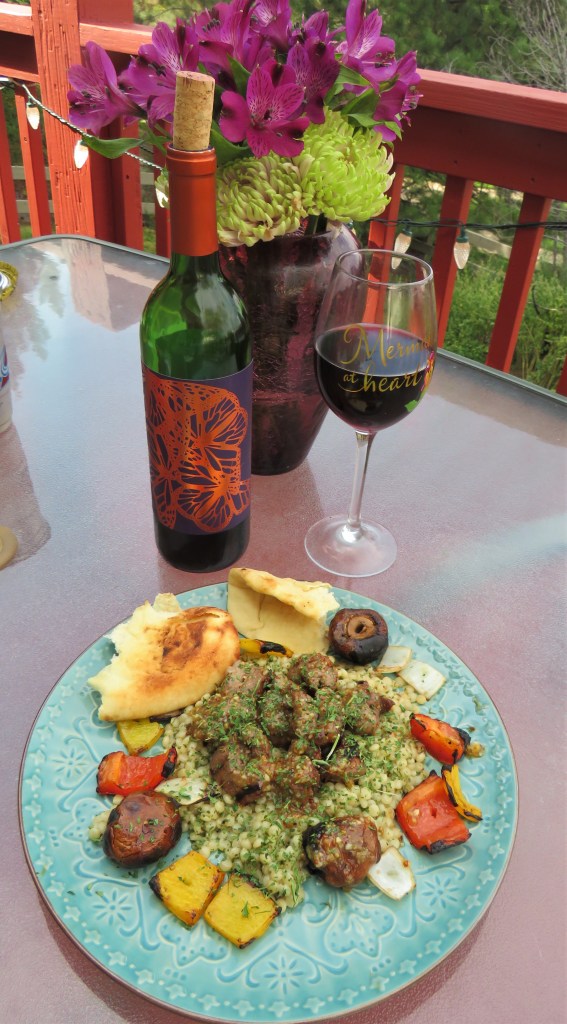
Since most of the meals I cook are for just the two of us, and we tend to buy our meats in bulk, you will often see the same meat cooked in a different way shortly after the first time around. Last time I made lamb, I made it as a Moroccan or Middle Eastern lamb tagine Lamb And Vegetable Tagine. But I still had lamb down that needed to be cooked, since we didn’t freeze it. This time I turned them into kebabs. I marinated my lamb cubes in a honey-mustard-tarragon sauce. They were so good and so tender. They just melted in our mouths. I served it over couscous with the grilled vegetables on the side, some warmed pita bread and a smooth, silky red blend. It was a perfect Mediterranean meal.

The word kebab means to roast. Kebabs have been around since at least the 14th century. It is believed they originated in Turkey, when soldiers used to grill chunks of freshly hunted animals skewed on swords on open field fires. However they are traditional all through North African and Middle Eastern Countries and many Asian countries as well. Kebabs or kabobs are the same thing, but depending on where they are coming from, they are spelled differently. Kebabs, with an “e” are usually from Arabic speaking countries whereas kababs with an “a” are usually from Armenia or Iran. I will eat them from wherever. I love them no matter where they come from or how they are spelled. πŸ™‚

Lamb Kebabs with a Honey-Mustard-Tarragon Sauce

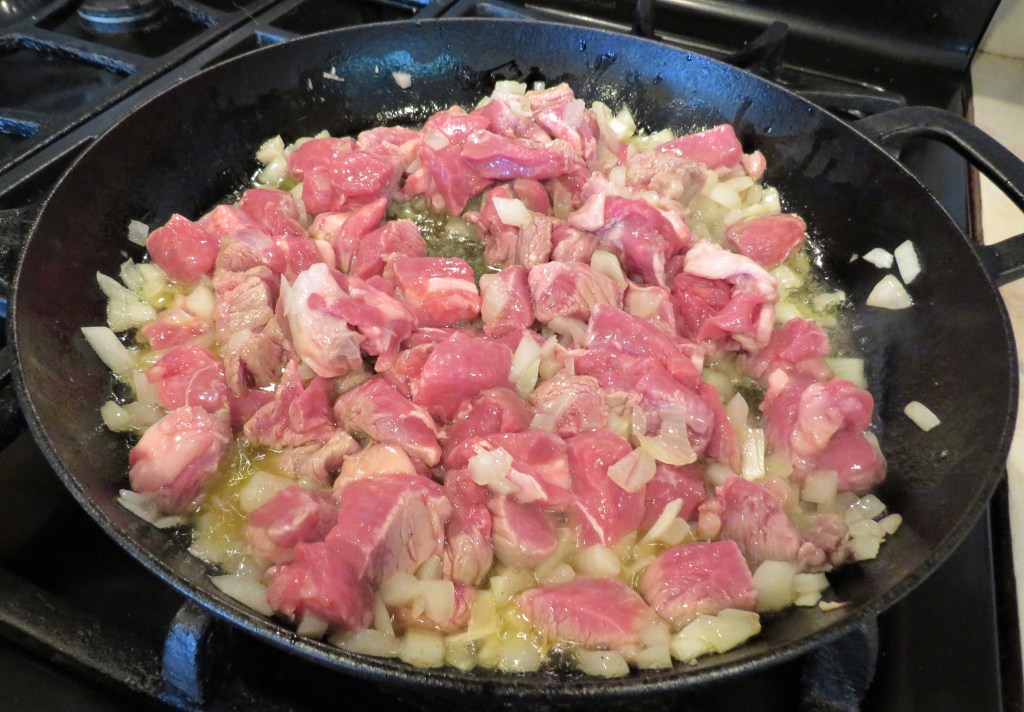
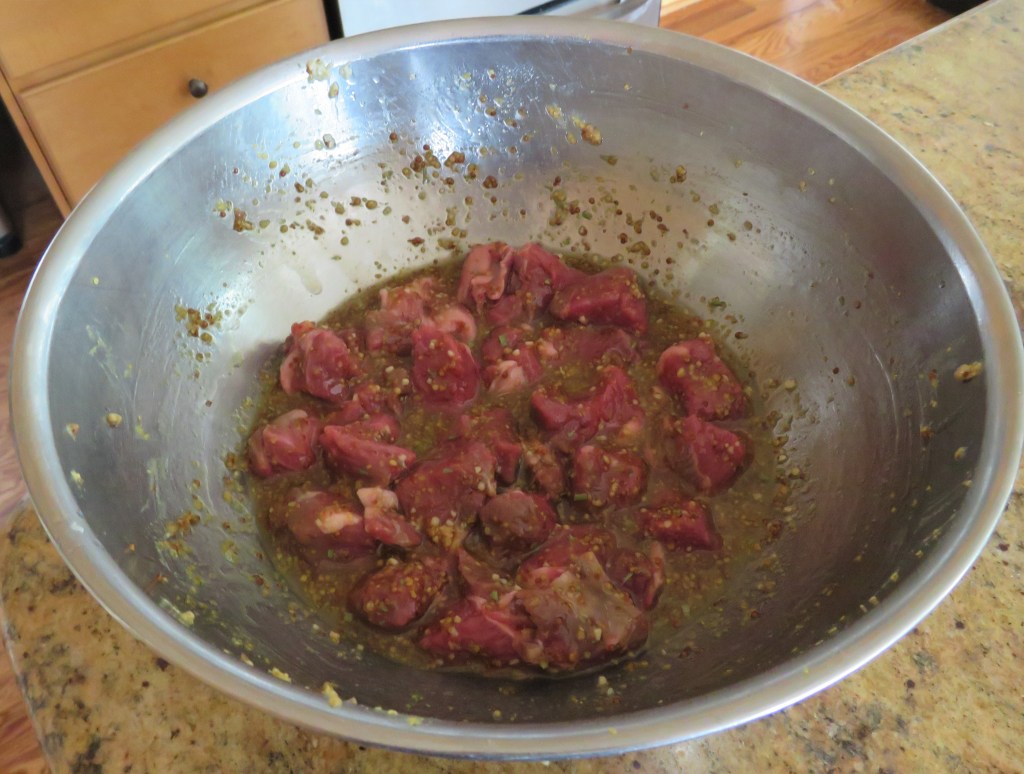
The meat is the base, but it is the sauce that makes the dish really special. This time I marinated my lamb in a honey-mustard-tarragon sauce, and boy, did it really give the lamb a great flavor.

1 1/-2 lbs lamb, cubed

3 TBSP Dijon mustard

2-3 TBSP honey

2-3 TBSP white balsamic vinegar

1-2 tsp dried tarragon or 1-2 TBSP fresh tarragon

1 TBSP garlic

Mix everything together well, then add the lamb cubes and marinate in the refrigerator for at least 4 hours before cooking.

When the lamb is ready, skewer it, top with a little more of the marinade and grill it up for about 5-7 minutes then flip and continue to cook for an additional 5-7 minutes on a hot grill.

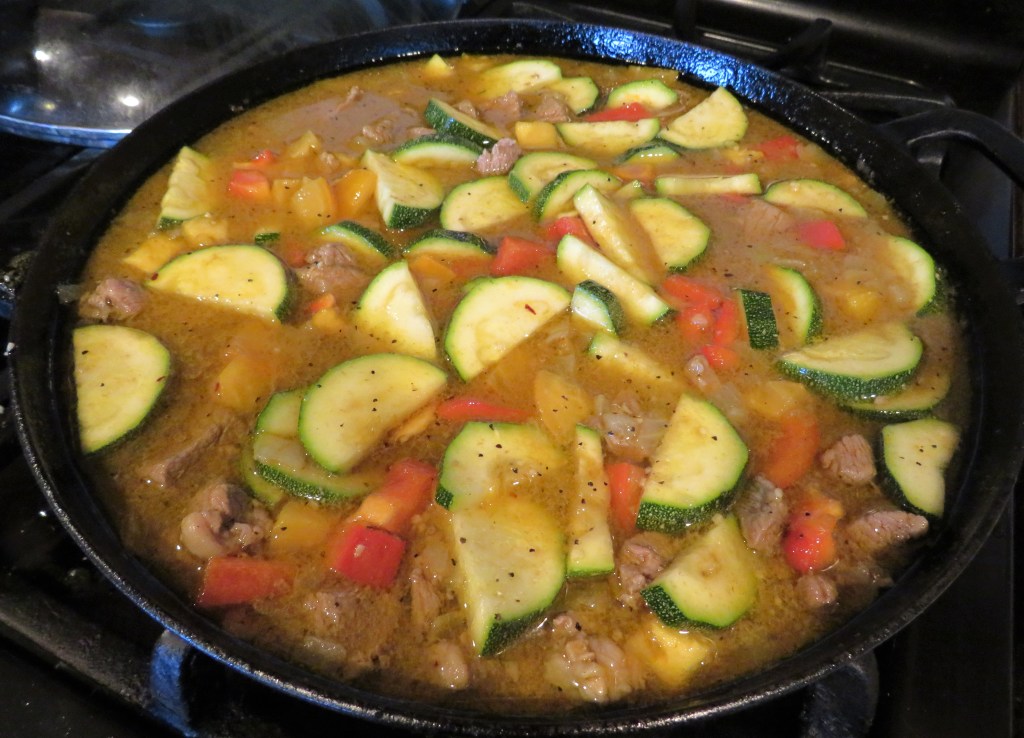
I also skewered up some peppers, mushrooms and onions and grilled them as well. I marinated the vegetables in a simple balsamic vinaigrette and placed them on the grill first. The vegetables take longer than the meat to cook.

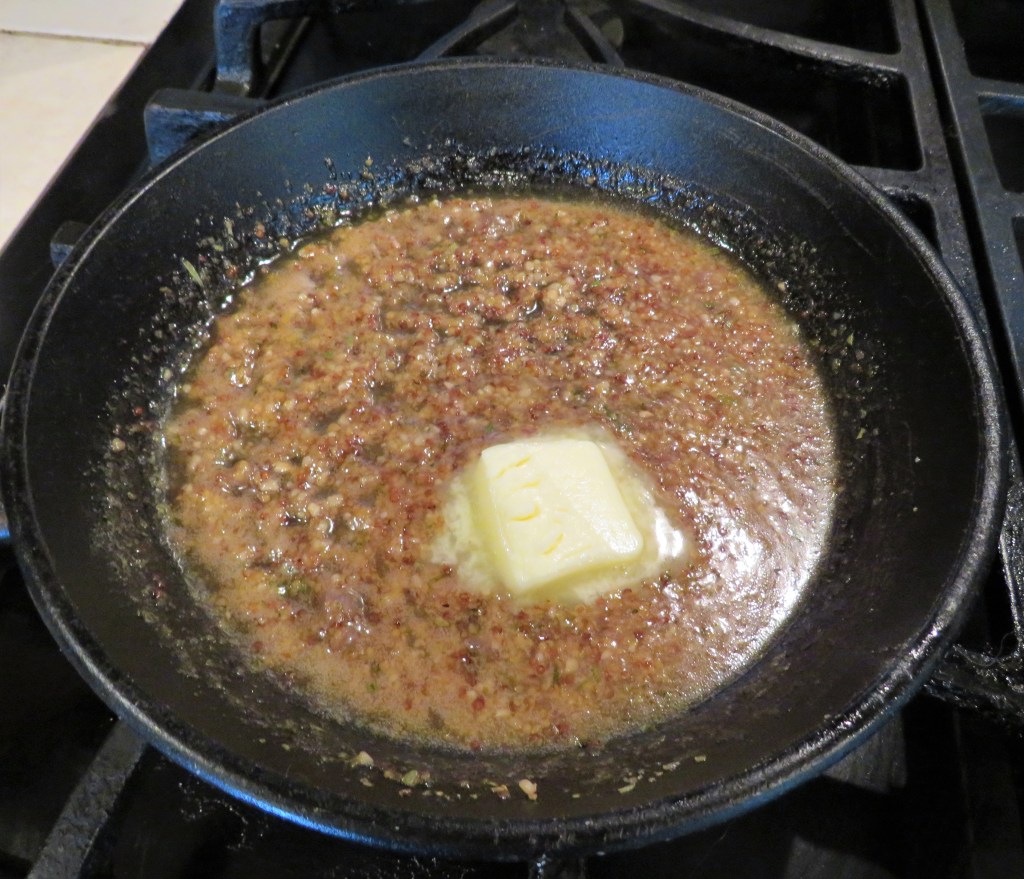
Reserve some of the marinade to top the cooked meats with later. Bring it to a boil, then reduce the heat to a simmer and continue to cook for about 10 minutes, stirring occasionally. At the very end, you can add a dollop or two of butter to finish the sauce if you like.

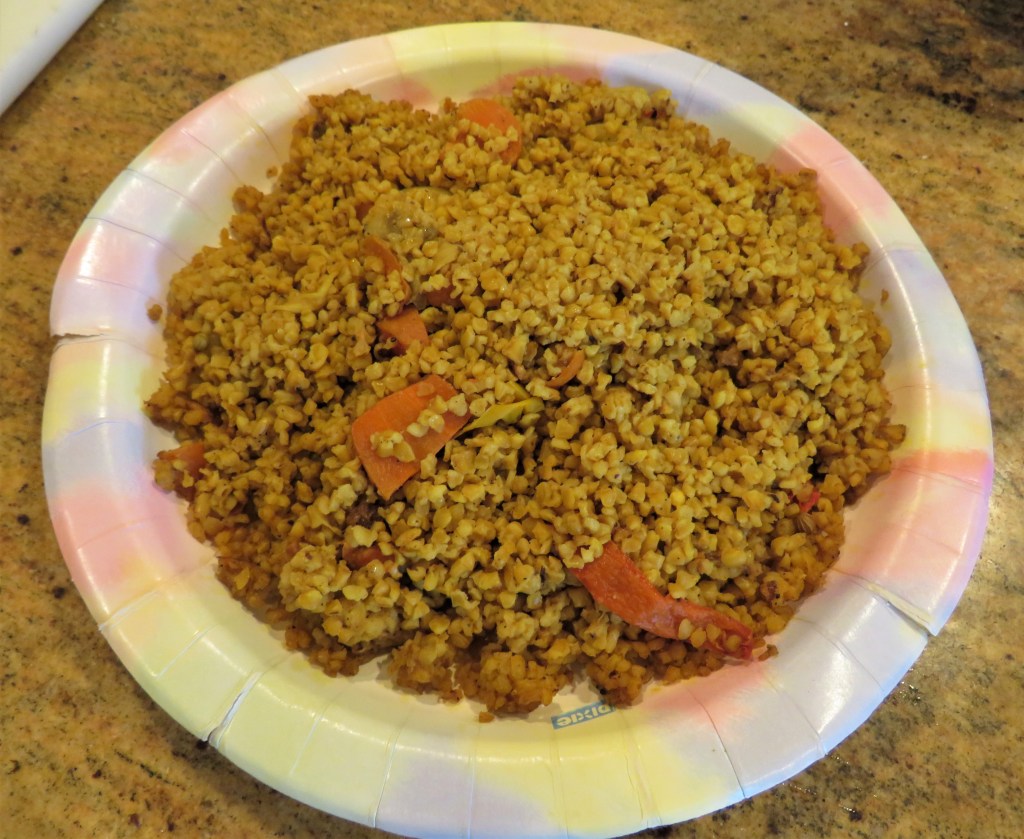
Serve everything over rice or couscous and voila! I like the pearled couscous better, though I often use the smaller couscous as well. Both are delicious. They have very different tastes and textures.

This is a very tasty and healthy dish that only takes a few minutes to prepare and cook.

Have a great day and make everyday great. Stay safe and stay well. ‘Til next time.

Nana’s Creole Italian Table

I am most definitely a free-association thinker. I will be thinking of one thing, and then that will take a turn that will lead me to another direction, then something else will turn my direction once again, and so on and so on, until eventually I get back to my original thought. This happens all the time. This is just how I think, how I cook and how I operate. It’s just who I am. πŸ™‚ I bring this up because this is how I was lead to the discovery/purchase of yet another fun cookbook, Nana’s Creole Italian Table, by Elizabeth (Liz) Williams.

I was doing some research on something, I don’t even remember what I was originally looking into, that lead me to a website about the Southern Food & Beverage Museum in New Orleans, founded by Liz Williams. The website is really cool, and I would absolutely love to go visit this museum if I am ever in New Orleans again; and I digress once again. πŸ™‚ The more I delved into the website, the more cookbooks I saw that I was interested in. You know, you can NEVER have your last cookbook. And yet again, one thing lead to another, and I now I have yet another fabulous new cookbook adorning my ever growing and overflowing bookshelves.

Even when I ordered the cookbook, I must have been distracted, because I thought I could just order it and have it delivered to me. But then I received an email stating my book was ready for me to pick up. Well, I live in Denver and the cookbook was in New Orleans, so that wasn’t going to work. I reached out to Liz Williams and explained the situation, and she was so sweet and so kind. She said no problem, and she would send me the book. My lack of ability to focus actually worked in my favor though, at least this time, because I received an autographed copy of the book that I would not have received otherwise. So I guess sometimes it pays to be a bit of a space cadet. πŸ™‚

And I have already made something from it, which was just a slight variation of what I was going to make anyway. I made pesto for my pasta, but I made my pesto with some influences from Nana. Of course I still did my own thing, and I added lemon olive oil and lemon balsamic vinegar, instead of just lemon zest. One of the ideas that Liz stated in her book, though, was how recipes evolve, from one household to another, from place to place. Recipes certainly evolve in my kitchen too, that’s for sure. πŸ™‚

Nana’s Pesto

3 cups fresh basil

4 cloves garlic, minced

1/2 cup grated Parmagiano cheese

1/3 cup toasted pine nuts or almonds

1/2 tsp lemon zest

3/4 cup extra virgin olive oil

salt to taste

Add everything to the food processor and process until it is a liquid.

My recipe, is very, very similar, though, I confess, if I am cooking, I never measure anything. I only measure if I am baking. And I did not use lemon zest this time, but instead I used lemon olive oil and lemon balsamic vinegar, as well as quite a bit of fresh ground black pepper. These very simple and subtle changes are the changes that transform recipes into your own recipes. Start with the basics and then re-create from there. No need to constantly reinvent the wheel, or in this case, the recipe.

And my pesto pasta dish for last night’s dinner.

As Liz wrote to me, ” Mangia bene!” or eat well.

If you would like to visit the Southern Museum of Food & Beverage, it is located at 1504 Oretha Castle Haley Blvd., New Orleans, LA 70113 (Directions) | P: (504) 569-0405 | F: (504) 587-7944. You can call or visit their website too at https://www.sofabinstitute.org/

Have a great day and make everyday great. Laissez le bontemp roulez! Stay safe and stay well. ‘Til next time.

Cappuccino Cookies

Cookies and coffee. WOW! What a delicious combination. These are grown up cookies for sure. These are sandwich cookies with coffee in the cookie dough and a cappuccino flavored whipped cream filling in between. Oh they are so yummy. They are not overly sweet, so they are perfect to pair with your cup of morning joe too.

Cappuccinos became popular in the United States in the late 1980’s, giving many Americans the impression that they were a “new drink”. However, cappuccinos have been around in Europe since the late 1700’s. Cappuccinos first popped up as the ‘Kapuziner’ in Viennese coffee houses in the 1700s. A description of the ‘Kapuziner’ from 1805 described it as “coffee with cream and sugar,” and a description of the drink from 1850 adds “spices” to the recipe. But the word β€œcappuccino” has nothing to do with how the beverage is made and instead refers to its distinct light brown color. Though the name cappuccino is an Italian word for coffee that coffee lovers around the world are familiar with, when the cappuccino drink was first introduced in Italy,Β it was named after the Capuchin friars because the color of the espresso mixed with frothed milk was similar to the color of the Capuchin robes they wore. The name, whimsical in a world of utilitarian coffee-drink names, stuck; we borrowed it into English in the late 1800s. For the most part, contemporary cappuccinos are made with espresso, steamed milk, and foamed milk. However, in some parts of the world, cappuccinos are still made more like Viennese Kapuziners, complete with whipped cream and other additives.Β 

In the United States, people drink cappuccinos at all times during the day. But in Italy, they are only enjoyed in the morning hours, before 11:00 AM. It is just a deep-rooted generational concept that Italians have held onto for centuries, with no real reasoning behind it, or at least none that I can see. In recent years, some European cappuccino customs have changed. Most notably, some Europeans (particularly those in the U.K., Ireland, the Netherlands, Germany, Belgium, France, and Spain) have begun to drink cappuccinos throughout the entire day rather than only in the morning. Now, cappuccinos are popular at cafes in the afternoon and at restaurants after dinner.

When we think of cappuccinos, we automatically think of a steaming hot cup of coffee made with milk. But today, it can also mean something that is made with and/or coffee flavored too. When I made my cappuccino cookies, I added coffee in both the cookie dough and in the whipped cream filling.

Cappuccino Cookies

These cookies are supposed to be small bite-sized cookies but those just weren’t good enough for my taste. So I quadrupled the recipe, which still only gave me about 3 dozen, but at least they were normal sized cookies, and not just the little tiny teasers they were supposed to be. πŸ™‚

3 cups flour

4 TBSP finely ground coffee crystals or espresso, divided

3 sticks of softened butter

1 cup powdered or confectioner’s sugar

1 tsp vanilla

1 1/3 cup heavy whipping cream

10 oz chocolate chips

cocoa powder and powdered sugar for dusting

Combine the flour and 1/2 the espresso together and mix well.

Mix the butter and powdered sugar together until creamy, then add the vanilla. Add the flour and coffee mixture until everything comes together to form a dough. Wrap in plastic and set in the refrigerator for at least 30 minutes before rolling out and cutting.

When you are ready to bake them, preheat the oven to 350* F or 190*C. Line your cookie pans with parchment paper.

Roll the dough in between two sheets of parchment paper to about 1/8″ thick.

Drop about 1 tsp of the dough on to the prepared cookies sheets, about 1 inch apart, and roll in to a ball. Lightly press with your hands or fingers and bake for about 10-15 minutes or until the edges are lightly browned.

Allow the cookies to cool for about 5 or so minutes before removing them and placing them on a baking rack to cool completely.

Make the coffee cream by bringing the cream to a scalding boil, then pour it over the chocolate chips. Mix together until it is smooth and creamy. Add the rest of the espresso or coffee, and mix thoroughly. Refrigerate for about 4 hours, then beat on high until it forms into stiff peaks.

I had some left over coffee cream from when I made cappuccino brownies Cappuccino Brownies that I added to the mix as well. In case you needed reminding, I am “The Queen of Leftovers” after all. πŸ™‚

When the filling is ready, spread it onto the bottom of one cookie, then place another cookie on top, bottom side down on the filling, to form a sandwich.

When the cookies are all filled, add the cocoa powder to a sifter and do a light duting over the cookies. Do the same with the powdered sugar.

Refrigerate for at least about 30 minutes for the cream filling to set before serving, then watch them quickly disappear. They’ll be gone before you know it.

Have a great day and make everyday great. Stay safe and stay well. ‘Til next time.

Black Forest Cake

Chocolate and cherries!!!!! Again, one of those famous combinations that is perfectly paired together. Chocolate and cherries are some of my favorite combinations, though, I do have quite a few, mostly something else that is paired with chocolate too. πŸ™‚

I had cherries and I had chocolate, so what did I do with them? I made a Black Forest Cake of course.

There is one belief that the cake can be traced back to the 1500s, back when Europe first saw chocolate being available. The story goes that it was created in Germany’s Black Forest, a region known for its sour cherries and kirschwasser (a brandy made with cherries), but that is just speculation. It is also believed that it was invented in the early 1915-1927 years, with more than a few German pastry chefs laying claim to it. The only thing that we can actually agree on is that it did originate in the Black Forest region of Germany, Β where it is known as SchwarzwΓ€lder Kirschtorte. The dessert is named after the specialty liquor known as SchwarzwΓ€lder Kirsch(wasser) of the Black Forest mountain range in southwestern Germany which gives the dessert its distinctive flavor

A black forest cake is a chocolate cake with cherries either in the batter, as a filling, or both and it’s usually covered in whipped cream and chocolate ganache. As with anything, especially something that has been around for a long, long time, there are many different variations. There is always more than one way to make a delicious cake. πŸ™‚

Black Forest Cake

1 3/4 cups flour

3/4 cups cocoa powder

1 3/4 cups sugar

2 tsp baking soda

1 tsp baking powder

1 tsp salt

1/2 cup canola oil

2 large eggs

3/4 cup sour cream or yogurt

1/2 cup buttermilk

1 tsp cherry extract

1 tsp vanilla

Preheat the oven to 350* F or 190* C,

Spray two 9″ or two 10″ springform cake pans with cooking spray and line the bottom of each pan with parchment paper.

Mix all the dry ingredients together and set aside.

Beat the oil and eggs together until creamy, then add the vanilla and cherry extract. Add the flour mixture 1/2 at a time, mix, then add 1/2 the sour cream, mix, and 1/2 the buttermilk and mix. Repeat until all the ingredients are incorporated into the batter.

Divide the batter, pouring 1/2 in each prepared pan. Spread the batter out evenly in the pans.

Bake for about for about 30 minutes, or until the center is done and a toothpick comes out clean when inserted in the middle.

Allow the cakes to cool completely before removing them from the pans and removing the parchment paper from the bottoms.

Make the whipped cream frosting and the cherry filling, then completely cover 1 cake with the frosting and add the cherries. Top with the other cake, and cover completely with the whipped cream frosting again.

The Whipped Cream Frosting

2 cups heavy whipping cream

1/4 cup powdered sugar

1 TBSP cherry extract, optional

Mix everything together until the cream forms into stiff peaks, then spread evenly over one cake. Add 1/2 the cooked cherries. Add the other layer of cake, and frost again.

Cherry Filling

I used fresh cherries, but you can also used canned cherries in heavy syrup.

4 cups cherries cut in half and pitted or 2 15-oz cans of dark sweet cherries in heavy syrup

water for the cherries

2 TBSP cherry liqueur or Kirsch

1 cup sugar if using fresh cherries

Put everything together in a heavy sauce pan, bring to a boil, then reduce the heat to a simmer and continue to cook for about 20-30 minutes, stirring occasionally. Let the sauce and the cherries cool completely and this will also help thicken the sauce a bit too.

Chocolate Ganache

1 cup heavy whipping cream

4 oz semi sweet chocolate chips

1-2 tsp cherry extract, optional

Bring the cream to a scalding boil, then immediately pour over the chocolate. Add the cherry extract, and fold together until it is smooth and creamy and all the chocolate is melted.

Pour the ganache over the top of the cake and let it drip over the sides. Add the remainder of the cooked cherries in the center. I added some of my extra whipped cream as well.

Let the cake set in the refrigerator for at least 30 minutes before slicing and sharing with friends. This cake is decadently delicious. I guarantee you are going to absolutely love it!

Have a great day and make everyday great. Stay safe and stay well. ‘Til next time.

Food Is A Culture

We all know that food is important to everyone, no matter who we are or where we come from. It is part of who we are. We use food for all occasions, whether happy or sad. It is a way for us to connect with others like nothing else. We eat when we are happy. We eat when we are sad. We cook for those we love. Food brings great comfort to all of us in our times of need. Food is life.

Here are some food quotes from famous people, foodies and non-foodies alike, that will help explain this even more.

Food for us comes from our relatives, whether they have wings or fins or roots. That is how we consider food. Food has a culture. It has a history. It has a story. It has relationships.

Winona LaDuke, Native American activist, economist and author

Food is a symbol of love when words are inadequate.

Alan D. Wolfelt, Ph.D., Grief Counselor

I watch cooking change the cook just as it transforms the food.

Laura Esquiviel, Mexican author and and cookbook author of Like Water For Chocolate, which was turned into a fabulous movie that is a must see for anyone who is a food lover. It’s an OLD movie, dating back to maybe the 1980’s or 1990’s, but if you can find it, it’s well worth it. Even today, it is still one of my favorites.

Alice Waters, Cookbook author, Chef and owner of Chez Panisse Restaurant. I actually have a couple of her cookbooks.

Heston Blumenthal, British Celebrity Chef and TV personality.

Have a great day and make everyday great. Stay safe and stay well. ‘Til next time.

Southwestern Baked Beans

As you all know, I LOVE food; all kinds of foods from everywhere and all cultures. I also LOVE to travel, but traveling isn’t always as easy to do as cooking, so I travel through my food by cooking all different kinds of ethnic foods from all over the world, from every region.

Yesterday, I took you to the Middle East with my lamb and vegetable tagine Lamb And VegetableΒ Tagine. Today, I am back here at home, in the American Southwest, one of my favorite stops. Today I give you some Southwestern baked beans.

Baked beans are an American tradition, and there are so many different versions, all with their own unique characteristics. This particular version is baked beans with a bit of kick, just the way I like them too.

Southwestern cooking is a blend of Mexican, Native American and Cowboy influences that all come together perfectly to create its own style. Southwestern cooking is a time honored tradition of flavors that usually cooks things very slow. If you lead a busy life, as most of us do, we don’t always have the time to really cook in the traditional Southwestern style. Lucky for us, the slow cookers were invented to help alleviate some of the stress without compromising any of the flavors.

Chilies are a HUGE part of Southwestern cuisine, and there are many different varieties of chilies available too. And they all come in a variety of different forms. Jalapenos are a staple in our house. I use them all the time. Chipotle chilies are also kept in my pantry at all times. I also use a wide array of different dried chilies as well. These are my favorites, though I often use many other kinds of chilies too. When cooking with fresh chilies, the seeds are the part that contain most of the heat, so unless you want to set your mouth on fire, and many people do, I highly recommend removing the seeds before working with chilies. And be extra careful NOT to touch your eyes or face after. I tell you this from lots and lots of experience, though I still forget most of the time too and regret it after. πŸ™‚ Also when cooking with chilies, fresh chilies get milder as they cook with time, but dried chilies like the heat, and the longer they are exposed to the heat, the higher their intensity level.

Other Southwestern staples include different kinds of cheeses, salsas, herbs, tortillas, beer, and of course beans. You can pretty much turn any dish into a Southwestern dish by adding any or all of these ingredients.

Many cultures eat a lot of beans, and there are many different bean recipes from all over the world, however, beans are a must for Southwestern cuisine. For most recipes, canned or dried beans are interchangeable. Obviously there are differences between the two, like canned beans are easier to use and require a lot less time, but they did not hold up their consistency, especially when slow cooked. Dried beans usually require a long soak, preferably overnight. But both options will add a heartiness and depth to whatever recipes you add them to.

Southwestern Baked Beans

This version of baked beans is very similar to Cowboy Beans, and has just enough heat to wake up the flavors and energize your meal a bit.

This time I made mine with Anasazi beans, but you can use any kind of dried beans you like. Each variety will bring something new to the recipe and to your table.

1 lb dried small beans of your choice

1 TBSP white vinegar

Cover your beans with enough water to completely cover them, add the vinegar and cover tightly. Let the beans soak overnight. When ready to use, drain and rinse well.

4-5 slices bacon, cut into 1 inch pieces, cooked

3-4 chipotle chilies with sauce, diced fine

1 onion, diced medium

1 jalapeno, diced fine

1-2 TBSP garlic

1/2 cup ketchup, though you could substitute salsa too

1 12-oz can of beer, any variety

1/4 cup firmly packed brown sugar

1 TBSP Dijon mustard

1 tsp cumin

salt & pepper to taste

2 TBSP fresh oregano or 2 tsp dried oregano

2-3 TBSP fresh cilantro, chopped

1 tsp chili powder

2 1/2 cups water

Combine everything together and mix well, then pour into the slow cooker and cover with the water.

Cook on high for about 4-5 hours, stir, then lower the temperature to medium-low and continue to cook for an another 3-4 hours. Your beans will be tender and most of the liquid will have evaporated and the whole house will be smelling oh so good.

When everything is cooked and ready, served it alongside your favorite Southwestern meal, though you can serve it along side anything, and it will instantly turn the whole meal into a Southwestern delight. I made chicken and vegetable enchiladas and rice. I topped my rice with the beans and a few avocado slices. !Esta mui delicioso!

Que tengas un gran dia y haz que todos los dias sean geniales or have a great day and make everyday great. Stay safe and stay well. ‘Til next time.

Nature Walks – Pretty In Pink

This has been one of the wackiest summers I can remember. The first part of summer was cool and very wet. We had so much rain, which made everything so green and lush and all the flowers came to life in abundance. Then it got EXTREMELY hot, though we would still have afternoon rain and showers, often mixed with thunder and lightning. Here it is August now, and we are still very green. This is almost unheard of, but I am NOT complaining, not one little bit. I love how green and lush everything is. And I love all the colorful flowers too.

Today, I am sharing some of pretty pink flowers that I’ve seen, blooming in all their glory.

Color your world pink today and have a great day. πŸ™‚

Lamb And Vegetable Tagine

The other day our neighbors Hanaa and Aziz brought over some Lebanese farro. I wanted something delicious and Middle Eastern to go with it and we had lamb out, so I made a lamb and vegetable tagine to go with the farro. I also sent some back to Hanaa and Aziz as a way of saying thank you for their generosity and thoughtfulness.

The history of the tagine. Due to its ancient nomadic origins, the tagine dish is from Berber cuisine. However, over the centuries, the dish was influenced by different civilizations including Arab, Moorish and Ottoman and became one of the most emblematic dishes of Moroccan cuisine. In general terms, the dish tagine contains a choice of protein, vegetables, fresh herbs, spices, dried fruits, and nuts. There is nothing unidimensional about tagine, either β€” sweet and savory flavors often mingle with rich, earthy aromas in this appetizing stew.

A tagine is an important part of Moroccan cuisine and has been a part of the culture for hundreds of years. The word tagine actually has two meanings. First, it refers to a type of North African cookware traditionally made of clay or ceramic. The bottom is a wide, shallow circular dish used for both cooking and serving, while the top of the tagine is distinctively shaped into a rounded dome or cone.

Second, the word tagine also refers to the succulent, stew-like dish which is slow-cooked in the traditional cookware. Typically, a tagine is a rich mixture of meat, poultry, or fish, and most often includes vegetables or fruit. Vegetables may also be cooked alone in the tagine.

Most people agree that the tagine’s origin dates back to the late 18th century when Harun al Rashid ruled the Islamic Empire. However, there is another school of thought that the use of ceramics in Moroccan cooking is probably of Roman influence; Romans were known for their ceramics and likely brought that tradition to their rule of Roman Africa. Either way, the first appearance of recipes cooked tagine-style appeared in the 9th century in the publication The Thousand and One Nights.

This is the farro that Hanaa made, or at least I think she called it farro. It certainly looks like farro too, but I am not as up-to-date on all my Middle Eastern grain varieties as I should be.

Lamb and Vegetable Tagine

3 TBSP olive oil

2 TBSP lemon olive oil, optional

1 1/2-2 lbs lamb, cubed

1 onion, diced medium

1-2 TBSP garlic

1 tsp cumin

1-2 tsp turmeric

1 TBSP ginger

1 zucchini, sliced

1 red bell pepper, diced medium

2-3 large tomatoes, diced

2 TBSP lemon juice

salt & pepper to taste

red pepper flakes to taste, optional

lemon verbena and/or mint

I have never actually cooked in a tagine, so I am not even going to try to give cooking directions for that. But I do use a skillet everyday, so I will tell you how to cook it all in a skillet.

Get a large skillet very hot and add the oil(s) then add the onions and cook for about 2-3 minutes, or until they start to soften.

Add the lamb and cook for about 5-7 minutes, or until the lamb browns lightly, stirring frequently.

Add enough water to cover the lamb and onions, bring to a boil, then cover and reduce the heat to a simmer and continue to cook for about 1 1/2 hours, stirring occasionally.

When the lamb has cooked and is tender, add the vegetables and spices, and more water if needed.

Let everything for about 15 minutes, at a slightly higher temperature. Add the mint and/or lemon verbena right at the very end of the cooking process. Drizzle lemon juice over the top and stir in right before serving.

You can serve it as is, like a stew, or you can serve it over rice, farro or other Middle Eastern grains, or potatoes. Either way, this is a delicious one-dish meal that you’re going to love. You can change the vegetables around too. I was going to add eggplant, but my eggplant wasn’t looking so good, so it got tossed, into the bin and NOT my dish.

Have a great day and make everyday great. Stay safe and stay well. ‘Til next time.

Juneau And The Squeaker

This post is totally different than most of my other posts. It is more of a PSA and is about dog safety. It is NOT about food at all. It is about my Juneau or my Juni Bug.

She is OK now, and is now once again at home, but yesterday was a very scary day for us, again.

Juneau, like most dogs, loves her toys. But unlike most other dogs, Juneau doesn’t just play with her toys; she DESTROYS them, and then eats the insides and eats the squeakers. Unfortunately, Dorrie is proving to be the same way. SO NO MORE TOYS in our house anymore.

We think this was the culprit. As you can see, Dorrie completely killed the pig. Unfortunately though, the pig almost got Juneau in revenge too.

This is NOT the first time this has happened either. This is the second time we’ve been in this situation with Juneau. And she is only 2 1/2 years old. Both times, the squeaker got lodged between her duodenum and her small intestine, requiring major surgery. This time, it was slightly better than last time, since they did not have to remove any of her small intestine. Last time, they had to remove 8 inches of her small intestine.

Our regular vet does not have the capacity to keep animals overnight, so we picked her up from them once she was out of surgery and had to take her to an ER vet overnight, so they could watch and monitor her.

I got a call from the ER vet this morning, around 8:00 AM. They told me she had a very good night, but did NOT want to be there any longer. She removed her catheter on her own, had eaten some earlier and could I come and bring her some chicken. If she ate again, she could come home. The doctors wanted to make sure she was eating consistently and was doing OK before releasing her.

She definitely wanted to come home, and she ate the whole can. She even finished off this little bit.

At first, we thought we had removed all dangerous stuff and she would be OK with toys as long as we were watching her and removed all things dangerous once the toys had been attacked.

We also weren’t too concerned at first, because Juneau is a very picky eater, and it is a regular thing for her to skip meals, especially if she is “bored with her food”. But when she hadn’t eaten in a couple of days, we got very concerned. She was even turning down her cookies, and she LOVES her cookies, again just like her mommy. That’s when we called our vet. She was eating a lot of grass and throwing up, trying to dislodge the culprit, but it was in too deep, and she couldn’t remove it on her own.

Juneau is home again now, and she is eating and moving on her own. These are very good signs indeed, however, we still have to keep an eye on her for the next few days, and we have her on meds and painkillers too. My message to all of you doggie parents though, especially if you have toy destructors like we do, is DON’T give them toys. We were VERY lucky, twice, but I definitely DO NOT want to go through this again, EVER! Your good, loving thoughts and prayers are very much appreciated by Juneau and Larry and I. Thank you all so much. I hope Juneau’s story helps all of you doggie parents and all your fur babies.

Tuscan Styled Shrimp

If somethings has shrimp in the name, it’s a given I am going to like it. This is also pretty true for any most kinds of Italian food too. Preparing shrimp in an Italian way, well, that is definitely going to be a winner, no doubt about that. πŸ™‚

I made Tuscan styled shrimp, or at least that’s what I am calling it, and it was oh so good. I loaded it up with spinach, artichoke hearts, garlic, onions, tomatoes, mushrooms and of course lots of huge jumbo shrimp. Shrimp and seafood are not traditionally part of the Tuscan diet, as Tuscany is landlocked and plunged in the center of rolling hills, but today, anything goes. Traditional Tuscan food is more centered around meats, cheeses, wild game, and of course fresh vegetables and bread; all the foods that come from the land.

Tuscan styled foods are simple foods made in a light sauce, usually made with olive oil and/or broths. They are made using fresh, high-quality ingredients that bring out the natural flavors in each dish.Β They are made with fresh aromatic herbs and peppers, garlic, onions, tomatoes, lemons, legumes, just to name a few. All the foods I love. I cook this way all the time. Sometimes, they are referred to as “poor man’s food or cucina povera“. I must really like poor man’s food a lot, because, no matter what style I am cooking in, these are the dishes I tend to gravitate to the most.

Cucina povera became the way to cook in order to survive when Tuscany was a poor, rural area. With access to limited ingredients, Tuscans got creative in the kitchen to make the most of what they had by embracing a no-waste philosophy. The magic ofΒ cucina poveraΒ lies in the frugal Italian cook’s ability to transform humble ingredients from the Tuscan countryside into simple, flavor-packed dishes.

Tuscan Styled Shrimp

1 1/2-2 lbs large shrimp or prawns, peeled and deveined

4 cups baby spinach, stems removed

2 large tomatoes, diced

1-2 cups sliced mushrooms

1 can artichoke hearts, drained and cut in half

1 onion, diced

1-2 TBSP garlic

salt & pepper to taste

red pepper flakes to taste

1 TBSP capers

2-3 TBSP olive oil

2 TBSP lemon olive oil, optional

2 TBSP lemon balsamic vinegar, optional

1 cup dry white wine

1-2 cups chicken or vegetable broth

1-2 tsp basil

1-2 tsp oregano

1-2 tsp marjoram

Get a large skillet very hot, then add the olive oil and lemon olive oil, if using. Add the shrimp and cook until completely pink, about 2-3 minutes per side. Remove and set aside.

Saute the onions and garlic for about 2 minutes, then add the spinach and mushrooms. Cook for an additional 5-7 minutes, stirring frequently.

Add the wine and cook down for about 1-2 minutes, or until most of the liquid has evaporated. Then add the tomatoes, capers, chicken broth and seasonings.

Bring to a boil, then reduce the heat to a simmer and continue to cook for about 7-10 minutes, stirring occasionally. Add the artichoke hearts and re-add the shrimp at about the last 2 minutes of cooking.

Drizzle more lemon olive oil or lemon juice on top and mix in, then serve over cooked pasta or cooked cannellini beans. This is a light sauce, so a lighter pasta is perfect. I used angel hair pasta. You do not want a heavy pasta. The delicate flavors of the sauce will get lost on it. Top it with some fresh Mozzarella or Parmigiano, serve it with some warmed bread and chilled wine, and dinner is done. !Buon Appetito!

You can also use this same sauce for chicken too.

Have a great day and make everyday great. Stay safe and stay well. ‘Til next time.