Roasted And Seared

Roasting foods, and especially vegetables, has a way of “concentrating flavors [and] making [them] taste like better versions of themselves. (p. 442 All About Roasting A New Approach To A Classic Art by Molly Stevens). The dry heat of the oven helps to caramelize the sugars in the vegetables giving them a sweet, smoky flavor while crisping up the edges at the same time. In order to really bring out the best flavors when roasting vegetables, you need to coat them in some kind of fat, like butter or oil. This helps to prevent the vegetables from shriveling up as well as helping the seasonings to attach to the vegetables. In essence, it makes them irresistible.

Last night’s dinner was entirely roasted and seared. And in my humble opinion, they were roasted and seared to perfection. πŸ™‚

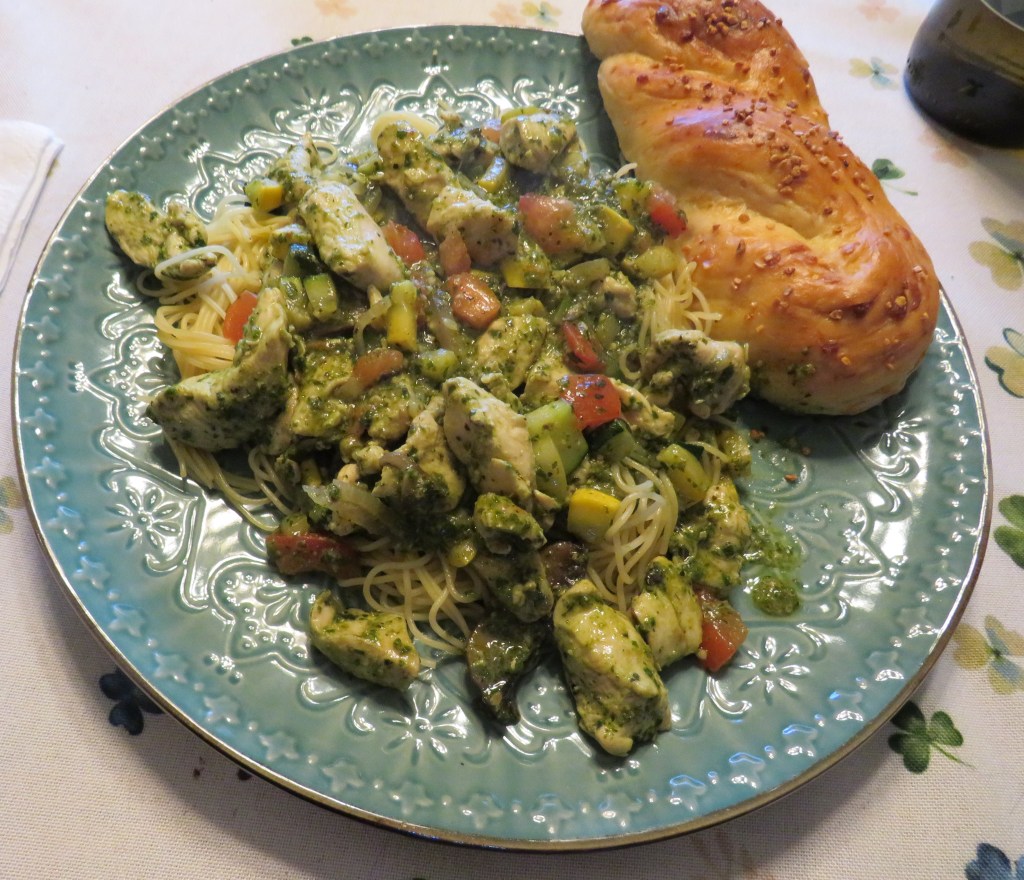
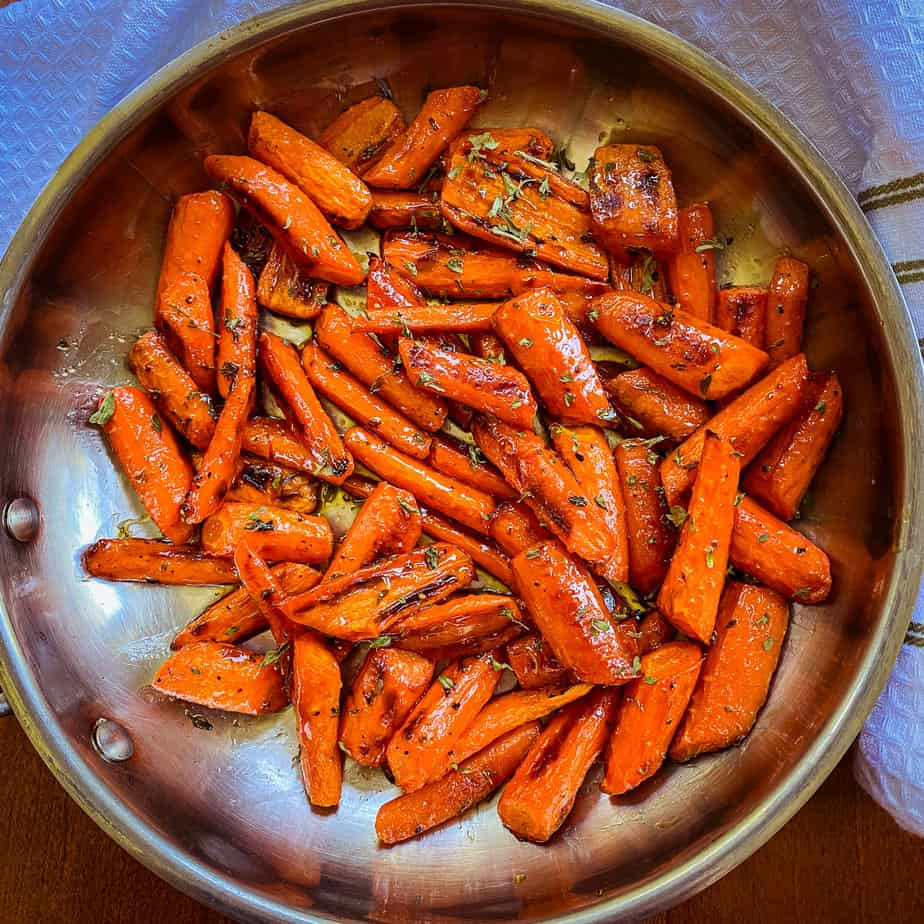
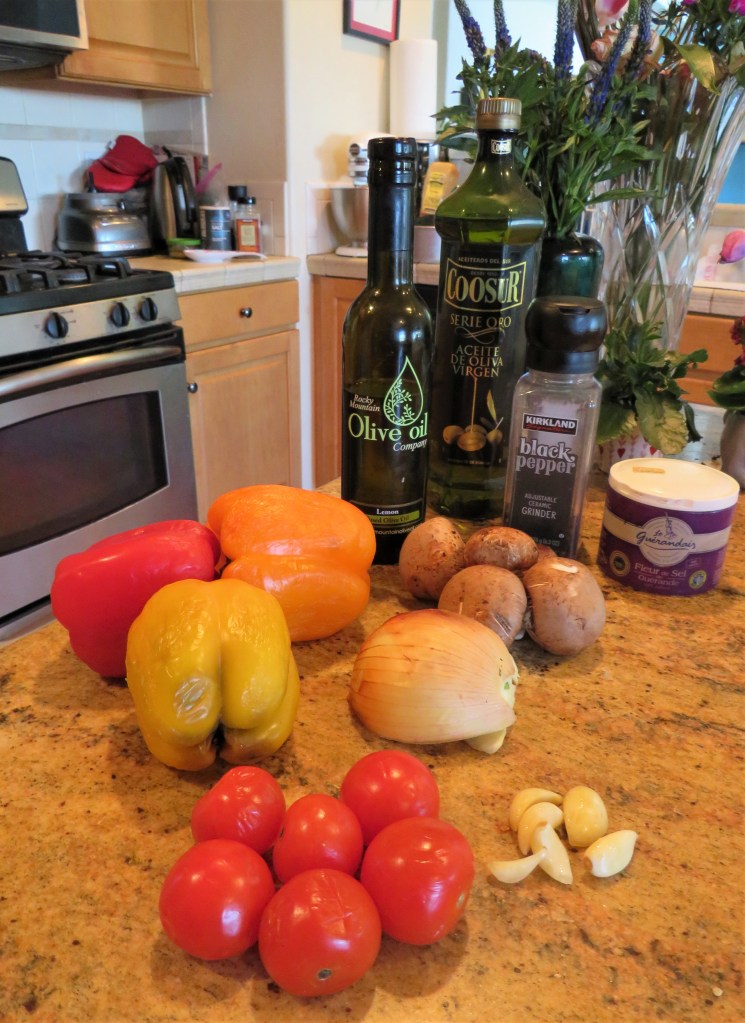
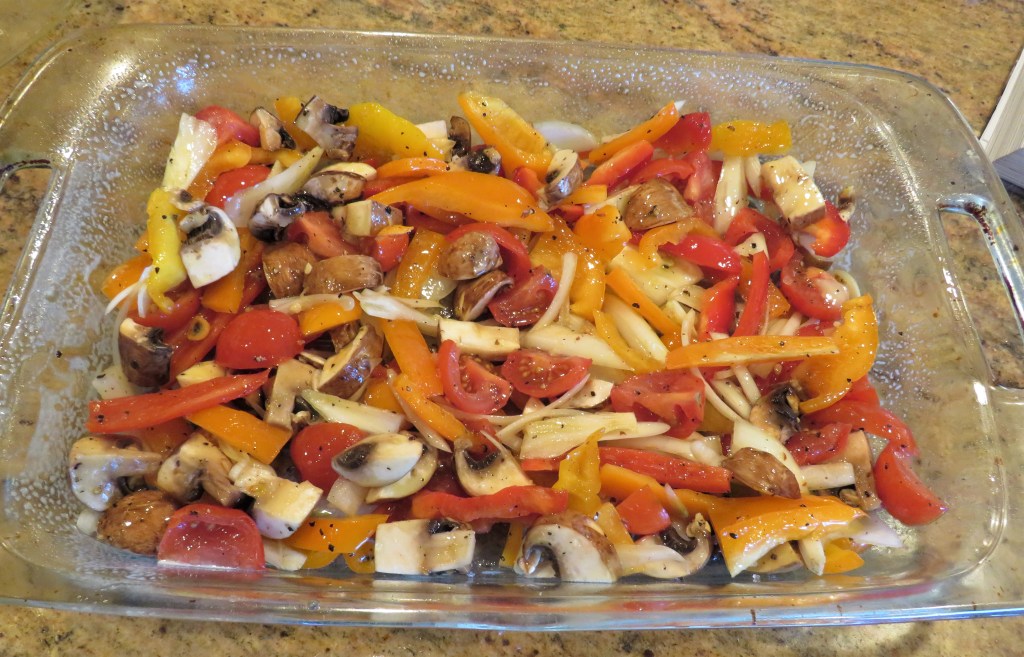
Let’s start with the roasted vegetables. I had a colorful array of peppers that I cut into thin strips, and added some quartered mushrooms, sliced onion, whole garlic cloves, sliced very thin, and sliced tomatoes. I tossed it all in a little olive oil and lemon olive oil, along with some salt & pepper, then put them in the oven to roast at 400*F of about 205*C for about 30 minutes or so.
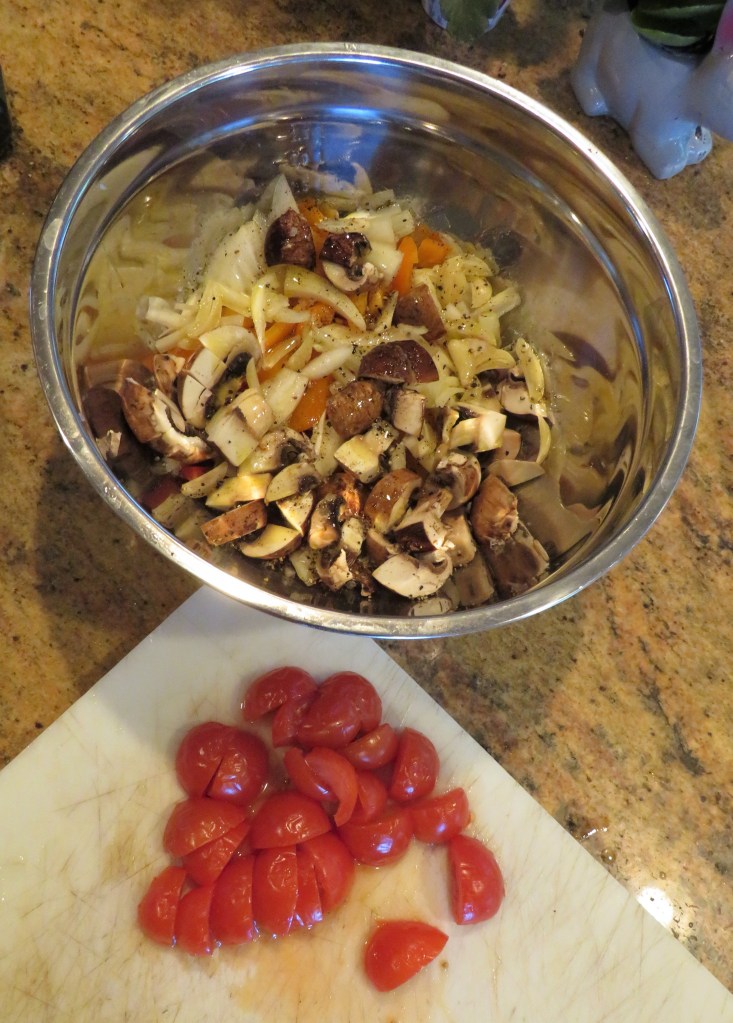
Don’t they look pretty and colorful? πŸ™‚

While roasting the vegetables, I also roasted some new potatoes at the same time. I par-boiled them first with a dash of vinegar, then drained them and tossed them in olive oil, salt and pepper and some parsley and put them in a pan to roast next to the vegetables. Vinegar helps form a thin crust on the outer layer of potatoes. This crust is what’s necessary to help them keep their shape and not become mushy or fall apart when boiling.

While the potatoes and vegetables were cooking, it was time to sear the steak. I marinated it in some olive oil mixed with salt, pepper, rosemary, thyme and garlic for about 2 hours before searing it in a very hot skillet mixed with a combination of olive oil and butter.

This is my absolute favorite way to enjoy a good steak. The skillet has to be VERY HOT, and then it needs the right amount of fat, that has a high smoke point and won’t burn, hence the combination of both butter and olive oil. I sear it for about three minutes per side first, then depending on the thickness of the steak, I usually sear it for another 2 minutes per side once again. USE a timer for this one. I always say cooking is not a science, where baking is, however when it comes to searing meats, it is an exact science indeed. This will give you a delicious crust on the outside while the inside remains juicy and tender. A perfect steak for me is rare to medium rare, with an internal temperature no higher than about 130*F or about 55*C. I even recommend removing the steak from the heat a little before it gets to this internal temperature, because it will continue to cook for a few minutes after you remove it from the heat and tent it.

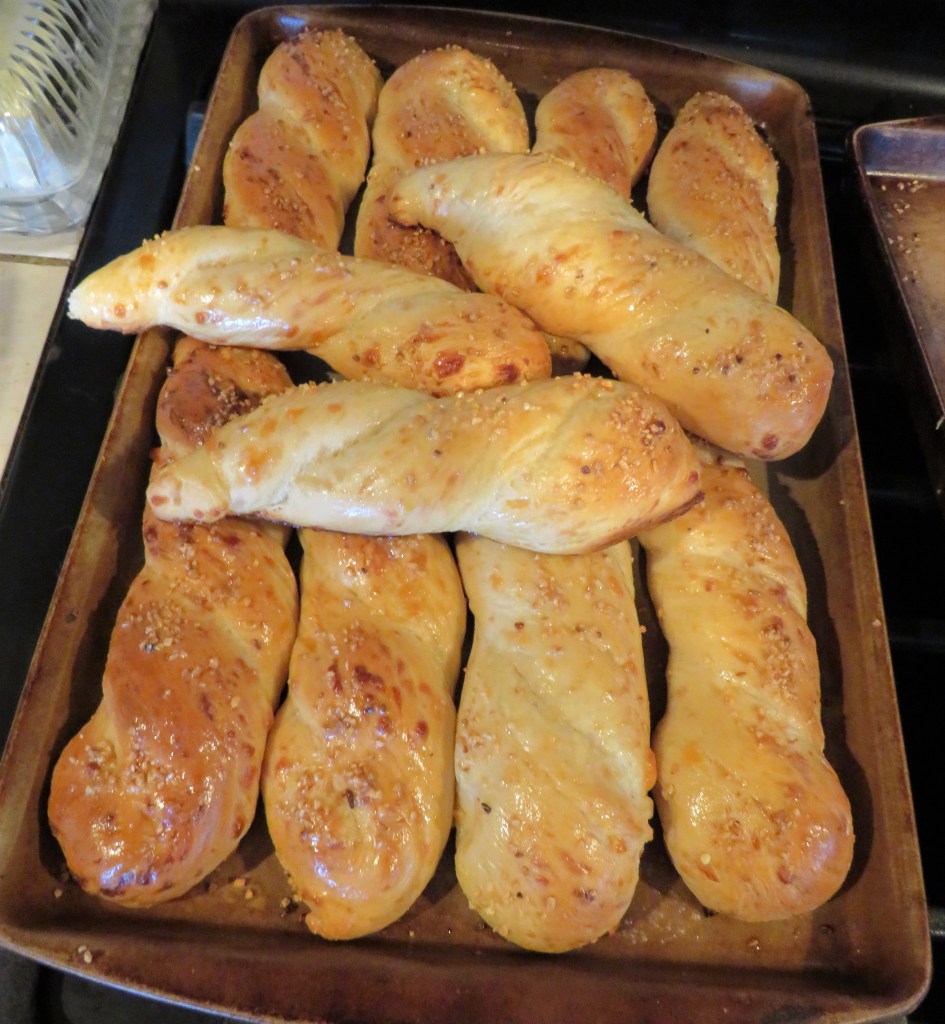
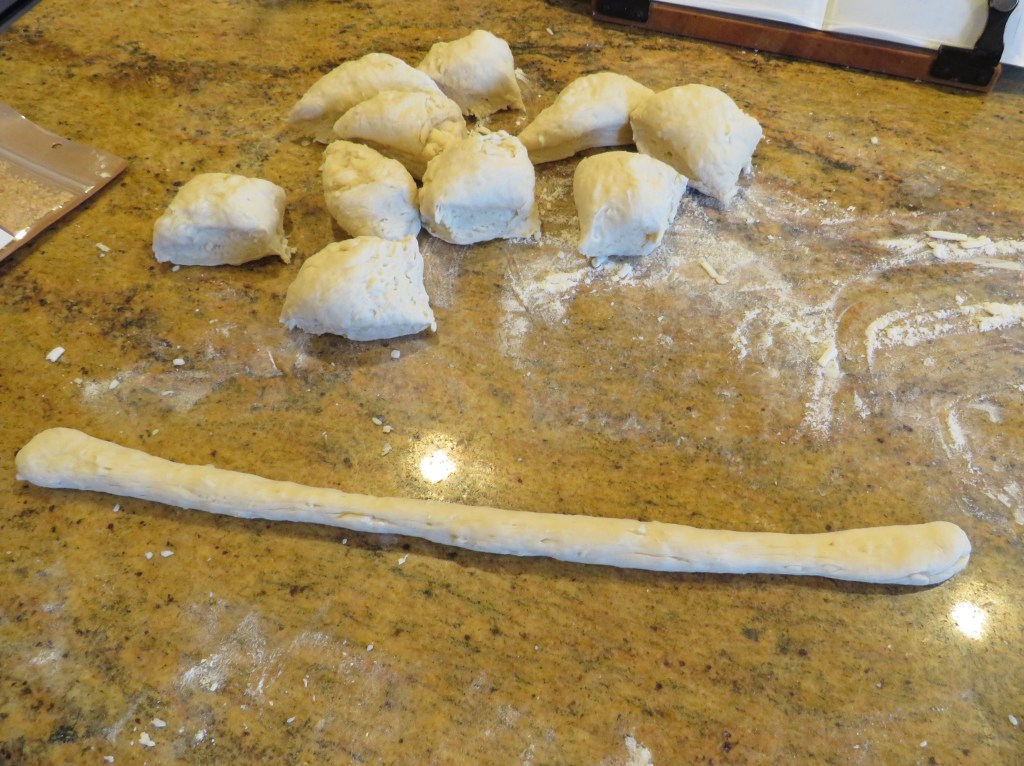
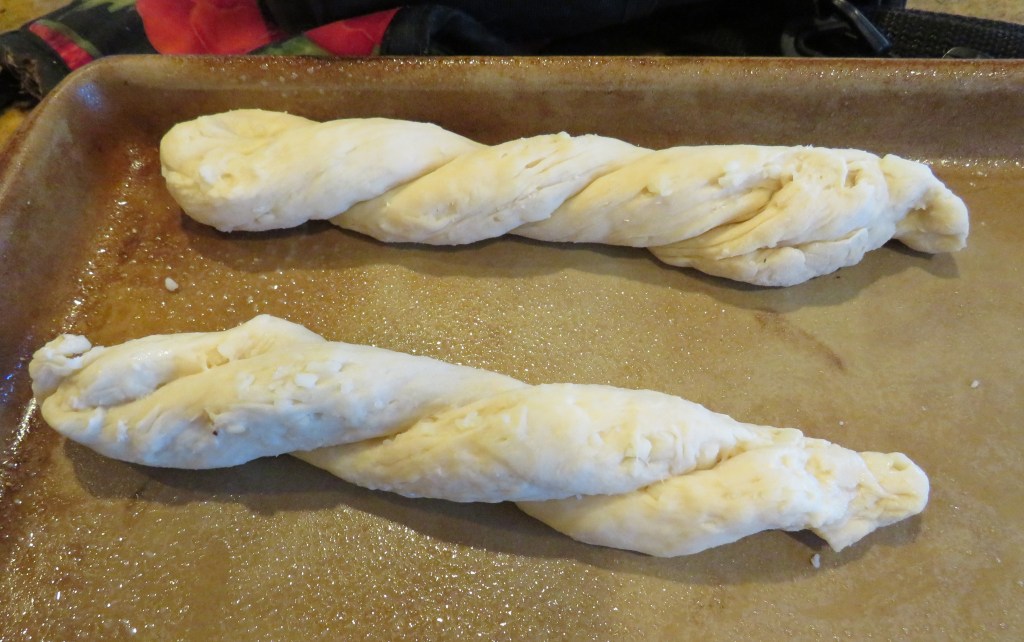
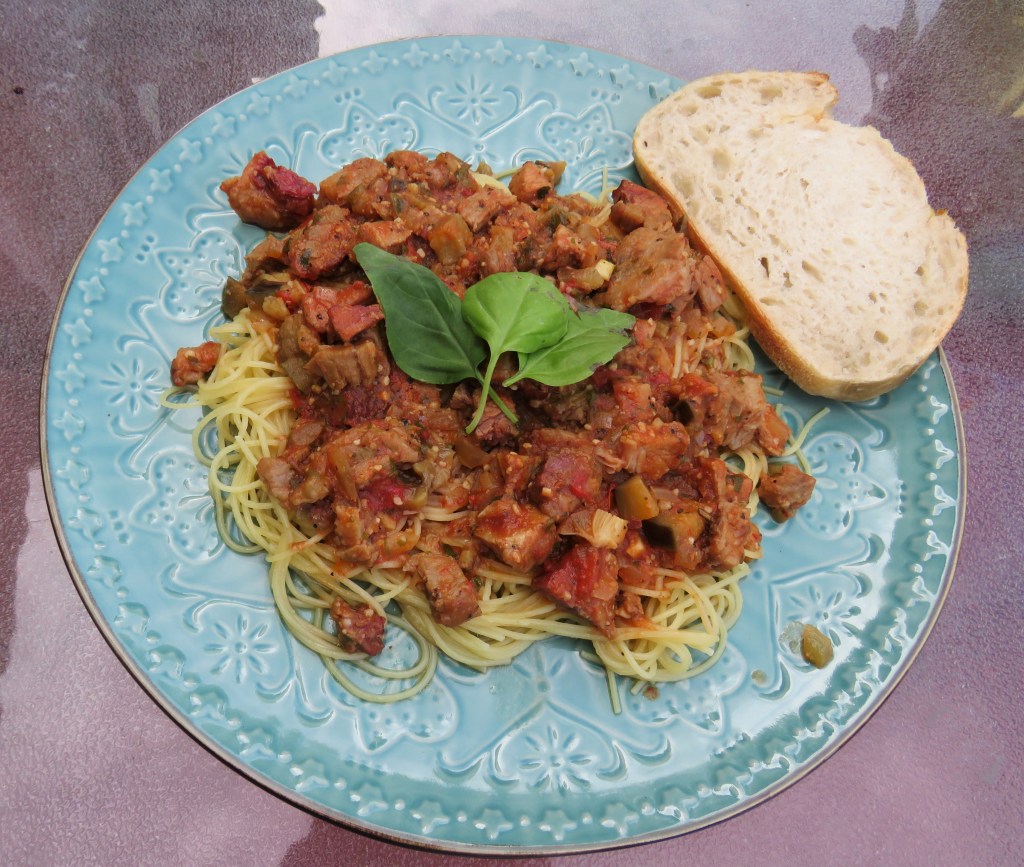
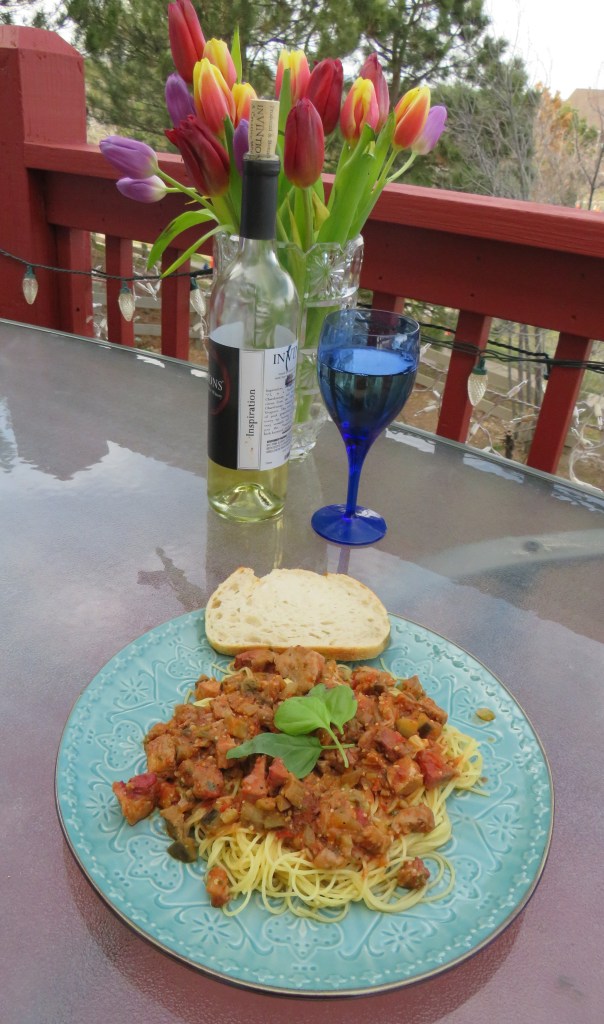
Once everything was cooked to perfection, it was time to plate it all up. I served it all with a cheesy bread twist Cheesy Bread Twists and a glass or two of a big, bold red Tempranillo. Delicious!

Eat well whenever you can. Life is short and tomorrow is never guaranteed, so live it up and enjoy every moment. Have a great day and make everyday great. Stay safe and stay well. ‘Til next time.

Cheesy Bread Twists

I knew I was making some pesto pasta with chicken and vegetables for dinner, but I needed some kind of bread to go with it. I know there are many gluten-free people who disagree, and that is perfectly OK. But I must have some Italian in me from a former life, because I like bread with EVERYTHING. πŸ™‚ I didn’t have any bread, and I love making bread, so it was time to do some research to come up with something easy-peasy and not to time consuming to make. I found the perfect bread recipe to go with my pesto pasta. I made some cheesy bread twists.

There is something very therapeutic about making bread. I can’t explain it, but anyone who has ever baked bread from scratch would most likely agree. “Fresh baked bread smells and tastes like honest food. People are just irresistibly drawn to fresh, homemade bread”. (p.5 Fleischmann’s Yeast – Best-Ever Bread)

Cheesy Bread Twists

I followed the recipe for the most part, though you know I made a few of my own personal adjustments. πŸ™‚ These bread twists do NOT require a lot of proof time, making them perfect for making bread in a short period of time.

3-3 1/2 cups flour

3 TBSP sugar

2 packages of Fleischmann’s Rapid Rise yeast or 4 1/2 tsp of dry active yeast – I used the dry active yeast

1 1/2 tsp salt

2/3 cup water

1 5-oz can evaporated milk

1 1/2 cups shredded cheese of your choice – I used shredded Jack

egg wash

dried roasted garlic, poppy seeds, sesame seeds or Parmigiano cheese for topping

melted butter

Combine about 2 1/2-3 cups of flour with the salt and and 2 TBSP sugar. Mix well

Whisk the water, 1 TBSP of sugar and the yeast together and let sit for about 10 minutes or until it becomes frothy.

Heat the milk to about 130* F or about 55*C. Make a well in the center of the flour mixture and pour the warmed milk into the well. Add the yeast mixture. With a spatula or wooden spoon, mix everything together as best as you can.

Add the cheese to the mixture, and mix together once again. When you can no loner mix everything with the spatula or the spoon, pour the mixture out onto a lightly floured surface, and knead together for about 8 minutes, incorporating as much of the remaining flour as the dough will take. This is supposed to be a very soft dough, so DO NOT over mix it. Knead it until it forms into a ball. Cover and let set for about 10 minutes before shaping the dough.

Cut the dough into 12 equal portions, then roll gently with your hands until the dough stretches out to make ropes that are about 14 inches long.

Double the rope and twist about 3 times and pinch the ends together. Place on a greased cookie sheet, cover and let rise for about 40-45 minutes.

When you are ready to bake the twists, preheat the oven to 400* F or about 205*C.

Make an egg wash and brush the bread twists with the egg wash. Then sprinkle on your topping, if using. I used the roasted garlic.

Bake for about 20 minutes, or until golden brown. Immediately after removing from the oven, brush the bread twists with melted butter and serve. These are best when served hot, straight out of the oven. Good luck with eating just one of these though. I could easily make these a meal all by themselves. πŸ™‚

Have a great day and make everyday great. Stay safe and stay well. ‘Til next time.

Nibbly Night

Last night was yet another of our many fun game nights. Rather than doing dinner, we all chose to do nibblies instead. So it was both game night and nibbly night. I made a selection of mostly Keto and gluten-free treats for all of us to enjoy, and that we did too. There wasn’t too much left at the end of the evening. This is always a good sign when entertaining. πŸ™‚

None of us wanted anything too heavy, so nibblies were a perfect option. And for the most part, they were fairly healthy.

I made a sausage and cheese tray with five different kinds of cheese and a couple of different kinds of crackers; a big bowl of mixed olives, with four different kinds of olives; a big fruit platter using some of my chocolate orange sauce again (I told you that you would be seeing it again, in another form soon); and my chocolate orange shortbread cookies as well.

For my fruit platter, I had some mixed berries, strawberries, dried mango slices and dried banana chips. I used some of my chocolate orange sauce as an option to dip the fruit into as well. The chocolate sauce went very well with all of the fruit varieties too.

Then I just assembled it all and made it pretty. We eat with our eyes long before the food reaches our taste buds, so making our dishes pretty is part of the fun.

Good friends, good food and good fun. Who could ask for anything more? I can’t complain. Life is very, very good indeed. We do our best to enjoy every moment. πŸ™‚

Have a great day and make everyday great. Stay safe and stay well. ‘Til next time.

Chocolate Orange Shortbread Cookies

You all know how much fun I have recreating from my leftovers. I got yet another chance to play with my food yet again too. When I made my chocolate orange cake Chocolate Orange Cake I had a lot of frosting left over. Well, I didn’t want to make another cake, so what could I do with the frosting? I made cookies. Cookies are always my favorite dessert anyway, so what better way to use up some of chocolate orange frosting, right?! πŸ™‚

Shortbread cookies originated in Scotland around the 12th century, and were popular with Mary, Queen of Scots, during the 16th century. Mary Queen of Scots’ cravings for shortbread skyrocketed it to fame. She asked private chefs to create β€˜petticoat shortbread’ shapes based on the petticoats she wore during the 16th century. And thanks to her, this shape remains a big favorite now. During her reign (1542 – 1567), a bite was reserved only for the elite. As shortbread was made with butter, sugar and flour, it would be both expensive and difficult to get hold of the ingredients, and so it became synonymous withΒ wealth, luxury and celebrations. It was munched on by nobles and royals, and saved for special occasions like weddings, Christmas and New Year for the less rich. It was often made for weddings, showing off that the happy couple could afford to serve guests such a rare treat. Today, shortbread reigns supreme in Scotland and is affordable for all. So as you can see, these popular cookies have been around for a very long time. They are still a favorite all over the world today too, although today, there are many more varieties.

The story of shortbread begins with the medieval β€œbiscuit bread”. Any leftover dough from bread making was dried out in a low oven until it hardened into a type of rusk: the word β€œbiscuit” means β€œtwice cooked”. Gradually the yeast in the bread was replaced by butter, and biscuit bread developed into shortbread. The name “shortbread” comes from the use of butter, which gives the cookies, or biscuits as they are called in the UK, their buttery taste and crumbly, soft to the bite texture. The name of shortbread cookies comes from the old meaning of the world β€œshort”, which reflects the crumbliness of the dough and the name β€˜shortbread’ stuck. That firm to the bite feel with a crumbly texture is the source of your shortbread addiction. Butter, and especially high quality butter, gives the dough its crumbly feel.

Are shortbreads a cookies, a biscuit or bread? This was a serious question to the British government, especially when it came to taxing these delicious treats. In the 1980’s, the Scottish Association of Master Bakers Scottish fought hard to fight off the European Union who wanted to classify shortbread a β€˜common biscuit’ in order to charge the higher biscuit tax imposed by the government. Today, many consider it a β€˜biscuit’, but the β€˜shortbread’ name stays thanks to their perseverance.

Chocolate Orange Shortbread Cookies

The key to good shortbread cookies is to NOT overwork the dough. Mix it just until it starts to come together, then dump it onto a lightly floured surface until you have a smooth dough. The less you work the dough, the more crumbly and melt-in-your-mouth your shortbread cookies will be. You also want to make sure the butter to flour ratio is in correct proportion. If one of them is off, the dough will not have the desired soft and crumbly texture or rich, buttery taste.

12 TBSP or 1 1/2 sticks softened butter

2/3 cup dark brown sugar

1 egg

1 tsp vanilla

1 tsp orange extract

2 cups + 2 TBSP flour

1/4 tsp salt

1 TBSP orange zest

2 TBSP orange juice or orange balsamic vinegar

Combine all the dry ingredients together and mix well.

Mix the butter and sugar together until creamy, then add the egg, orange juice or orange vinegar and the extracts and mix together again. I did not have orange juice, so I added the orange vinegar instead. It worked just fine.

Add 1/2 the flour and mix in, then add the rest of the flour and mix just until everything is combined. Turn the dough onto a lightly floured surface and work it with your hands until the dough forms.

Shape the dough into a log and wrap in plastic wrap. Refrigerate for at least 4 hours before baking.

When you are ready to bake the cookies, preheat the oven to 350* F or 180*C. Then slice the dough into pieces about 1/4″ thick and place on a non-greased cookie sheet, about 2 inches apart.

Bake for about 15 minutes, or until the edges start to lightly brown. Remove from the oven and allow to cool slightly on the pan, then move them to a cooling rack and allow them to cool completely before dipping them in the frosting.

For my frosting, I used some of my leftover chocolate orange frosting and added a little heavy whipping cream to make it more like a ganache, then heated it all together on the stove for about 5-7 minutes, stirring constantly.

I dipped half of the cookie into the chocolate mixture and lightly sprinkled some orange zest on the chocolate portions.

When the cookies are all topped, place the tray into fridge to set for at least about 30 minutes or so before enjoying, and enjoy you will too.

These cookies are definitely addicting. I bet you can’t stop at just one. But go ahead. I dare you. πŸ™‚

And believe it or not, I still have quite a bit of my chocolate orange frosting left. So, don;t be too ssurprised when you see yet another chocolate orange com

Have a great day and make everyday great. Stay safe and stay well. ‘Til next time.

Nature Walks – Spring Squirrels

My squirrels are playful all year long, but they tend to get especially playful during spring. HMMMM. I wonder why????? πŸ™‚ πŸ™‚ πŸ™‚ Here are some more fun pictures of my playful squirrels.

It’s OK to get squirrely every now and then. πŸ™‚ Have a great day and make everyday great. Stay safe and stay well. ‘Til next time.

Bourekas and Pasta

You all know how much fun I have recreating from my leftovers. It’s become a fun game for me. What can do with this? When I made my bourekas Mediterranean Pork and EggplantΒ Bourekas I only used about half of my filling. I was planning on making another batch of bourekas, but decided on turning it into pasta instead. So this

was born from this. Hard to imagine right?!

Not really when you think about it. I used only the filling for the pasta by adding about 3/4 cup of dry white wine, a little tomato paste and adjusted the seasonings a bit. Then I served it all over angel hair pasta. It was a quick, easy-peasy idea, which is what I needed since I had a busy day and got home a little later than expected and still needed to make dinner.

We also christened our deck for the season as well. We enjoyed our first of many evening dinners yet to come for the season out on our beloved deck, overlooking our lakes/ponds.

Life is good. We do our best to enjoy every minute of it too. The little things are the perfect things. Have a great day and make everyday great. Stay safe and stay well. ‘Til next time.

National Carrot Day

In case you hadn’t noticed, I love writing my blog. I love it for many reasons, but one reason is that I learn so much about so many things I never knew of before. For instance, today, April 4th, is National Carrot Day. Who knew? I had never heard of that before, but yes, it really is a thing. It was established in 2003, with many countries around the world observing this fun and healthy day.

The purpose of National Carrot Day is to make people aware of how important it is to include carrots into your diet. Carrots are high in fiber, so they help regulate bowel movements and prevent constipation. They also help keep weight in check since they are low-calorie food loaded with fiber. Carrots are an excellent source of vitamin A, which is essential for eye health and good vision. Eating carrots in moderation is good for you.

Carrots come in many different colors, but in the United States, the orange carrot is the most popular color and variety. I just had carrots last night that I added to a spring vegetable medley, and I used orange, purple and white carrots in the mix.

Carrot (Daucus carota) is native from Europe and west and central Asia and was probably domesticated in Afghanistan. Cultivated carrots were introduced in the MA and in Europe around the eighth century CE.

Carrots are very healthy for both humans and animals alike. I know I feed carrots to “the kids” all the time and they love them. When I cook their food, they almost always get carrots added to the mix.

Carrots have long been used as a reward for animal trainers too, especially horse, donkey and mule trainers. A carrot was a reward for them if they performed well in training or action. They like them so carrots were given as treats and as an incentive to continue.

Carrots can be eaten either raw or cooked. Both are healthy options, for both us and our animal friends. However, cooked carrots, at least for humans, are slightly healthier because cooking carrots allows beta carotene, an antioxidant compound that gets converted to vitamin A in the intestine, to absorb more easily in the body. And lucky for us, carrots are very versatile and can be cooked and prepared in many different, delicious ways.

Carrots are the foundation of so many meals, from rich and savory stews to sweet cakes and candies. They can serve as almost any part of a meal as well, including a sweet candied carrot or as the color to a tray of richly roasted vegetables.

International Carrot Day celebrates this root in all its uses, forms and flavors! And if you want to learn more about carrots, there is even a website with a virtual carrot museum to help you out. The World Carrot Museum is a website about the collection, preservation, interpretation and exhibition of objects relating to the carrot. It is a virtual museum which has no brick and mortar existence. The website is maintained by John Stolarczyk of Skipton, England, and is run as a not-for-profit organization. You can find it at http://www.world carrot musuem.com

Learning all about carrots is just one of the many fun and interesting things we can learn about through blogging. Who knew about all of this? I know I didn’t, but we do now. πŸ™‚ We are never too old to learn new things. In fact, learning new things helps keep us young and vibrant. Learning is living. So learn something new everyday. You just might surprise yourself. πŸ™‚ Have a great day and make everyday great. Stay safe and stay well, especially if you eat your carrots. ‘Til next time.

Nature Walks – The Happy Heron

It’s Heron season again, and they are beginning to show up around the lakes once more. Slowly, one at a time, but they are beginning to come back none-the-less. I was so excited to see this handsome big guy. He completely caught me by surprise, but what a pleasant surprise it was too. He just made my day.

At first, I spotted him in the reeds.

Then he flew off thinking he would lose me. Wrong! He allowed me to follow him from lake to lake to lake and I was able to get some more good shots of him again, before he completely flew the coop. I did get some good action shots of him too.

Have a great day and make everyday great. Stay safe and stay well. ‘Til next time.

Mediterranean Pork and Eggplant Bourekas

I know you are all probably asking “What is a boureka”. I didn’t know either until I made them. They are delicious pockets in puff pastry that are deep fried to perfection. Bourekas, are handheld pockets made of crisp pastry dough filled with a variety of savory ingredients and are the snack food of choice for many Israelis.

They are like Jewish empanadas and can be filled with anything you like. I filled mine with pork, so mine were not Jewish, but then neither am I. πŸ™‚

Traditional bourekas were originally created by Turkish Jews. The Sephardi Jews who were expelled from Spain who sought refuge in the Ottoman Empire. The Sephardic Jews created a new dish which adaptedΒ bΓΆrekΒ to their kosher dietary laws, and combined it with their traditional empanadas to create bourekas. Bourekas are said to have originated in Turkey with the immigration of Sephardic Jews from Spain in the late 1400s (via Taste of Jew). It’s believed that the term is a combination of the Spanish word ’empanada’ and the Turkish word ‘borek’ meaning hand-held pie.

Pork and Eggplant Bourekas

The recipe I was inspired by called for chorizo, but I was looking for a fun, creative way to re-use my smoked pork, so that is what I added to mine instead. I also added a little brisket because I didn’t think I had enough pork for my filling. Silly me! What was I thinking? And of course I added a few other personal tweaks to make it my own dish as well. What else would you expect form me? πŸ™‚

1 lb either cooked pork, cubed or cooked beef, cubed, or a combination thereof

1/2 eggplant, cubed

1/2 onion, diced

1 1/2 TBSP garlic

2 tomatoes, diced

salt & pepper to taste

1 TBSP orange zest

1/3 cup fresh cilantro and/or parsley, chopped

1 package puff pastry sheets, fully thawed according to package directions

olive oil and/or orange olive olive for cooking

season seeds

canola or avocado oil for frying

Cube all the cooked meat and set aside. If you are using chorizo, make sure it is thoroughly cooked.

Dice the tomatoes and set aside.

Dice the eggplant and onions.

Get a large pan very hot and add the oil(s). I liked the addition of a little orange olive oil as well. It made it very flavorful. Add the eggplant and salt & pepper first and cook for about 2-3 minutes, stirring often. Then add the onions and garlic and continue to cook until the onions are translucent and soft.

When the eggplant and onion mixture is cooked, add the meat and mix together well. Cook for an additional 3 minutes or so.

Add the tomatoes, orange zest and cilantro and cook just long enough to heat everything up. Adjust the seasonings as needed. Drain off the excess oil and liquid.

Cut the puff pastry into squares that are about 5 inches in size. Add about 2 TBSP of filling to 1/2 the squares, leaving a little space around the edges free. Add another square on top and firmly press together. Crimp with the edge of a fork. Moisten you finger tip with a little water and seal the edges.

I let mine set for about 30 or so minutes at room temperature to proof a bit before frying them. Then get your oil to about 350*F or 180*C. You want an oil like either avocado or canola oil, that has a higher smoke point and won’t burn. Place the bourekas in the fry basket without crowding them. You might have to do them in batches. Place them in the hot oil and let them cook for about 2-3 minutes per side, or until golden brown and the dough is completely cooked.

As soon as the bourekas come out of the hot oil, sprinkle a few toasted sesame seeds on top, and enjoy. These are best eaten immediately, while they are still hot. As with any dish that has been around for such a long time, there are endless possibilities for fillings. Make them with whatever you have on hand and with whatever you like. However you decide to make them, I promise you are going to like them a lot. πŸ™‚

Have a great day and make everyday great. Stay safe and stay well. ‘Til next time.

Nature Walks – My Little Chickadee

Chickadees are pretty little birds. I see them quite often, but they are so fast and quick, that is often very difficult for me to get good shots of them. Usually they fly off before I can even get my camera focused. This time though, I was lucky. There was one little guy who was posing for the camera. This is almost unheard of, at least for me. Of course, I was going to take as many pictures of him as I could, while he was there posing for me.

We have two kinds of Chickadees here in our area, the Black-Capped, which is the one I saw yesterday, and the Mountain Chickadee.

It was my lucky day in a couple of ways. First, I had a window of sunshine that allowed me to go walk-about before the rain and hail came down. And second, I was lucky enough to be able to get some good, clear shots of my little Chickadee. I’ll take both opportunities and think of them as gifts from above. Thank you, thank you. πŸ™‚