Cashew Shrimp and Vegetables

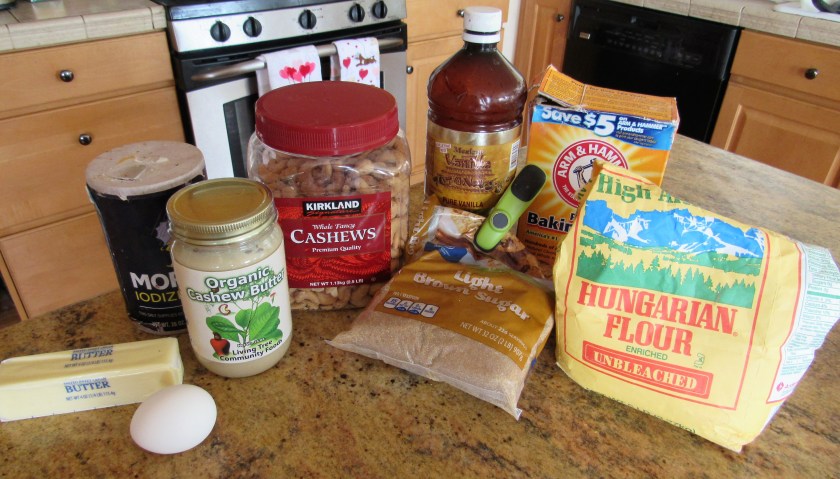
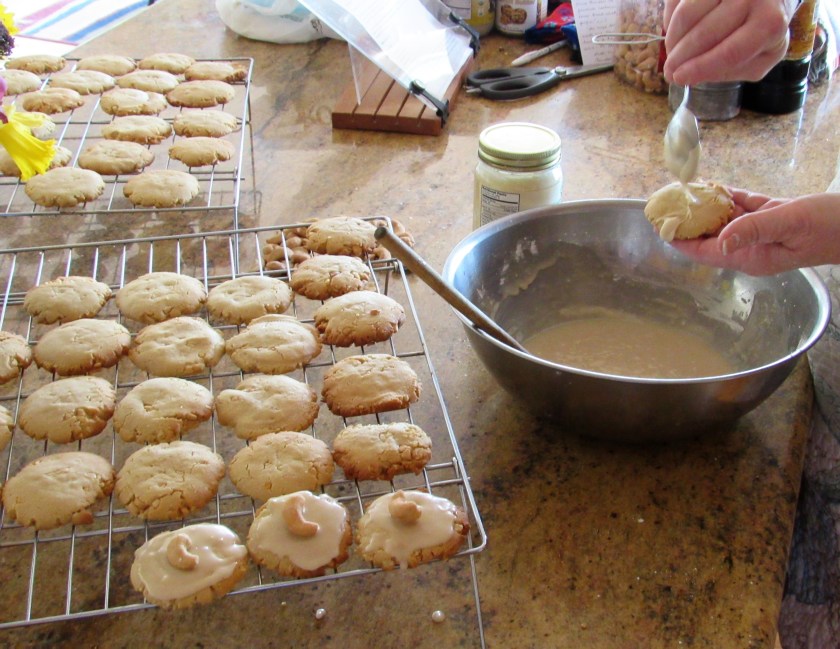
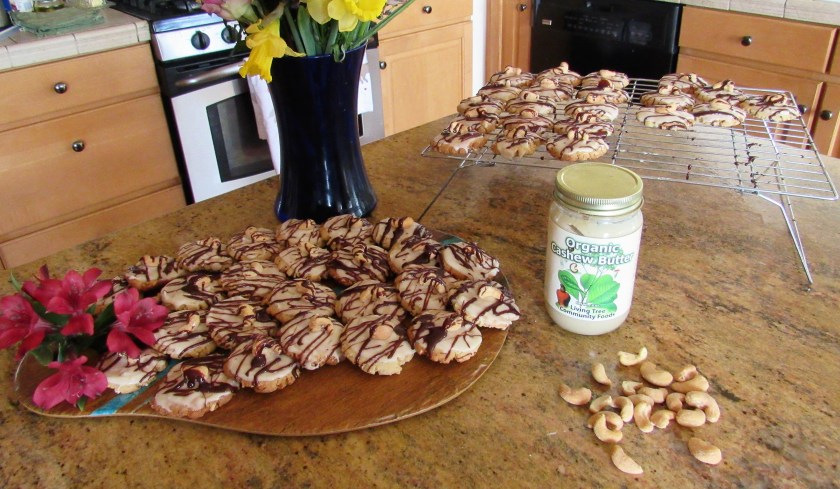
Cashews are my favorite nuts, although they are actually the seeds found within the fruit or the cashew apple, from the cashew tree.  The cashew tree is a tropical evergreen tree that originated in Northeastern Brazil.  The Portuguese colonists started exporting cashews and cashew products in the 1500’s and they became very popular in Goa in the mid 1500’s.  From there, they grew and spread all over South East Asia and then moved on to North Africa.  Today, the largest cashew producing areas are Vietnam, India, Nigeria and The Ivory Coast.  The trees can grow up to about 14 m, but the ones that are the most productive trees are the “dwarf” trees, at about 6 m in height.  They have a higher yield and mature faster than than larger trees.  The name cashew was derived from the Portuguese word caju, which was taken from the Tupian word acaju, meaning a nut that produces itself.  Cooking with cashews, in all its forms, is very popular in both Indian and Pakistani recipes.  The whole cashew has a wide variety of uses, ranging from cooking to making lubricants from the shells, to using the shells for paints and waterproofing. The shells were also used in arms production during WWII.  The fruit part can be used for making chutneys and alcohols, or can be cooked and eaten as is.  We actually have some cashew wine from Belize.  It is a very tasty, sweet wine that is best as a dessert wine.  The seed, or nut part, is also very versatile and is used in many different ways, including making nut butters, nut cheeses and milks.  Cashew milk is a good alternative to dairy milk, especially for people who cannot tolerate dairy milk.  Though cashews contain a lot of fats, they are also very healthy.  One serving of cashews provides 36% of the daily requirements for protein, 13% of fiber, and 11% of carbs.  They are also rich in thiamin, vitamin B6, vitamin K, iron, potassium, zinc and selenium.  So next time your are looking for something to munch on, go nutty and go for the cashews.

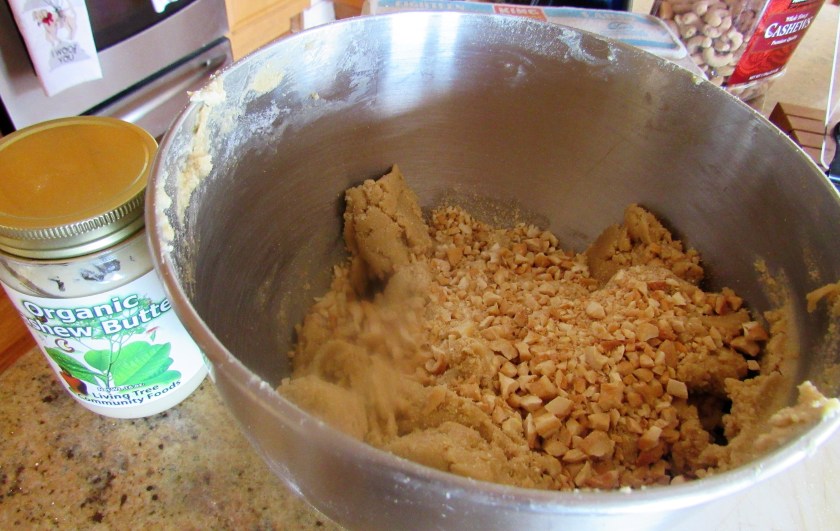
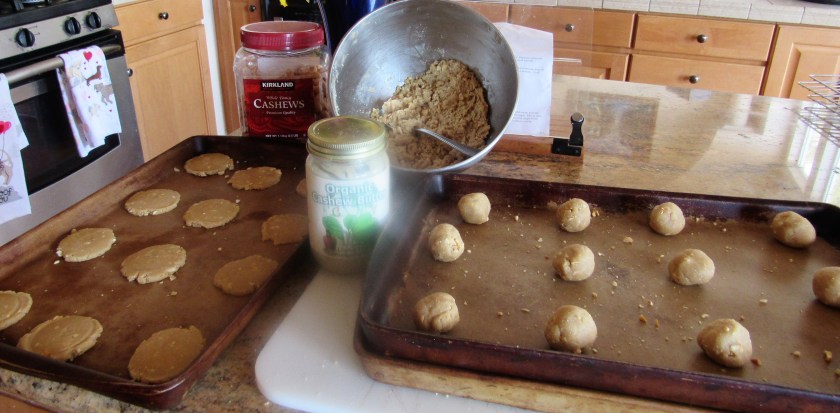
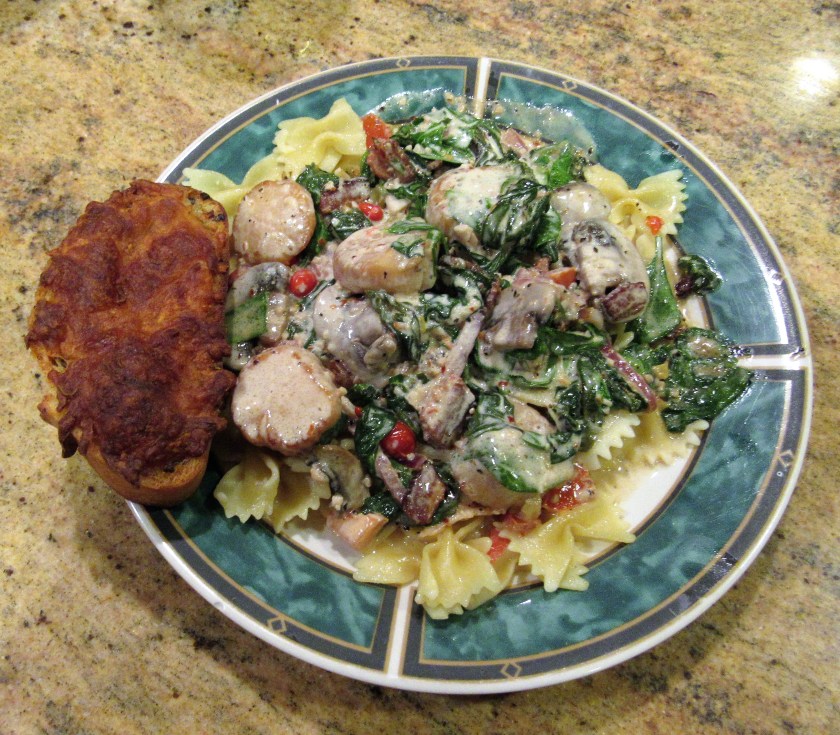
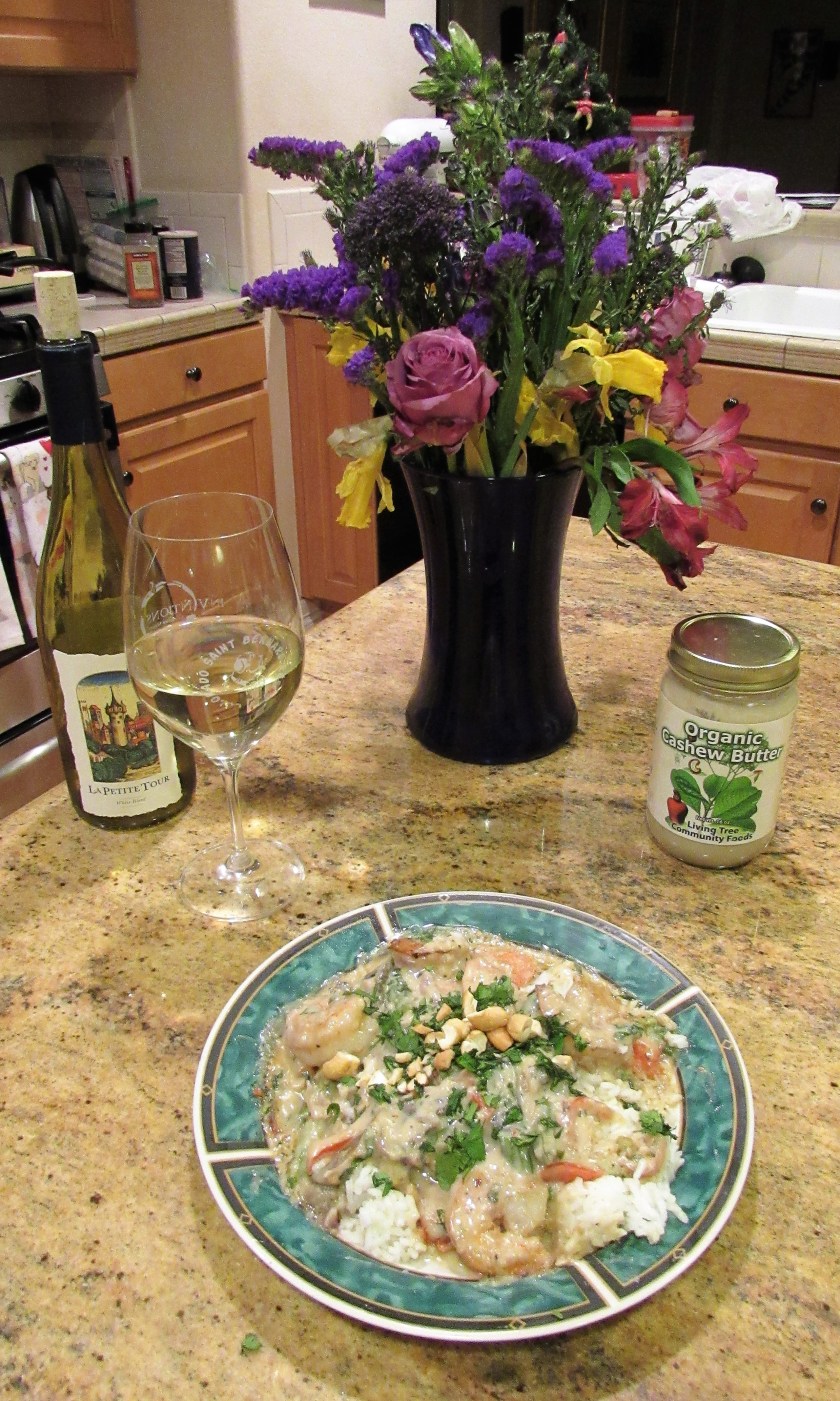
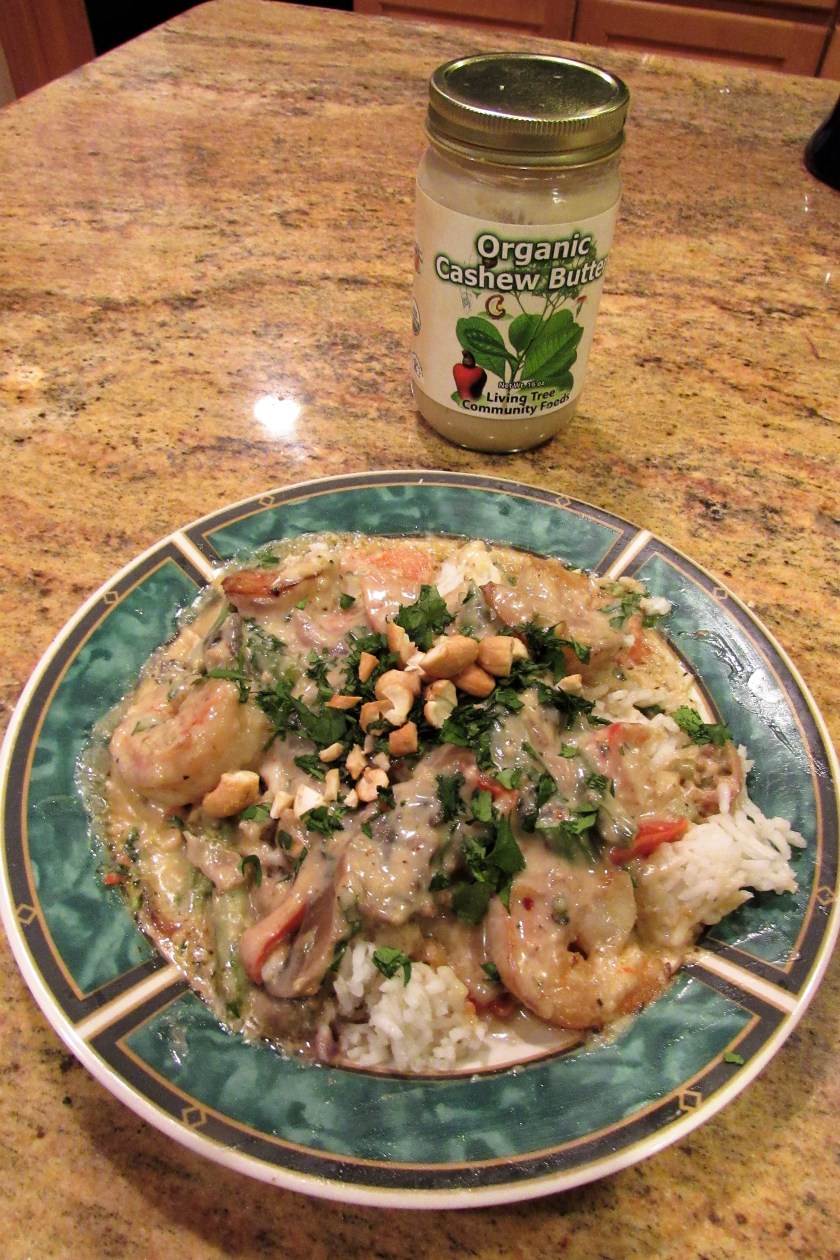
For dinner last night, I decided to go Asian and made cashew shrimp with loads of vegetables.  I incorporated my Living Tree Community Organic Cashew Butter into the sauce, then added some chopped cashews on top as a garnish. More Treats from Living Tree Community Foods  Dinner was delicious!

IMG_5404


Cashew Shrimp

IMG_5389

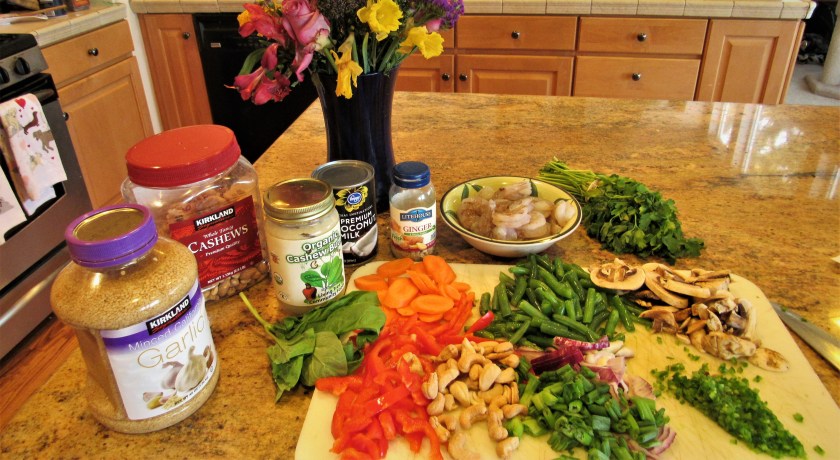
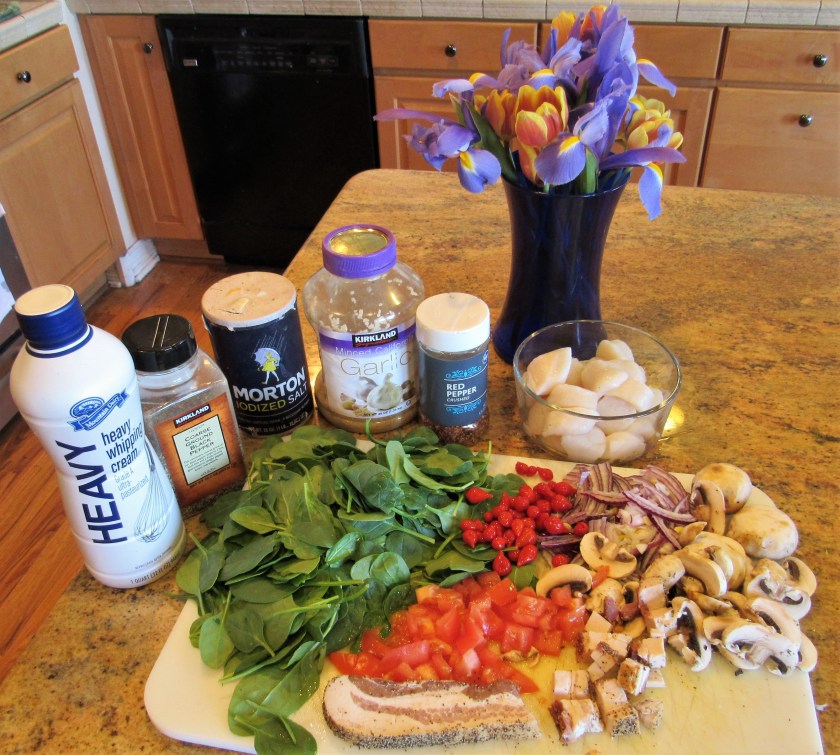
1 lb large prawns or shrimp, peeled and deveined

1 carrot, sliced thin

1/2 red bell pepper, sliced thin

1 cup green beans, cut into pieces about 1-1 1/2 ”

1 cup mushrooms, sliced thin

1/4 red onion, sliced very thin

1 TBSP garlic

1 TBSP ginger

1 can coconut milk

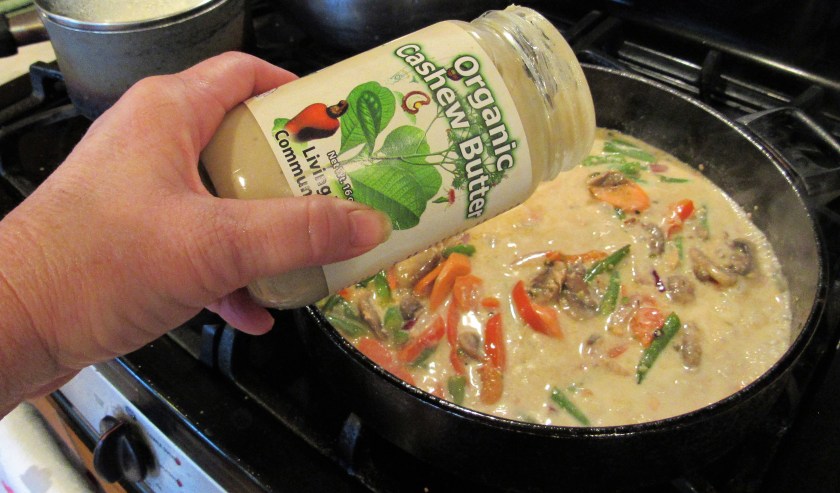
1/2-3/4 cup Living Tree Community Organic Cashew Butter

4-5 large basil leaves, chiffonade

1/3 cup green onions, sliced

salt & pepper to taste

red pepper flakes to taste

cilantro

1/4 cup chopped cashews

oil for cooking

milk, if needed to thin the sauce

cooked rice


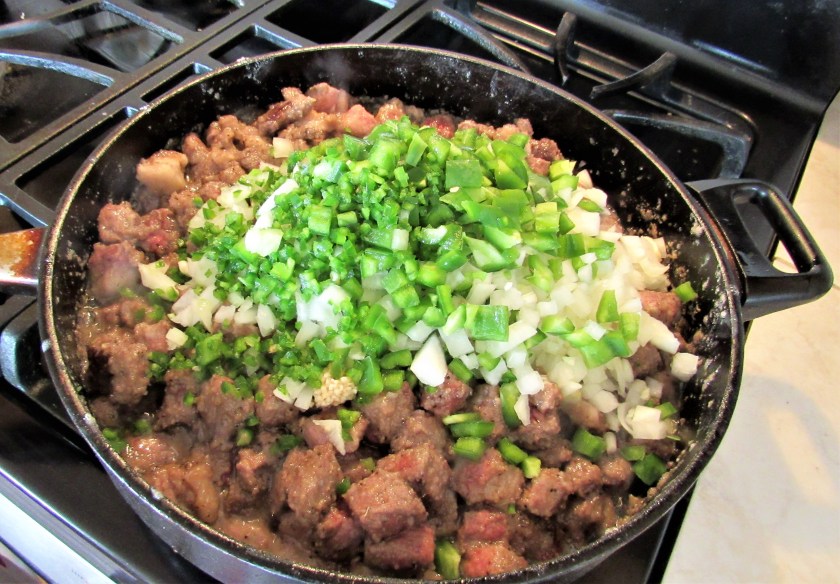
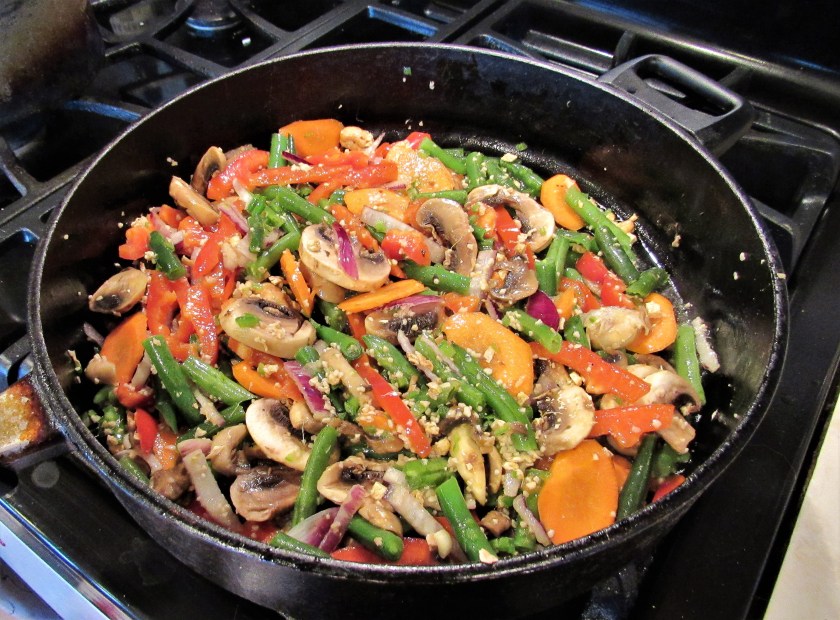
Saute the vegetables, garlic and ginger in hot oil until they are tender, then set aside.

IMG_5393

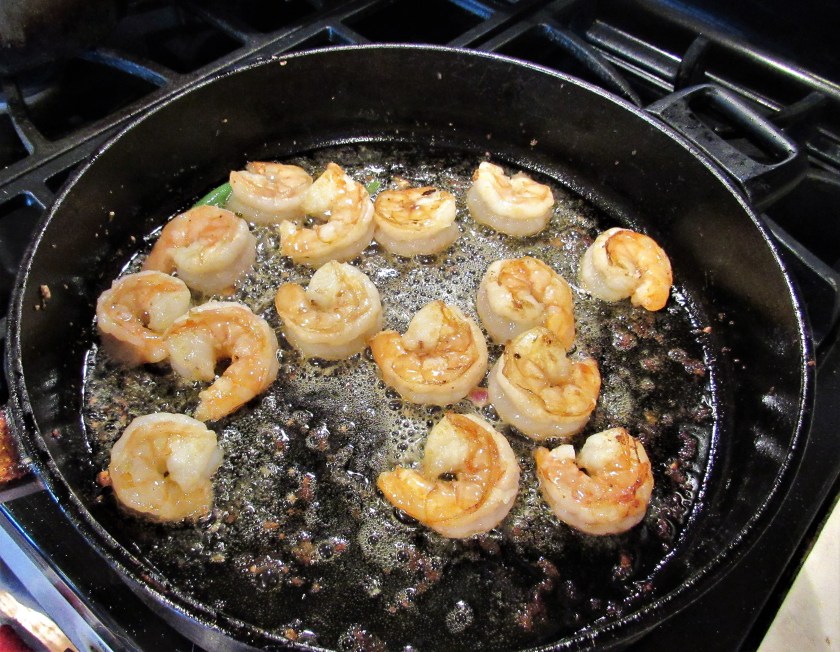
In the same oil, cook the shrimp until they are pink on both sides, about 3-5 minutes.

IMG_5395

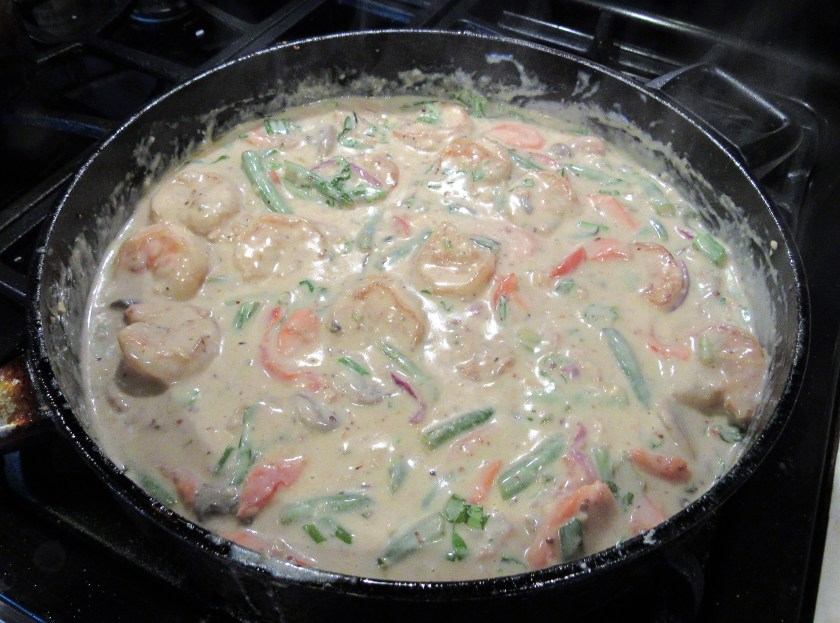
Once the shrimp is cooked, remove it from the skillet and set aside.  Add the vegetables back into the hot skillet, then add the coconut milk and combine thoroughly.

IMG_5397

Mix in the Living Tree Community Organic Cashew Butter, and again, mix thoroughly.  The sauce might be a little thick, so add regular milk as needed if you want a thinner sauce.

IMG_5398

Again, incorporate everything together well, adjust the seasoning if necessary, then at the last minute, add the fresh basil and green onions and mix well.  You can either add the shrimp back in at this point, or serve this over the rice and add the shrimp as you plate it.  As you can see, my shrimp are mixed in with the sauce.  Garnish with the chopped cilantro and chopped cashews.  I served it with a cool crisp chardonnay, but a riesling would be very nice as well, especially depending on how spicy the dish is.  A sweet riesling will help cut down on the spicy flavors from the sauce.

IMG_5402

IMG_5406

*** You can easily make this dish vegetarian or vegan by substituting the shrimp for either vegan/vegetarian friendly proteins or by just eating it with the vegetables.  Either way, it comes out very good.


A Spirited Stay at the Stanley

We went up to Estes Park and stayed at the Stanley Hotel once again.  Last time we went, in early Oct., we were a little disappointed because we stayed in the new section of the hotel and not the old, traditional part, as well as not being visited by any spirited visitors that time either.  A Quick Trip to Estes Park  So for my birthday (coming up later this week), Larry booked us for another night’s stay at the Stanley.  This time, we were not disappointed in either way.  Not only did we stay in the old, traditional part of the hotel, but we also got booked into one of the haunted rooms.  We stayed up on the 4th floor, which was originally used as the nursery or children’s section of the hotel, so many of the spirited visitors on that floor are either nannies, or the children they cared for, or both.  We stayed in room #418, which is one of the reported haunted rooms.  The ghosts at the Stanley are all friendly ghosts, and really just want to be apart of the daily activities.  Despite what you might think, especially if you are a Stephen King fan, there have never been any violent crimes or deaths at the Stanley.  The Stanley spirits do not wish to harm or alarm anyone.  They just want to be apart of the fun.  My husband missed our spirited encounter since he was sound asleep, but I heard our friendly ghosts playing and singing in the hallway, right outside our door, around 11:00 PM or so, and as per usual, I could not sleep.  I heard the voice of a young girl singing “You Are My Sunshine”.  It sounded like it was right outside our door.  A couple of minutes later, I heard the sound of little kids playing and running down the hallway.  I looked out the door, and no one was there.  The voice was very clear and distinct, and most definitely came from a young girl.  A few minutes later, I heard the nanny and the kids again.  Someone else had apparently heard them too, because I saw some other people walking down the hall and heard them saying they had heard someone singing “You Are My Sunshine” as well.   There are not that many people staying at the hotel right now, and there were no small children staying there either, since this is their low tourist season, and the hotel was fairly empty.  Maybe the quiet time of the year is when the spirits like to come out and “play”, since they can play relatively unbothered by a lot of guests roaming around, which means they are free to roam and play at will.  Having a spirited encounter definitely made my day.  Now that I have had a ghostly encounter, and have stayed in the old traditional part of the Stanley, it is time to move on and try some other places.  This one can now go down into the books and can be crossed off the to-do list.

The Stanley Hotel in the day time.

IMG_3303

The Stanley all lit up at night.

IMG_5374

Our beautiful Snow capped Rocky Mountains from the Stanley’s grounds.

IMG_5352

This was the view from our room.  We are overlooking the new building, The Aspire, where we stayed last time, and Stanley Lake.

IMG_5358

Some of the rich, lush decor from they days of yesteryear at The Stanley.

IMG_5354

They no longer use keys like this anymore, but they make a great display of what used to be.

IMG_5357

No attention to detail is spared at the Stanley, even with the light fixtures.

IMG_5355

Before checking into the Stanley, we roamed around town for a bit.  As I mentioned earlier, it is the low tourist season.  A lot of the shops were closed, but the ones that were open were happy to see us.  Estes Park, like so many other small mountain towns, has a lot of artists who call Estes Park home.   There are craftsman of all kinds, and they are all more than happy to share their artistic passions and creations with anyone and everyone who is interested in learning about them.

We stopped into a glass shop and watched one of the artists making some beautiful blown glass pieces.  This to me is very fascinating, since I love working with glass.  I have never done any blown glass pieces, but I have done both stained glass and fused glass pieces.  I need to get back into working with glass again soon.

IMG_5334

IMG_5336

IMG_5338

We also stopped into a weaver’s school, where they were weaving some rugs.  They were more than happy to give me a brief weaving lesson too.  This is an original weaving loom, made in the 1800’s.

IMG_5342

This is a modern weaving loom.

IMG_5345

I am getting my first weaving lesson.  They were using strips from old jeans to weave into the rug.

IMG_5350

IMG_5349

Estes Park is a small town, yet they have a lot of candy and taffy shops.  We counted at least 4 taffy shops along the street.  Neither of us are big taffy fans, but it is kind of interesting to watch it being made.

IMG_5341

We had a simple dinner of soup, salad and pizza at Poppy’s Pizza & Grill, a family owned restaurant right on the river.  The river is frozen at the moment, but I have been there before when it is flowing freely, and have seen beavers in action while dining at Poppy’s.  You can find Poppy’s Pizza & Grill by checking out the website estesdining.com.

IMG_5364

Our dining view of the river.

IMG_5361

Larry had a salad from the salad bar, and I had this delicious soup and a glass of pinot noir.  The soup was loaded with chicken and vegetables and just hit the spot.

IMG_5360

The sausage on this loaded pizza was handmade in-house and was great.  It had just the right amount of spice to make it just right.

IMG_5368

After returning back to the Stanley, we had some libations in the famous Cascades Bar, located in the lobby of the hotel.  The Cascades is a world renown whiskey bar, and they offer a multitude of fine whiskeys from all over the world.  Neither of us are whiskey drinkers, but the bar/restaurant are still sights to behold.

Just a small sampling of all the whiskeys offered at The Cascades Bar

IMG_5377

IMG_5382

IMG_5380

I hope you all enjoyed our quick little trip to beautiful Estes Park, nestled in the heart of the Colorado Rocky Mountains.  Estes Park is located about 1-1 1/2 hours west of where we live, so it is an quick, easy escape from day-to-day reality.


Frosted Cashew Butter Cookies

It’s been awhile sine I’ve last made cookies.  Cookies are my downfall, and if they are around, I will eat them until they are all gone.  So I am trying my best not to make them nearly as often as I would like, so I am not “obligated” to eat them all.  However, with that being said, I knew I wanted to make some cookies with the cashew butter I received from Living Tree Community Foods the minute I received it.  More Treats from Living Tree Community Foods  At long last, the frosted cashew butter cookies are made, and they came out fabulous!  I served them on another one of my gifts from CheForward, that came in before the holidays.  Presents for the Chef.  I am feeling so honored that so many wonderful people are sending me these fantastic products to sample.  Thank you for allowing me all these unbelievable opportunities to sample so many extraordinary products.  To me, I am just having fun playing in the kitchen with my new toys.

IMG_5333

Frosted Cashew Butter Cookies

IMG_5222

1/2 cup butter at room temperature

1 cup firmly packed brown sugar

1 egg

1 tsp vanilla

2 cups flour, sifted

3/4 tsp baking soda

1 cup Living Tree Community organic cashew butter

1 1/4 cups cashews


Preheat the oven to 375* F.


Mix the butter and sugar together until creamy.  Then mix in the egg and vanilla and mix again.  Add the cashew butter and mix once more.

Combine all the dry ingredients, mix well, and add them into the butter and sugar mixture adding about 1/3 at a time, mixing in between each addition.  Once all the ingredients are combine fold in about 3/4 cup of chopped cashews.

IMG_5311

Spoon out about 3/4 TBSP of dough and form into a ball, place the dough balls onto an ungreased baking sheet, then press the dough balls to flatten them and bake for about 12-14 minutes, or until the edges are slightly golden.  (I know my lens needs cleaning.  I often have stuff on my hands while I am trying to take the pictures, and as careful as I try to be, sometimes I still get stuff on the lens).

IMG_5312

Once the cookies are baked, remove them from the oven and let them cool completely before frosting them.


Golden Cashew Butter Frosting

1/4 cup butter

1/4 cup Living Tree Community organic cashew butter

2 cups powdered sugar

1 tsp vanilla

2-3 TBSP milk

IMG_5316

Melt the butter and the cashew butter in a saucepan, stirring constantly until well combined and melted and the butter has a slight golden color.  Then combine it with the powdered sugar, milk and vanilla.  Combine well, making sure all the lumps are dissolved.  Once everything is combined well, start spreading the frosting on top of the cooled cookies.  Place a whole cashew on top in the center of the cookie before the frosting sets (you can use chopped cashews if your prefer).

IMG_5317

IMG_5321

I had some leftover chocolate ganache from when I made the chocolate almond butter tart, Chocolate Almond Butter Tart so I decided to melt it and drizzle it over the cookies to spruce them up and to really make them stand out and pop.

IMG_5327

The finished cookies came out even better than I had hoped.  They are decadently delicious, and quite possibly, my new favorite cookie.

IMG_5331


Award Ceremony – January 2019.

My friend Goldie cracks me up and always puts a smile on my face. She is so supportive of my blog ” A Jeanne in the Kitchen” too. We all need more Goldies in our lives.

Sam "Goldie" Kirk's avatarOne day at a time...

Here we are again.

Sooner than we thought we would.

It is the end of January.

We have discussed in prior posts and comments how time flies, but I’m just marveling how having a calendar does nothing to help. You would think that having one and being able to look at one to see how much time we have would prepare us. But it does not. At least not me.

So live, because who knows when your calendar will run out. And you will not see it coming, since you never look at it anyway.

Thank you to all who are reading this for entering a new year with me. For staying on this crazy blogging bus.

And a special THANK YOU to those who nominated me. You will see that some of the tags are a bit outdated, but it is because I was busy around the Christmas season…

View original post 1,566 more words

Spicy Scallops a la Crema

I guess it has been awhile since we last dined on scallops.  I was thinking it had not been all that long ago, but apparently, I was wrong.  I love, love, love scallops.  They are among my favorite seafoods.  I could eat them everyday and never get tired of them.  They are also very healthy for you. Spicy Southwestern Scallops  Not only do I love scallops, but I also love anything in a cream sauce, loaded with vegetables.  I know, it is super fattening, and not the healthiest sauce option, but we all have to have some vices, right?!  Fortunately, I do not eat foods in a rich cream sauce everyday.  I would weigh about 600 pounds if I did.  Every now and then, though, it is just fine.   The other day, I made a spicy scallop dish in a rich creamy sauce that was decadently delicious; spicy scallops a la crema.

IMG_5202

Spicy Scallops a la Crema

IMG_5180

1 1/2 lbs sea scallops, rinsed and patted dry

5-6 slices bacon, chopped and cooked

3/4 cup mushrooms, sliced

2 tomatoes, diced

1 TBSP garlic

1/4 red onion, sliced very thin

3 cups baby spinach, stems removed, chopped

1/4 cup sweet Spanish peppers

salt & pepper to taste

red pepper flakes to taste

1-1 1/2 cups heavy whipping cream

olive oil and/or butter for cooking

2-3 TBPS butter

cooked pasta


Cook the bacon to your desired level of crispiness.  Usually when adding bacon to a dish, I like it a little crispier than if I am just eating bacon by itself.  Set aside and reserve the grease.

IMG_5182

Cook the scallops in the bacon grease and add either more butter or olive oil, as needed.  Cook the scallops for about 2-3 minutes per side.  If cooking a lot of scallops, cook in batches.

IMG_5186

Once the scallops are cooked, remove them and set aside.  Again, using the same pan, and adding either more butter or oil as needed, saute the vegetables and add the seasoning,


IMG_5187

Add the cream and mix well.

IMG_5189

IMG_5192

Once the cream is mixed in, you may need to adjust the seasonings if needed.  Then add the bacon, scallops and Spanish peppers.  Add the remaining butter to the sauce to finish it and make it really rich and creamy.  Combine well and serve over your favorite pasta.  You can use any kind of pasta you like, but this is a heavier sauce, so a heartier pasta will be best.  For this dish, I used farfelle or bowtie pasta.

IMG_5198

Dinner was served with cheese bread (I left it to my husband to cook while I was at work, and it got slight over done.  It still tasted good though.) and a crisp chardonnay with hints of apples and melon.  Decadently delicious!

IMG_5200

Life Happens

I apologize for my “lack of blog’ content today.  I had a super busy day, and it’s still going.  All I can say is  …. Life happens.  We all just have to roll with the punches, and live it.  Live it now, while it is happening, not in the past when it is too late or in the future when no ones knows what will happen next.  Fear not though, there are still many, many fabulous dishes yet to be cooked and enjoyed.  I’ll catch you all on the flip side.

36837015_803990173129351_28287556554588160_n


Cornbread with Red Chili-Pecan Streusel Topping

There are some food combinations that just seem to be perfectly paired.  They are good on their own, but so much better with their partner; burgers and fries, bacon and eggs, chips and salsa, and of course, chili and cornbread, just to name a few.   The other day when our Colorado blizzard came to town, it was perfect day for both chili and cornbread.  A Bowl of Chili  It was very cold on the outside, but warm and cozy on the inside.  My mother was a Texas girl, and cornbread was a staple.  I grew up on cornbread and I love cornbreads of all kinds, but I also love to shake things up and break out of the mold.  One of my favorite cornbread recipes is cornbread with a pecan stresuel topping.  It just perks up the flavors and has its own unique Southwestern personality.  “Cornbread is very accomodating stuff, welcoming a host of add-ons that only seem to make it more satisfying”.  (p.214 – The Southwestern Grill, Michael McLaughlin)  This cornbread has it all; a little sugar and spice along with some toasted pecans and everything is very nice.  A little taste of this, and you will know you are living the good life.

img_5289

Cornbread with Red Chili-Pecan Streusel

img_5277

Streusel Topping

1/2 cup flour

1/2 cup chopped pecans

1/4 cup firmly packed brown sugar

2 TBSP med. hot chili powder

1 TBSP cinnamon

6 TBSP cold butter, cubed (This time I used some of the cinnamon butter we brought home from our nephew’s wedding.  Apple Cinnamon Coffee Cake with Caramel Sauce  I definitely liked it with the addition of cinnamon and will be doing this again.)

Combine all the ingredients in the food processor and blend, except the chopped pecans.  Once everything is coarsely mixed together toss in the chopped pecans and mix thoroughly.  You want the mixture to be crumbly.  Chill until ready to use.

img_5278

Cornbread

2 cups cornmeal

1 cup flour

1/3 cup sugar

4 tsp baking powder

1 tsp salt

2 eggs

1 1/2 cups buttermilk

1/2 cup butter, melted


Preheat the oven to 375* F

Spray an 9×13 baking pan with cooking spray

Mix together all the dry ingredients.    Whisk the eggs and buttermilk together.  Then mix in the melted butter and combine with the dry ingredients.  Mix everything together until just blended.  Do not over mix.  Pour the corn bread mixture into the baking dish.  Spread it evenly in the dish.  Then evenly cover the cornbread with the streusel topping.

img_5282

img_5284

Bake for about 20-25 minutes, or until the the edges of the cornbread start to pull away from the edges of the pan, or when a toothpick inserted into the middle comes out clean.

img_5286

My grandfather used to love his buttermilk, and he drank it all the time.  When I would visit, I wanted to be like “Papa” so I asked for some buttermilk too, thinking if papa likes it it must be pretty good.  WRONG!!!   After one or two small sips, I was cured from that for life, and have never touched it since.  So when I bake, I use the dried buttermilk, because although I love to bake with it, I absolutely detest drinking it on its own.  This way, I just mix it with milk and I have it when I need it and none gets wasted.  It is easy to find, in the baking aisle of your local grocery store.  The directions call for mixing it with water, but I prefer mixing it with milk.  It makes it creamier and richer.

A Bowl of Chili

We had a blizzard here yesterday.  There were complete white-out conditions, it was frigidly cold, the roads were a complete disaster and the sky dropped 10 inches of snow at my house.  This was all in the morning hours of the day.  I was out and tried to brave those conditions before turning around and calling it a day.  Once I was safely at home, there was no way I was going back out into that mess.  NO WAY!  But as bad as it was for those few short hours, by the afternoon, it was back to blue skies and sunshine.  As I sit here looking out my window right now, most of that slushy mess on the roads yesterday is gone and the snow is already starting to melt some.  Awwwww! Life in Colorado!  As bad as it was on the outside though, it was perfect day to stay inside and cook up some good heart warming chili and cornbread.

img_5290

I love a thick, strong and bold chili.  And I love it with a lot of meat.   I almost always a steak or a roast rather than hamburger meat.  If I do use hamburger meat, it is combined with the steak to add more texture and richness.

Chili Con Carne

img_5242

2 1/2-3 lbs steak or roast , cubed

1/2 cup (more as needed) flour

1 onion, diced

1 green bell pepper, diced

2-3 jalapenos, diced fine

2 TBSP garlic

1 can dark red kidney beans, with the sauce

1 can stewed tomatoes, with the sauce

salt & pepper to taste

2 TBSP tomato paste

3-4 TBSP chili powder

2 tsp cumin

4-5 cups beef broth

1/2 cup red wine or vinegar

oil and or butter to cook the meat


Remove the excess fat from the meat and discard, then cube then the meat into bite sized chunks.  Add the flour  and salt and pepper to taste and coat the meat.  This is to help it coat the meat brown it as well as thicken the chili.

img_5245

Once the meat is coated, in a hot skillet with enough oil and/or butter, add the meat and cook until completely browned, stirring frequently.  When the meat is browned, add the vegetables and continue to cook until the vegetables are semi-soft and the onions are translucent.

img_5250

Once everything is cooked, transfer the meat and the vegetables into the slow cooker and set aside.

Mix together all the wet ingredients and the spices, then add to the meat and vegetable mixture.  Combine thoroughly.  And let cook at the low speed/temperature for 6-8 hours.  Stir occasionally, to make sure nothing sticks and the flavors incorporate well together.

img_5251

img_5253

img_5257

Once the chili is cooked, serve it alongside some warm cornbread and take away all your chills.

img_5289


Still Fighting the Crud

Just when I thought I was feeling better, the crud came back with a vengeance.  This has been going on now for over three weeks.  I am so done with it.  I am sick and tired of being sick and tired.  There is no other way to describe it except to call it “The Colorado Crud”.  As much as I have wanted to be in the kitchen, it just hasn’t happened.  However, I will be making some chili today.  It is perfect chili weather.  This is what it looks like right now.  This is the view from my back deck, overlooking our first frozen pond.  This snow just came in late last night and into the wee hours of the morning.  Now this being Colorado, most of it will be gone by tomorrow, but at the moment, we are in almost complete white-out conditions.

img_5232

This is from my front porch.

img_5234

The view from the office, upstairs.

img_5237

We are in almost total white-out conditions.  I tried to make it in to work this morning, and made it about 8 blocks.  It took me 30 minutes to make those 8 blocks, and I saw at least 15-20 cars stuck and skidding all over the place.  So I called in and said NO WAY!  Then it took me another 30+ minutes to make it safely back into my garage.  For all of those driving in this today, be safe, be smart and be careful.


Nothin’ Better Than Burgers

Many, many years ago, when I first got out of culinary school, people used to ask me all the time “if now that I am chef, do I still like burgers and dogs?”  ABSOLUTELY!  Especially when they are good burgers and dogs.  The sad thing though, is that it is getting harder and harder to find good burgers, unless of course, I am willing to spend an arm and a leg for them, which I am not.  So, we make them at home.  Yes, you need good beef, but you can doctor them up anyway you like to make them even better too.  About 6-8 months ago, we went in with some of my husband’s siblings and bought a quarter cow.  We have it stored in the freezer, and pull it out when we need it.  With this quarter cow, we got A LOT of hamburger meat too.  So …. burgers are on the menu fairly often.  We also like bold and flavorful burgers, which are hard to find when dining out, but then we like bold and flavorful foods no matter what they are.  Today’s burgers were served with bacon and sauteed mushrooms and onions that I sauteed in the bacon grease, along with some garlic fries.  Yummy!

img_5230

I mixed the ground beef with all these seasonings to make them delicious gourmet burgers.

img_5224

Spicy Gourmet Burgers

2 lbs ground beef

1 TBSP garlic

2 tsp Worcestershire sauce

1 TBSP dried onions

1 TBSP steak seasoning

2-3 whole roasted chili peppers, skinned and seeded, chopped fine


Mix everything together well.  Using your hands and really mashing everything together is actually the best way to get all the flavors incorporated into the meat.

img_5227

Once everything is incorporated together well, form the meat into patties to your desired thickness and size.  I made the patties about 1/3 lb each.   The higher the fat content of the meat, the higher the shrinkage rate will be when the burgers are cooked.  This beef has a higher fat content than what we usually like, at about 80%, so the burgers did shrink a bit more during the cooking process.  Usually we like leaner beef, but these sure were tasty burgers.  Fat does taste good!

Once the burgers are shaped, slap them on the grill and cook to perfection.  I love mine on the medium rare side, with just a touch of pink left on the inside.

img_5228

For the fries, I tossed them with parsley, salt and garlic immediately after I took them out of the fryer, while they were still hot.  The best garlic fries we have ever had were from Gott’s, a chain of restaurants in Northern California.  We have been trying to re-create them ever since.  I think we are very close, if not right on.

img_5230


***On a different note ….  Thank you to all who wished me good healing thoughts.  I am almost back to 100%.  I still have a cough, but nothing like it was before, and all the other symptoms are almost completely gone as well.  I think it was the good healing energy coming from all of you that really helped.  Fortunately, I am normally very healthy, and I rarely get sick.  On those rare occasions, because I am normally so healthy, I do not take long to recover.