Dinner at Suzanne’s

We have been getting together with a lot of friends lately, both new and old, and of course having a great time with all.  Suzanne and her husband Bill had us over for dinner at their house last night.  We sat outside and enjoyed their beautiful gardens and each other’s company, and a good time was had by all.

Suzanne’s larkspur has completely taken over.  Her front yard was a beautiful sea of purple.

IMG_2940

IMG_2943

Suzanne made us some delicious enchiladas for dinner.

IMG_2951

After dinner, we were entertained by Bill and one of his many guitars.

IMG_2952

As you can see, we are fat and happy.  Unfortunately, I am getting fatter and fatter by the minute.

IMG_2950

Thank you Suzanne and Bill for a fun evening.  We thoroughly enjoyed ourselves.

IMG_2944

Stay safe and stay well Everyone. ‘Til next time.

Priscilla’s Lemon Tart

After dinner and before the games of Clue, we enjoyed Priscilla’s fabulous lemon tart.  Italian Orzo and Vegetable Salad  It was the perfect combination of tart and sweet, and the fresh raspberries on top just made it perfect, especially with some fresh whipped cream on the side. But before enjoying Priscilla’s delicious tart, we had to sample some freshly grown strawberries from our yard.

We had a bumper crop of strawberries this year.  There are more coming, but this first yield was …. are you ready …. 4 small, tiny strawberries.  Yes, only four.

IMG_2920

You can see more strawberries that are beginning to blossom, but they’re just not quite ready yet.

IMG_2921

Our bumper crop of strawberries only had a very small yield, but  there was one for each of us, so we all enjoyed our one strawberry.  They were so sweet and so good.  I am looking forward to more of them.  Hopefully soon.

IMG_2919

After our one strawberry each, it was time to enjoy this beautifully delicious tart Priscilla made, and enjoy we did, too.

IMG_2935

Stay safe and stay well Everyone.  ‘Til next time.

Italian Orzo and Vegetable Salad

Life is slowly getting back to normal, and we have been getting together with friends quite a bit lately since social gatherings were not only frowned upon, but were not allowed in many cases for what seems like so long.  This time Priscilla and Jonathon came over for fun times out on the deck.  We weren’t sure if the weather was going to cooperate to let us enjoy our deck and the lakes. There were high winds, dark clouds and a bit of rain.  But by the time it was time to eat, Mother Nature eased up and we ended up have a very enjoyable, pleasant meal out on the deck, just as we had hoped.

Priscilla and I always co-make the meal when we get together.  We both love to cook, and it just makes it so much more fun when we share the meal and share the dishes.  She made some delicious bruschettas with roasted peppers as the appetizers and a fabulous lemon custard tart for dessert.  I added a variety of olives for the appetizers as well, and then made some bacon wrapped chicken kebabs and an Italian orzo and vegetable salad for the mains.  As always, everything was a hit and the company was great.

This salad is a perfectly cool salad that helps you get through those really hot, dog days of summer.

IMG_2926

Italian Orzo and Vegetable Salad

IMG_2922

2 cups cooked orzo

3/4 cup toasted or candied pecans

1/4 cup apple cider

1/3 cup olive oil

1 TBSP garlic

1 TBSP Dijon mustard

salt to taste

1 tsp black pepper

1 roasted bell pepper chopped – yellow, orange or red, peeled and seeded

8 oz green beans, ends removed

1 apple, peeled and diced

1/2 red onion, sliced very thin

2 TBSP lemon verbena, chiffonade, optional

2 TBSP shaved Parmigiano cheese, optional for topping


I candied my pecans to give a little extra sweetness, but you can just toast them too if you prefer.  To candy them, I just cooked them in butter and honey for about 7 minutes, then turned them out on a piece of parchment paper to harden.  Once they have cooled, chop them in small to medium sized pieces.

IMG_2923

IMG_2924

Make the dressing by combining the apple cider, olive oil, Dijon mustard, salt, pepper and garlic.

Toss all the remaining ingredients together, including the pecans.  Add the dressing and toss well.

IMG_2925

IMG_2927

Top the salad with the shaved Parmigiano cheese, if using, cover and refrigerate for at least an hour before serving.  This salad is best when served cold or cool.

After dinner and dessert we played a couple of games of Clue.  Nicodemus, who never wants to miss out on anything, decided she needed to join the game as well.  She wanted to be Colonel Mustard.

IMG_6781

Stay safe and stay well Everyone.  ‘Til next time.


Nature Walks – More Baby Ducks

Just like our geese, our ducks are at various stages of growth.  There are some that are a little older and a little bigger, and then there are still some that are still pretty young.  I never get tired of seeing either the ducklings or the goslings.  I really enjoy them when they are all grown up too.

Two different duck families out for a family swim.  These are all on the same lake, just different angles and lighting.

IMG_2873

IMG_2884

IMG_2879

IMG_2876


IMG_2878


IMG_2874

After a long swim, it’s time to rest a bit.  Swimming with such little legs and little wings is very tiring.

IMG_2881

IMG_2882

Stay safe and stay well Everyone.  ‘Til next time.


Turkey Calzones

Once again, Larry was rummaging through the freezer and pulled out some turkey breast that I had cooked for one of the holidays.  Even though it is late spring, almost summer, the best cookbooks to go to for using up leftover holiday turkey are the holiday cookbooks.  I found a recipe for turkey calzones that sounded just perfect.  Of course, I changed it up a bit and made it my own too.  I mean, after all, that’s just what I do.  🙂

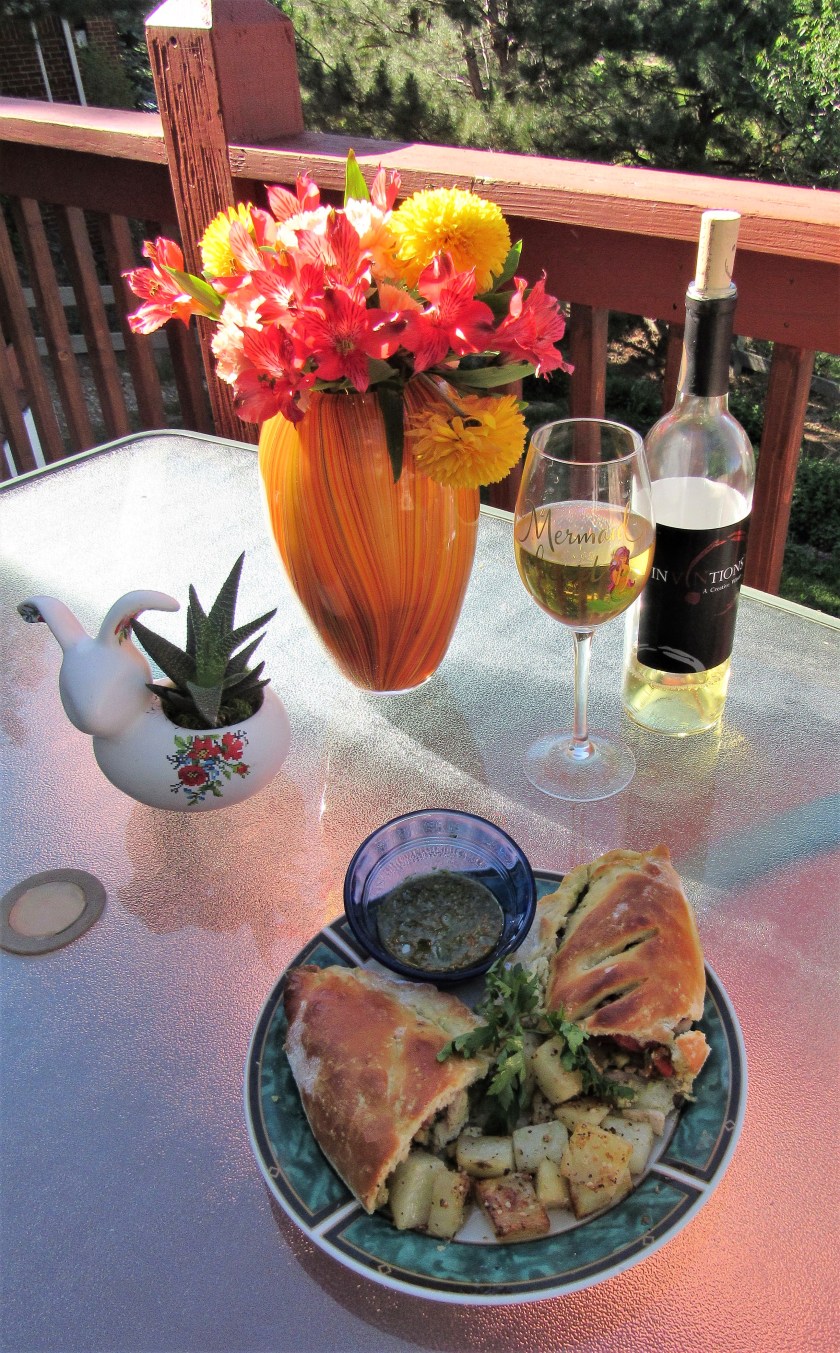
The calzones were definitely a meal in and of themselves, but to make the meal more balanced, I roasted some garlic potatoes too.  Then I added my new favorite white wine, a barrel aged Chenin Blanc, of course from InVINtions, A Toast to InVINtions! to make the meal complete.
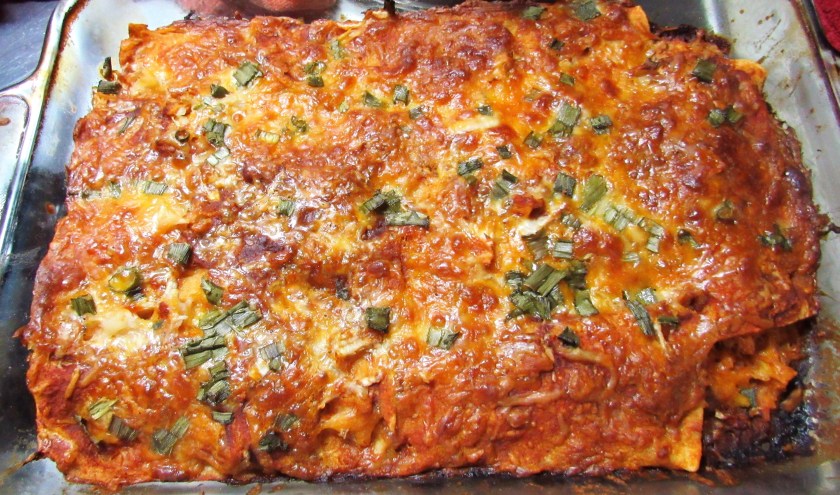
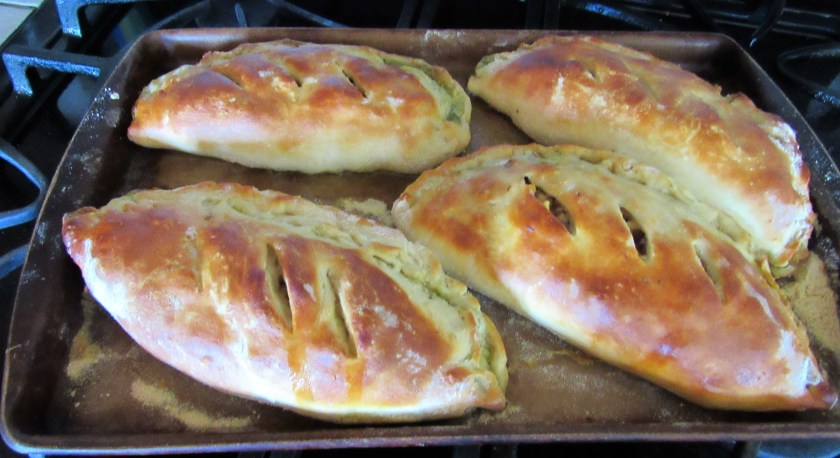
IMG_2860

Turkey Calzones

IMG_2854

The Dough

4 1/2 tsp dry active yeast or 2 packages

3 tsp sugar

1/2 cup warm water

1/2 cup milk or buttermilk

1 egg

2 TBSP olive oil

3 1/2 cups flour

2 tsp salt


Make the sponge first but adding 1/4 cup of water to the yeast along with 1/2 tsp of sugar.  Mix together and let set for about 10 minutes or until it becomes frothy.

Mix together the flour and all the dry ingredients and set aside.

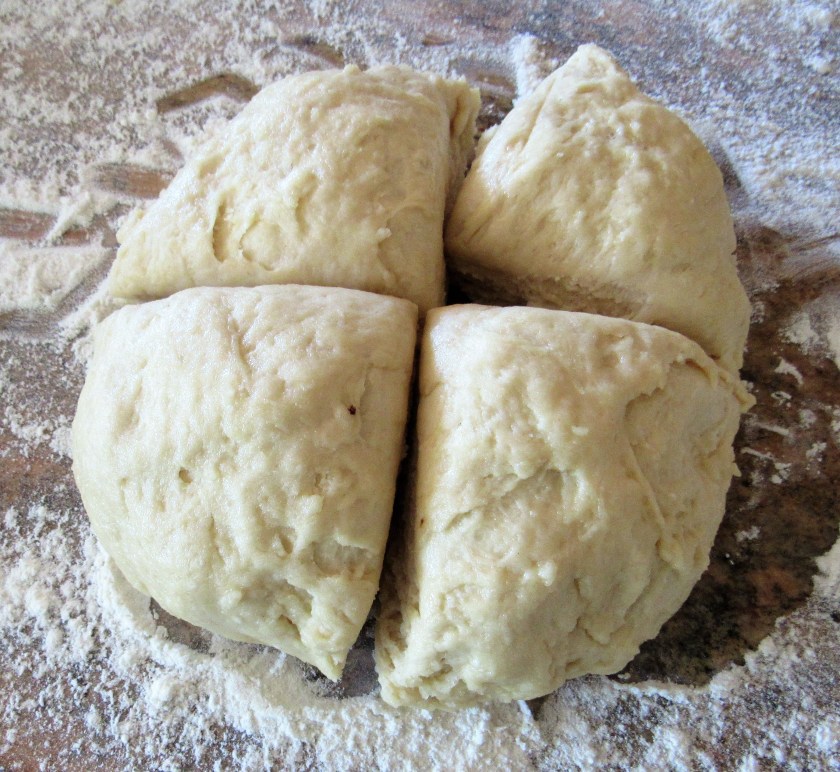
Whisk the egg, milk, the rest of the water and olive oil together, then combine with the yeast mixture.  Start mixing in the flour mixture.  Combine it all well and turn it out onto a lightly floured surface and a start kneading the dough together until it forms a smooth ball, amybe 3-5 minutes, or longer as needed.  Oil a bowl and add the dough.  Cover and let rise for 1 hour in a warm place.  Then punch the dough down and roll it out.

I cut my dough into four equal parts and made four calzones.  Roll the dough out into thin circles about 1/4 inch thick.

IMG_2855

Preheat the oven to 400* F or about 200* C.

Line a baking sheet with cornmeal.


The Filling

3/4-1 lb thinly sliced cooked turkey (you can also use chicken)

5-6 bacon strips, cooked and crumbled

1 red bell pepper, roasted, peeled and seeded

1 apple, peeled and diced

1/4-1/2 red onion, sliced very thin

4-6 oz jalapeno jack cheese, or cheese of your choice

1/2 cup pesto sauce

egg wash


Once the dough has been rolled out, spread the pesto on about 1/2 the dough, leaving about 1/2 inch around the edges.  Add the cheese, then the turkey, a bit more pesto, and the onions, apples, and bacon.

IMG_2856

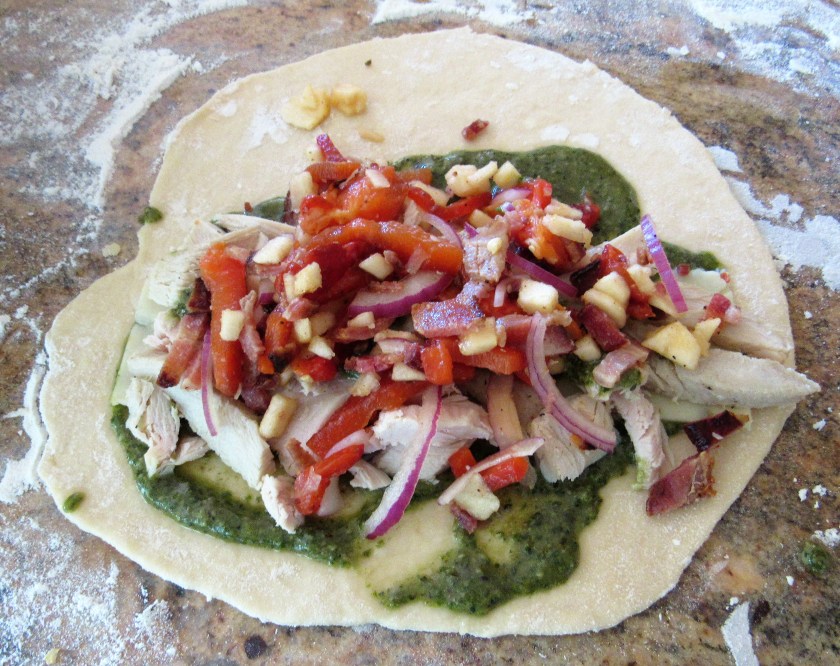
Carefully fold over the dough and tightly pinch the edges and crimp to tightly seal the seams.  With a serrated knife, score the top of the calzones and brush with the egg wash.

IMG_2857

Bake for about 30-40 minutes, or until golden brown.

IMG_2859

Serve it up and enjoy.  Mangia! I like to have a little extra sauce on the side for dipping, well …. because I am a saucy kind of girl.  🙂

IMG_2861

Stay safe and stay well Everyone.  ‘Til next time.


The Sunburst

I love to paint, and I do so quite often.  I never know how or where my muse will lead me, but I follow her lead and end up where I end up.  This time my muse was taking me in a couple of different directions.  I started off wanting to paint something completely different than what it came out to be, but I scrapped it and started over.  I just did not like the way my original idea was coming out.  The energy just wasn’t right for that idea at that time.  Here is the result of my latest painting project.

IMG_2902

Whenever I paint something, Larry always asks me what am I going to do with it or where am I going to hang it.  My answer is always the same “I have no idea”.  I just like painting them.  I don’t care about the rest.  🙂  I have a big house, but I don’t have a lot of wall space.  So most of my paintings are sitting in a corner, waiting for some place to hang.

Stay safe and stay well Everyone.  ‘Til next time.


Cubed Steak with Mushrooms and Onions

Cubed steak is made from tough cuts of beef that have been pounded out to tenderize them, usually from top round or top sirloin.  It has been around forever, particularly in the Southern and Western parts of the United States, but it really became popular in the 1930’s and 1940’s as an inexpensive cut of beef, when mechanized cubing machines became readily available.  The name comes from the shape of the indentations left by that process (called “cubing”).

We had some cubed steak in the freezer that Larry pulled out to put into our meat rotation.  I have to admit, cubed steak is not one of my favorites, and I don’t cook with it too much, but it is still good if cooked properly.  To me it is like a combination of hamburger and steak.  If I want a burger, I want a burger, and if I want a steak, I want a steak.  I am not into this in between stuff, but it was part of what we got when we went it on a portion of a cow from one of Larry’s sisters.  Cubed steak is very popular as “chicken fried steak”, but I am not a big gravy fan, and I knew I did not want to cook it that way.  So I prepared it with mushrooms and onions instead and served it over wide egg noodles, but you can serve it over mashed potatoes too.  It came out very good.  This might be a new favorite way of preparing cubed steak for me.  It was very similar to a stroganoff, and I love beef stroganoff.

IMG_2849

Cubed Steak with Mushrooms and Onions

IMG_2840

2 lbs cubed steak

1 onion, sliced thin

1-1 1/2 cups sliced mushrooms

2 cups beef broth

1 TBSP garlic

1 tsp Worcestershire sauce

salt & pepper to taste

salt, pepper and flour to coat the cubed steak

olive oil and butter to cook.


Mix the salt, pepper and flour together and completely coat the cubed steak.

IMG_2841

Heat the butter and olive oil in a skillet and brown the meat on both sides, then remove it from the skillet, set aside and keep warm.

IMG_2845

Add the mushrooms, onions and garlic and saute until the onions are translucent and tender.  Add salt & pepper to your taste.

IMG_2842

When the onions are tender, add the beef broth and Worcestershire sauce.  Mix everything together well, and add the meat.  Bring to a boil, then reduce to a simmer and continue to cook for about 10-15 minutes, stirring frequently.

IMG_2844

IMG_2847

I was quite happy to have my sauce like this but Larry wanted it a little thicker.  No problem.  Just add some on the flour mixture you coated the meat with.  Once the sauce is to your desired thickness, add some over either the noodles or the mashed potatoes, then add the meat, then top with more sauce.  Serve it up with your favorite side dishes, and some red wine, and you are good to go.

IMG_2851

Stay safe and stay well Everyone.  ‘Til next time.


Nature Walks – The Goslings Are Growing Up

It doesn’t seem like it was all that long ago when I first wrote about our baby goslings.  They were so cute and adorable.  These were taken on May 6 and May 7, back when they were tiny babies.

IMG_1797

IMG_1807

IMG_1810

But now, as summer approaches, our goslings are not so little any more.  Now they are teenagers.  They are getting so big and are still growing everyday.  They are beginning to flex their wings now.  It won’t be long before they fly the coop and are on their own.

IMG_2732

IMG_2885

The goslings are quickly losing all their yellow baby feathers to the brown and gray of the adults.  Soon, our goslings will be all grown up, getting ready to start their next cycle of life.  So enjoy the goslings while you can.  They won’t be around for too much longer.  This one was taken yesterday, June 10.  What a difference in just one month.

IMG_2888

Stay safe and stay well Everyone.  ‘Til next time.

Fruity Frozen Pupsicle Treats

My four-legged fur babies are my children.  Just like any mom, I will do whatever I can to make my fur babies happy and content and to keep them safe and healthy.   I make the wet food for my dogs Lucie and Vinnie about once a week.  Every now and then, I even make them special treats as well.  This time I made them some fruity frozen pupsicle treats.  Just like kids who love their popsicles, my dogs love their pupsicles.  The pupsicles help cool them down when the temperatures are on the rise.  They are super easy to make and very healthy for our furry friends too.  Just like any treat, they are treats.  Don’t give them too many at a time.

Fruity Frozen Pupsicle Treats

IMG_2866

1 large jar of fruity baby food – any flavor will do

1 ripe banana – the riper the better

16 oz fruit yogurt

3/4 cup water


Mash the banana until it makes a fine mush.  Then add the rest of the ingredients and mix together well.  Whenever I make something for Lucie and Vinnie, my “special assistant” Fritzie comes out to help.  She loves to help out and to supervise, making sure I make things just right.  I used a berry baby food and blackberry yogurt, but any fruity flavors will do.

IMG_2867

Fill your cube trays and freeze.  I found these fun paw print cube trays a long time ago, and I think they are perfect for “the kids”.  I’ve never had any complaints yet, so I think they approve too.  🙂  I also had some star cube trays too, so I mixed them up a bit.

IMG_2868

Once the pupsicles are completely frozen, they are ready to give to the pups.

Vinnie is anxiously awaiting his treats.  If I turned my back for just one second, all of these would be gone in a flash.

IMG_2903

Anticipation.  Vinnie and Lucie have to work for their treats.  They are always motivated by food; especially Lucie.

IMG_2904

Stay safe and stay well Everyone.  ‘Til next time.


Our New Guest Chef – Asha Batchelor

It’s been a while since I have featured a guest chef.  I am always looking for someone to share their recipes with me, and therefore share them with all of us.  But sadly, not many people have been sending me their recipes and their photos lately, so there hasn’t been anyone to feature.  But guess what ….  We have a new guest chef now.

Our new guest chef is ……. Asha Batchelor.  We know Asha from her blog site sports, food,actives,life.  Asha is a little camera shy, and did not send a picture of herself, but she did send us a family recipe for Malaysian Fried Noodles with Shrimp, from Malaysia, where her grandmother still lives and still enjoys making this traditional dish.

In Malaysia, fried noodles and shrimp is known as Hokkien mee.  This dish is popular all throughout Southeast Asia, but especially so in Indonesia, Malaysia, Singapore and Thailand.  The dish originated back in China’s Fujian or Hokkien region.  There are three distinct types of Hokkien Mee. The Singaporean variant consists of egg noodles and rice noodles stir-fried with egg, slices of porkprawns and squid, and served and garnished with vegetables, small pieces of lardsambal sauce and lime (for adding the lime juice to the dish).

Here is Asha and her grandmother’s recipe for Malaysian Fried Noodles and Shrimp.

1. Shallots, chopped
 2. Fresh garlic, minced
 3. Fresh Shrimps.
 4. Green turnips (cut to small pieces)
 5. Chilli paste.
 6. Sweet soy sauce.
 7. Oyster sauce.
 8. Salt.
 9. Brown sugar.
 10. Ketchup.
 11. Yellow noodles. (Asian.)


Fry the shallots and garlic, until golden brown. Add the shrimp, and chili paste. and put 2 tablespoons of water and let simmer for 10 minutes, or until the shrimp is well cooked.  Then, add the oyster sauce, soy sauce, some salt, and brown sugar, then simmer for 5 more minutes. Add, 2 tablespoons of ketchup. When the sauce has thicken, you add the noodles and green turnips. Keep stirring until cooked. If you want it to be more darker add a little bit more soy sauce. Not too much to not let it be so salty. Cook for  10-15 more minutes. Then garnish with peppers or chilies. Best eaten when warm.
YUM!!!!!  Doesn’t this look tasty?!  Thank you Asha for sharing your
grandmother’s recipe.  Since Asha did not include amounts – her grandmother must cook like I do – here is Asha’s email address asham2008@icloud.com.  You can contact her for more information.
Part of having a blog is to get to know and help out our fellow
bloggers.  After all, we are all here to help and support one another.  That being said, I am always looking to feature guest chefs and their recipes.   If you are interested in being a guest chef, send me you recipe(s) with as many pictures as you like, a brief history and/or description of the recipe and why it is special to you, along with your contact information.  I like getting pictures of you as well, so we can all get to know you better, but those are optional.  Send everything to my email address at ljbjej@q.com, or you can use my secondary email address at ljbjej4@gmail.com.
Stay safe and stay well Everyone.  ‘Til next time.